TESTO 625 Instruction Manual
Humidity/temperature measuring instrument
Hide thumbs
Also See for 625:
- User manual ,
- Instruction manual (37 pages) ,
- Instruction manual (56 pages)
Table of Contents
Advertisement
Humidity/temperature measuring instrument
Visit us at www.TestEquipmentDepot.com
Instruction manual
General notes ....................................................20
1.
Safety advice......................................................21
2.
Intended purpose ..............................................22
3.
Product description ............................................23
3.1
Display and control elements ........................................23
3.2
Interfaces ......................................................................24
3.3
Voltage supply ..............................................................24
4.
Commissioning ..................................................25
5.
Operation ..........................................................26
5.1
Connecting a probe ......................................................26
5.2
Switching the instrument on / off ..................................26
5.3
Switching the display light on / off ................................27
5.4
Performing settings ......................................................27
6.
Measuring ..........................................................31
7.
Care and maintenance ......................................32
8.
Questions and answers ......................................33
9.
Technical data ....................................................34
10. Accessories/spare parts ....................................35
99 Washington Street
Melrose, MA 02176
Phone 781-665-1400
Toll Free 1-800-517-8431
Contents
testo 625
en
Advertisement
Table of Contents

Related Manuals for TESTO 625


Summary of Contents for TESTO 625
-
Page 1: Table Of Contents
625 Humidity/temperature measuring instrument 99 Washington Street Melrose, MA 02176 Phone 781-665-1400 Toll Free 1-800-517-8431 Visit us at www.TestEquipmentDepot.com Instruction manual Contents General notes ............20 Safety advice............21 Intended purpose ..........22 Product description ..........23 Display and control elements ........23 Interfaces ..............24 Voltage supply ..............24... -
Page 2: General Notes
General notes General notes This chapter provides important advice on using this documentation. The documentation contains information that must be applied if the product is to be used safely and efficiently. Please read this documentation through carefully and familiarise yourself with the operation of the product before putting it to use. -
Page 3: Safety Advice
Ensure correct disposal Take faulty rechargeable batteries/spent batteries to the collection points provided for them. Send the product back to Testo at the end of its useful life. We will ensure that it is disposed of in an environmentally friendly manner. -
Page 4: Intended Purpose
Use the product only for those applications for which it was designed. Ask Testo if you are in any doubt. testo 625 is a compact measuring instrument for measuring humidity and temperatures by means of a plug-... -
Page 5: Product Description
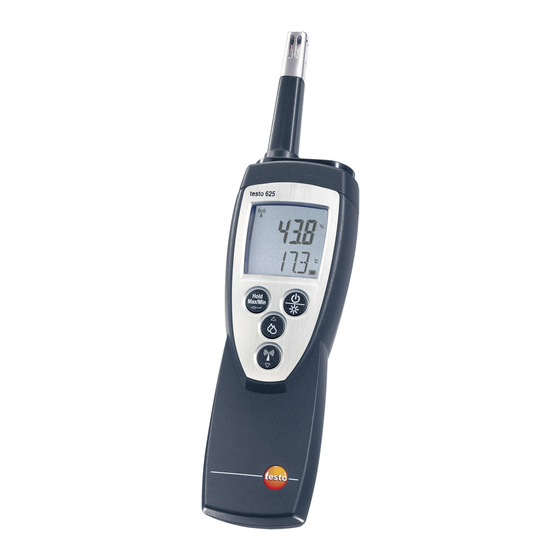
3. Production description 23 Product description This chapter provides an overview of the components of the product and their functions. 3.1 Display and control elements Overview Probe socket Display Control buttons Battery compartment (rear) Radio module and service compartment (rear) Button functions Button Functions... -
Page 6: Interfaces
3. Production description Important displays Display Meaning Battery capacity (bottom right in display): · 4 segments in the battery symbol are lit: Instrument battery is fully charged · No segments in the battery symbol are lit: Battery is almost spent Measurement channel: Radio probe (the number of “radio wave”... -
Page 7: Commissioning
4. Commissioning 25 Commissioning This chapter describes the steps required to commission the product. Inserting a a r r adio m m odule ( ( accessory p p art): Radio probes may only be used in countries in which they have been Type Approved (see application infor- mation of the radio probe). -
Page 8: Operation
5. Operation Operation This chapter describes the steps that have to be executed frequently when using the product. 5.1 Connecting a probe Plug-in probes Plug-in probes must be connected before the measuring instrument is switched on so that they are recognised by the instrument. -
Page 9: Switching The Display Light On / Off
5. Operation 27 Switching t t he i i nstrument o o ff: Press and hold (for approx. 2s) until the display goes out. 5.3 Switching the display light on / off Switching t t he d d isplay l l ight o o n/off: The instrument is switched on. - Page 10 5. Operation on was selected: Put the humidity probe into the reference medium and wait for the equalisation period to elapse. - The current humidity reading and the calibration point (nominal value) are displayed. Start the calibration menu with Select the desired option with and confirm with ·...
- Page 11 5. Operation 29 Select the desired option with and confirm with · YES: Switches automatic probe detection on (recommended). · no: Switches automatic probe detection off. no was selected: to set the probe ID manually and confirm with Continue with objective O SET YES was selected: - Automatic probe detection is started.
- Page 12 5. Operation To s s et A A uto O O ff: Configuration mode is opened, AutoOff is flashing. Select the desired option with and confirm with · on: The measuring instrument switches off automatically if no button is pressed for 10min (Hold or Auto Hold is lit).
-
Page 13: Measuring
6. Measuring 31 Measuring This chapter describes the steps that are required to perform measurements with the product. Taking a a m m easurement: The instrument is switched on and is in measurement view. Put the probe in position and read off the readings. Changing t t he m m easurement c c hannel d d isplay: To change between displaying the connected probe and the radio probe ( ): Press... -
Page 14: Care And Maintenance
7. Care and maintenance Care and maintenance This chapter describes the steps that help to maintain the functionality of the product and extend its service life. Cleaning t t he h h ousing: Clean the housing with a moist cloth (soap suds) if it is dirty. -
Page 15: Questions And Answers
ERFORMING SETTINGS objective O REGISTER THE RADIO PROBE · Probe break. · Please contact your dealer or Testo Customer Service. Display reacts slowly · Ambient temperature · Raise ambient is very low. temperature. uuuuu Display: ·... -
Page 16: Technical Data
Parameters Relative humidity (%), temperature (°C/°F) Calculated variables Dew point temperature (°Ctd/°Ftd), wet bulb temperature (wetbulb °C/wetbulb °F) Measuring range Testo humidity probe, capacitive: 0...+100%RH NTC probe: -10...+60°C / +14...+140°F Type K (NiCr-Ni) probe (radio probe): -200...+1370°C / -328...+2498°F Resolution 0.1%RH... -
Page 17: Accessories/Spare Parts
0430 9725 Miscellaneous TopSafe testo 625, protects from impact and dirt particles 0516 0221 Radio probes may only be used in countries in which they have been Type Approved (see application information of the radio probe). - Page 18 Test Equipment Depot - 800.517.8431 - 99 Washington Street Melrose, MA 02176 TestEquipmentDepot.com 0977.6250/03/T/dr/19.07.2006...
Need help?
Do you have a question about the 625 and is the answer not in the manual?
Questions and answers