
Related Manuals for Axon TASER Axon Dock


Summary of Contents for Axon TASER Axon Dock
- Page 1 TASER Axon Dock Installation Manual IMPORTANT SAFETY INSTRUCTIONS Read all warnings and instructions. Save these instructions. The most up-to-date warnings and instructions are available at www.taser.com MMU0054 Rev: F...
-
Page 2: Table Of Contents
24 Status Page Errors Chapter 8: Warnings 26 TASER Axon Flex, Axon Flex 2, Axon Fleet, Axon Body, Axon Body 2, Axon Dock, and Axon Signal Unit Warnings, Instructions & Information 33 Avertissements, directives et renseignements sur l’utilisation des produits TASER... -
Page 3: Chapter 1: Introduction To The Axon Dock
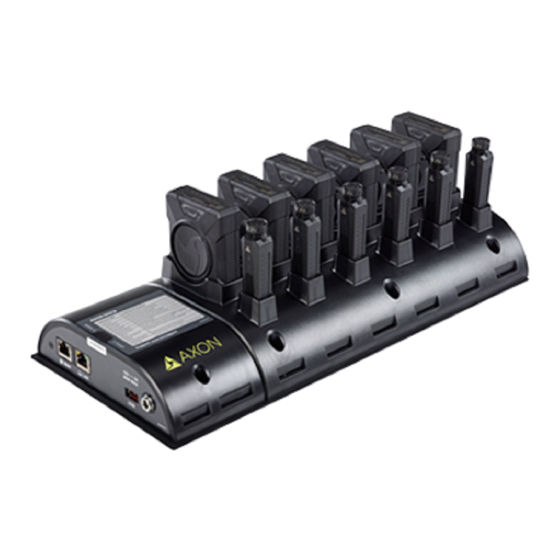
The system is modular, and up to 5 individual bays can be connected to 1 core. The type of bay you use will depend on which Axon camera you use. There are 3 individual bay de- signs; one accepts Axon Body cameras and Axon Flex cameras and controllers. Another other accepts Axon Body 2 and Axon Fleet cameras, and the third is designed for Axon Flex 2 cameras and control- lers. - Page 4 One accepts Axon Body cameras and Axon Flex cameras and controllers. Another accepts Axon Body 2 and Axon Fleet cameras, and the third is designed for Axon Flex 2 cameras and controllers. (The 6-bay for Axon Flex 2 systems is not shown here.)
-
Page 5: Additional Materials
TASER Axon Dock Installation Manual Additional Materials The package containing the Axon Dock also contains two Ethernet cables and an external power sup- ply with an AC power cable. Ethernet Cables Power Supply and Cable Chapter 1: Introduction to the Axon Dock 3... -
Page 6: Chapter 2: Agency Network Configuration
3. Port 80 (TCP) for time synchronization. Once registered to your agency, the dock uses 1 of 2 methods to synchronize the clocks on the Axon devices: 1. HTTP over port 80 (TCP) to synchronize time from youragency.evidence.com;... -
Page 7: Ip Address Configuration
Before being registered to your agency, the dock will perform time synchronization against “time. evidence.com.” The Axon system does not currently support HTTP/HTTPS Proxies. If the dock is placed on a network where a proxy is used to access web sites, the IP assigned to the dock must be whitelisted. Depending on the specific network setup, this may require a static or reserved DHCP IP. -
Page 8: Chapter 3: Axon Dock Installation
• Ensure that you know your user name, password, and agency domain name. This email invitation will come from noreply@evidence.com. • If you do not accept the invitation, you will not be able to complete Axon Dock setup. Step 2: Assemble the Dock Take the dock out of the box and confirm that all pieces are present. - Page 9 When properly installed, the locking adapter is flush in place with the core and bay. Place the connected dock on a flat surface, away from heat sources and direct sunlight. See Chapter 4: Wall Mounting an Axon Dock for additional information on using the Wall Mount.
- Page 10 Step 3: Connect to the Network The back of the Axon Dock core has 2 ports for Ethernet cables, the WAN and LAN ports. Note: The USB port on the rear of the core is not currently functional. It is there for future applica- tions.
- Page 11 TASER Axon Dock Installation Manual Plug the other end of this Ethernet cable into an active Internet port, which connects to your agency network. Plug the other Ethernet cable into the LAN port. Plug the other end of this Ethernet cable to your computer.
- Page 12 TASER Axon Dock Installation Manual Connect the end other end of the power cord to a standard power outlet. The green “POWER” LED on top of the core will light up when the dock is powered. Give the dock several minutes to fully start.
- Page 13 TASER Axon Dock Installation Manual Step 7: Administrator Login In the Domain name box type your agency’s evidence.com domain name. For example, in taser.evidence.com, “taser” is the domain name. Type the admin user name and password that you previously created when you first registered with Evidence.com in the respective boxes.
- Page 14 TASER Axon Dock Installation Manual Note: Do not click the Save Changes button. You are already registered when this message is dis- played. Go to Step 9: Confirm Registration. Step 9: Confirm Registration • Click Status on the top-left part of the screen. There should be 6 green check marks on the left side of the screen. This dock is now registered.
-
Page 15: Safety Instructions
Chapter 4: Wall Mounting an Axon Dock Safety Instructions Before mounting your Axon Dock: Ensure that the area behind the wall where the dock will be located is clear of obstructions to avoid damage to surroundings, pipes, or existing wiring. -
Page 16: Dimensions For An Axon Dock With A 6-Bay For Axon Body Cameras And Axon Flex Systems
CTR TO CTR [21.6 cm] [18.7 cm] 17.50 5.21 [44.5 cm] [13.2 cm] Dimensions for an Axon Dock with a 6-Bay for Axon Body 2 and Axon Fleet Camer- 14.000 CTR TO CTR 7.24 [18.4 cm] [35.6 cm] ETHERNET INPUT 7.375... -
Page 17: Dimensions For An Axon Dock With A 6-Bay For Axon Flex 2 Systems
TASER Axon Dock Installation Manual Dimensions for an Axon Dock with a 6-Bay for Axon Flex 2 Systems Note: All dimensions are in inches (and centimeters). You can use the overall size of the wall mount bracket to determine the spacing and fit between mul- tiple assemblies. - Page 18 Find the location where you want to mount the Wall Mount Bracket. Locate the Wall Mount Bracket on the wall. Use a level to ensure the bracket is level before marking the holes. Mark the center of the four keyholes on the wall. Chapter 4: Wall Mounting an Axon Dock 16...
- Page 19 Plug the CAT 5e (or better) cable from your agency’s network data jack into the WAN port on the dock. You can secure the cable in position with the attached zip tie and the associated slots in the bracket. Chapter 4: Wall Mounting an Axon Dock 17...
-
Page 20: Removing The Locking Adapters
If it becomes necessary to separate the core from the 6-bay (or individual bay or bays), follow these steps. Remove any Axon devices from the bays. Unplug all power and network cables from the core. Insert a flat-blade screwdriver into the locking adapter. -
Page 21: Chapter 5: Attaching The Desk Plate
Chapter 5: Attaching the Desk Plate Introduction If you use your Axon Dock on a desk or table, you should attach your dock to a desk plate. The desk plate holds the core and bay together and keeps the dock from sliding on flat surfaces. - Page 22 TASER Axon Dock Installation Guide Place the dock on the desk plate so the openings on the dock are lined up with the holes in the plate. Note: Ensure the core is placed over the rectangular holes in the plate.
- Page 23 TASER Axon Dock Installation Guide Turn the dock and desk plate assembly over. Remove the adhesive backing from the rubber feet. Place the rubber feet on the desk plate. The metal is scored where the feet are to be located.
-
Page 24: Chapter 6: Troubleshooting The Axon Dock
Chapter 6: Troubleshooting the Axon Dock I cannot reach the status page • Ensure that Wi-Fi or any other Internet connection is disabled/disconnected on your computer. If an Internet connection is enabled on your computer, it may interfere with accessing the Evidence. -
Page 25: Status Lights
TASER Axon Dock Installation Manual Status Lights The core has a power LED to indicate the core is receiving power and a status LED to indicate that the core’s software is running. Power LED Status LED The power LED will be on when the bay is plugged into power. The power LED will be off when the bay is not plugged into power. -
Page 26: Chapter 7: Network Troubleshooting
Chapter 7: Network Troubleshooting Status Page Errors We were unable to obtain an IP address from your DHCP server Possible Issue Troubleshooting Steps Internet port you are using is not active. Attempt to use a different Internet port, or verify that the current port is active. - Page 27 TASER Axon Dock Installation Manual We were unable to contact your network’s default gateway Possible Issue Troubleshooting Steps Static IP address entered incorrectly. – This ap- Return to the networking tab and confirm that plies only when using Static IP configuration.
-
Page 28: Chapter 8: Warnings
1. Read and obey. Read, understand, and follow all current Axon system instructions, manuals, warn- ings, and relevant TASER training materials before using any Axon system. Failure to do so could increase the risk of serious injury, system malfunctions, or loss of data. - Page 29 (such as grain, dust, or metal powders); and any other area where you would normally be advised to turn off your vehicle engine. Axon Flex, Axon Flex 2, Axon Body, Axon Body 2, and Axon Fleet cameras contain wireless transmission technology that transfers radio frequencies over the air as a form of energy transfer.
- Page 30 • Position the Axon system’s camera and activation buttons within easy reach. 3. Navigate safely. If your Axon system is paired or combined with a mobile phone or device or MDT and has applications that provide maps, digital compass headings, directions or location-based tracking or navigation assistance, these applications should only be used for basic navigation assis- tance and should not be relied on to determine precise locations, proximity, distance, or direction.
- Page 31 TASER Axon Dock Installation Manual nent if an Axon Flex or Axon Flex 2 camera is mounted near your head and used at high volume. Set the volume to a safe and comfortable level. Be advised that you can adapt over time to a higher volume of sound that may sound normal but can be damaging to your hearing.
- Page 32 To prevent potential injuries or system malfunctions, take the following precautions: 1. Anchoring and Installation. If the Axon system is installed in the cab of the vehicle (in a location other than under the center console), it should be permanently mounted to avoid injury. Do not install an Axon system anywhere that will interfere with airbag deployment.
- Page 33 Current software may be obtained from www.evidence.com. 3. Storage. Do not use or store the Axon system or its accessories in the following locations or under the following conditions: • Anywhere extremely hot, cold, or humid: ◊...
- Page 34 FCC that it does not exceed the limit established by the government-adopted requirement for safe exposure. The Axon systems have been tested and found to comply with the limits for a Class B digital device, pursuant to part 15 of the FCC Rules. These limits are designed to provide reasonable protection against harmful interference in a residential installation.
-
Page 35: Avertissements, Directives Et Renseignements Sur L'utilisation Des Produits Taser Axon Flex, Axon Flex 2, Axon Body, Axon Body 2, Axon Dock Et Unité Axon Signal
Ce document présente des avertissements, des directives et des renseignements importants sur la sécurité qui visent à réduire les dangers liés à l’utilisation des caméras Axon de TASER International, Inc. (TASER). Ces directives et avertissements ont été établis pour votre protection et pour la sécurité... - Page 36 Les caméras Axon Flex, Axon Flex 2 Axon Body, Axon Body 2 et Axon Fleet utilisent une technologie de transmis- sion sans fil qui transmet les radiofréquences sous forme de transfert d’énergie. La transmission sans fil est considérée comme un facteur de risque pouvant enflammer un environnement présen-...
- Page 37 1. Manipulation des composants. Veillez à ce que les composants Axon soient proprement con- nectés entre eux (par ex. la caméra Axon Body doit être insérée correctement dans la station Dock). Il ne faut pas : échapper, écraser, désassembler, déformer, ouvrir ou incinérer les composants du système Axon ni y introduire des objets étrangers.
- Page 38 • Familiarisez-vous avec le système Axon et ses fonctionnalités. • Veillez à ce que la caméra du système Axon et les boutons d’activation soient à portée de main. 3. Conduisez de façon sécuritaire. Si votre système Axon comprend un téléphone, un appareil mo- bile ou un TDM et qu’il offre des applications fournissant des cartes, des boussoles numériques, des...
- Page 39 TASER Axon Dock Installation Manual être remplacées. N’ESSAYEZ PAS de remplacer ces piles. La pile de la caméra Axon Body 2 peut seulement être remplacée par une pile fabriquée par TASER. 2. Évitez les températures extrêmes. N’exposez pas les piles à la chaleur excessive, au froid, à l’eau, aux autres liquides ou aux substances corrosives.
- Page 40 N’installez pas le système Axon à tout endroit qui nuirait au déploiement des coussins gonflables. 2. Évitez les températures extrêmes. N’exposez pas le système Axon à la chaleur ou au froid exces- sifs, à de l’eau, à d’autres liquides, ou à des substances corrosives. N’installez pas le système Axon dans le compartiment du moteur, à...
- Page 41 à 50 °C (122 °F). ◊ Les caméras sur les agents Axon ne doivent pas être stockées à des endroits où il est prob- able que la température dépasse 35 °C (95 °F) [comme à la lumière directe du soleil, près de chaufferettes ou dans un véhicule lorsque la température ambiante est très élevée] ou...
- Page 42 • Contacter le service à la clientèle de TASER pour obtenir de l’aide. AVIS DE LA FCC/ IC : les systèmes Axon respectent les limites d’exposition pour être portés près du corps figurant dans le bulletin OET 65 de 2001 et la norme ANSI/IEEE C95.1 de 1992. L’utilisation adéquate de cet appareil conformément aux directives du produit résultera en une exposition con-...
- Page 43 équivalente (p.i.r.e.) ne dépasse pas celle requise pour établir une communication satisfaisante. LES SYSTÈMES AXON RÉPONDENT AUX EXIGENCES DU GOUVERNEMENT POUR L’EXPOSITION AUX ONDES RADIO.
- Page 44 Industries B.V., and Wi-Fi is a trademark of the Wi-Fi Alliance. , AXON, Axon, Axon Body, Axon Body 2, Axon Dock, Axon Flex, Evidence.com, TASER, and © are trademarks of TASER International Inc., some of which are registered in the US and other countries. For more information, visit www.
Need help?
Do you have a question about the TASER Axon Dock and is the answer not in the manual?
Questions and answers