Blackmagicdesign Blackmagic URSA Mini Installation And Operation Manual
Digital cinema camera
Hide thumbs
Also See for Blackmagic URSA Mini:
- Installation and operation manual (78 pages) ,
- Installation and operation manual (104 pages)
Chapters
Table of Contents

Related Manuals for Blackmagicdesign Blackmagic URSA Mini


Summary of Contents for Blackmagicdesign Blackmagic URSA Mini
- Page 1 Installation and Operation Manual Blackmagic URSA Mini and URSA Mini Pro 4.6K Blackmagic Viewfinder and Studio Viewfinder June 2017 日本語 English, , Français, Deutsch, Español, 한국어 中文...
- Page 2 Languages To go directly to your preferred language, simply click on the hyperlinks listed in the contents below. English 日本語 Français Deutsch Español 1017 中文 한국어 1220 1423...
-
Page 3: English
English Welcome Thank you for purchasing Blackmagic URSA Mini! Since we released our first digital film camera a few years ago we have been privileged to have received some of the best guidance and feedback we have ever had for a new product! We all grew up admiring the work of the world’s leading cinematographers and DOPs and it’s been an... -
Page 4: Table Of Contents
Control Buttons Menu Settings Side Handle Interchangeable Lens Mount URSA Mini Pro 4.6K Control Buttons Blackmagic URSA Mini Pro PL Mount Forward Control Panel Blackmagic URSA Mini Pro B4 Mount Ergonomic Control Panel Blackmagic URSA Mini Pro EF Mount Internal Control Panel... - Page 5 Using Avid Media Composer Mapping Keyboard Shortcuts Using Adobe Premiere Pro CC Adding Transitions Using Autodesk Smoke 2013 Adding Titles Blackmagic URSA Mini B4 Mount Adding Audio Tracks Shimming Lens Mounts Color Correcting your Clips Shimming URSA Mini PL Using Scopes Shimming URSA Mini Pro 4.6K...
-
Page 6: Which Camera Are You Using
You’ll notice while reading this manual that occasionally a feature will be specific to a particular Blackmagic URSA Mini camera. All URSA Mini cameras produce incredible, wide dynamic range images and share the same basic chassis. There are some differences between different models, though. -
Page 7: Ursa Mini
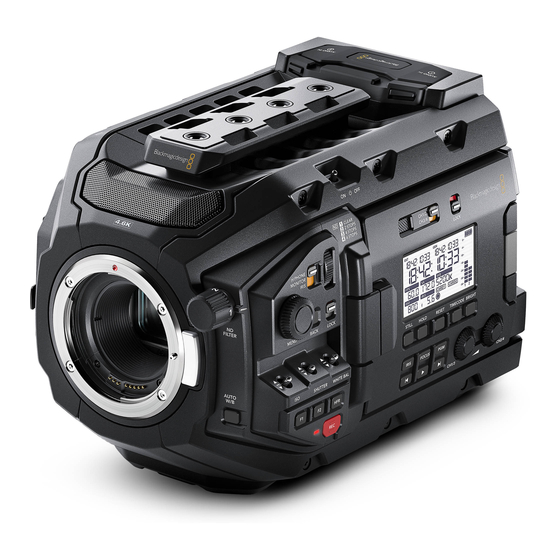
URSA Mini, left side URSA Mini Pro 4.6K Blackmagic URSA Mini Pro 4.6K is a little different. This camera is only available as a 4.6K model with an EF mount, but it can accept other lens types via its interchangeable lens mount. -
Page 8: Getting Started
Getting Started Getting started with your Blackmagic URSA Mini is as simple as attaching the side handle, mounting a lens, and powering your camera. Attaching a Lens Attaching a lens to your camera is the same process for URSA Mini 4K, URSA Mini 4.6K and URSA Mini Pro 4.6K, however the EF, PL and B4 mounts have slightly different ways of... - Page 9 There is no need to rotate the lens. LENS Attaching and removing a PL lens on Blackmagic URSA Mini PL URSA Mini Pro 4.6K URSA Mini Pro 4.6K's PL mount features four pins at the 12 o'clock position that are used to communicate with lenses featuring Cooke’s /i Technology interface.
- Page 10 This detailed information can also be utilised by powerful applications such as DaVinci Resolve and Blackmagic Fusion for a wide variety of advanced functions. For example, the recorded metadata can be used to simulate the specific lens in 3D space, or correct lens distortions. URSA Mini Pro 4.6K PL and URSA Mini PL support control of PL 35mm lenses with servo handgrips.
-
Page 11: Powering Your Camera
To turn on URSA Mini: Press and release the ‘power’ button. On Blackmagic URSA Mini, the power button is located on the control panel behind the fold out LCD. Simply open the LCD to access the control panel. - Page 12 To turn on URSA Mini Pro 4.6K: On Blackmagic URSA Mini Pro 4.6K, a power switch is also located above the fold out LCD. Move the switch to the 'on' position to power your camera. To turn the camera off, move the switch to the 'off' position.
- Page 13 XLR 1 XLR 2 XLR 1 XLR 2 If you need to, you can also hold down the record and forward skip buttons on the control panel behind the LCD to power your camera on or off If your URSA Mini Pro 4.6K is turned off when the power switch is set to 'on', your camera may have been powered down via Bluetooth control or by holding down the record and forward skip control panel buttons.
-
Page 14: Storage Media
Push the CFast card ejector button to eject the card. The storage information at the bottom of the LCD touchscreen will show the name and record time remaining of the detected CFast cards. Blackmagic URSA Mini has two CFast slots for continuous recording Storage Media... - Page 15 ProRes and compressed RAW formats. The tables below identify the CFast cards recommended for use when shooting with Blackmagic URSA Mini. Which CFast cards should I use with the Blackmagic URSA Mini and URSA Mini Pro Cameras? The following CFast 2.0 cards are recommended for 2160p RAW up to 30 fps.
- Page 16 32GB Lexar Professional 3400x 64GB Lexar Professional 3400x 128GB Lexar Professional 3400x 256GB For the most up to date information on supported CFast cards for Blackmagic URSA Mini please refer to the Blackmagic Design support center at www.blackmagicdesign.com/support. Storage Media...
-
Page 17: Sd Cards
SD Cards In addition to CFast 2.0 cards, Blackmagic URSA Mini Pro 4.6K can record on high speed UHS-I and UHS-II type SD cards. Using high end SDXC UHS-II cards, you can even record ProRes HQ footage in 2160p for Ultra HD content! With SD cards, you can use more affordable storage media when shooting compressed video formats in HD. - Page 18 URSA Mini Pro. It’s worth regularly checking the latest version of this manual for more up to date information. Updated manuals are available for download from the Blackmagic Design website at www.blackmagicdesign.com/support NOTE For high resolution, high frame rate and RAW recording, we recommend using CFast 2.0 media, which is typically faster and is available in higher capacities.
- Page 19 Exercia Pro UHS-II 270MB/s SDXC 256GB Transcend Ultimate UHS-II 180MB/s SDXC 64GB Wise 285MB/s UHS-II SDXC 64GB For the most up to date information on supported SD cards for URSA Mini Pro please refer to the Blackmagic Design support center at www.blackmagicdesign.com/support. Storage Media...
-
Page 20: Preparing Media For Recording
Locking and Unlocking SD Cards SD cards can be write protected, or 'locked', to prevent data from being overwritten. When inserting an SD card, make sure the card is not write protected. Write protection is disabled by moving the plastic switch on the left side of the card to the position closest to the connectors. -
Page 21: Preparing Media On Blackmagic Ursa Mini
SD card or CFast card. Always check the settings carefully before formatting. Preparing Media on Blackmagic URSA Mini Tap either storage indicator at the bottom of the LCD touchscreen to enter the storage manager. -
Page 22: Preparing Media On Blackmagic Ursa Mini Pro 4.6K
For more information on locking SD cards, see the 'SD cards' section of this manual. Preparing Media on Blackmagic URSA Mini Pro 4.6K The process for preparing storage media on your URSA Mini Pro 4.6K is exactly the same as the URSA Mini process outlined above. -
Page 23: Preparing Media On Mac
Preparing Media on Mac Use the Disk Utility application included with Mac OS to format your card in the HFS+ or exFAT formats. Remember to back up anything important from your CFast or SD card as all data will be lost when it is formatted. - Page 24 For lower data rates try lowering your frame rate, resolution, or try a compressed codec such as ProRes. Check the Blackmagic Design website for the latest information at www.blackmagicdesign.com Storage Media...
-
Page 25: Recording
Recording Recording Clips On Blackmagic URSA Mini you can start recording by pressing the red 'record' button on the inside control panel, the touchscreen, or the side handle. A 'record' button is also on the outside of the fold out monitor. Press the 'record' button again to stop recording. - Page 26 Maximum Sensor Frame Rates The tables below contain available codecs, resolutions and their maxiumum sensor frame rates for URSA Mini 4K. URSA Mini 4K Resolution Codec Sensor scan Max Frame Rate 4000x2160 Lossless RAW Full 60 (dual card) 4000x2160 RAW 3:1 Full 4000x2160 RAW 4:1...
- Page 27 URSA Mini 4.6K and URSA Mini Pro 4.6K Resolution Codec Sensor scan Max Frame Rate 4608x1920 Lossless RAW Window 60 (dual card) 4608x1920 RAW 3:1 Window 4608x1920 RAW 4:1 Window 4608x1920 ProRes 444XQ Window 4.6K 2.4:1 4608x1920 ProRes 444 Window 4608x1920 ProRes HQ Window...
- Page 28 URSA Mini 4.6K and URSA Mini Pro 4.6K Resolution Codec Sensor scan Max Frame Rate 3072x2560 Lossless RAW Window 60 (dual card) 3072x2560 RAW 3:1 Window 3072x2560 RAW 4:1 Window 3072x2560 ProRes 444XQ Window 3K Anamorphic 3072x2560 ProRes 444 Window 3072x2560 ProRes HQ Window...
- Page 29 1920x1080 ProRes Proxy Full To select your desired codec and resolution on Blackmagic URSA Mini. Press the 'menu' button on the control panel. Navigate to the first page of the 'record' tab. Tap your desired combination of codec, quality, and resolution.
-
Page 30: Trigger Record
Trigger Record Your URSA Mini automatically sends a signal via the SDI outputs that will trigger recording when connected to equipment that supports the SDI trigger record feature, such as Blackmagic Video Assist. This means when you press record on your camera, your external SDI equipment will also start recording, and will stop recording when you press record again. - Page 31 CFast Frame CinemaDNG CinemaDNG CinemaDNG ProRes ProRes ProRes ProRes ProRes ProRes Card Rate RAW 3:1 RAW 4:1 444 XQ 422 HQ 422 LT 422 Proxy Duration Duration Duration Duration Duration Duration Duration Duration Duration 23.98 75 mins 142 mins 175 mins 84 mins 127 mins 189 mins...
- Page 32 3K Anamorphic* CFast Frame CinemaDNG CinemaDNG CinemaDNG ProRes ProRes ProRes ProRes ProRes ProRes Card Rate RAW 3:1 RAW 4:1 444 XQ 422 HQ 422 LT 422 Proxy Duration Duration Duration Duration Duration Duration Duration Duration Duration 23.98 20 mins 39 mins 48 mins 22 mins 33 mins...
- Page 33 4K 16:9* CFast Frame CinemaDNG CinemaDNG CinemaDNG ProRes ProRes ProRes ProRes ProRes ProRes Card Rate RAW 3:1 RAW 4:1 444 XQ 422 HQ 422 LT 422 Proxy Duration Duration Duration Duration Duration Duration Duration Duration Duration 23.98 17 mins 32 mins 40 mins 18 mins 27 mins...
-
Page 34: Playback
SDI outputs. CFAST URSA Mini Camera URSA Mini Pro 4.6K Camera Blackmagic URSA Mini has playback and transport controls buttons on both the internal and ergonomic control panels. NOTE Blackmagic URSA Mini will play back clips of different quality settings as long as they are in the same codec, frame rate and resolution. - Page 35 The controls of your camera work just like a CD player, so pressing the ‘forward skip’ button will skip to the start of the next clip. Press the ‘reverse skip’ button once to go to the start of the current clip or press twice to skip back to the start of the previous clip. Hold the ‘forward’ or ‘reverse skip’...
-
Page 36: Introduction To Ursa Mini
Introduction to URSA Mini Industry standard BNC connectors are located on the right and rear panel of your URSA Mini for SDI connections. There are also two separate LANC inputs, one for the side handle and one at the rear of the camera for an external LANC controller. XLR inputs are on the top panel behind the mounting points for professional balanced analog audio on URSA Mini and URSA Mini Pro 4.6K, and AES digital audio input on URSA Mini Pro 4.6K. -
Page 37: Left Side - Ursa Mini
Audio Level Adjustment Knobs Adjustment knobs to set the recording levels for audio channels 1 and 2. Refer to the ‘Blackmagic URSA Mini controls' section. Mini USB Port Mini USB Port for updating internal software. Refer to the ‘Blackmagic Camera Setup Utility’... - Page 38 URSA Mini Pro 4.6K model, foldout touchscreen closed Power Switch Power switch for turning on the camera. There is also a backup power switch inside the fold out monitor that allows the camera to be powered on by pressing both the record and forward clip buttons at the same time.
-
Page 39: Right Side
Viewfinder or external monitors and accessories. Refer to the ‘Blackmagic URSA Viewfinder’ and ‘Blackmagic URSA Studio Viewfinder’ sections for more information. LANC Input Dedicated 2.5mm TRS LANC connector for Blackmagic URSA Mini side handle. Refer to the 'getting started' section for more information on connecting the side handle. -
Page 40: Rear Panel
EF lenses. 12G-SDI Out Blackmagic URSA Mini’s 12G-SDI output is used to send HD and Ultra HD video to SDI equipment such as routers, monitors, SDI capture devices, and broadcast switchers. You can also connect the 12G-SDI output to an external recorder such as the Blackmagic Video Assist for backup recording. -
Page 41: Top Panel
You can also set your camera to use the reference signal from an ATEM switcher via the Program SDI Input. This is helpful when working with ATEM switchers because all cameras can receive program return, camera control and be referenced together using a single SDI signal. -
Page 42: Ursa Mini Controls
URSA Mini Controls Your Blackmagic URSA Mini has a control panel on the left side, behind the fold out monitor and contains all the buttons and adjustment knobs you need to change settings and control audio levels. You can monitor your audio levels using the audio meters on the LCD touchscreen. - Page 43 Record The ‘record’ button is marked REC on your Blackmagic URSA Mini’s control panel, fold out LCD and side handle. Press any of the record buttons to start and stop recording. Refer to the ‘recording’ section for more information.
-
Page 44: Side Handle
Side Handle Your Blackmagic URSA Mini ships with a side handle that provides a comfortable, secure grip for the camera. The side handle also lets you trigger auto iris and focus on compatible EF lenses, plus start or stop recording with the simple press of a button. To enable these functions, you must connect the included LANC cable and connector between the camera and the side handle. - Page 45 D ring. Close the plastic cap. Attaching the side handle to Blackmagic URSA Mini URSA Mini is shipped with a short LANC cable so you can control your camera using the side handle buttons.
-
Page 46: Ursa Mini Pro 4.6K Control Buttons
URSA Mini Pro 4.6K Control Buttons Blackmagic URSA Mini Pro 4.6K has control panels on the chassis, outside and inside of the foldout touchscreen monitor to give you quick, easy access to all of its essential functions as well as powerful monitoring tools. These panels are designed to be close to hand whether shooting from a tripod, handheld or with the shoulder mount kit. - Page 47 ND Filters Your URSA Mini has three internal neutral density filters. Together with a clear filter, the available settings are ‘2,’ ‘4’ and ‘6’ stops. These filters allow you to reduce the amount of light reaching your URSA Mini’s sensor by a preset number of exposure 'stops'. By reducing the exposure, you can continue shooting at wide apertures in bright conditions such as outdoors on sunny days.
- Page 48 Menu Wheel When 'status text' is turned on for your URSA Mini's front SDI output, you can use the menu wheel to navigate many of the head up display features usually accessed via the LCD touchscreen. Simply press the menu wheel as you would a button to access your URSA Mini Pro 4.6K's head up display on an external monitor such as Blackmagic SmartView, Video Assist or URSA Viewfinder.
-
Page 49: Ergonomic Control Panel
For more information on project and off speed frame rates, see the ‘touchscreen controls’ section in this manual. Record The ‘record’ button is marked REC on your Blackmagic URSA Mini Pro 4.6K's left side. Press the record button to start and stop recording. Refer to the ‘recording’ section for more information. - Page 50 Monitor Speaker The small speaker built into the outside control panel lets you listen to the audio while shooting. It is located where your ear would normally be when shooting with the camera on your shoulder. To adjust the volume of the speaker, simply rotate the settings wheel as described in the 'URSA Mini Pro 4.6K Control Buttons' section.
- Page 51 ‚ Battery indicator If your URSA Mini Pro 4.6K is running on battery power, this indicator displays remaining battery life in 25% increments. Each of the battery indicator’s four bars corresponds to 25% battery life remaining. When your battery drops below 20% charge, the colour of the status LED, near the record button begins to flash.
- Page 52 Status LCD Controls URSA Mini Pro 4.6K status LCD controls Still Press this button to capture a still image as a single uncompressed DNG frame. Image files will be saved to the 'stills' folder in the root directory of the media you are currently recording to.
- Page 53 Control and Playback Buttons URSA Mini Pro 4.6K control and playback buttons Iris The 'iris' button activates the automatic aperture setting on compatible lenses. When using video dynamic range settings, a single press of the iris button will set an average exposure based on the highlights or shadows in your shot.
-
Page 54: Internal Control Panel
Audio Level Adjustment Knobs URSA Mini Pro 4.6K audio adjustment knobs Use the built in adjustment knobs to set the recording levels for audio channels 1 and 2. Turn each knob clockwise or counterclockwise to increase or decrease the recording level for each channel of audio. - Page 55 NOTE It is standard practice to plug in your XLR cable before switching phantom power on. It is also important to switch phantom power to ‘off' when you no longer have a phantom powered microphone connected. Connecting devices that don’t have phantom power protection built into their AES XLR outputs whilst still sending phantom power from the camera’s XLR audio inputs may damage your equipment.
- Page 56 Menu Press the ‘menu’ button to open the dashboard. Refer to the ‘settings’ section for more information about the dashboard feature and how to adjust settings. Record Press any of the record buttons marked REC to start and stop recording. Refer to the ‘recording’...
-
Page 57: Touchscreen Controls
Touchscreen Controls Touchscreen Your Blackmagic URSA Mini’s fold out LCD touchscreen pivots for shooting high and low angles. Buttons on the outside of the LCD panel let you control your URSA Mini when mounted on your shoulder using the URSA Viewfinder and the LCD closed. - Page 58 Tap the 'zebra' icon while accessing 'LCD monitor options' to access your URSA Mini's zebra settings To toggle zebra for the LCD touchscreen, tap the switch icon in the bottom left of the screen while in the 'zebra' tab. Set the exposure level that zebra appears at by dragging the slider left and right, or tapping the arrow buttons next to the zebra level percentage.
- Page 59 Frame Guides The ‘frame guide’ setting toggles the appearance of frame guides on the LCD touchscreen. You can also choose from seven frame guide options for all outputs on your URSA Mini. Frame guides include aspect ratios for various cinema, television and online standards. Tap the 'frame guides' icon while accessing 'LCD monitor options' to access your URSA Mini's frame guide settings To toggle the appearance of frame guides on your URSA Mini's LCD touchscreen, tap the switch...
- Page 60 ‚ 4:3 Displays the 4:3 aspect ratio compatible with SD television screens, or to help with framing when using 2x anamorphic adapters. You can change the opacity of frame guide overlays. For more information see the ‘monitor settings’ section of this manual. NOTE For information on enabling frame guides on your camera’s front and main SDI outputs, see the ‘monitor settings’...
- Page 61 The rule of thirds grid automatically scales to any on screen frame guides ‚ Thirds The ‘thirds’ setting displays a grid with two vertical and horizontal lines placed in each third of the image. Thirds are an extremely powerful tool to help compose your shots. For example, the human eye typically looks for action near the points where the lines intersect, so it’s helpful to frame key points of interest in these zones.
- Page 62 Safe area guides can also be used to assist with framing your shot where you know that the shot will be stabilised in post production, which can crop the edges of the image. They can also be used to indicate a specific crop. For example by setting it to 50% whilst recording at Ultra HD 3840x2160 you can see what a 1920x1080 crop of the frame would look like.
- Page 63 Your Blackmagic URSA Mini has 8 project frame rate settings including 23.98, 24, 25, 29.97, 30, 50, 59.94 and 60 frames per second. To adjust your URSA Mini’s project frame rate while in the ‘FPS’ menu, tap the left or right arrows next to the current frame rate at the bottom left of your touchscreen.
- Page 64 Sensor frame rate The sensor frame rate sets how many actual frames from the sensor are recorded every second. This frame rate will affect how fast or slow your video will play back at your set project frame rate. With 'off speed frame rate' enabled, tap the arrows on either side of the sensor frame rate or move the slider to make adjustments By default, your URSA Mini’s project and sensor frame rates are matched for a natural playback speed.
- Page 65 Shutter The ‘Shutter’ indicator displays your shutter angle. By tapping this indicator, you can manually change your URSA Mini’s shutter angle or configure shutter priority auto exposure modes. Your URSA Mini's shutter indicator. Tap this to access shutter settings Shutter angle defines the level of motion blur in your video, and can be used to compensate for varying light conditions.
- Page 66 If you are shooting outside, or using flicker free lights, you can also manually select a shutter angle by double tapping the current shutter indicator at the bottom left of your screen. This will bring up a keypad which you can use to set any shutter angle between 5 and 360 degrees. Use the manual shutter keypad to enter your shutter timing of choice when shooting outdoors or under flicker free lights Your URSA Mini has three shutter based auto exposure modes.
- Page 67 Iris The ‘Iris’ indicator displays your current lens aperture. By tapping this indicator, you can change the aperture of compatible lenses and configure iris based auto exposure modes. Your URSA Mini's iris indicator. Tap this to access shutter settings NOTE To adjust your Iris from the LCD touchscreen, your URSA Mini must be fitted with a lens that supports changing aperture via the camera.
- Page 68 Automatic exposure works smoothly with compatible B4 or PL lenses which are designed for video or film production. EF lenses may produce noticeable ‘steps’ in exposure when changing aperture. For this reason, we recommend using only ‘shutter’ auto exposure mode if shooting on URSA Mini EF. Duration Display At the top of your URSA Mini LCD touchscreen, you’ll see your camera’s duration display.
- Page 69 Your URSA Mini's ISO indicator. Tap this to access ISO settings While in the 'ISO' menu, your URSA Mini's ISO settings appear along the bottom of the LCD touchscreen Depending on your situation, you may choose a lower or higher ISO setting. For example, in low light conditions ISO 1600 can be suitable when shooting on URSA Mini 4.6K but may introduce some visible noise.
- Page 70 To further dial in your image, you can adjust the ‘tint.’ This adjusts the mix of green and magenta in your image. For example, adding some magenta can compensate for the green cast of many fluorescent lights. Many of your URSA Mini’s white balance presets include some tint. Tapping the white balance and tint indicator on your URSA Mini gives you access to five presets, as well as a white balance indicator and slider on the left, and a tint indicator on the right.
- Page 71 Power Your URSA Mini’s power status is displayed in the top right of the LCD screen. There are four possible indicators: Your URSA Mini's power indicator is at the top right of the LCD touchscreen. While using battery power, tapping this toggles between 'voltage' and 'percentage' displays Displayed when your URSA Mini is plugged into mains power.
- Page 72 The left edge of the histogram displays shadows, or blacks, and the far right displays highlights, or whites. When you close or open the lens aperture, you’ll notice the information in the histogram moves to the left or right accordingly. You can use this to check 'clipping' in your image shadows and highlights.
- Page 73 NOTE You can set your URSA Mini to stop recording if dropped frames are detected to prevent a situation where you waste time shooting unusable footage if you don't notice the dropped frame indicator. See the 'record settings' section in this manual for more information.
- Page 74 You can format CFast cards from this menu. For more information on formatting CFast cards using URSA Mini, see the 'preparing media on Blackmagic URSA Mini' section of this manual. Tapping the card name in the storage menu sets it as the active card.
-
Page 75: Playback Menu
Double tap to zoom You can magnify any part of your URSA Mini's preview image by double tapping the LCD touchscreen. The area you tap will be magnified, and you can move around the image by dragging your finger around the LCD touchscreen. This is very helpful when checking focus. - Page 76 you to the next clip, while tapping ‘reverse’ once will move you back to the beginning of the current clip. Tapping ‘reverse’ twice will move to the beginning of the previous clip. Playback of clips can also be looped by activating the loop icon. The reverse, play, forward and loop icons To shuttle, hold down either the forward or reverse transport buttons.
-
Page 77: Settings
Settings Dashboard Pressing the ‘menu’ control button on your URSA Mini will bring up your camera's dashboard. This is a tabbed menu containing the settings not available from your URSA Mini's head up display. Settings are divided by function into ‘record,’ ‘monitor,’ ‘audio,’ ‘setup,’ ‘presets,’ and ‘LUTS’... - Page 78 ‘codec and quality’ menu. Now choose 'Ultra HD' in the resolution menu. NOTE Blackmagic URSA Mini supports a wide range of Cinema DNG RAW and Apple ProRes resolutions from 4.6K or 4K on URSA Mini 4.6K and URSA Mini 4K, respectively, down to HD.
- Page 79 4K ProRes HQ. This frame rate is normally set to match your playback speed and audio sync used in your post production workflow and delivery requirements. Your Blackmagic URSA Mini has 8 project frame rate settings including 23.98, 24, 25, 29.97, 30, 50, 59.94 and 60 frames per second.
- Page 80 Record RAW on 2 Cards Blackmagic URSA Mini lets you record CinemaDNG RAW clips at higher frame rates by recording to both CFast cards simultaneously. When this setting is enabled your URSA Mini will record to both cards when available.
- Page 81 Record Settings 3 The third page of the 'record' settings tab contains the following settings. Timelapse This setting activates the time lapse feature to automatically record a still frame at the following intervals: ‚ Frames 2 - 10 ‚ Seconds 1 - 10, 20, 30, 40, 50 ‚...
-
Page 82: File Naming Convention
This setting is intended for live studio production where there is no time for post production and you want to output the image live to air. We recommend leaving it ‘off’ for images you are recording for further post production. For this reason, sharpening is not applied to RAW files that are intended for significant post processing. - Page 83 LCD, Front SDI, Main SDI Monitor Settings 1 The first page of the 'LCD,' 'front SDI,' and 'main SDI,' monitor tab contains identical settings for each output. For example, you can set 'zebra' on for the LCD touchscreen, but off the front or main SDI outputs.
- Page 84 If your URSA Mini has a 3D LUT active, use this setting to independently apply that LUT to your LCD touchscreen, front or main SDI output. NOTE For more information on loading and using 3D LUTs, see the ‘LUTS’ section of this manual. Zebra Tap the ‘zebra’...
- Page 85 Text Surrounds Image This setting is available on URSA Mini 4K and URSA Mini 4.6K models only. Tap the ‘text surrounds image’ switch in the ‘LCD’ menu to scale the image on your LCD touchscreen down 75%. This puts the image in the centre of the LCD touchscreen away from status indicators at the top and bottom edges, giving you an unobstructed view of your URSA Mini's preview image while keeping status text on screen.
- Page 86 Front SDI and Main SDI Monitor Settings 2 The second page of your URSA Mini's 'front SDI' and 'main SDI' monitor tab contains settings unique to your front and main SDI outputs. Status Text It can be useful to hide the status text and meters on your front SDI or main SDI output, leaving only the information necessary to compose or direct a shot.
- Page 87 Setting the status text to ‘director’ in your URSA Mini’s 'front SDI' or 'main SDI' monitor settings changes the status text for that output to show the following information. Displays the currently selected frames per second for that camera. If off speed frame rate is disabled, only the project frame rate will be shown.
- Page 88 All Monitor Settings 1 Monitor settings that affect all of your URSA Mini's outputs are grouped within the 'all' menu. For example, setting 'safe area guide %' to 90% in this menu will set the safe area guide to 90% for your camera's LCD, front SDI and main SDI outputs. There are two pages of 'all' settings.
- Page 89 Focus Assist Intensity To set the level of focus assistance for your LCD touchscreen, front SDI and main SDI, tap the ‘low,’ ‘medium’ or ‘high’ setting. NOTE Setting the focus assist intensity level does not effect whether focus assistance is enabled on your URSA Mini’s LCD touchscreen or SDI outputs. You’ll still need to turn focus assistance on individually for each output in the 'LCD,' 'front LCD, or 'main LCD' monitor menus.
-
Page 90: Audio Settings
Safe Area Guide % To adjust the size of the safe area overlay on your URSA Mini’s LCD touchscreen, front SDI and main SDI outputs, tap the arrows to the left and right of the percentage displayed in this setting. This percentage indicates the size of the safe area in relation to the image frame. - Page 91 Headphones Volume This slider adjusts the output levels for headphones attached to URSA Mini’s 3.5mm headphone jack. Move the audio slider left or right to adjust levels. Speaker Volume This slider adjusts the output levels for your URSA Mini’s built in speaker. Move the audio slider left or right to adjust levels.
- Page 92 Headphones Volume This slider adjusts the output levels for headphones attached to URSA Mini’s 3.5mm headphone jack. Move the audio slider left or right to adjust levels. Speaker Volume This slider adjusts the output levels for your URSA Mini’s built in speaker. Move the audio slider left or right to adjust levels.
-
Page 93: Audio Settings - Ursa Mini Pro 4.6K
Audio Settings – URSA Mini Pro 4.6K The audio settings for your URSA Mini Pro 4.6K are spread over two pages and divided between channels 1 and 2, while an upcoming software update will add two additional channels. You can map each audio channel to a different source, as well as adjusting various settings such as padding and low cut filters. - Page 94 Recorded Channel 1/2 Level Use these sliders to adjust the recording levels of your chosen channel 1 and 2 sources. Audio meters are included with each slider to help you set the correct audio level. These levels will also update when you adjust the audio using the audio knobs on the ergonomic control panel.
-
Page 95: Setup Settings
Setup Settings The ‘setup’ tab contains your URSA Mini’s identification settings, software version, function button settings and other camera settings not directly linked to recording or monitoring. This menu has four pages, which you can cycle through by tapping the arrows at the edge of the LCD touchscreen, or swiping left or right. - Page 96 Battery Display Your URSA Mini can change the way the battery level indicator displays the remaining charge. The two settings are ‘percentage’ and ‘voltage.’ When using a battery and plates that support percentage accurate levels, setting ‘battery display’ to ‘percentage’ will show your battery power remaining as a percentage.
- Page 97 Setup Settings Page 2 The second page of your URSA Mini's 'setup' tab contains the following settings. ATEM Camera ID If you’re using URSA Mini with an ATEM Switcher and want your camera to receive tally signals from the switcher, you’ll need to set the camera number on your camera. This ensures the switcher sends the tally signal to the correct camera.
- Page 98 Setup Settings Page 3 The third page of your URSA Mini's 'setup' tab contains the following settings Set Function Button On the outside of your URSA Mini’s LCD touchscreen, you’ll notice two function buttons, ‘F1’ and ‘F2.’ These are mappable to frequently used features and are quickly accessible when using your camera with the LCD touchscreen closed, such as when you are using URSA Viewfinder.
- Page 99 To set these buttons, select a function button and then its behavior, a setting, and a parameter for that setting. Button Behavior Setting Parameter Function 1/2 Behaves as Once you have selected the function button you want to map, you can select a behaviour. The available options are: ‚...
- Page 100 Setup Settings Page 4 The fourth page of your URSA Mini's 'setup' tab contains the following settings. Door LED Your URSA Mini has a small LED on the outside of the LCD touchscreen that provides tally and status information. You can enable or disable it by tapping the ‘Door LED’ switch icon. The LED for tally and status information is located in the forward control panel on URSA Mini Pro 4.6K, and is referred to as 'Status LED'.
- Page 101 When selecting 'factory reset' you will be prompted to confirm your action Hardware ID The ‘Hardware ID’ indicator displays an 8 character identifier for your URSA Mini. This is unique to each camera. A longer, 32 character version of this ID is also included in the metadata for RAW and ProRes video.
- Page 102 Setup Settings Page 5 The fifth page of your URSA Mini's 'setup' tab contains the following settings. The camera Bluetooth name will be the letter of your camera as selected in the slate, followed by the 8 character hardware ID for your URSA Mini Bluetooth On URSA Mini Pro 4.6K, Bluetooth control allows you to control your camera wirelessly from portable devices.
- Page 103 When you try to connect for the first time the Blackmagic Camera Control App will request a six digit code to pair with the camera. This code will be displayed on the camera’s LCD screen. Type this code into the iPad. The information on the screen will confirm that your URSA Mini Pro 4.6K is now paired with your iPad.
- Page 104 NOTE If you are not using Bluetooth to control your URSA Mini Pro 4.6K, it is a good idea to turn Bluetooth off for the purpose of security. Disconnect Current Device Use this setting to disconnect your URSA Mini Pro 4.6K from the iPad it is currently paired with.
- Page 105 Tap the slate icon in the lower right corner to access and update the slate URSA Mini Pro 4.6K uses Bluetooth LE to communicate with devices for wireless control. As this is the same type of protocol used in portable devices, it only uses a minimal amount of battery power.
-
Page 106: Presets
Presets The 'presets' tab lets you save and recall a complete collection of settings for your URSA Mini. This is very useful when one camera is used for multiple projects. For example, you may use your URSA Mini for a variety of different shoots, from documentaries to music videos, with very different settings between types of projects. - Page 107 Enter a name for your preset by tapping the 'add' icon in the preset tab and using the touch keyboard Once you have a preset saved, tap its name in the preset menu to select it. To load it tap the ‘load’ icon. Select a preset and tap the 'load' icon to load it.
-
Page 108: Luts
NOTE If your URSA Mini’s preset slots are full, the import menu will not be available. You will need to delete an existing preset to make room. Exporting presets To export a preset to a CFast or SD card, select the preset you want to export by tapping it, and tap the ‘manage’... - Page 109 Your URSA Mini supports 33 point 3D LUTs in .cube format created in DaVinci Resolve and 17 point 3D LUTs converted to Resolve .cube format via LUT conversion programs. Your camera processes 3D LUTs using high quality tetrahedral interpolation. For more information on displaying LUTs, see the ‘monitor settings’ section in this manual.
- Page 110 NOTE If you are having trouble importing a LUT to your URSA Mini, it may be the wrong size. You can use a LUT editor like Lattice to check its size, or open it in any text editor on your computer. Next to the tag 'LUT_3D_SIZE' will be a number indicating the LUT's size.
-
Page 111: Entering Metadata
VFX assets to plates. Your Blackmagic URSA Mini automatically saves some metadata to each clip, such as camera settings, timecode, date and time. You can use your camera’s slate to add many additional details. - Page 112 Slate for This setting shows the clip which the metadata currently displayed in the ‘clip’ applies to. In ‘standby’ mode, this refers to the next clip that will be recorded. Lens Data These settings display information about the current lens fitted to your camera. Many electronic lenses automatically supply information such as the lens model, aperture and focal length.
- Page 113 ‚ Distance Shows the focus distance settings of the lens for the recorded clip. Some lenses can provide this data automatically and it will be provided in millimeters. You can also enter this data manually. ‚ Filter Shows the current lens filters used. Tap this setting to enter data manually. You can make multiple entries separated by commas.
- Page 114 Your URSA Mini's slate is divided into 'clip' and 'project' tabs Reel The ‘reel’ indicator shows the current reel. Your URSA Mini automatically increments reel numbers, so there is usually no need to enter this manually. When you are moving to a new project and want to start from reel '1' again go into the project tab of the slate and tap tap 'reset project data'.
- Page 115 When entering 'scene' metadata, your URSA Mini will prompt you with increment suggestions to the left of the touch keyboard, and shot types to the right Take The ‘take’ indicator shows the take number for the current shot. You can increment this up or down by tapping the left or right arrows on either side of the take number, or tapping the indicator to enter the take number editor.
- Page 116 Good take Tap the ‘good take’ indicator to flag good takes for easy recall in post production. This tag applies to either the last clip recorded, if your URSA Mini is in ‘standby’ mode, or the clip currently being viewed in ‘playback’ mode. Int / Ext Tap ‘int’...
-
Page 117: Using Servo Zoom Lenses
Using Servo Zoom Lenses Using servo zoom lenses with your URSA Mini camera is a powerful combination. Manual iris, zoom and focus rings on the lens barrel, plus a built in hand grip and zoom rocker makes shooting very efficient and gives you a range of dynamic techniques that are difficult, if not impossible, to achieve using other lens types. - Page 118 Lenses that also have motorized focus control can even utilize the ‘focus’ button on your URSA Mini to activate auto focus, and focus can be controlled remotely by an ATEM switcher via ATEM Software Control. Once you have attached a B4 lens, set the resolution to 2K 16:9 or lower, and 'window sensor' to 'on' in the 'record' tab of the dashboard.
-
Page 119: Camera Video Output
Camera Video Output HD Monitoring Output Blackmagic URSA Mini’s down converted 3G-SDI out connector always outputs 1080 HD video so you can easily connect to routers, monitors, SDI capture devices, broadcast switchers and other SDI devices. This output is labeled ‘front SDI’ in the touchscreen settings menu. - Page 120 Connecting to Monitors SDI monitoring can be really handy when accessing the fold out monitor is impractical, such as when secured high on a jib arm, on a crane, or mounted on a vehicle. Monitoring information is displayed via your HD-SDI monitoring out connector by adjusting the ‘front SDI overlay’...
-
Page 121: Ursa Mini Shoulder Mount Kit
URSA Mini Shoulder Mount Kit Attaching the shoulder mount The URSA Mini Shoulder Mount Kit lets you carry URSA Mini on the shoulder for ENG style shooting. This kit includes a top handle, shoulder mount baseplate, extension arm for the URSA Mini side handle, long LANC cable, Viewfinder adapter plate, plus all the required screws. - Page 122 Gently place your URSA Mini upside down on a flat, stable surface so you can easily access the base of your camera. Fasten the shoulder mount baseplate to URSA Mini using the 2 x ¼” flat head screws and driver. Tighten the screws until the baseplate is firmly attached and the screws won’t loosen.
- Page 123 To attach the top handle with URSA Viewfinder Top handle URSA Viewfinder cap Place your URSA Mini on a flat, stable Remove the URSA Viewfinder cap from the surface so you can access the top of base of the handle by gently lifting its arm your camera.
- Page 124 Attaching the extension arm When using the URSA Mini shoulder mount kit, you’ll need to reposition URSA Mini’s side handle for comfortable shoulder based shooting. Use the bundled extension arm and longer LANC cable to move the side handle to a more ergonomic position. To attach the side handle extension arm: Place your URSA Mini on a flat, stable surface allowing room next to the camera to lower the extension arm.
-
Page 125: Blackmagic Ursa Viewfinder
Blackmagic URSA Viewfinder Blackmagic URSA Viewfinder is a powerful electronic viewfinder designed for your Blackmagic URSA Mini. The 1080HD color OLED display and precision glass optics provides a bright, vivid, and lifelike image so you can quickly find focus and see the finest detail in your images. -
Page 126: Adjusting The Eyepiece
Connect your viewfinder’s SDI and power cables to your URSA Mini HD-SDI monitoring output and +12 volt output When using the URSA Viewfinder with URSA Mini, it is highly recommended that you also install the URSA Mini shoulder mount kit as this provides the correct mounting points, 1/4” thumb screw, and height adjustments to optimize the positioning of your viewfinder. -
Page 127: Menu Settings
The buttons also have a customizable function feature so you can assign shortcuts to quickly enable common features you may use frequently. For example you may wish to assign the false color feature to the zoom button. Refer to the ‘shortcuts’ section for more information. ZOOM (F1) - ‘menu’... - Page 128 Meters Switches between the types of meters to display in overlay view. The options are ‘histogram’, ‘audio’, ‘both’ or ‘none’. Peaking Switches peaking on and off. Zebra Switches zebra levels on and off. Set your desired zebra levels using the camera settings.
- Page 129 Scroll to ‘exit’ and press the ‘menu’ button to close the menu display view. The ‘shortcuts’ settings in URSA Viewfinder Setup The ‘setup’ menu provides the following features: Brightness Adjustment Allows adjustments for the brightness of the display with range -10 to +10. Tally Brightness Allows adjustments of tally LED brightness.
- Page 130 NOTE Enabling 'Grid' in your URSA Viewfinder setup menu will also allow your viewfinder to display tally signals sent from an ATEM switcher. Overlays must also be set to 'on' in the display menu. Status Text Toggles the appearance of status text, such as white balance, frame rate and ISO. When 'status text' is turned 'on' in your URSA Mini's 'front SDI' monitor settings, you can use this setting toggle its appearance in your Blackmagic URSA Viewfinder.
- Page 131 Updating URSA Viewfinder’s Internal Software Update your viewfinder using the Blackmagic Camera Setup utility software. The viewfinder will need to be powered when updating, so we recommend keeping the viewfinder connected to your URSA Mini during the update process. This also means your URSA Mini will need to supply consistent power, so be sure to plug into external power.
-
Page 132: Blackmagic Ursa Studio Viewfinder
Blackmagic URSA Studio Viewfinder is a powerful viewfinder that allows you to turn your Blackmagic URSA Mini into a professional live production camera. The studio viewfinder features a bright 7” screen and has a large easily viewable tally light, control knobs, large handles, sun hood and variable tension articulated mount. -
Page 133: Mounting And Connecting To Blackmagic Ursa Mini
Mounting and Connecting to Blackmagic URSA Mini When using the Blackmagic URSA Studio Viewfinder with Blackmagic URSA Mini, you have the option of mounting the unit to the camera in a number of ways. You can mount the Blackmagic URSA Studio Viewfinder directly to the top of Blackmagic URSA Mini via the supplied V-lock mount plate which can be easily removed from the top... - Page 134 Blackmagic URSA Studio Viewfinder mounted V-Lock mount plate being attached to to shoulder mount kit 3rd party camera The V-Lock mount plate can also be installed on any camera you want to use the URSA Studio Viewfinder with that has 1/4” mounting points, or by using a third party cheese plate. You can also mount the Blackmagic URSA Studio Viewfinder to a third party camera system that has an existing V-lock mount plate as many of them have this quick release plate on them already.
-
Page 135: Adjusting The Blackmagic Ursa Studio Viewfinder
To connect your Blackmagic URSA Studio Viewfinder to your URSA Mini, simply connect the viewfinder’s attached cables to URSA’s front 12V power and 3G-SDI outputs. The power switch on the viewfinder will then allow you to turn on the viewfinder instantly when your camera is powered. Note that there are cable clamps on the side of the URSA Mini handle mount to keep you cables neat and hold the... - Page 136 These tension dials have a very large range of tension adjustment, allowing you to select a specific amount of resistance. This allows you to easily pan and tilt the viewfinder to the precise position you require. Tension dials on either side of the viewfinder Tilt Lock Dial Locks the angle of tilt on the viewfinder mechanism.
- Page 137 Sun hood The sun hood helps you to see the screen in bright or sunny conditions. To attach the sun hood, slide it over the top of the Blackmagic URSA Studio Viewfinder and push it into place, securing it with the two captive screws on the base of the sun hood. The top section of the visor is adjustable, and can raise and lower to provide additional viewing angles.
-
Page 138: Button Features
Button Features The tactile dials down the right hand side let you change brightness, contrast, peaking quickly and easily. The dials are ergonomically designed so you can adjust the dials from the side with your thumb when using the sun hood, or with two fingers for finer more controlled adjustment. MENU BRIGHT BACK... - Page 139 Tally Light The large tally light on the rear of the Blackmagic URSA Studio Viewfinder lets both the talent and operator know which camera is on the air, which camera is about to be on air, and if they are ISO recording. The tally illuminates red for on-air, green for preview and when used with URSA Mini will illuminate orange for ISO record.
-
Page 140: Menu Settings
Menu Settings The push button ‘menu’ dial allows you to enter the menu by pressing it, whilst rotating the dial navigates up and down through the menu options. Pressing the ‘menu’ dial whilst a menu heading is highlighted, will allow you to switch between the display, shortcuts, setup and cursor sub menus. - Page 141 Guides This setting gives you the option to show or hide your guides. The guides will match the style of guides that have been set in the URSA Mini in the camera 'all' section of the 'monitor' menu. The aspect ratio, frame guide opacity level, safe area percentage, and the type of grids shown will match what you have set in the camera.
- Page 142 Once you have set up your shortcuts as required you can either scroll to ‘exit’ and press the ‘menu’ dial to close the menu display view, or hit the back button to exit out of the menu. The 'shortcuts' submenu Setup The ‘setup’...
- Page 143 A high LED brightness setting is recommended for bright conditions, as it will provide greater visibility for talent and operators in the conditions. A low LED brightness is recommended when filming in darker environments where it is easier to see when the light is on. Focus Assist The ‘focus assist’...
- Page 144 Cursors displayed on screen Once you have set them up they can be switched on or off from the 'cursors' menu or assigned to your function keys for quick access. This is important for live production, as it allows the camera operator to take this into consideration and accurately compose and frame shots.
-
Page 145: Interchangeable Lens Mount
Interchangeable Lens Mount Blackmagic URSA Mini Pro 4.6K is shipped with an EF mount attached, however you are not locked into using EF lenses as the camera has an interchangeable lens mount. This means you can remove the original EF mount and attach an optional PL or B4 mount. Blackmagic Design PL and B4 lens mount kits are available from Blackmagic Design resellers, and the EF mount is... -
Page 146: Blackmagic Ursa Mini Pro Pl Mount
Blackmagic URSA Mini Pro PL Mount Attaching the PL mount to your URSA Mini Pro 4.6K lets you use high end precision cinema lenses for feature film and television production. The PL mount kit includes: 1x PL mount The PL mount is shipped with a protective dust cap. - Page 147 Add the 0.10mm shim to your camera, then the lens mount and turn until it is finger tight. place the Blackmagic URSA Mini Pro 4.6K Use the wide end of the baffle tool to tighten PL lens mount onto the camera body.
-
Page 148: Blackmagic Ursa Mini Pro B4 Mount
Blackmagic URSA Mini Pro B4 Mount With the B4 mount attached to your URSA Mini Pro 4.6K, you can mount par-focal zoom lenses commonly used for electronic news gathering and wedding videos. These lenses maintain focus throughout large zoom ranges and typically have manual focus and iris control, plus a zoom rocker on the hand grip allowing you to smoothly ease in and out of the zoom. - Page 149 Place Blackmagic URSA Mini Pro 4.6K Add the 0.10mm shim to the camera, then vertically on a solid, clean bench top to place the Blackmagic URSA Mini Pro 4.6K B4 ensure that the mount can be inserted lens mount onto the camera body ensuring vertically.
-
Page 150: Blackmagic Ursa Mini Pro Ef Mount
Blackmagic URSA Mini Pro EF Mount The EF mount can be purchased if you ever need to replace the original EF mount that is shipped with your camera. The EF mount kit includes: 1x EF mount The EF mount lets you attach common EF stills lenses. - Page 151 FILTER AUTO AUTO LENS LENS Place Blackmagic URSA Mini Pro 4.6K Carefully place the Blackmagic vertically on a solid, clean bench top URSA Mini Pro 4.6K EF lens mount onto the to ensure that the mount can be inserted camera body ensuring the red dot is at the vertically.
-
Page 152: Blackmagic Ursa Mini Pro Shim Kit
0.50mm and 0.10mm shims underneath the original EF mount. This shim and others are included in the Blackmagic URSA Mini Pro Shim Kit. Other thicknesses are included in the kit in case you need to re-shim your camera to suit PL lenses that may require slightly different clearances to maintain accurate focus marks. -
Page 153: Mounting Batteries
Mounting Batteries Connecting a third party battery plate lets you mount V-mount or gold mount batteries Mounting V-mount or Gold Mount Batteries You can easily mount industry standard V-mount or gold mount batteries to Blackmagic URSA Mini. To mount a battery, you’ll need to attach a Blackmagic V-mount battery plate, a third party V-mount or gold mount battery plate to your camera’s plate mount. -
Page 154: Using Your Own Battery Plate
To mount your battery plate to the rear panel: Remove Blackmagic URSA Mini’s molex power cover from the rear panel by unscrewing the 4 corner screws with a phillips head PH1 screwdriver. You’ll now see Blackmagic URSA Mini's 12 way molex 55959-1230 power connector. - Page 155 Batt Batt Batt Batt Monitor0 Monitor 1 +12V Out 11 EnableN The rear view of the adapter’s connector housing. Refer to the wire configuration table for a description of each pin Wire Configuration Table Pins Signal Color Direction Description 1, 2, 3, 4 Batt To URSA 12 V to 20 V...
-
Page 156: Using Davinci Resolve
Using DaVinci Resolve Shooting with your Blackmagic URSA Mini is only part of the process of creating film and television content, and just as important is the process of media backup and management as well as editing, color correction and encoding final master files. Your Blackmagic URSA Mini... -
Page 157: Importing Your Clips
Importing your Clips To start editing your clips, you’ll first need to import them into the media pool: Launch DaVinci Resolve. If this is the first time you’ve opened DaVinci Resolve, wait for the Project Manager to appear, and double click the ‘untitled project’ icon in the project manager window. -
Page 158: Working With Raw Files
Working with RAW files When you first import RAW files, DaVinci Resolve will decode the sensor data contained in the files using the ISO, white balance and tint settings used on the camera at the time of shooting. If you're happy with the look of these settings, you can start editing right away. The great thing about shooting RAW is that you're not tied to these settings at all! The breadth of available post processing options when working with RAW files mean that you'll develop your own workflow over time. -
Page 159: Editing Your Clips
Project Raw Settings If you need to make a setting change that is common to all the clips, for example a global change to the white balance or ISO setting, you can set the clips to use the project RAW settings and make global changes from there. -
Page 160: Trimming Clips
Go to the timeline and position the timeline play head where you want your clip to be inserted. To insert the clip onto the timeline, click inside the source viewer then drag the mouse pointer across to the timeline viewer. A list of edit options will appear. Select the type of edit you want. -
Page 161: Mapping Keyboard Shortcuts
The ‘edit’ page. You can trim your clips, change their order, move them around and add transitions between them using the timeline editor Mapping Keyboard Shortcuts If you are familiar with keyboard shortcuts using other editing software, you can easily map your own in DaVinci Resolve to increase speed and optimise your workflow. -
Page 162: Adding Transitions
Adding Transitions A transition is a visual effect used to bridge one clip to another in a pleasing way, for example dissolves, wipes, dips to color, and more. These can add a layer of excitement to your edit. Transitions don’t always have to be joining two clips, for example you can apply a dissolve transition to the end of one clip to create a quick and easy fade to black. -
Page 163: Adding Titles
Adding Titles It’s easy to create titles for your edit. You can place a title on any video track just as you would a clip. If you run out of tracks you can easily add new ones by right clicking next to an existing track name and selecting ‘add track’. -
Page 164: Color Correcting Your Clips
To add a new audio or video track, right click next to a track name and select ‘add track’. For audio, select the track type you want Color Correcting your Clips Once you have edited your sequence of clips, you can start color correcting. This is best begun after you have finished editing your sequence so you can maintain a consistent look, but part of the fun of DaVinci Resolve is being able to move between the edit and color page to make fine adjustments and discover new creative choices. -
Page 165: Using Scopes
Using Scopes Most colorists make creative color choices by focusing on the emotion and the look they want their program to have and then simply work using the monitor to achieve that look. You can look at everyday objects and how different types of light interact with them to generate ideas on what you can do with your images and a little practice. -
Page 166: Secondary Color Correction
Adjusting the ‘gain’ Click on the ‘gain’ dial and slide it back and forth. This adjusts the highlights which are the brightest areas of your clip. The highlights are shown on the top section of the waveform on the parade scope. For a brightly lit shot, these are best positioned just below the top line of the waveform scope. -
Page 167: Qualifying A Color
Qualifying a Color Often you’ll find a specific color in your clip can be enhanced, for example grass by the side of a road, or the blue in a sky, or you may need to adjust color on a specific object to focus the audience’s attention on it. -
Page 168: Tracking A Window
For example, you can track a window on a person in order to make color and contrast changes just to that person without affecting his/her surroundings. By making corrections like this you can influence the audience’s attention on areas you want them to look at. To add a power window to your clip: Add a new serial node. -
Page 169: Using Plugins
To track a window to a moving object: Create a new serial node and add a power window. Go to the start of your clip and position and size the window to highlight just the object or area you want. Open the ‘tracker’... -
Page 170: Mastering Your Edit
Mastering your Edit So now you’ve edited, color corrected and graded your clips you’ll want to export a render of your edit in the ‘deliver’ page. This page lets you select the range of clips you want to export, plus the format, codec and resolution you want. You can export in many types of formats such as QuickTime, AVI, MXF and DPX using codecs such as 8-bit or 10-bit uncompressed RGB/YUV, ProRes, DNxHD, H.264 and more. -
Page 171: Understanding Studio Camera Control
Understanding Studio Camera Control Blackmagic URSA Mini can be used as a studio camera and controlled from an ATEM switcher using the Camera Control feature in ATEM Software Control. This lets you add a camera with large sensor picture quality and amazing dynamic range to your broadcast studio and control it just as you would any studio camera. -
Page 172: Using Camera Control
REMOTE REMOTE All SDI and HDMI video conn STEREO IN PUSH PUSH PUSH PUSH STEREO IN SD, HD and Ultra HD switchable unle CONTROL CONTROL CH 1 CH 2 CH 1 CH 2 CH 1 CH 2 USB 2.0 HDMI IN USB 2.0 HDMI IN SDI INPUTS... - Page 173 Color Wheel The color wheel is a powerful feature of the DaVinci Resolve color corrector and used to make color adjustments to each YRGB channel’s lift, gamma and gain settings. You can select which setting to adjust by clicking on the three selection buttons above the color wheel. Master Wheel Use the master wheel below the color wheel to make contrast adjustments to all YRGB channels at once, or luminance only for each lift, gamma or gain setting.
-
Page 174: Zoom Control
To darken or lift the pedestal, drag the control left or right. Holding the command key on a Mac, or the Control key on Windows, allows only pedestal adjustments. The iris/pedestal control illuminates red when its respective camera is on air Zoom Control When using compatible lenses with an electronic zoom feature, you can zoom your lens in and out using the zoom control. - Page 175 Auto Focus Button The auto focus button is located at the bottom left corner of each camera controller. Press to automatically set the focus when you have an active lens that supports electronic focus adjustments. It’s important to know that while most lenses support electronic focus, some lenses can be set to manual or auto focus modes, and so you need to ensure your lens is set to auto focus mode.
- Page 176 Your ATEM Switcher will display gain in dB. This corresponds to the ISO settings on your camera in the following way: Gain 1600 Please note that while URSA Mini 4.6K can be set to 18dB of gain, URSA Mini 4K’s maximum gain is 12dB Shutter Speed Control Shutter speed control is used to change your URSA Mini’s shutter angle.
- Page 177 Shutter Shutter Shutter Shutter Shutter Shutter Angle Angle Angle Angle Angle Angle Shutter Speed 23.98 fps 24 fps 25 fps 29.97 fps 50 fps 59.94 fps 1/50 172.7 172.8 215.8 360* 1/60 143.9 179.8 359.6 1/75 115.1 115.2 143.9 287.7 1/90 95.9 239.8...
-
Page 178: Davinci Resolve Primary Color Corrector
CCU interface to a user interface that’s more like a primary color corrector on a post production color grading system. Your Blackmagic URSA Mini features a DaVinci Resolve primary color corrector built in. If you have used DaVinci Resolve, then creatively, grading in your URSA Mini will be identical so you can use your color grading experience for live production. - Page 179 ‚ Double-click within the color ring: Resets the color adjustment without resetting the master wheel adjustment for that control. ‚ Click the reset control at the upper-right of a color ring: Resets both the color balance control and its corresponding master wheel. Lift, gamma and gain color wheels in the color corrector panel Master Wheels Use the master wheels below the color wheels to adjust each YRGB channels’...
- Page 180 Lum Mix Setting The color corrector built into your Blackmagic URSA Mini is based on the DaVinci Resolve primary color corrector. DaVinci has been building color correctors since the early 1980’s and most Hollywood films are color graded on DaVinci Resolve than any other method.
-
Page 181: Blackmagic Camera Setup Utility
Blackmagic Camera Setup Utility Updating Camera Software – Mac After downloading the Blackmagic Camera Setup utility software and unzipping the downloaded file, open the resulting disk image to reveal the Blackmagic Camera Setup Installer. Launch the installer and follow the on screen instructions. After the installation has finished, go to your applications folder and open the Blackmagic Cameras folder, where you’ll find this manual, the Blackmagic Camera setup utility, plus a documents folder containing readme files and information. - Page 182 After installing the latest Blackmagic Camera Setup utility on your computer, connect a USB cable between the computer and your Blackmagic URSA Mini. On Blackmagic URSA Mini, the USB port is located on the left side panel above the memory card slots. Simply open the rubber cap to access the port.
-
Page 183: Post Production Workflow
Post Production Workflow Working with Files from CFast 2.0 and SD cards Edit directly from your CFast card by removing it from your camera and mounting it on your computer using a CFast 2.0 reader/writer or CFast drive To import your clips from a CFast 2.0 or SD card: Remove the CFast card from your Blackmagic URSA or URSA Mini. -
Page 184: Using Final Cut Pro X
Using Final Cut Pro X To edit Apple ProRes 422 HQ clips using Final Cut Pro X, you need to create a new project and set a suitable video format and frame rate. This example uses ProRes 422 HQ 1080p25. Final Cut Pro X project settings Launch Final Cut Pro X, go to the ‘menu’... -
Page 185: Using Adobe Premiere Pro Cc
Launch Media Composer and the ‘select project’ window will appear. Click the ‘new project’ button. In the ‘new project’ window name your project. Go to the ‘format’ drop down menu and select 1080i/59.94. Go to the ‘color space’ drop down menu and select YCbCr 709. Go to the ‘raster dimension’... -
Page 186: Using Autodesk Smoke 2013
Using Autodesk Smoke 2013 To edit your clips using Autodesk Smoke 2013, create a new project and set a suitable video format, bit depth, frame type and frame rate. This example uses ProRes 422 HQ 1080p25. Autodesk Smoke 2013 Launch Smoke and the ‘project and user settings’ window will appear. Click on the ‘new’... -
Page 187: Blackmagic Ursa Mini B4 Mount
Blackmagic URSA Mini B4 Mount The PL mount on Blackmagic URSA Mini PL can be removed and replaced with an optional B4 mount. This mount differs slightly to the B4 mount on URSA Mini Pro 4.6K. For example, the screw holes are in a different position to allow for the EF button release housing on URSA Mini Pro 4.6K. - Page 188 11 o’clock position. Place the 2 x 0.50mm shims supplied with Place the Blackmagic URSA Mini B4 lens your Blackmagic URSA Mini B4 lens mount mount onto the camera body ensuring the onto the original 0.50mm shim. This creates...
-
Page 189: Shimming Lens Mounts
Shims are also used for URSA Mini Pro 4.6K's interchangeable lens mount. Your Blackmagic URSA Mini is supplied with a 0.50mm shim already installed. The Blackmagic URSA Mini Pro 4.6K Shim Kit contains additional shim sets of various thicknesses, and can be purchased from your local Blackmagic Design reseller. - Page 190 Remove the existing 0.50mm shim and Add the 0.10mm shim to your camera, replace with the appropriate shim thickness then place the Blackmagic URSA Mini needed to bring your lens focus marks into Pro 4.6K PL lens mount onto the camera alignment with the focal distance.
-
Page 191: Shimming Ursa Mini Pro 4.6K
Loosely turn the five mounting screws until Using the torque wrench and 2.0mm Hex initial contact is made with the shoulder of key, apply one full turn of pressure to the lens mount. To access all five screws, mounting screw 1, followed by one full turn to you will need to rotate the PL locking ring, as screw 2, repeat for screws 3 and 4, then 5 some holes are obscured when the ring is... -
Page 192: Developer Information
Blackmagic Design cameras. Please refer to the ‘Understanding Studio Camera Control’ chapter section of this manual, or the ATEM Switchers Manual and SDK manual for more information. These can be downloaded at www.blackmagicdesign.com/support. This document describes an extensible protocol for sending a uni directional stream of small control messages embedded in the non-active picture region of a digital video stream. - Page 193 The command id is an 8 bit unsigned integer which indicates the message type being sent. Receiving devices should ignore any commands that they do Command id (uint8) not understand. Commands 0 through 127 are reserved for commands that apply to multiple types of devices. Commands 128 through 255 are device specific.
- Page 194 Data types 129 through 255 are available for device specific purposes. The operation type specifies what action to perform on the specified Operation type (uint8) parameter. Currently defined values are: The supplied values are assigned to the specified parameter. Each element will be clamped according to its valid range.
- Page 195 Group Parameter Type Index Minimum Maximum Interpretation [0] = frame rate – – 24, 25, 30, 50, 60 [1] = M-rate – – 0=regular, 1=M-rate 0=NTSC, 1=PAL, 2=720, [2] = dimensions – – 3=1080, 4=2k, Video mode int8 5=2k DCI, 6=UHD 0=progressive, [3] = interlaced –...
- Page 196 Group Parameter Type Index Minimum Maximum Interpretation 0.0=minimum, Mic level fixed16 – 1.0=maximum 0.0=minimum, Headphone level fixed16 – 1.0=maximum 0.0=minimum, Headphone program mix fixed16 – 1.0=maximum 0.0=minimum, Speaker level fixed16 – 1.0=maximum Audio 0=internal mic, 1=line level input, Input type int8 –...
- Page 197 Group Parameter Type Index Minimum Maximum Interpretation 0.0=minimum, Peaking level fixed16 – 1.0=maximum 0=disable bars, Color bars display int8 – 1-30=enable bars with time (seconds) timeout (s) [0] = focus 0=Peak, Display – – assist method 1=Colored lines 0=Red, Focus Assist int8 1=Green, [1] = focus...
- Page 198 Group Parameter Type Index Minimum Maximum Interpretation [0] red default 0.0 [1] green default 0.0 Lift Adjust fixed16 [2] blue default 0.0 [3] luma default 0.0 [0] red default 0.0 [1] green default 0.0 Gamma Adjust fixed16 [2] blue default 0.0 [3] luma default 0.0 [0] red...
- Page 199 Example Protocol Packets Packet Operation Length Byte header command data trigger instantaneous auto focus on camera 4 turn on OIS on all cameras set exposure to 10 ms on camera 4 (10 ms = 10000 0x10 0x27 0x00 0x00 us = 0x00002710) add 15% to zebra level 0x33 0x01 (15 % = 0.15 f = 0x0133 fp)
-
Page 200: Blackmagic Embedded Tally Control Protocol
Blackmagic Embedded Tally Control Protocol Version 1.0 (30/04/14) This section is for third party developers or anybody who may wish to add support for the Blackmagic Embedded Tally Control Protocol to their products or system. It describes the protocol for sending tally information embedded in the non-active picture region of a digital video stream. - Page 201 uint8[1] bit 0: slave device 3 program tally status (0=off, 1=on) bit 1: slave device 3 device preview tally status (0=off, 1=on) bit 2-3: reserved (0b00) bit 4: slave device 4 program tally status (0=off, 1=on) bit 5: slave device 4 preview tally status (0=off, 1=on) bit 6-7: reserved (0b00) .
-
Page 202: Help
After checking the version of Blackmagic Camera Utility software installed on your computer, please visit the Blackmagic Design support center at www.blackmagicdesign.com/support to check for the latest updates. While it is usually a good idea to run the latest updates, it is wise to avoid updating any software if you are in the middle of an important project. -
Page 203: Regulatory Notices And Safety Information
Regulatory Notices and Safety Information Regulatory Notices Disposal of waste of electrical and electronic equipment within the European union. The symbol on the product indicates that this equipment must not be disposed of with other waste materials. In order to dispose of your waste equipment, it must be handed over to a designated collection point for recycling. -
Page 204: Warranty
Warranty Limited Warranty Blackmagic Design warrants that this product will be free from defects in materials and workmanship for a period of 12 months from the date of purchase. If a product proves to be defective during this warranty period, Blackmagic Design, at its option, either will repair the defective product without charge for parts and labor, or will provide a replacement in exchange for the defective product. - Page 205 インストール / オペレーション マニュアル Blackmagic URSA Mini and URSA Mini Pro 4.6K Blackmagic Viewfinder、 Studio Viewfinder 2017 年 6 月 日本語...
- Page 206 ようこそ このたびは Blackmagic URSA Mini をお買い求めいただき誠にありがとうございました。 数年前に最初のデジタルフィルムカメラをリリースしてから、 これまで新製品に対していただいた中 でも最高の助言やフィードバックが数多く寄せられてきました。 私たちは皆、 世界をリードするカメ ラマンや撮影監督の優れた作品を見て育ちました。 私たちのヒーローである彼らと、 カメラに追加 する新機能に関して何時間も話し合いを重ねていることを非常に誇りに思います。 もちろん、 話し 合いを持った誰もが素晴らしいアイデアを提供してくれました! URSA Mini は、 驚異的な広ダイナミックレンジのセンサーを、 小型で軽量かつ頑丈なメタル製の筐 体に搭載しています。 URSA Mini の機能的なユーザーインター フェースは、 すべてのカメラ機能にすばやく簡単にアクセスす る必要のあるワンマンオペレーション用に設計されています。 ATEM スイッチャーと包括的な統合性 を持っ ており、 スーパー 35mm デジタルフィルムカメラの驚異的な画質をライブプロダクションスイッ チャーで使用できます。 さらに、 URSA Mini は優れた 4K URSA センサーと、 より広範囲のダイナミックレンジに対応した 4.6K セ...
- Page 207 カメラ正面 アイピースの調整 URSA Mini – 左側面 ボタン機能 URSA Mini Pro 4.6K – 左側面 メニュー設定 右側面 Blackmagic URSA Studio Viewfinder リアパネル Blackmagic URSA Mini にマウント / 接続 トップパネル Blackmagic URSA Studio 底面 Viewfinder の調整 URSA Mini コントロール ボタン機能 コントロールボタン メニュー設定 サイドハンドル...
- Page 208 キーボードショートカットのマッピング Avid Media Composer を使う トランジションの追加 Adobe Premiere Pro CC を使う タイトルの追加 Autodesk Smoke 2013 を使う オーディオトラックの追加 クリップのカラーコレクション Blackmagic URSA Mini B4 Mount スコープの使用 レンズマウントのシム調整 セカンダリーカラーコレクション URSA Mini PL のシム調整 カラーの特定 URSA Mini Pro 4.6K のシム調整 Power Window を追加 デベロッパーの皆様へ...
-
Page 209: どのカメラをお使いですか
どのカメラをお使いですか? 同マニュアルを読み進めると、 時々、 ある機能が特定の Blackmagic URSA Mini カメラ特有の機能である ことに気づかれるでしょう。 すべての URSA Mini カメラは驚異的な広ダイナミックレンジのイ メージを提供し、 同じ基本の筐体を共有していますが、 モデルごとにいくつかの相違点があります。 選択できるモデル: ‚ URSA Mini 4K ‚ URSA Mini 4.6K ‚ URSA Mini Pro 4.6K URSA Mini 4K EF SDI OUT 4.6K SDI OUT FILTER URSA Mini 4.6K PL... -
Page 210: Ursa Mini
ろん、 EF/PL レンズマウントを使い慣れている人 であれば、 マウント部を見るだけで見分けられるでしょう。 これらのマウントに関する詳細は、 「はじめに」 セクションを参照してください。 URSA Mini 、 左側面 URSA Mini Pro 4.6K Blackmagic URSA Mini Pro 4.6K は少々異なります。 4.6K モデルは、 EF マウントのみになりますが、 レン ズマウントが交換可能なので他のタイプのレンズも使用できます。 交換可能なレンズマウントに関する詳 細は、 「交換可能なレンズマウント」 セクションを参照してください。 URSA Mini Pro 4.6K は、 筐体の左側面に追加コントロールボタンと LCD ステータス ・ スクリーンが、 レンズ... - Page 211 キャップを取り外すことです。 EF レンズマウントから保護用のダストキャップを外すには、 ロックボタンを押しながら、 反時計回りに回 します。 PL マウントでは、 PL ロックリングを反時計回りに回し、 保護用のダストキャップを引いてマ ウントから外します。 メモ Blackmagic URSA Mini Pro 4.6K は交換可能なレンズマウントを搭載しており、 EF 、 PL 、 B4 レンズ、 そしてアクセサリの付いた追加レンズマウントを使用できます。 URSA Mini Pro 4.6K の マウントタイプの変更に関する詳細は、 同マニュアルの 「交換可能なレンズマウント」 セクション を参照してください。 作業のこつ URSA Mini Pro 4.6K は、 箱から出した時に EF レンズを装着できる状態になっ ています。...
- Page 212 レンズを外すときは、 ロックリングを反時計回りに止まるまで回し、 レンズをカメラ筐体から直 接引き出しゆっく り外します。 レンズを回す必要はありません。 LENS PL レンズを Blackmagic URSA Mini PL に装着 / 取り外し URSA Mini Pro 4.6K URSA Mini Pro 4.6K の PL マウントは、 12 時の位置に 4 ピンが付いています。 これは Cooke の /i Technology インター フェース対応のレンズとの通信に使用されます。 このインター フェースに対...
- Page 213 メモ レンズを装着していない時は、 センサーを覆うガラスのフィルターがゴミや埃にさらされて います。 常にダストキャップを付けて保護するようにしてください。 B4 マウントレンズを取り付ける : B4 レンズのロックリングを反時計回りに回し、 マウント上部のアラインメントピンを確認します。 レンズマウントのスロットがアラインメントピンの位置に合うよう、 URSA Mini の B4 マウントと B4 レンズを合わせます。 レンズを B4 マウントに合わせて持ち、 両方のマウント プレートを合わせます。 アラインメントピンがスロットに入ったことを確認します。 ロックリングを時計回りに回してレンズをマウントに締め、 正しい位置に固定します。 LENS B4 レンズを B4 マウントの付いた Blackmagic URSA Mini PL に装着 / 取り外し はじめに...
- Page 214 AC-12V DC アダプターの 4 ピン XLR コネクターを、 カメラの 12-20V 電源コネクターに接続します。 外部電源とバッテリー電源に接続している場合、 外部電源のみが使用されます。 充電されたバッテリー が 接 続されている時に外部電 源を外した場 合、 カメラは動 作を中断することなく、 バッテリー 電源に切り替えます。 同梱の AC ー 12V DC アダプターを使って Blackmagic URSA Mini に電源を接続 V マウント / ゴールドマウントバッテリーなど、 業界標準のサードパーティ製外部バッテリーを URSA Mini と使用できます。 異なるタイプのバッテリーをサポートするバッテリープレートのマウントに関する詳細は、 「バッテリーのマウント」 のセクションを参照してください。...
- Page 215 電源を入れる際はボタンを素早く押して離してください。 カメラの起動には約 10 秒 かかりますが、 再度ボタンを押す必要はありません。 カメラをオフにする時は、 電源がオフにな るまでボタンを長押しします。 URSA Mini Pro 4.6K をオンにする : Blackmagic URSA Mini Pro 4.6K では、 電源ボタンは開閉式 LCD の上部にあります。 スイッチを 「 ON 」 の位置にするとカメラがオンになります。 スイッチを 「 OFF 」 の位置にするとカメラがオフになります。 スイッチを 「 ON 」 の位置にするとカメラがオンになります。 URSA Mini Pro 4.6K はリダンダント電源スイッチにも対応しています。 コントロールパネルの内側にある...
- Page 216 XLR 1 XLR 2 XLR 1 XLR 2 LCD の内側にある 「 REC 」 ボタンと 「 1 フレーム送り」 ボタンを長押しすることでカメラをオン / オフできます。 作業のこつ 電源スイッチがオンになっ ているのに URSA Mini Pro がオフになった場合、 Bluetooth コントロールにより、 あるいは 「 REC 」 ボタンと 「次クリップ頭出し」 ボタンを 長押ししたことで電源がオフになった可能性があります。 電源スイッチをオフ、 オンの 順に切り替えるか、 コントロールパネルの該当ボタンを長押ししてカメラをオンにします。 はじめに...
-
Page 217: Cfast カード
URSA Mini Pro 4.6K を使用している場合、 SD カードに収録することもできます。 CFast カードを使用して 収録するには、 それに応じてカメラを設定する必要があります。 メディアスロットの上部にあるストレージ メディアスイッチを 「 CFAST 」 の位置に設定します。 CFast カードの挿入 : 開閉式モニターを開いて、 CFast スロットにアクセスします。 CFast カードのラベル面をタッチスクリーンに向けて、 所定の位置まで挿入します。 CFast カー ドを取り出すには、 CFast カードのイジェクトボタンを押します。 LCD タッチスクリーンの下方にあるストレージ情報に、 検出された CFast カードの名前と残り収 録時間が表示されます。 Blackmagic URSA Mini は 2 つの CFast スロットを搭載し、 継続的な収録が可能。 メディ アの保存... - Page 218 Lexar Professional 3400x 256GB メモ Blackmagic URSA Mini との使用が認定されている Sandisk CFast 2.0 カードは 「 D シリーズ」 のみです。 これらのカードはカード裏の左下に大きく 「 D 」 と記されていることで見分けがつきます。 さらに分かりやすいようにモデル番号もリストに表示しました。 このモデル番号は地域ごとに多 少の違いがあり、 モデル番号の 「 x 」 が市場により異なります。 例えば、 アメリカでは 「 A 」 、 アジア 太平洋およびヨーロッパでは 「 G 」 です。...
- Page 219 以下の CFast 2.0 カードは、 4K ProRes 422 HQ ( 60fps まで) の収録に推奨されますが、 メーカーが製造 中止しています。 メーカー カード名 ストレージ Lexar Professional 3400x 32GB Lexar Professional 3400x 64GB Lexar Professional 3400x 128GB Lexar Professional 3400x 256GB Blackmagic URSA Mini の対応 CFast カードに関する最新情報は、 Blackmagic Design サポートセンター を参照してください。 www.blackmagicdesign.com/jp/support メディ アの保存...
-
Page 220: Sd カード
SD カード Blackmagic URSA Mini Pro 4.6K は、 CFast 2.0 に加え、 高速の UHS-I および UHS-II タイプの SD カードに も収録可能です。 ハイエンドの SDXC UHS-II カードを使用することで、 ProRes HQ フッテージを Ultra HD コンテンツ用に 2016p で収録できます! SD カードを使用すれば、 HD で圧縮ビデオフォーマットを撮影する場合、 より低価格のストレージメディ アを使用できます。 SDXC および SDHC は、 民生用のスチル / ビデオカメラ用の非常に一般的なメディアス... - Page 221 を Mac OS で使用する場合、 Mac のディスクフォーマットである HFS+ を使用できます。 Windows を使用し ているのであれば、 Windows のディスクフォーマットである exFAT フォーマットを使用してください。 Mac コンピューターでも exFAT フォーマットを読み込めます。 下記の表では、 Blackmagic URSA Mini Pro との使用に推奨される SD カードを紹介します。 定期的に当マ ニュアルの最新バージョンを確認し、 常に新しい情報を入手することをお勧めします。 最新のマニュアル は Blackmagic Design ウェブサイト ( www.blackmagicdesign.com/jp/support ) でダウンロードできます。 メモ...
- Page 222 Exercia Pro UHS-II 270MB/s SDXC 64GB Toshiba Exercia Pro UHS-II 270MB/s SDXC 128GB Toshiba Exercia Pro UHS-II 270MB/s SDXC 256GB Transcend Ultimate UHS-II 180MB/s SDXC 64GB Wise 285MB/s UHS-II SDXC 64GB URSA Mini Pro の対応 SD カードに関する最新情報は、 Blackmagic Design サポートセンターを参照してく ださい。 www.blackmagicdesign.com/jp/support メディ アの保存...
- Page 223 SD カードのロック / 解除 SD カードは書き込み保護、 あるいは 「ロック」 してデータが上書きされるのを防ぐことができます。 SD カードを挿入する際は、 カードが書き込み保護されていないことを確認してください。 書き込み保護を 無効にするには、 カードの左側にあるプラスチックのスイッチをコネクター側に位置するように動かします。 収録が終わったら、 スイッチをスライドして下に戻すことで、 カードの書き込み保護を有効にできます。 LOCK ▼ ロックタブを上下に動かして SD カードをロック / 解除 URSA Mini Pro 4.6K は、 ロックされた SD カードが挿入されると、 LCD タッチスクリーンとストレージメニュー に 「ロック」 アイコンを表示して知らせます。 カードがロックされていると、 ビデオの収録、 スチルのキャプ チャー、...
- Page 224 メモ メディアをフォーマットする前に、 メディアストレージスイッチが SD カードまたは CFast カー ドの適切な方に設定されているか確認することは非常に重要です。 フォーマットする前に、 設定 を常に注意して確認してください。 Blackmagic URSA Mini でメディアを準備する LCD タッチスクリーンの下方にあるストレージインジケーターをタップしてストレージ設定に行 きます。 「 Format Card 1 」 あるいは 「 Format Card 2 」 をタップすると、 スロット 1 、 2 の CFast カードがそ れぞれフォーマットされます。 URSA Mini のストレージ設定でカメラの CFast カードをフォーマット。...
-
Page 225: Blackmagic Ursa Mini Pro 4.6K でメディアを準備する
された場合、 カードをフォーマットできません。 ストレージマネージャーのカード名の隣にロック アイコンが表示されます。 カードのロックを解除してフォーマットし、 収録してください。 SD カード のロックに関する詳細は、 同マニュアルの 「 SD カード」 セクションを参照してください。 Blackmagic URSA Mini Pro 4.6K でメディアを準備する URSA Mini Pro 4.6K でストレージメディ アを準備する手順は、 上述の URSA Mini での手順と全く同じです。 唯一の違いは、 CFast カードに加えて SD カードのフォーマットのオプションがあることです。 カメラのメディ アストレージスイッチは、 SD あるいは CFast に設定できますが、 「 Format Card 」 をタップすると、 選択され... -
Page 226: Mac でメディアを準備
Cards と SD カードストレージの切り替えに関する詳細は、 同マニュアルに前述された 「 SD カード」 セクショ ンを参照してください。 Mac でメディアを準備 Mac OS に同梱されている Disk Utility アプリケーションを使っ て、 カードを HFS+ あるいは exFAT でフォー マットします。 フォーマットすると CFast カード /SD カードのすべてのデータが消去されるので、 重要なデー タは事前にバックアップしてください。 CFast 2.0 あるいは SD リーダー / ライター、 あるいは CFast ドライブを使用して、 CFast カード /SD カードをコンピューターに接続します。... - Page 227 ボリュームラベルを入力して 「 Quick Format 」 を選択し、 「 Start 」 をクリックします。 ストレージメディアがフォーマットされ、 使用できる状態になります。 Windows の Format ダイアログボックス機能を使用して、 CFast/SD カードを exFAT でフォーマット メモ 収録映像にコマ落ちが生じる場合は、 使用しているカードが、 コーデックおよびフレーム サイズに対して弊社の推奨するメディアのリストに含まれているかどうかを確認してください。 データレートを下げるには、 フレームレートまたは解像度を下げるか、 あるいは ProRes などの圧 縮コーデックを使用してください。 最新の情報は、 Blackmagic Design ウェブサイトを参照して ください。 www.blackmagicdesign.com/jp メディ アの保存...
-
Page 228: 収録
収録中にストレージメディ アのスイッチを切り替えると、 現在行っ ている収録が終了した後 にメディ アタイプが切り替わります。 つまり、 テイク中にスイッチが切り替えられても収録にダメー ジを与えることはありません。 コーデック、 解像度、 センサーエリアの選択 Blackmagic URSA Mini は、 lossless RAW 、 圧縮 RAW から選択して、 CinemaDNG RAW コーデックで収録 します。 様々な Apple ProRes 圧縮コーデックも使用できます。 センサー フレームレートのオプションは、 使用するコーデックや解像度によっ て変わります。 RAW 4:1 または RAW 3:1 圧縮を使用して収録したクリップは DaVinci Resolve と互換性がありますが、... - Page 229 最大センサー フレームレート URSA Mini 4K で使用可能なコーデック、 解像度、 最大センサー フレームレートは、 次の表を参照してください。 URSA Mini 4K 解像度 コーデック センサースキャン 最大フレームレート フル 60 (デュアルカード) 4000x2160 Lossless RAW フル 4000x2160 RAW 3:1 フル 4000x2160 RAW 4:1 フル 3840x2160 ProRes 444XQ フル 3840x2160 ProRes 444 フル 3840x2160 ProRes HQ Ultra HD...
- Page 230 URSA Mini 4.6K 、 URSA Mini Pro 4.6K 解像度 コーデック センサースキャン 最大フレームレート ウィンドウ 60 (デュアルカード) 4608x1920 Lossless RAW ウィンドウ 4608x1920 RAW 3:1 ウィンドウ 4608x1920 RAW 4:1 ウィンドウ 4608x1920 ProRes 444XQ ウィンドウ 4.6K 2.4:1 4608x1920 ProRes 444 ウィンドウ 4608x1920 ProRes HQ ウィンドウ...
- Page 231 URSA Mini 4.6K 、 URSA Mini Pro 4.6K 解像度 コーデック センサースキャン 最大フレームレート ウィンドウ 60 (デュアルカード) 3072x2560 Lossless RAW ウィンドウ 3072x2560 RAW 3:1 ウィンドウ 3072x2560 RAW 4:1 ウィンドウ 3072x2560 ProRes 444XQ ウィンドウ 3072x2560 ProRes 444 アナモル フ ィ ック ウィンドウ 3072x2560 ProRes HQ ウィンドウ...
- Page 232 フル 1920x1080 ProRes LT フル 1920x1080 ProRes Proxy Blackmagic URSA Mini で使用したいコーデックと解像度を選択する : コントロールパネルの 「 MENU 」 ボタンを押します。 「 Record 」 タブの最初のページへ行きます。 使用したいコーデック、 品質、 解像度のコンビネーションをタップします。 ウィンドウセンサーエリアで収録したい場合は、 「 Record 」 メニューのページ 2 へ行き、 「 Window Sensor 」 を有効にします。 フルセンサーで収録するにはこの設定をオフにします。 「 MENU 」 を押してメニューを終了します。...
- Page 233 トリガー収録 Blackmagic Video Assist など、 SDI トリガー収録をサポートしている機器と接続している際は、 URSA Mini の SDI 出力から自動的に信号を送信され、 それがトリガーとなっ て収録が開始されます。 つまり、 カメラの 録画ボタンを押すことで、 外部接続している SDI 機器の収録を開始できます。 同様に、 録画ボタンをもう一 度押して収録を停止できます。 URSA Mini から送信されるトリガー信号を受信するには、 使用している機器の SDI トリガー収録機能を有効 にする必要があります。 SDI 機器が SDI トリガー収録に対応している場合は、 通常、 その機器の設定メニュー から同機能を有効にできます。 カメラのトリガー収録機能を使用すれば、 Blackmagic Video Assist などのその他の...
- Page 234 フレーム CFast CinemaDNG CinemaDNG CinemaDNG ProRes ProRes ProRes ProRes ProRes ProRes カード レート RAW 3:1 RAW 4:1 444 XQ 422 HQ 422 LT 422 Proxy 収録時間 収録時間 収録時間 収録時間 収録時間 収録時間 収録時間 収録時間 収録時間 75 分 142 分 175 分 84 分...
- Page 235 3K アナモルフィック * フレーム CFast CinemaDNG CinemaDNG CinemaDNG ProRes ProRes ProRes ProRes ProRes ProRes カード レート RAW 3:1 RAW 4:1 444 XQ 422 HQ 422 LT 422 Proxy 収録時間 収録時間 収録時間 収録時間 収録時間 収録時間 収録時間 収録時間 収録時間 20 分 39 分 48 分...
- Page 236 4K 16:9* フレーム CFast CinemaDNG CinemaDNG CinemaDNG ProRes ProRes ProRes ProRes ProRes ProRes カード レート RAW 3:1 RAW 4:1 444 XQ 422 HQ 422 LT 422 Proxy 収録時間 収録時間 収録時間 収録時間 収録時間 収録時間 収録時間 収録時間 収録時間 17 分 32 分 40 分...
- Page 237 カメラのトランスポートコントロールボタンを使っ て、 撮影したクリップを再生できます。 再生ボタンを押すと録画したビデオが再生され、 URSA Mini の LCD タッチスクリーンで確認できます。 URSA Mini の SDI 出力に接続したディスプレイでもクリップを確認できます。 CFAST URSA Mini カメラ URSA Mini Pro 4.6K カメラ 作業のこつ Blackmagic URSA Mini の再生コントロールボタンとトランスポートコントロールボタ ンは、 内部コントロールパネルとエルゴノミクスパネルの両方にあります。 メモ Blackmagic URSA Mini では、 コーデック、 フレームレート、 解像度が同じであれば、 品質設 定の異なるクリップを再生できます。 再生...
- Page 238 カメラのコントロールは、 CD プレーヤーと同じように操作できます。 「次クリップ頭出し」 ボタンを押すと 次のクリップの頭へ飛びます。 「前クリップ頭出し」 ボタンを 1 回押すと、 現在のクリップの頭に戻り、 2 回 押すと前のクリップの頭に戻ります。 次クリップ / 前クリップの頭出しボタンを長押しすると、 2 倍速で再生 / 巻き戻しします。 倍速の再生 / 巻き戻し中に 「早送り」 あるいは 「巻き戻し」 ボタンを 2 回押すと 4 倍速、 3 回 押すと 8 倍速、 4 回押すと 16 倍速になります。 互換性のあるレンズを使用している場合、 次 / 前クリップの頭 出しボタンを、...
-
Page 239: Ursa Mini の概要
URSA Mini の概要 URSA Mini の右側面とリアパネルには SDI 接続用の業界標準 BNC コネクターが付いています。 また 2 つの 独立した LANC 入力にも対応しており、 1 つはサイドハンドル用、 そしてカメラ後部の 1 つは外部 LANC コ ントローラー用です。 トップパネルのマウントポイントの後方に XLR 入力が付いており、 URSA Mini および URSA Mini Pro 4.6K でプロ仕様バランスアナログオーディオ、 URSA Mini Pro 4.6K で AES デジタルオーディオ入力に使用でき ます。... -
Page 240: Ursa Mini - 左側面
自動ホワイトバランス 自動ホワイトバランスボタン ( Auto W/B ) は、 現在スクリーンの中央にあるものに基づいてホワ イトバランスを設定するときに使用します。 例えば、 レンズの正面にグレーのカードなどを置いて 自動ホワイトバランスを設定します。 詳細は、 「 URSA Mini Pro 4.6K コントロールボタン」 セクシ ョンを参照してください。 URSA Mini – 左側面 URSA Mini の左側面では、 CFact カードの挿入、 コントロールパネルへのアクセス、 設定の変更が可能です。 USB ポートは CFast スロットのすぐ上にあり、 URSA Mini の内部ソフトウェアをアップデートする際に簡単 にコンピューターに接続できます。 開閉式タッチスクリーン... - Page 241 URSA Mini Pro 4.6K モデル。 開閉式タッチスクリーンを閉じた状態。 電源 カメラをオンにする電源。 開閉式モニターの内側にバックアップスイッチがあり、 「 REC 」 ボタンと 「 1 フレーム送り」 ボタンを同時に長押しすることでカメラの電源をオンにできます。 ND フィルター URSA Mini は、 3 つのニュートラル・デンシティ ・ フィルターを内蔵しており、 センサーに届く光量 を調整できます。 クリアから 6 ストップの光量削減まで、 4 つの設定が使用できます。 このホイー ルを回すだけで設定を選択できます。 設定を変えるごとに該当のフィ ルターが定位置に収まります。 詳細は、 このマニュアルの 「 URSA Mini Pro 4.6K コントロールボタン」 セクションを参照して ください。 前方コントロールパネル...
- Page 242 Blackmagic URSA Viewfinder 、 Blackmagic URSA Studio Viewfinder 、 外部モニター、 その他の アクセサリに電源を供給する 4 ピン XLR コネクター。 詳細は 「 Blackmagic URSA Viewfinder 」 お よび 「 Blackmagic URSA Studio Viewfinder 」 セクションを参照してください。 LANC 入力 Blackmagic URSA Mini サイドハンドル専用の 2.5mm TRS LANC コネクター。 サイドハンドルの 接続に関する詳細は、 「はじめに」 セクションを参照してください。 放送用レンズコントロールコネクター 12 ピン接続に対応した互換 PL/B4 マウントレンズに電源およびコントロール信号を送信します。...
- Page 243 始 / 停止コントロールなど。 LANC は、 録画開始 / 停止、 アイリス、 フォーカスコントロール (互換性 のある EF レンズ) に対応。 12G-SDI 出力 Blackmagic URSA Mini の 12G-SDI 出力は、 ルーター、 モニター、 SDI キャプチャーデバイス、 放送 スイッチャーなどの SDI デバイスに、 HD 、 Ultra HD ビデオを送信します。 12G-SDI 出力を Blackmagic Video Assist などの外部レコーダーに接続すれば、 バックアップ収録が可能です。...
- Page 244 12V+ 電源入力 4 ピンの 12-20V XLR コネクターを使っ て、 同梱の電源アダプターやポータブルバッテリーなどの 外部ソース電源に接続します。 ヘッドフォン / ヘッドセット ヘッドフォンモニタリングおよびトークバック用の 3.5mm ジャック出力。 iPhone 、 Android と互換 性があり、 トークバック用にマイクを内蔵したヘッドセットを接続できます。 トークバックオー ディオは、 SDI 出力のチャンネル 15 および 16 にエンベッドされます。 トップパネル 1/4 インチマウントポイント カメラのトップパネルには 4 つの頑丈なマウントポイントがあり、 トップハンドルやアクセサリ を取り付けられます。 外部アナログオーディオは、 トップパネルの バランス...
-
Page 245: Ursa Mini コントロール
Blackmagic URSA Mini 左側面の開閉式モニターの裏にはコントロールパネルがあり、 設定の変更やオー ディオレベルのコントロールに必要なすべてのボタンと調整ノブが搭載されています。 オーディオレベルは、 LCD タッチスクリーンのオーディオメーターでモニタリングできます。 CFAST 内側のコントロールパネルボタンとタッチスクリーンでカメラ設定を調整。 コントロールボタン 内側のコントロールパネルに加え、 Blackmagic URSA Mini の LCD の外側およびサイドハンドルにはコン トロールボタンがあります。 これらのアイリス、 フォーカス、 録画 / 再生ボタンは、 すべて同一の機能です。 外側のパネルボタンでは、 クリップの収録 / 再生、 フォーカスピーキングのオン / オフの切り替え、 LCD のプログラム / カメラ表示の切り替え、 互換レンズ使用時のアイリス / 自動フォーカスの 調整が可能です。 アイリス... - Page 246 制作中には行わないことが重要です。 メニュー 「 MENU 」 ボタンを押すとダッシュボードが開きます。 ダッシュボード機能と設定の調整に関す る詳細は、 「設定」 セクションを参照してください。 収録 録画ボタンは、 Blackmagic URSA Mini のコントロールパネルおよび開閉式 LCD 、 サイドハンドル で 「 REC 」 と表示されているボタンです。 いずれかの録画ボタンを押すと、 収録を開始 / 停止でき ます。 詳細は、 「収録」 のセクションを参照してください。 再生コントロールボタン 再生コントロールボタンで再生の開始 / 停止、 次 / 前のクリップの頭出しが可能です。 Blackmagic URSA EF では、...
- Page 247 CFAST オーディオレベル調整ノブを時計回り / 反時計回りに回すと、 オーディオ収録レベルを上げ / 下げできます。 機能ボタン Blackmagic URSA Mini の LCD の外側に、 「 F1 」 および 「 F2 」 の 2 つの機能ボタンが付いています。 URSA Mini の 「 Setup 」 メニューを使い、 よく使用する機能をこれらのボタンにマッピングできます。 詳細は、 同マニュアルの 「セットアップ設定」 セクションを参照してください。 サイドハンドル Blackmagic URSA Mini には出荷時にサイドハンドルが同梱されています。 サイドハンドルを使用すると...
- Page 248 ハンドルの取り付け URSA Mini のサイドハンドルの取り付けは簡単です。 ハンドルの右側にあるプラスチック製のキャップを開くと締め付けネジがあります。 ハンドルを URSA Mini 側面のロゼットマウントに揃えます。 ハンドルを希望の位置に留め、 大き めのマイナススクリュードライバー、 あるいは D リングを使っ てサイドハンドルのネジをきつく締 めます。 プラスチック製のキャップを閉めます。 Blackmagic URSA Mini のサイドハンドルの取り付け URSA Mini には短い LANC ケーブルが同梱されており、 サイドハンドルのボタンを使ってカ メラをコントロールできます。 サイドハンドルの LANC 出力から LANC ケーブルをカメラの LANC 入力に接続します。 URSA Mini コントロール...
-
Page 249: Ursa Mini Pro 4.6K コントロールボタン
URSA Mini Pro 4.6K コントロールボタン Blackmagic URSA Mini Pro 4.6K は、 筐体、 そして開閉式タッチスクリーンモニターの外側および内側に コントロールパネルを搭載しており、 すべての重要な機能およびパワフルなモニタリングツールにすばや く簡単にアクセスできます。 これらのパネルは三脚、 ハンドヘルド、 あるいはショルダーマウントキットで の撮影で、 指先で使用できるように設計されています。 前方コントロールパネル URSA Mini Pro 4.6K の前方コントロールパネルには、 撮影 / 収録のセットップ中に調整が必要なコント ロールがすべてまとめられています。 ショルダーマウントキットを使い、 開閉式モニターを閉じて撮影し ている場合などに簡単にアクセスできるよう設計されています。 URSA Mini Pro 4.6K 前方コントロールパネル 電源スイッチ... - Page 250 ND フィルター URSA Mini は、 3 つのニュートラル・ デンシティ ・ フィルターを内蔵しています。 「クリア 」 フィルターの 他、 「 2 」 、 「 4 」 、 「 6 」 ストップの設定を選択できます。 これらのフィルターを使用することで、 URSA Mini のセンサーに入る光量を、 露出 「ストップ」 のプリセッ トに基づいて削減できます。 露出を減らす ことで、 野外や晴れた日など明るい環境での撮影において、 ワイドアパーチャーで撮影を続 けることができます。 ニュートラル・ デンシティ設定を調整するには、 ホイールを回転させます。 「クリア 」 設定は、 ND フィ ルターが使用されていない状態です。...
- Page 251 メニューホイール URSA Mini のフロント SDI 出力で 「ステータステキスト」 をオンにしている場合、 通常は LCD タッ チスクリーン経由でアクセスする多くのヘッドアップディスプレイ機能を、 メニューホイールを使 っ てナビゲートできます。 メニューホイールをボタンのように押すと、 Blackmagic SmartView 、 Video Assist 、 URSA Viewfinder などの外部モニターで URSA Mini Pro 4.6K のヘッドアップディスプレイにアクセスで きます。 メニューホイールを押し、 有効にしてホイールを回すと、 LCD モニターオプション、 フレー ムレート、 ISO 、 ホワイトバランス、 ティントなどの機能を選択できます。 ホイールを押して選択を 確定し、...
- Page 252 ジェクト フレームレートを切り替えられます。 この設定を変更できるのは、 収録を停止している時 だけです。 プロジェクト フレームレートおよびオフスピードフレームレートに関する詳細は、 同マニュ アルの 「タッチスクリーンコントロール」 セクションを参照してください。 収録 録画ボタンは、 Blackmagic URSA Mini Pro 4.6K の左側面で 「 REC 」 と表示されているボタンです。 録画ボタンを押すと、 収録を開始 / 停止できます。 詳細は、 「収録」 のセクションを参照して ください。 エルゴノミクスパネル URSA Mini Pro 4.6K のタッチスクリーンモニターの外側に LCD ステータスモニターと様々なコントロール が付いています。 このパネルではカメラのステータス情報を一目で確認でき、 オーディオレベルのモニタ...
- Page 253 モニタースピーカー コントロールパネルの外側に付いている小型スピーカーで、 撮影中にオーディオを聴くことがで きます。 このスピーカーはカメラを肩乗せで撮影する時に、 耳の高さに合うよう配置されています。 スピーカーのボリュームを調整するには、 「 URSA Mini Pro 4.6K コントロールボタン」 セクション に記載されているように、 設定ホイールを回します。 モニターチャンネル選択 URSA Mini Pro 4.6K は現在 2 つのオーディオチャンネルに対応しています。 将来的なソフトウェ アアップデートで 4 チャンネル ( 2 ペア) まで使用できるようになる予定です。 このスイッチを使用 して、 LCD ステータス表示とモニタースピーカーでモニターできるペアを選択できるようになります。 ロック このスイッチを使うと、 URSA Mini Pro 4.6K のエルゴノミクスパネルのすべての設定をロックで きます。...
- Page 254 ‚ バッテリーインジケーター URSA Mini Pro 4.6K をバッテリー稼働している場合、 同インジケーターがバッテリー残量を 25 % 刻みで表示します。 バッテリーインジケーターの 4 つのバーは 25 %のバッテリー残量に対応して います。 バッテリー残量が 20 %以下になると、 録画ボタンの近くにあるステータス LED が点滅し 始めます。 収録中は赤とオレンジが交互にゆっくり点滅し、 スタンバイモードでは白とオレンジ が交互に点滅します。 メイン電源で稼働している場合は、 このインジケーターは表示されません。 ‚ FPS 、 シャッターアングル、 ホワイトバランス 「 FPS 」 、 「 SA 」 、 「 WB 」 インジケーターは、 カメラの現在のフレームレート、 シャッター アングル、 ホワイ トバランスと表示します。...
- Page 255 ステータス LCD コントロール URSA Mini Pro 4.6K ステータス LCD コントロール スチル 「 STILL 」 ボタンを押すとスチルイメージを単一の非圧縮 DNG フレームとしてキャプチャーでき ます。 イメージファイルは、 現在収録しているメディアのルートディレクトリにある 「 Still 」 フォル ダーに保存されます。 これらはビデオクリップのファイル名定義に従いますが、 ファイル名の末 尾の 4 桁は、 「スチル番号」 を意味する 「 S001 」 になります。 カメライメージが URSA Mini タッチス クリーンの右上に表示され、...
- Page 256 コントロール / 再生ボタン URSA Mini Pro 4.6K コントロール / 再生ボタン アイリス 「 IRIS 」 ボタンは、 互換性のある EF レンズで自動アパーチャー設定をオンにします。 Video ダイナ ミックレンジを使用している場合、 「 IRIS 」 ボタンを 1 回押せば、 ショットのハイライトおよび暗部 に基づいた平均の露出が適用されます。 Film ダイナミックレンジ設定を使用している場合、 「 IRIS 」 ボタンを押せば、 ショットの最も明るいハイライトに露出が適用されます。 このボタン互換性の ある放送レンズコントローラーに接続した互換性のある EF/PL レンズと機能します。 アパーチャーをマニュアルで設定するには、...
- Page 257 オーディオレベル調整ノブ 内蔵の調整ノブでオーディオチャンネル 1 、 2 の収録レベルを設定します。 各ノブを時計回り / 反時 計回りに回すと、 各オーディオチャンネルの収録レベルを上げ / 下げできます。 各ノブを調整しなが らオンスクリーンの対応するオーディオメーターを確認できるので、 最適なレベルに設定できます。 URSA Mini Pro 4.6K のオーディオ調整ノブ 内部コントロールパネル URSA Mini Pro 4.6K の開閉式モニターが開いている時、 内部コントロールパネルにアクセスできます。 このコントロールは、 オーディオ入力の設定およびファンタム電源設定、 アイリス、 フォーカス、 メニュー、 再生コントロールなどに使用します。 XLR 1 XLR 2 XLR 1 XLR 2 URSA Mini Pro 4.6K 内部コントロールパネル...
- Page 258 メモ XLR ケーブルはファンタム電源をオンにする前に接続してください。 ファンタム電 源を使ったマイクを接続していない場合は必ずファンタム電源をオフにすることが重要 です。 カメラの XLR オーディオ入力からのファンタム電源を供給中に、 ファンタム電源保 護が AES XLR 出力に内蔵されていないデバイスを接続すると機器が破損する原因とな ります。 マイクを取り外す際は、 必ず +48V がオフになっ ているのを確認してください。 コントロール / 再生ボタン フォーカス EF マウントで電子フォーカス調整に対応する EF レンズを使用している場合、 「 FOCUS 」 ボタンを 押すと自動フォーカス機能がオンになります。 開閉式モニターに、 白いフォーカス ・ スクエアが表 示されます。 スクエアの内側にあるものに正確にフォーカスが合います。 レンズがフォーカスさ れると、...
- Page 259 メニュー 「 MENU 」 ボタンを押すとダッシュボードが開きます。 ダッシュボード機能と設定の調整に関す る詳細は、 「設定」 セクションを参照してください。 収録 いずれかの 「 REC 」 ボタンを押すと、 収録を開始 / 停止できます。 詳細は、 「収録」 セクション を参照してください。 再生コントロールボタン 再生コントロールボタンで再生の開始 / 停止、 次 / 前のクリップの頭出しが可能です。 EF マウント で互換性のある EF レンズを使用している場合、 次 / 前クリップの頭出しボタンを、 アイリスの開閉 XLR 1 XLR 2 ボタンとしても使用できます。...
-
Page 260: タッチスクリーンコントロール
タッチスクリーンコントロール タッチスクリーン Blackmagic URSA Mini の 5 インチ開閉式 LCD タッチスクリーンは、 ピボットに対応しており、 高 / 低アング ルでの撮影が可能です。 LCD を閉じてショルダーマウントで URSA Viewfinder を使っ ている場合は、 LCD パネルの外側にあるボタンを使っ て、 URSA Mini をコントロールできます。 タッチスクリーンの機能 LCD タッチスクリーンは、 スピーディかつ直感的な操作を可能にするよう設計されたタッチ / ジェスチャー ベースのインター フェースに対応しています。 URSA Mini の LCD タッチスクリーンの異なるエリアをタッチ / スワイプすることで、... - Page 261 LCD モニターオプションでゼブラアイコンをタップすると URSA Mini のゼブラ設定にアクセスできます。 LCD タッチスクリーンでゼブラを切り替えるには、 「 Zebra 」 タブで、 スクリーン左下のスイッチアイ コンをタップします。 スライダーを左右にドラッグするか、 あるいはゼブラレベルパーセンテージの左右にある矢印ボタンを タップして、 ゼブラが表示された露出レベルを設定します。 ゼブラレベルは露出 75 ~ 100 %間で 5 % ずつ調整できます。 カメラのフロント / メイン SDI 出力でのゼブラの使用に関する詳細は、 同マニュアルの 「モニター設定」 セ クションを参照してください。 作業のこつ 少し雲がかった日の屋外撮影など照明環境に変化がある場合は、 ゼブラレベルを 100 未満に設定することで露出過多の注意を表示できます。 フォーカスアシスト ( Focus Assist ) フォーカスアシスト設定は、...
- Page 262 フレームガイド ( FRAME GUIDES ) フレームガイド設定は、 LCD タッチスクリーン上のフレームガイド表示を切り替えます。 URSA Mini のすべ ての出力用に 7 つのフレームガイドオプションから選択できます。 フレームガイドには、 様々な映画、 テレビ、 オンライン標準のアスペクトレシオが含まれます。 LCD モニターオプションでフレームガイドアイコンをタップすると URSA Mini のフレームガイド設定にアクセスできます。 URSA Mini の LCD タッチスクリーンでフレームガイドの表示を切り替えるには、 スクリーン左下のスイッチ アイコンをタップします。 スライダーを左右にドラッグするか、 現在選択されているアスペクトレシオの横の矢印ボタンをタップして、 使用したいフレームガイドを選択します。 選択できるガイド: ‚ 2.35:1 、 2.39:1 、 2.40:1 フラット ・ ワイドスクリーンのアスペクトレシオを表示します。 アナモルフィック、 あるいはフラッ ト...
- Page 263 ‚ 4:3 4:3 のアスペクトレシオを表示します。 SD テレビスクリーンと互換。 2x アナモフィックアダプターを使 用している場合、 フレーミングをサポート。 作業のこつ フレームガイドオーバーレイの透明度は変更が可能です。 詳細は、 このマニュ アルの 「モニター設定」 セクションを参照してください。 メモ カメラのフロント / メイン SDI 出力でのフレームガイドの使用に関する詳細は、 このマニュアルの 「モニター設定」 セクションを参照してください。 グリッド ( GRIDS ) グリッド設定は、 LCD タッチスクリーン上の 3x3 グリッド、 十字線、 センタードットの表示を切り替え、 すべての URSA Mini 出力で使用するオーバーレイを設定できます。 LCD モニターオプションでグリッドアイコンをタップすると...
- Page 264 3x3 グリッドのグリッドはスクリーンのフレームガイドに合わせて自動的に調整されます。 ‚ 3x3 グリッド 3x3 グリッド ( Thirds ) は、 縦横各 2 本のラインで画面を均等に 3 分割する 3x3 グリッドを表示しま す。 3x3 グリッドは非常にパワフルなツールで、 ショットの構成をサポートします。 例えば、 人間の 目は一般的に、 ラインが交わるポイントの近くで起こるアクションに注目するので、 3x3 グリッド設 定は、 これらのエリアに重要なポイントを置くサポートになります。 俳優の目は一般的にスクリー ンの上から 1/3 のラインにフレーミングされるので、 上の横ラインをフレーミングガイドとして使用 できます。 3x3 グリッド設定は、 別々のショットでフレーミングの一貫性を保つのに役立ちます。 ‚ 十字線 十字線...
- Page 265 ポスト プロダクションでショットがスタビライズされ、 イメージの端がクロップされることが分かっ ている ような場合、 セー フエリアガイドはショットのフレーミングにも役立ちます。 またセー フエリアで特定のク ロップを表示することもできます。 例えば、 Ultra HD 3840x2160 の収録中にセー フエリアを 50 %に設定 すると、 1920x1080 のフレームクロップがどのように見えるか確認できます。 セー フエリアガイドは、 フレー ムガイドに合わせて調整されます。 選択したターゲット フレームのパーセンテージに調整されます。 The 'safe area' indicator set to 85% LCD タッチスクリーンでセー フエリアガイドを切り替えるには、 「 Safe Area Guides 」 タブで、 スクリーン 左下のスイ...
- Page 266 業界で一般的に使用されているフレームレートを選択できます。 通常、 このフレームレートは、 ポスト プロダクション ・ ワークフローで使用する再生スピードに合わせて設定します。 Blackmagic URSA Mini は、 23.98 、 24 、 25 、 29.97 、 30 、 50 、 59.94 、 60fps の、 8 つのプロジェク ト フレームレート設定に対応しています。 「 FPS 」 メニューで URSA Mini のプロジェクト フレームレートを調整するには、 タッチスクリーン...
- Page 267 センサー フレームレート ( Sensor Frame Rate ) センサー フレームレートは、 毎秒、 センサーから収録される実際のフレーム数を設定します。 このフレームレートは、 設定したプロジェクトフレームレートでの、 ビデオのファ スト / スロー 再生に影響します。 「 OFF SPEED FRAME RATE 」 を有効にして、 センサー フレームレートの横の矢印をタップ、 あるいはスライダーを動かして調整。 URSA Mini のプロジェクト フレームレートとセンサー フレームレートは自然な再生速度で一致す るデフォルト設定になっています。 しかし、 URSA Mini の 「 FPS 」 メニューの右下にある 「 OFF SPEED FRAME RATE 」...
- Page 268 シャッター シャッターインジケーターは、 シャッターアングルを表示します。 このインジケーターをタップすると、 URSA Mini のシャッターアングルをマニュアルで変更したり、 シャッターの自動露出モードを設定できます。 URSA Mini のシャッターインジケーター タップしてシャター設定にアクセスできます。 シャッターアングルはビデオのモーションブラーのレベルを決定します。 また、 照明条件の変動を補うた めにも使用できます。 ほとんどの条件下では、 十分なモーションブラーをキャプチャーするには、 180 度 が最適なシャッターアングルです。 しかし、 照明条件が変更したり、 シーン中の動きが増えたりする場合 には調整が必要です。 例えば、 シャッターアングル 360 度は露光が最大限で、 センサーの光量を最大限に活かせます。 これは、 低照明条件でシーン中の動きが僅かな場合の撮影に最適です。 あるいは、 動きの多いシーンを撮影して いる場合は、 90 度などの狭いシャッターアングルで、 モーションブラーを最低限に抑えたシャープでく っ きりした画像が得られます。 メモ...
- Page 269 野外で撮影している場合、 あるいはフリッカーの生じない照明を使用している場合、 スクリーンの左下に ある現在のシャッターインジケーターをダブルタップすると、 シャッターアングルをマニュアルで選択で きます。 キーパッドが表示されるので 5 ~ 360 度間でシャッターアングルを設定します。 野外での撮影時、 フリッカーの生じない照明下での撮影時に、 マニュアルシャッターキーパッドを使ってシャッターアングルを入力。 URSA Mini には 3 つのシャッターベース自動露出モードがあります。 これらを選択するには、 シャッター メニューの一番右にある 「 AUTO EXPOSURE 」 をタップします。 シャッター 露出とアパーチャーを維持したままシャッタースピードを自動調整します。 固定の被写界深度を 維持したい場合に選択してください。 シャッターを自動調整すると、 モーションブラーに影響が ある場合があります。 屋内撮影で使用する様々な照明器具によっ てフリッカーが生じる場合が あるので注意してください。 自動露出に 「 Shutter 」 を選択すると、 URSA Mini の自動アイリス機 能は使用できません。...
- Page 270 アイリス ( IRIS ) アイリスインジケーターは、 現在のレンズアパーチャーを表示します。 このインジケーターをタップすると、 互換性のあるレンズのアパーチャーを変更したり、 アイリスベースの自動露出モードを設定できます。 URSA Mini のアイリスインジケーター。 タップしてシャター設定にアクセスできます。 メモ アイリスを LCD タッチスクリーンで調整するには、 カメラ経由でアパーチャーを変更できる レンズが URSA Mini に装着されている必要があります。 B4/PL レンズを放送用 12 ピンコネクター で URSA Mini に接続して使用する場合は、 ハンドグリップのレンズアイリススイッチが 「 A 」 また は 「 Auto 」 に設定されていることを確認してください。 アイリスインジケーターを...
- Page 271 作業のこつ 自動露出はビデオ / フィルムプロダクション用に設計された互換性のある B4/PL レン ズでスムーズに機能します。 EF レンズでは、 アパーチャーが変更されると露出が段階的に変わっ ていくのが分かります。 この理由から、 URSA Mini EF で撮影を行う場合は自動露出モードをシャッ ターに設定することをお勧めします。 継続時間表示 URSA Mini の LCD タッチスクリーンの上部で、 カメラの継続時間表示を確認できます。 URSA Mini の継続時間表示。 収録中は赤くなります。 残り時間表示は、 タイムコードカウンターを表示するので、 クリップの長さを確認したり、 収録 / 再生中に タイムコードをモニタリングしたりできます。 カウンターはタイムシーケンスを、 時間: 分 :秒: フレーム数 で表示し、...
- Page 272 URSA Mini の ISO インジケーター。 タップして ISO 設定にアクセスできます。 ISO メニューで、 LCD タッチスクリーンの下側に URSA Mini の ISO 設定が表示されます。 状況に応じて、 低い / 高い ISO 設定を選択してください。 例えば、 照明量が少ない条件下では URSA Mini 4.6K でも ISO 1600 が適する場合もありますが、 目に見えるノイズが発生する可能性があります。 照明量が多 く明るい場合は、 ISO 200 に設定すると、 よりリッチなカラーが得られます。 ホワイトバランス ホワイトバランスは、...
- Page 273 さらにイメージの調整が必要な場合は、 ティントを調整します。 ティントは、 イメージ内のグリーンとマゼ ンタのミックスを調整します。 例えば、 少量のマゼンタを加えることで、 多くの蛍光灯に見られるグリーン の色味を相殺できます。 多くの URSA Mini のホワイトバランスプリセットには、 ティントが含まれています。 URSA Mini のホワイトバランス / ティントインジケーターをタップすると 5 つのプリセット、 ホワイトバランスインジケーターおよびスライダー (左) 、 ティントインジケーター (右) に アクセスできます。 これらを調整して、 各照明条件にあったホワイトバランスをカスタム設定します。 ホワイトバランスメニューで、 スクリーンの右下にカメラの現在のティント設定が表示されます。 ティント を調整するには、 ティントインジケーターの左右にある矢印をタップ / 長押しします。 1 単位のインクレメン トで、 -50 ~ +50 の幅で調整できます。 矢印を長押しするとスピーディに調整できます。 メモ...
- Page 274 電源 URSA Mini の電源状況は、 LCD スクリーンの右上に表示されます。 状況によって 4 つのインジケーター があります: URSA Mini の電源インジケーターは、 LCD スクリーンの右上に表示されます。 バッテリー電源の 使用時にインジケーターをタップすると 「ボルテージ」 と 「パーセンテージ」 表示を切り替えます。 URSA Mini が主電源に接続されている場合に表示されます。 正確なパーセンテージに対応したバッテリーおよびプレートを使用し ており、 バッテリー表示が 「パーセンテージ」 に設定されている場合、 パーセンテージ このインジケーターはバッテリーレベルをパーセンテージで表示します。 残り 20 %を切るとインジケーターは赤くなります。 バッテリー表示が 「パーセンテージ」 に設定されていても、 バッテリー プレートとバッテリーが正確なパーセンテージ情報に対応していな バッテリーバー ければ、...
- Page 275 ヒストグラム表示の左側はシャドウ (ブラック) で、 右側はハイライト (ホワイト) になります。 レンズアパー チャーを閉じたり開いたりすると、 ヒストグラム上の情報が左右に動く ことを確認できます。 これを使い、 イメージのシャドウ / ハイライトのクリッピングをチェックできます。 ヒストグラムの左右の端がなだらかに 下降せず、 急に途切れているのであれば、 ハイライトあるいはシャドウのディテールが損なわれています。 メモ タッチスクリーンの左下にヒストグラムが表示されない場合は、 LCD モニター設定がコー デックと解像度を表示する設定になっ ている場合があります。 詳細は、 このマニュアルの 「モニ ター設定」 セクションを参照してください。 録画ボタン URSA Mini のタッチスクリーンの下側、 ヒストグラムの隣に丸いグレーのボタンがあります。 これは 「録画」 ボタンです。 このボタンを 1 度タップすると録画が開始し、 もう 1 度タップすると停止します。 収録中、 この ボタンと...
- Page 276 メモ コマ落ちが検出された場合に収録を停止するすよう URSA Mini を設定することも可能です。 こうすることで、 コマ落ちインジケーターに気づかないまま収録を続け、 使用できないフッテー ジのために時間を無駄にすることが避けられます。 詳細は、 このマニュアルの 「収録設定」 セク ションを参照してください。 残り収録時間 URSA Mini のタッチスクリーンの下側に CFast カードのインジケーターが表示されます。 CFast カードが挿入されている場合、 スクリーンの下側にあるストレージインジケーターが、 カードの残り 収録時間を表示します。 残り収録時間は、 分で表示され、 選択したフレームレートやコーデックにより変わ ります。 これらの設定を変更した場合、 インジケーターは自動的に残り時間を計算し直します。 カードの残り収録 時間が約 5 分になると、 インジケーターの文字が赤くなり、 残り 2 分になると断続的に点滅します。 カード の容量が一杯になると...
- Page 277 またこのメニューから CFast カードをフォーマットできます。 URSA Mini を使った CFast カードのフォーマッ トに関する詳細は、 同マニュアルの 「 Blackmagic URSA Mini で CFast カードを準備する」 セクション を参照してください。 作業のこつ ストレージメニューでカード名をタップして、 カードをアクティブなカードとして設定 できます。 URSA Mini はこのカードに先に収録します。 オーディオメーター ピークオーディオメーターは、 内部マイ クを使用している場合はチャンネル 1 、 2 、 外部オーディオを接続して いる場合は外部オーディオのオーディオレベルを表示します。 単位は dBFS で表示され、 ピークホールド ・イ...
- Page 278 ダブルタップしてズーム LCD タッチスクリーンをダブルタップすると、 URSA Mini のプレビューイメージのあらゆるパーツを拡大で きます。 タップしたエリアが拡大され、 LCD タッチスクリーンを指でドラッグしてイメージを動かすことが できます。 この機能はフォーカスを確認する際に役立ちます。 画面を元に戻すには、 カメラのタッチスク リーンを再度ダブルタップします。 ズームインしている際、 LCD タッチスクリーンの左上にあるインジケーターに、 イメージのどの部分を見ているかが表示されます。 スマートフォンやタブレットと同様に、 スクリーンを指でドラッグしてイメージを動かすことができます。 フルスクリーンモード ショットのフレーミングやフォーカス合わせの際に、 URSA Mini の LCD タッチスクリーンを上下にスワイプ することで、 一時的にタッチスクリーンのステータス情報やメーターを隠すことができます。 収録インジ ケーター、 フレームガイド、 グリッド、 フォーカスアシスト、 ゼブラ表示は残ります。 URSA Mini の LCD タッチスクリーンを上下にスワイプして、 ステータス情報を隠します。...
- Page 279 LCD タッチスクリーンを使用している場合、 「再生」 ボタンを 1 度押すと再生を開始し、 再び押すと一時停止し ます。 早送り / 巻き戻しボタンは、 CD プレーヤーと同様に使用できます。 「早送り」 を 1 度タップすると次のクリッ プへ飛び、 「巻き戻し」 を 1 度タップすると現在のクリップの頭に飛びます。 「巻き戻し」 を 2 度タップすると前の クリップの頭に飛びます。 ループアイコンを有効にすることで、 クリップの再生をループさせることもできます。 巻き戻し、 再生、 早送りボタン、 ループアイコン 早送り / 巻き戻しボタンを長押しすると早送り / 巻き戻しできます。 これは、 フッテージを通常スピードの 2 倍速で早送り...
-
Page 280: 設定
設定 ダッシュボード URSA Mini の 「 MENU 」 コントロールボタンを押すと、 カメラのダッシュボードが表示されます。 これは URSA Mini のヘッドアップディスプレイからはアクセスできない設定を含むタブメニューです。 設定は、 機能に 「収録 ( RECORD ) 」 、 「モニター ( MONITOR ) 」 、 「オーディオ ( AUDIO ) 」 、 「設定 ( SETUP ) 」 、 「プリセット (... - Page 281 例えば、 ProRes HQ を使っ て Ultra HD クリップを収録したい場合、 「コーデックおよび品質」 メニューで 「 ProRes 」 、 「 HQ 」 を選択します。 その後、 解像度メニューで 「 Ultra HD 」 を選択します。 メモ Blackmagic URSA Mini は、 4.6K モデルで HD ~ 4.6K 、 4K モデルで HD ~ 4K の幅広 い Cinema DNG/Apple ProRes 解像度をサポートしています。 収録設定 2 収録設定タブの...
- Page 282 般的に使用されているフレームレートを選択できます。 例えば、 4K ProRes HQ で 23.98fps を選択できます。 通常、 このフレームレートは、 ポスト プロダクション ・ ワークフローとデリバリーの再生スピードおよびオ ーディオ同期に合わせて設定します。 Blackmagic URSA Mini は、 23.98 、 24 、 25 、 29.97 、 30 、 50 、 59.94 、 60fps の、 8 つのプロジェクト フレーム レート設定に対応しています。 設定...
- Page 283 「フルのカード」 設定は、 ストレージカードが使用されているパーセンテージに基づい ており、 カードのサイズや使用しているデータ量に基づくものではありません。 2 枚のカードに RAW 収録 ( Record RAW on 2 Cards ) Blackmagic URSA Mini は、 2 枚の CFast カードに同時に収録することで、 高フレームレートの CinemaDNG RAW クリップ収録が可能です。 同設定が有効になっ ており 2 枚のカードがある場合、 URSA Mini は両方の カードに収録します。 CFast カードが 1 枚しか挿入されていない場合、 カメラは選択されたフレームレート...
- Page 284 収録設定 3 収録設定タブの 3 ページ目には以下の設定が含まれます。 タイムラプス ( TIMELAPSE ) 同設定は、 スチルフレームを以下のインターバルで自動的に撮影するタイムラプスを設定します。 ‚ フレーム 2 - 10 ‚ 秒 1 - 10 、 20 、 30 、 40 、 50 ‚ 分 1 - 10 例えば、 10 フレーム、 5 秒、 30 秒、 5 分ごとにスチルフレームを撮影するように設定可能です。 タイムラプス機能を使用することで、...
-
Page 285: モニター設定 ( Monitor
この設定は、 ポスト プロダクションを行う時間がなく、 イメージをライブでオンエアしたい場合に役立ち ます。 後にポスト プロダクションに持ち込む予定がある場合は、 この設定は 「 Off 」 にしておくことをお勧 めします。 この理由から、 ポスト プロダクションでの処理を目的としている RAW ファイルにはシャープニ ングは適用されません。 コマ落ち発生時に収録を停止 ( STOP REC IF CARD DROPS FRAMES ) コマ落ちが検出された時の URSA Mini の対処を設定できます。 同設定がオフになっ ているとコマ落ちが 検出されても収録を続けます。 同設定がオンになっ ていると、 コマ落ちが検出された際に収録を停止します。 これにより、 使用できないフッテージを収録してしまうことがなくなり、 時間を節約できます。 作業のこつ... - Page 286 LCD 、 フロント SDI 、 メイン SDI のモニター設定 1 LCD 、 フロント SDI 、 メイン SDI モニタータブの最初のページには、 各出力に同一の設定が含まれています。 例えば、 ゼブラ機能を LCD スクリーンではオンにして、 フロント SDI およびメイン SDI ではオフに設定する ということが可能です。 クリーンフィード ( CLEAN FEED ) LCD 、 フロント SDI 、 メイン SDI メニューで 「クリーンフィード」 スイ ッチをタップすると、 該当出力で、 収録タリーインジケーターを除くすべてのステータステキスト、...
- Page 287 URSA Mini で有効な 3D LUT がある場合、 同設定を使えば、 LCD タッチスクリーン、 フロント SDI 、 メイン SDI 出力に個別に LUT を適用できます。 メモ 3D LUT のロード / 使用に関する詳細は、 同マニュアルの LUT セクションを参照し てください。 ゼブラ ( Zebra ) LCD 、 フロント SDI 、 メイン SDI メニューで 「ゼブラ」 スイッチをタップすると、 これらの出力でゼ ブラガイドを使用できます。...
- Page 288 イメージの周辺テキスト ( TEXT SURROUNDS IMAGE ) この設定は URSA Mini 4K および URSA Mini 4.6K モデルのみで使用可能です。 LCD メニューで 「イメージの周辺テキスト」 スイッチをタップすると、 LCD タッチスクリーンのイメージが 75 %に スケールダウンします。 上部および底部のステータスインジケーターと切り離された形で、 LCD タッチスクリーンの中央にイメージが表示されるので、 ステータステキストをスクリーンに表示 させたままでも URSA Mini のプレビューイメージをテキストに邪魔されずに確認できます。 「イメージの周辺テキスト」 は、 ステータステキストをスクリーンに表示させたまま、 URSA Mini EF または PL のプレビューイメージをクリアに確認できます。 ディスプレイ...
- Page 289 フロント SDI 、 メイン SDI のモニター設定 2 URSA Mini の 「フロント SDI 」 および 「メイン SDI 」 モニタータブの 2 ページ目には、 フロント / メイン SDI 出力 独自の設定が含まれます。 ステータステキスト ( STATUS TEXT ) フロント / メイン SDI 出力でステータステキストやメーターを隠してショットの構成に必要な情報 のみを使用したい場合に役立ちます。 フロント / メイン SDI モニターメニューでステータステキス トのスイッチアイコンをタップしてステータステキストとメーターの表示を切り替えます。...
- Page 290 URSA Mini のフロント / メイン SDI モニター設定でステータステキストを 「監督 ( Director ) 」 に設 定すると、 該当出力のステータステキストが以下の情報を表示します。 現在カメラが選択しているフレーム / 秒を表示します。 オフスピードフレームレートが無効になっ ている場合、 プロジェクト フレームレートのみを表示します。 オフスピードフレームレートを使用 している場合、 プロジェクト フレームレートの後にセンサー フレームレートが表示されます。 URSA Mini のスレートで設定されたカメラインデックスを表示します。 詳細はこのマニュアルで 後述される 「スレート」 セクションを参照してください。 OPERATOR URSA Mini のスレートで設定されたカメラオペレーターを表示します。 詳細はこのマニュアルで 後述される 「スレート」 セクションを参照してください。 DURATION DISPLAY 現在収録中のクリップ、...
- Page 291 すべてのモニター設定 1 URSA Mini のすべての出力に影響を与えるモニター設定は、 「すべて ( All ) 」 メニューに分類されます。 例えば、 このメニューでセー フエリアガイドを 90 %に設定すると、 カメラの LCD 、 フロント SDI 、 メイン SDI 出力のすべてのセー フエリアガイドが 90 %に設定されます。 「すべて ( All ) 」 設定は 2 ページあります。 URSA Mini の 「すべて」 モニタータブの最初のページには以下 の設定が含まれます。...
- Page 292 フォーカスアシストレベル ( FOCUS ASSIST LEVEL ) LCD タッチスクリーン、 フロント SDI 、 メイン SDI 用のフォーカスアシストのレベルを設定するには、 「低 ( Low ) 」 、 「中間 ( Medium ) 」 、 「高 ( High ) 」 をタップします。 メモ フォーカスアシストのレベルを変更しても、 URSA Mini の LCD タッチスクリーンや SDI 出力のフォーカスアシストのオン / オフには影響しません。 各出力のフォーカスアシ ストをオンにするには、...
-
Page 293: オーディオ設定 (Audio)
セー フエリアガイド% ( SAFE AREA GUIDE % ) URSA Mini の LCD タッチスクリーン、 フロント SDI 、 メイン SDI 出力のセー フエリアオーバーレイのサイ ズを調整するには、 同設定のパーセンテージ表示の左右にある矢印ボタンをタップします。 この パーセンテージは、 イメージフレームのセー フエリアサイズを示しています。 多くの放送局では 90 %のセー フエリアが求められます。 アナモルフィック ・デスクイーズ ( 1.33x ANAMORPHIC DESQUEEZE ) アナモルフィックレンズで撮影している場合、 イメージは URSA Mini のプレビュー出力および収 録したファイルで、... - Page 294 ヘッドフォンボリューム ( HEADPHONES VOLUME ) このスライダーは、 URSA Mini の 3.5mm ヘッドフォンジャックに接続したヘッドフォンの出力レベルを調整 します。 オーディオスライダーを左右に動かすことで、 レベルを調整できます。 スピーカーボリューム (SPEAKER VOLUME) このスライダーは、 URSA Mini の内蔵スピーカーの出力レベルを調整します。 オーディオスライダーを 左右に動かすことで、 レベルを調整できます。 カメラ内蔵マイク ( CAMERA INTERNAL MIC LEVEL ) このスライダーは、 URSA Mini 内蔵マイクの収録レベルを調整します。 オーディオスライダーを左右に動 かすことで、 レベルを調整できます。 内蔵マイクは、 オーディオチャンネル 1 、 2 に収録します。 ローカット...
- Page 295 ヘッドフォンボリューム ( HEADPHONES VOLUME ) このスライダーは、 URSA Mini の 3.5mm ヘッドフォンジャックに接続したヘッドフォンの出力レベルを調整 します。 オーディオスライダーを左右に動かすことで、 レベルを調整できます。 スピーカーボリューム (SPEAKER VOLUME) このスライダーは、 URSA Mini の内蔵スピーカーの出力レベルを調整します。 オーディオスライダーを 左右に動かすことで、 レベルを調整できます。 チャンネル 1 、 2 入力 ( CHANNEL 1 INPUT, CHANNEL 2 INPUT ) 「 Line 」 あるいは 「 Mic 」 をタップして、 チャンネル 1 および 2 の外部オーディオ入力レベルを設定します。 こ れらのチャンネルは、...
-
Page 296: オーディオ設定 - Ursa Mini Pro 4.6K
オーディオ設定 – URSA Mini Pro 4.6K URSA Mini Pro 4.6K のオーディオ設定は、 2 ページに分かれており、 またチャンネル 1 と 2 に分かれています。 次回のソフトウェアアップデートでは、 さらに 2 チャンネルが追加される予定です。 各オーディオは異なるソースにマッピングできます。 また、 パディングやローカット フィルターなどの様々 な設定を調整できます。 これらの設定は、 URSA Mini Pro 4.6K の内部コントロールパネルのスイッチと併せて使用するので、 オー ディオソースを特定のチャンネルに設定した後、 内蔵コントロールパネルのスイッチで信号の種類やファ ンタム電源の有効化が行えます。 オーディオ設定 1 URSA Mini Pro 4.6K の 「 AUDIO 」 モニタータブの最初のページには以下の設定が含まれます。 チャンネルソース... - Page 297 収録チャンネル 1/2 レベル ( RECORDED CHANNEL1/2 LEVEL ) チャンネル 1 および 2 のソースの収録レベルは、 このスライダーを使用して調整できます。 各スライダーには オーディオメーターがついているので、 オーディオレベルを的確に設定するのに役立ちます。 エルゴノミ クスパネルにあるオーディオノブを使っ てオーディオを調整すると、 これらのレベルも同時に調整されます。 最適な音質を実現するには、 オーディオレベルが 0dBFS を越えないようにしてください。 0dBFS はカメラ が収録可能な最高のレベルなので、 これを超えるオーディオはクリップされ、 歪みの原因となります。 オーディオ設定 2 URSA Mini Pro 4.6K の 「 AUDIO 」 モニタータブの 2 ページ目には以下の設定が含まれます。 ヘッドフォンボリューム...
-
Page 298: セットアップ設定 ( Setup
セットアップ設定 ( SETUP ) セットアップタブには、 URSA Mini の識別設定、 ソフトウェアバージョン、 機能ボタン設定、 そして収録や モニタリングと直接リンクしないその他のカメラ設定が含まれます。 同メニューは 4 ページあり、 LCD タッ チスクリーンの端にある矢印をタップするか左右にスワイプすることで切り替えられます。 セットアップ設定 1 ページ URSA Mini のセットアップタブの最初のページには以下の設定が含まれます。 URSA Mini のセットアップメニュー。 URSA Mini Pro 4.6K では、 内蔵 ND フィルター 情報の表示方法のカスタマイズのためのオプションがあります。 日付および時刻 ( DATE AND TIME ) 日付および時刻設定をタップして... - Page 299 バッテリー表示 ( BATTERY DISPLAY ) URSA Mini は、 バッテリーレベルインジケーターのバッテリー残量表示を変更できます。 設定には 「パー センテージ ( Percentage ) 」 と 「ボルテージ ( Voltage ) 」 があります。 正確なパーセンテージに対応した バッテリーおよびプレートを使用しており、 バッテリー表示が 「パーセンテージ」 に設定されている場合、 バッテリーレベルをパーセンテージで表示します。 作業のこつ バッテリー残量のパーセンテージ表記に対応するバッテリーのリストは、 同マニュ アルの 「バッテリーのマウント」 セクションに記載されています。 正確なパーセンテージを認識できない組み合わせのプレートとバッテリーを使用している場合、 ディス プレイには 4 本のバーが表示され、 バッテリー残量の減少に伴いバーが空になります。 同設定が...
- Page 300 セットアップ設定 2 ページ URSA Mini のセットアップタブの 2 ページ目には以下の設定が含まれます。 ATEM カメラ ID ( ATEM Camera ID ) URSA Mini を ATEM スイッチャーと併せて使用し、 スイッチャーからのタリー信号をカメラで受信したい 場合は、 カメラのカメラ番号を設定する必要があります。 カメラに番号が付いているとスイッチャーから 適切なカメラにタリー信号を送信できます。 カメラ番号は左右の矢印ボタンをタップして、 1-99 に設定で きます。 デフォルト設定は 1 になっ ています。 カラーバー ( COLOR BARS) プレビューイメージの代わりにカラーバーを出力する機能は、 URSA Mini をスイッチャーや外部モニター に接続している場合に便利です。...
- Page 301 セットアップ設定 3 ページ URSA Mini のセットアップタブの 3 ページ目には以下の設定が含まれます。 機能ボタンの設定 ( SET FUNCTION BUTTON ) URSA Mini の LCD タッチスクリーンの外側に 「 F1 」 、 「 F2 」 の 2 つの機能ボタンがあります。 URSA Viewfinder を使用しており、 LCD タッチスクリーンを閉じて使用する場合などに、 これらのボタンは、 頻繁に使用す る機能にスピーディにアクセスできるようマッピングできます。 URSA Mini の F1 および F2 ボタンは、 LCD タッチスクリーンの外側にあります。 URSA Mini Pro 4.6K 設定...
- Page 302 これらのボタンを設定するには、 まず機能ボタンを選択し、 機能、 設定、 そし て設定のパラメーターを選択します 。 ボタン 機能 設定 パラメーター F1/2 の機能 ( FUNCTION 1,2 BEHAVES AS ) マッピングしたい機能ボタンを選択したら、 機能を選択します。 選択できるオプション: ‚ プリセット 同機能を設定すると、 機能ボタンを押した際に設定とパラメーターのコンビネーションを呼び 出します。 プリセットを設定するには、 使用したい設定を 「設定」 メニューから選択し、 「 PARAMETER 」 メニューの横にある矢印アイコンをタップして調整します。 例えば、 F1 ボタンを f8 のプリセットアパーチャーの呼び出しに設定する場合、 「プリセット ( Preset ) 」 を選択して...
- Page 303 セットアップ設定 4 ページ URSA Mini のセットアップタブの 4 ページ目には以下の設定が含まれます。 ドア LED ( Door LED ) URSA Mini は、 LCD タッチスクリーンの横に小さな LED が付いており、 タリーおよびステータス情報を提 供します。 「ドア LED 」 スイッチアイコンをタップすることで、 これを有効 / 無効にできます。 タリーとステー タス情報の LED は URSA Mini Pro 4.6K の前方コントロールパネルにあり、 「ステータス LED 」 と呼ばれます。 「ステータス...
- Page 304 「出荷時設定にリセット」 を選択すると確認メッセージが表示されます。 ハードウェア ID ( HARDWARE ID ) 「ハードウェア ID 」 インジケーターは、 URSA Mini を識別する 8 文字を表示します。 これは各カメラ独自の ものです。 32 文字バージョンのカメラ ID が RAW および ProRes ビデオのメタデータに含まれます。 ファイル 名を変更した場合でもカメラハードウェア ID はそのままなので、 特定のカメラでどのフッテージが撮影さ れたかを確認する際に便利です。 ソフトウェア (SOFTWARE) URSA Mini にインストールされている現在のソフトウェアバージョンを表示します。 ソフトウェアのアップ デートに関する詳細は、 「 Blackmagic Camera Setup Utility 」 セクションを参照してください。 再生...
- Page 305 セットアップ設定 5 ページ URSA Mini のセットアップタブの 5 ページ目には以下の設定が含まれます。 カメラのブルートゥースの名前は、 スレートで選択したカメラの文字に URSA Mini の 8 文字のハードウェア ID が加わったものです。 ブルートゥース ( Bluetooth ) URSA Mini Pro 4.6K では、 ブルートゥースコントロールにより、 ポータブルデバイスからカメラをワイヤレ スでコントロールできます。 「 Blackmagic Camera Control App 」 を使用して、 カメラの電源のオン / オフ、 設定の変更、 メタデータの調整、 収録のリモートトリガーを iPad から実行できます。 ブルートゥースは、 設 定メニューの...
- Page 306 初めて接続する場合、 カメラとペアリングするために Blackmagic Camera Control App は 6 桁 のコードを要求します。 このコードは、 カメラの LCD スクリーンに表示されるので、 このコードを iPad に入力します。 URSA Mini Pro 4.6K が iPad とペアリングされたことが、 スクリーン上に表示されます。 カメラと iPad のペアリングに問題が生じた場合は、 以下のエラーメッセージが表示されます: 設定...
- Page 307 メモ URSA MINI PRO 4.6K のコントロールにブルートゥースを使用しない場合、 セキュ リティーのためブルートゥースをオフにしておくことを推奨します。 デバイスの切断 ( Disconnect Current Device ) 同設定は、 URSA Mini Pro 4.6K と現在ペアリングされている iPad の接続を切断します。 ペアリングデバイスを消去 ( Clear Paired Devices ) 同設定は、 URSA Mini Pro 4.6K がペアリングされているデバイスのリストを消去します。 Blackmagic Camera Control App でカメラをコントロール URSA Mini Pro 4.6K を iPad とペアリングできたら、 iPad アプリを使っ てカメラの電源のオン / オフ、 設定の 変更、...
- Page 308 右下にあるスレートアイコンをタップしてスレートにアクセス / アップデートします。 URSA Mini Pro 4.6K は、 ブルートゥース LE を使っ てデバイスと通信し、 ワイヤレスコントロールを実行し ます。 これは、 ポータブルデバイスに使用されるのと同じタイプのプロトコルで、 バッテリー電源の使用を 最小限に抑えられます。 右上にある 「 Power Off 」 をタップすると URSA Mini Pro 4.6K の電源をオフにできます。 カメラがオフになる前に、 選択を確定するメッセージが表示されます。 URSA Mini Pro 4.6K の電源がオフになっ ていても、 ブルートゥースが有効になっ ていれば、 カメラの名前 は...
-
Page 309: プリセット ( Presets
プリセット ( PRESETS ) プリセットタブは、 URSA Mini の完全な設定を保存、 呼び出しできます。 複数のプロジェクトでカメラを 使用する場合、 非常に役立ちます。 例えばドキュメンタリーやミュージックビデオなど、 タイプやプロジェ クトの設定が異なる複数の撮影で URSA Mini を使用する場合などです。 URSA Mini のプリセット機能は、 特定のプロジェクト / タイプの撮影の設定を保存し、 必要な際にすばやく簡単に呼び出すことができます。 また、 プリセットの読み込み / 書き出しも可能です。 これは複数のカメラを使った撮影に非常に便利です。 1 台の URSA Mini をプロジェクトに合わせて設定し、 プリセットを他のすべての URSA Mini に書き出します。 URSA Mini のプリセットタブ メモ... - Page 310 プリセットタブで 「追加」 アイコンをタップして、 タッチキーボードでプリセット名を 入力します。 プリセットを保存したら、 プリセットメニューで名前をタップして選択します。 ロードするには 「ロード ( Load ) 」 アイコンをタップします。 プリセットを選択し、 「ロード」 アイコンをタップしてロード。 選択したプリセットが 青く表示されます。 現在ロードされているプリセットは、 アイコンの下に青いラインが表示されます。 「アップデート ( Update ) 」 アイコンをタップするとプリセットをアップデートできます。 URSA Mini の現 在の設定をアップデートするかどうか確認するメッセージが表示されます。 「アップデート ( Update ) 」 を押して確定します。 プリセットの読み込み ( Import preset ) プリセットを読み込むには、...
-
Page 311: Lut
メモ URSA Mini のプリセットスロットがフルになると、 読み込みメニューが無効になります。 ここから他のプリセットを読み込むには、 既存のプリセットを削除する必要があります。 プリセットの書き出し ( Exporting preset ) プリセットを CFast/SD カードに書き出すには、 書き出したいプリセットをタップして選択し、 「管理 ( Manage ) 」 アイコンをタップします。 「プリセットの読み込み ( Import Preset ) 」 、 「選択したプリセット を書き出し ( Export Selected Preset ) 」 の 2 つのオプションが表示されます。 URSA Mini Pro 4.6K のストレージメディア選択スイッチを使用して、... - Page 312 3D LUT は、 DaVinci Resolve やその他のカラーコレクションソフトウェアで簡単に作成できます。 または オンラインでも LUT を様々な提供元からダウンロードできます。 URSA Mini には、 17 ポイントまたは 33 ポイ ントの LUT を 6 つまで保存できます。 それぞれの最大サイズは 1.5 メガバイトです。 ロードした LUT は、 カメ ラの LCD タッチスクリーン、 フロント SDI 、 メイン SDI 、 またはそれらのあらゆる組み合わせに適用して 表示できます。 URSA Mini は、...
- Page 313 メモ URSA Mini に読み込めない LUT は、 サイズに問題がある場合があります。 Lattice などの LUT 編集ツールを使用してサイズを確認するか、 コンピューターのテキストエディターで LUT を開き ます。 "LUT_3D_SIZE" タグの隣に LUT のサイズを示す数字があります。 この値が 17 または 33 以外 である場合は、 Lattice を使用して 3D LUT のサイズを 17 ポイントに変更してください。 LUT の適用 LUT をカメラに保存したら、 LUT メニューで LUT をタップして選択し、 さらにロードアイコンをタップします。 これで...
- Page 314 メタデータ入力 メタデータはクリップの中に保存される情報で、 テイク番号、 カメラ設定、 その他の識別情報などが含ま れます。 メタデータは、 ポスト プロダクションでフッテージを分類 / 処理する際に極めて便利です。 例えば、 テイク / ショット / シーン番号はクリップの管理において必須であり、 レンズに関する情報は歪みの自動除去 や VFX 素材とプレートのマッチングで役に立ちます。 Blackmagic URSA Mini は、 クリップにいくつかのメタデータ (カメラ設定、 タイムコード、 日時など) を自 動的に保存します。 ユーザーはカメラのスレートを使用して自由にデータを追加できます。 スレート Blackmagic URSA Mini URSA Mini のタッチスクリーンを左右にスワイプすると、 スレートが表示されます。...
- Page 315 レンズデータ ( LENS DATA ) カメラに装着しているレンズに関する情報です。 電子レンズの多くは、 レンズモデル、 アパーチャー、 焦点 距離などの情報を自動的に提供します。 レンズからこれらの情報が提供されない場合や、 追加データを 入力したい場合は、 同画面で鉛筆のアイコンをタップして情報をマニュアル入力できます。 以下の情報を 含むレンズデータメニューが表示されます: 「レンズデータ」 メニューでは、 Cooke /i Technology 対応レンズからの情報を自動的に表示。 ‚ レンズの種類 ( LENS TYPE ) レンズのモデルが表示されます。 レンズのモデルが自動的に表示されない場合は、 同設定を タップしてデータをマニュアルで入力できます。 データが自動的に提供されない場合は、 タッチキーボードでレンズデータをマニュアル入力できます。 ‚ アイリス ( IRIS ) クリップの開始点でのアパーチャー設定を表示します。...
- Page 316 ‚ フィルター ( FILTER ) 現在使用しているレンズフィルターを表示します。 同設定をタップするとデータをマニュアルで 入力できます。 複数入力する場合は、 コンマで区切ります。 フィルター情報はマニュアルで入力します。 「レンズデータ」 メニューでは、 Cooke /i Technology 対応レンズからの情報、 マニュアルで入力したフィルター情報を自動的に表示。 メモ レンズデータは、 レンズデータメニューのリセットアイコンをタップしていつでも消去 できます。 この作業では、 データの消去を確認するプロンプトが表示されます。 確定す ると、 すべてのレンズデータが消去され、 現在使用しているレンズからのレンズデータ が自動的に表示されます。 これらのフィールドにマニュアルで情報を入力した場合、 次回レンズをマウントする際にレンズデータをリセットする必要があります。 リセットを 行わないと、 マニュアル入力した値が保持されます。 メタデータ入力...
- Page 317 URSA Mini のスレートはクリップタブとプロジェクトタブに分かれています。 リール ( Reel ) リールインジケーターには現在のリールが表示されます。 URSA Mini はリール番号を自動的に増加していくため、 通常はユーザーがマニュアルで入力する必要はあ りません。 新しいプロジェクトに移行して、 改めてリール 1 から開始したい場合は、 スレートのプロジェクト タブへ行き、 「プロジェクトデータをリセット ( Reset Project Data ) 」 をクリックします。 シーン ( SCENE ) シーンインジケーターには現在のシーン番号が表示されます。 さらに、 現在のショットの番号および 種類も表示できます。 同インジケーターの番号は、 常に現在のシーンを参照しています。 この番号は、 シーン番号の隣にある左 右の矢印を使用して変更できます。 またはシーン番号をタップして、 シーン番号エディターに進みます。 シーン番号に使用できるの番号は...
- Page 318 シーンメタデータの入力では、 URSA Mini はタッチキーボードの左に増加値の サジェスト、 右側にショットタイプを表示します。 テイク (TAKE) テイクインジケーターには、 現在のショットのテイク番号が表示されます。 テイク番号は左右の矢印を タップして変更できます。 または同インジケーターをタップして、 テイク番号エディターに進みます。 作業のこつ ショット番号またはシーン番号が進むと、 テイク番号は 1 に戻ります。 テイク番号エディターでは、 テイクの概要情報を追加できます。 これらはテイク番号キーボードの右側に 表示され、 それぞれは以下のシナリオに対応するものです: ピックアップ。 主な撮影が終わった後、 前のテイクに素材を追加するた めに撮り直したテイクです。 ビジュアルエフェクト。 ビジュアルエフェクトに使 用するテイク / ショットです。 シリーズ 。 カメラを止めずに収録した複数のテイクです。 スタンバイモードで 「 A 」 をタッ プして、...
- Page 319 グッドテイク ( GOOD TAKE ) : グッドテイクインジケーターをタップして良いテイクにフラグを付けておくと、 ポスト プロダクションでテ イクを見つけやすくなります。 このタグは、 URSA Mini がスタンバイモードの場合は最後に収録されたク リップに適用され、 再生モードの場合は現在表示しているクリップに適用されます。 屋内 / 屋外 ( INT/EXT ) 「 INT 」 または 「 EXT 」 をタップして、 スタンバイモードでは次に収録されるクリップに、 再生モードでは現 在のクリップに、 ”屋内”または”屋外”のタグを付けられます。 昼 / 夜 ( DAY/NIGHT ) 「...
-
Page 320: サーボズーム対応レンズの使用
サーボズーム対応レンズの使用 URSA Mini カメラとサーボズーム対応レンズは非常にパワフルなコンビネーションです。 撮影時に、 マニュ アルアイリス、 ズーム、 レンズのフォーカスリング、 内蔵ハンドグリップ、 ズームロッカーが使用できると作 業効率が大幅に向上します。 また、 他の種類のレンズの使用時には困難が伴う様々なテクニックも使え るようになります。 URSA Mini PL および URSA Mini Pro 4.6K は、 B4 および cine-servo PL ズームレンズの レンズコントロールをサポートしています。 接続には 12 ピン放送用コネクターを使用します。 互換性のあるレンズでは、 ズームロッカーへの給電、 収録ボタンでの収録の開始 / 停止、 アイリスのコント ロールなどが可能です。 サーボズームレンズの多くは RET ボタンを搭載しています。 このボタンをカメラの PGM ボタンと同じように使用することで、... - Page 321 電動フォーカスコントロールにも対応しているレンズでは、 URSA Mini の 「 FOCUS 」 ボタンで自動フォー カスを有効にすることも可能です。 ATEM Software Control を介して ATEM スイッチャーからフォーカスを リモートコントロールできます。 B4 レンズを装着したら、 解像度を 2K 16:9 (あるいはそれ以下) に設定し、 ダッシュボードの収録タブで 「 Window Sensor 」 を 「 On 」 にします。 B4 レンズは、 スーパー 35mm のイ メージサークルをカバーしないので、 イメージのビネットを防ぐために、 これらの設定を使用することは非常に重要です。 フォーカス、...
-
Page 322: カメラのビデオ出力
カメラのビデオ出力 HD モニタリング出力 Blackmagic URSA Mini のダウンコンバート 3G-SDI 出力は、 常に 1080 HD ビデオを出力するので、 ルーター、 モニター、 SDI キャプチャーデバイス、 放送スイッチャー、 その他の SDI デバイスに簡単に出力できます。 この出力は、 タッチスクリーンの設定メニューでは 「 Front SDI 」 と表記されています。 12G-SDI 出力 リアパネルの 12G-SDI 出力は、 1 本の SDI ケーブルで、 2160p50 、 59.94 、 60 などの高フレームプログレッシブ ・... - Page 323 モニターに接続 鳥瞰撮影やカーマウント、 クレーンマウントの使用時など、 開閉式モニターへのアクセスが困難な場合は、 SDI モニタリングが非常に役立ちます。 ディスプレイ設定メニューで 「 Front SDI Overlay 」 設定を調整すると、 モニタリング情報が HD-SDI モニタ リング出力コネクター経由で表示されます。 SDI オーバーレイには、 フレームガイドや、 撮影の詳細、 カメ ラ設定などの情報が含まれます。 単にショットをモニタリングしたい場合は、 いつでも SDI オーバーレイ 設定をオフにして、 クリーン SDI フィードを出力できます。 SDI 出力を SDI モニター、 Blackmagic SmartScope Duo 4K に接続すれば、 波形のライブモニタリングが可 能です。...
-
Page 324: Ursa Mini Shoulder Mount Kit
URSA Mini Shoulder Mount Kit ショルダーマウントの取り付け URSA Mini Shoulder Mount Kit で、 URSA を肩に乗せて使用する、 ENG スタイルの撮影が可能になりま す。 このキットには、 トップハンドル、 ショルダーマウント ・ベースプレート、 URSA Mini サイドハンドル用 エクステンションアーム、 長尺 LANC ケーブル、 URSA Viewfinder アダプタープレート、 さらに取り付けに 必要なすべてのネジが含まれています。 ベースプレートのクイ ックリリースマウントは、 ENG スタイル三脚プレートにロックできるだけでなく、 肩に乗 せてアクションを追うことも可能です。 URSA Mini Shoulder Mount Kit は、 Sony VCT 14 をモデルとするあらゆる三脚プレートと使用できます。 これらのプレートは、... - Page 325 URSA Mini をゆっくりと逆さにし、 平らで安定した場所に置いて、 カメラの底面にアクセス できるようにします。 マイナススクリュードライバーと 2 つの ¼ インチマイナスネジ使用して、 ショルダーマウント ・ベー スプレートを URSA に取り付けます。 ベースプレートがきちんと固定されるまでネジを締めます。 締めすぎるとネジ山が破損する場 合があるので注意してください。 トップハンドルを取り付ける ( URSA Viewfinder なしの場合) : URSA Mini Shoulder Mount Kit は、 オプションの URSA Viewfinder があっ てもなくても使用できます。 トップハンドルの底面には、 ゴム製のビュー ファインダーキャップが付いています。 このキャップは、 URSA Viewfinder を使用する場合にはアダプタープレートと付け替えます。...
- Page 326 トップハンドルを取り付ける ( URSA Viewfinder ありの場合) : トップハンドル URSA Viewfinder キャップ URSA Mini を平らで安定した場所に置き、 カメラ ハンドル側面のアームをゆっくりと外し、 穴から の上面にアクセスできるようにします。 キャップを引き抜いて、 ハンドルの底面から URSA Viewfinder キャップを取り外します。 URSA Viewfinder アダプタープレート 1/4 インチ ソケットヘッドネジ ツマミネジ: URSA Viewfinder x2 :ハンドル取り付け用 (オプション) の位置調整用 M3 ネジを 4 つと、 2.5mm 六角レンチを使用して、 URSA Mini の上面にある...
- Page 327 エクステンションアームの取り付け URSA Mini Shoulder Mount Kit を使用する際は、 URSA Mini のサイドハンドルの位置を調整することで、 快適な肩乗せ撮影が可能になります。 同梱のエクステンションアームと長尺 LANC ケーブルを使用して、 サイドハンドルを使いやすい位置に移動できます。 サイドハンドル用エクステンションアームを取り付ける : URSA Mini を平らで安定した場所に置きます。 その際、 エクステンションアームを下げられるよう、 カメラの横に空間的な余裕を持たせます。 この作業は、 URSA Mini を三脚に取り付けると 簡単です。 エクステンションアームの正しいサイドをベースプレートのロゼットに取り付け、 適切な位置まで アームを下げ、 同梱のロゼット用ツマミネジで留めます。 エクステンションアーム前面のロゼットに、 サイドハンドルを取り付けます。 ハンドルを希望の 位置に留め、 大きめのマイナススクリュードライバー、 あるいは D リングを使っ てサイドハンドル のネジをきつく締めます。...
-
Page 328: Blackmagic Ursa Viewfinder
Blackmagic URSA Viewfinder Blackmagic URSA Viewfinder は、 Blackmagic URSA Mini 用に設計されたパワフルな電子ビュー ファイン ダーです。 1080 HD 有機 LE ディスプレイと精密なガラスレンズで、 明るく鮮やかな生き生きとしたイメージ を得られるので、 スピーディにフォーカスを合わせて詳細を確認できます。 同ビュー ファインダーは、 肩乗せでハンドヘルド操作する場合や、 非常に明るい撮影環境など、 反射やグ レアのない絶対的な精密性が求められる環境に最適です。 同ビュー ファインダーは、 カメラに接続して給電でき、 カメラからのエンベデッド SDI データを使用して様 々なディスプレイ ・ オプションを提供します。 つまり、 カメラからクリーンな SDI フィードをビュー ファイン... - Page 329 ビュー ファインダーの SDI と電源ケーブルを、 URSA Mini の HD-SDI モニタリング出力と +12V 出力に接続します。 URSA Mini で URSA Viewfinder を使用する場合、 URSA Mini Shoulder Kit も併せて使用することをお勧め します。 URSA Mini Shoulder Kit に搭載された適切なマウントポイント、 1/4 インチのツマミネジ、 高さ調整 機能を使用して、 ビュー ファインダーの位置を最適な位置に調整できます。 「 URSA Mini Shoulder Mount Kit 」 セクションを参照してください。...
- Page 330 また、 これらのボタンはカスタマイズ可能なファンクション機能を搭載しているので、 ショートカットを設 定して、 頻繁に使用する一般的な機能に素早くアクセスすることもできます。 例えば、 フォルスカラー機 能をズームボタンに設定することが可能です。 詳細は、 「ショートカット」 のセクションを参照してください。 ZOOM (F1) – 「メニュー」 「 ZOOM 」 機能は、 画像にズームすることで、 フォーカスをシャープに合わせるサポートをします。 「 ZOOM 」 ボタンを押すとズームインし、 再度押すと 100 %ビューに戻ります。 メニュー設定を使 用している場合、 「 ZOOM 」 ボタンは 「メニュー」 ボタンとして機能します。 同ボタンを長押しする とメニュー設定が開きます。 メニュー設定では、 同ボタンを 1 度押すと設定の変更が確定 します。...
- Page 331 メーター ( Meters ) オーバーレイに表示するメーターの種類を切り替えます。 ヒストグラム ( Histogram ) 、 オーディオ ( Audio ) 、 両方 ( Both ) 、 なし ( None ) から選択できます。 ピーキング ( Peaking) ピーキングのオン / オフを切り替えます。 ゼブラ ( Zebra ) ゼブラレベルのオン / オフを切り替えます。 カメラ設定を使用して、 目的に応じたゼブラレベルを 設定してください。...
- Page 332 「 Exit 」 にスクロールしてメニューボタン を押し、 メニューディスプレイ表示を閉じます。 URSA Viewfinder のショートカット設定 設定 ( Setup ) セットアップメニューには以下の機能があります: 明るさの調整 ( Brightness Adjustment ) ディスプレイの明るさを -10 ~ +10 の範囲で調整できます。 タリーの明るさ ( Tally Brightness ) タリー LED の明るさを調整できます。 フォーカスチャート ( Focus Chart ) Blackmagic URSA Viewfinder にはフォーカスチャートが内蔵されており、 アイピースの焦点を ユーザーに合わせて調整できます。...
- Page 333 メモ URSA Viewfinder の Setup メニューでグリッド ( Grid ) を有効にすると、 ATEM スイッ チャーからのタリー信号もビュー ファインダーに表示できます。 オーバーレイ ( Overlay ) もディスプレイ ( Display ) メニューで有効にしてください。 ステータステキスト ( Status Text ) ホワイトバランス、 フレームレート、 ISO などステータステキスト表示を切り替えます。 URSA Mini のフロント SDI モニター設定でステータステキストがオンになっ ている場合は、 この設定を使用し て Blackmagic URSA Viewfinder のステータステキスト表示を切り替えられます。 詳細は、...
- Page 334 URSA Viewfinder 内蔵ソフトウェアのアップデート ビュー ファインダーのアップデートには、 Blackmagic Camera Setup ユーティリティソフトウェアを使用 します。 アップデートの際はビュー ファインダーの電源をオンにする必要があるため、 アップデート中は ビュー ファインダーと URSA Mini を接続したままにしておくことをお勧めします。 URSA Mini から安定した 電源供給を得るため、 URSA は外部電源に接続してください。 ビュー ファインダーの前面、 アイピースの近くにある小さな USB コネクターとコンピューターを接続します。 Blackmagic Camera Setup ソフトウェアが起動し、 現在使用している内蔵ソフトウェアを検知します。 古いバージョンを使用している場合は、 アップデートを推奨するメッセージが表示されます。 スクリーン の指示に従い、 ビュー ファインダーの内蔵ソフトウェアをアップデートしてください。 メモ...
-
Page 335: Blackmagic Ursa Studio Viewfinder
Blackmagic URSA Studio Viewfinder MENU BRIGHT CONTRAST BACK PEAKING Blackmagic URSA Studio Viewfinder パワフルなビュー ファインダー、 Blackmagic URSA Studio Viewfinder を追加すれば URSA Mini がプロ仕 様のライブプロダクションカメラに変身します! URSA Studio Viewfinder は、 7 インチの高輝度スクリー ン、 大きく見やすいタリーライト、 コントロールノブ、 大きなハンドル、 サンシェード、 テンション調整が可 能な連結式マウントを搭載しています。 これらの機能により、 ライブコンサートやスポーツなど、 長時間 に渡るイベントの撮影でも、... -
Page 336: Blackmagic Ursa Mini にマウント / 接続
Blackmagic URSA Mini にマウント / 接続 Blackmagic URSA Studio Viewfinder を Blackmagic URSA Mini と使用する場合、 カメラにユニットをマ ウントするいくつかの方法があります。 同梱の V ロックマウント プレートを使用して Blackmagic URSA Studio Viewfinder を Blackmagic URSA Mini の上部に直接マウントできます。 V ロックマウントプレートはトップハンドルプレートから簡単に取 り外せます。 3/16 六角ドライバーで V ロックプレートを URSA Mini ハンドルマウントから外し、 同梱の 1/4 インチスクリュー... - Page 337 Shoulder Mount Kit にマウントした Blackmagic URSA サードパーティ製カメラに取り付けた V ロック マウントプレート Studio Viewfinder 他のカメラで URSA Studio Viewfinder を使用したい場合、 1/4 インチマウントポイントが付いていれば V ロックマウント プレートをカメラに取り付けて URSA Studio Viewfinder を使用できます。 サードパーティ 製のチーズプレートを使用することもできます。 また、 多くのサードパーティ製のカメラシステムにクイッ クリリース可能な V ロックマウントプレートが付いているので、 Blackmagic URSA Studio Viewfinder をマウントできます。 作業のこつ Blackmagic URSA Studio Viewfinder は、 クリックリリース V ロックマウント プレー トを使用して取り付けます。...
-
Page 338: Blackmagic Ursa Studio Viewfinder の調整
Blackmagic URSA StudioViewfinder を URSA Mini に接続するには、 ビュー ファインダーの 付属ケーブルを URSA 正面の 12V 電源および 3G-SDI 出力に接続します。 カメラの電源を入れると、 すぐにビュー ファイ ンダーの電源スイッチをオンにできるように なります。 URSA Mini ハンドルマウントの横に、 ケーブルをまとめるための固定金具がつい ていることに注意してください。 URSA Mini の SDI 、 12V 電源接続 作業のこつ URSA Studio Viewfinder は、 オープンスタンダードの SDI および放送用の 4 ピン XLR 電源接続を使用しているので、... - Page 339 これらのテンションダイヤルは非常に幅広いテンション調整が可能で、 最適な抵抗力を選択できます。 これにより、 ビュー ファインダーを必要なポジションまで簡単にパン / ティルトできます。 ビュー ファインダーの両サイドのテンションダイヤル ティルトロック ・ダイヤル ビュー ファインダーの ティルトのアングルを ロックします。 パンテンション ・ダイヤル パンのテンションを コントロールします。 ティルトテンション ・ダイヤル ティルトのテンションを コントロールします。 作業のこつ マウントコントロール中央のテンションダイヤルは、 パンテンションをコントロール します。 このダイヤルをゆるめビュー ファインダーを握ると、 カメラを独立して動かせます。 つまり、 モータースポーツなど、 被写体のアクションを追っ てカメラを左右にパンする必要がある場合でも、 目の前にビュー ファインダーを設定して映像を確認できます。 視覚ガイドによりビュー ファインダー を簡単に中央の位置に戻せます。 Blackmagic URSA Studio Viewfinder...
- Page 340 サンシェード サンシェードにより、 明るい環境や日が照っ ている環境でもスクリーンが見やすくなっ ています。 サンシェー ドを取り付けるには、 Blackmagic URSA Studio Viewfinder の丈夫にスライドさせて所定の位置まで押 し込み、 2 つの拘束ネジでサンシェードの土台に固定します。 ひさしの上部は上げ下げ可能で、 視野角を 調整できます。 また、 サンシェードにより 7 インチスクリーンが保護されます。 サンシェードが必要ない場 合や、 ソフトウェアアップデートのために USB-C コネクターにアクセスしたい場合は、 素早く簡単 に取り外しできます。 MENU BACK サンシェードと調整可能なひさし Blackmagic URSA Studio Viewfinder...
- Page 341 ボタン機能 右サイドにある触覚ダイヤルは、 明るさ、 コントラスト、 ピーキングを素早く簡単に変更できます。 これら のダイヤルは人間工学に基づいて設計されており、 サンシェードを使用している場合は親指を使っ て横 から調整できます。 あるいは 2 本の指でより詳細な調整も可能です。 MENU BRIGHT CONTRAST BACK PEAKING メニューダイヤル ピーキング プッシュボタンのメニューダイヤルは、 スクリーン上のイメージのフォーカスピー メニューへ行き、 ビュー ファインダー設定 キングレベルを調整します。 スクリーン上 をナビゲートできます。 のオーバーレイで、 ピーキングのレベル が -100 ~ +100 で表示されます。 設定メニ バックボタン ( Back ) ューで、...
- Page 342 タリーライト Blackmagic URSA Studio Viewfinder の背面にある大型のタリーライトは、 出演者およびカメラ マンに、 現在オンエアのカメラ / 次にオンエアになるカメラ、 そして ISO 収録カメラを知らせます。 タリーは、 オンエアされているカメラは赤、 プレビューは緑に光ります。 URSA Mini と使用してい る場合、 ISO 収録はオレンジに光ります。 ディレクターが ATEM スイッチャーでカメラを切り替えると、 タリー信号が SDI 経由でカメラに送 信され、 プレビュー中のカメラ、 オンエア中のカメラ、 収録中のカメラでタリーライトが点灯します。 また、 URSA Studio Viewfinder にはクリップ式の透明なカメラ番号が同梱されます。 これらをタ リーライトに取り付けることで、 出演者は離れた場所からでもカメラ番号を確認できます。 ソフトウェア...
- Page 343 メニュー設定 プッシュボタンの 「 MENU 」 ダイヤルを押すとメニューへ移動します。 ダイヤルを回すとメニューオプショ ンを上下にナビゲートできます。 メニューのヘディングがハイライトされている時に 「 MENU 」 ダイヤルを 押すと、 ディスプレイ、 ショートカット、 設定、 カーソルのサブメニューを切り替えられます。 ダイヤルを回 すと各メニューの設定をスクロールできます。 設定がハイライトされている時にダイヤルを押すと、 「 MENU 」 ダイヤルを回して該当の設定を調整できます。 再度 「 MENU 」 ダイヤルを押して選択した内容を確定します。 「 Back 」 ボタンを押すか、 メニューをナビゲートして 「 Exit 」 を選択するとメニューから出ます。 ディスプレイ ゼブラ...
- Page 344 ガイド ( Guides) ガイドの表示 / 非表示オプションを選択できます。 ガイド設定は、 URSA Mini のモニターメニューの 「 All 」 セクションで設定したガイドのスタイルにマッチします。 アスペクトレシオ、 フレームガイドの不透明度、 セー フエリアのパーセンテージ、 表示するグリッ ドのタイプは、 カメラの設定にマッチします。 Studio Viewfinder の設定メニューでは、 ディスプ レイメニューのガイドをオンにした場合に Studio Viewfinder に表示されるガイドを設定します。 その後ガイド設定で、 単一のコマンドでこれらをオン / オフに切り替えられます。 ズーム ( Zoom ) ズーム機能のオン / オフを切り替えます。 この機能は画像にズームすることで、 フォーカスを合わ せるサポートをします。...
- Page 345 必要に応じてショートカットを設定したら、 「 Exit 」 にスクロールしてメニューダイヤルを押してメニューディ スプレイを閉じるか、 「 Back 」 ボタンを押してメニューから出ます。 ショートカットのサブメニュー 設定 ( Setup ) 設定メニューではビュー ファインダーの設定を選択できます。 フロントタリーの明るさ ( Front Tally Brightness ) タリー LED の明るさを、 オフ / 低 / 中間 / 高で調整できます。 タリーライトは調整中に光るので各設 定での明るさを確認できます。 「設定」 のサブメニュー リアタリーの明るさ ( Rear Tally Brightness ) タリー...
- Page 346 作業のこつ 明るい環境では、 出演者やカメラマンが見やすいように LED の明るさ設定 を上げることをお勧めします。 暗い環境での撮影ではライトが見やすいので 「 Low 」 設 定にすると良いでしょう。 フォーカスアシスト ( Focus Assist ) フォーカスアシスト設定は、 ビュー ファインダーのピーキングの表示を切り替えます。 赤、 緑、 青、 黒、 白、 そして従来のピーキングから選択できます。 フレームガイド ( Frame Guide ) Studio Viewfinder の 「 Guides 」 の一部として、 フレームガイドを表示するオプションを選択でき ます。 URSA Mini に接続している場合、 カメラの 「フレームガイド」 のアスペクトレシオにマッチ します。...
- Page 347 スクリーンに表示されたカーソル カーソルを設定したら 「 Cursors 」 メニューからオン / オフを切り替えたり、 機能ボタンに割り当てたりでき ます。 カメラマンはカーソルを考慮して正確にショットの構成やフレーミングができるため、 これはライブ プロダクションでは非常に重要です。 さらに、 高さ、 幅、 位置の異なるブラック / ホワイトのカーソルを 3 つ まで作成できるため、 ライブまたは後の放送で追加されるあらゆるグラフィックのサイズと位置を簡単 に調整できます。 また、 カーソルをデフォルトの状態に戻すオプションもあります。 Blackmagic URSA Studio Viewfinder でヘッドセットを使用 Blackmagic URSA Studio Viewfinder を URSA Mini と使用している場合、 カメラのヘッドフォン接続は トークバック用のヘッドセット接続になり、...
-
Page 348: 交換可能なレンズマウント
交換可能なレンズマウント Blackmagic URSA Mini Pro 4.6K は EF マウントが取り付けられた状態で出荷されますが、 EF レンズを必 ずしも使う必要があるわけではありません。 同カメラは交換可能なレンズマウントに対応しています。 つまり、 標準装備の EF マウントを外し、 オプションの PL または B4 マウントを取り付けられます。 Blackmagic Design の PL または B4 マウントキットは、 Blackmagic Design 販売店にて購入可能です。 EF マウントの交 換が必要になった場合もお買い求めいただけます。 PL マウント B4 マウント EF マウント... -
Page 349: Blackmagic Ursa Mini Pro Pl Mount
Blackmagic URSA Mini Pro PL Mount URSA Mini Pro 4.6K に PL マウントを取り付けることで、 劇場映画やテレビ制作用のハイエンドで正確な シネマレンズの使用が可能となります。 PL マウントキット同梱品: PL マウント x1 PL マウントは、 保護用ダストキャップを取り付けた 状態で出荷されます。 シムセット x1 シムセットには、 下記の厚みのシムが含まれてい ます: 0.50mm 0.18mm 0.10mm 0.30mm 0.15mm 0.05mm 0.20mm 0.12mm 0.025mm PL バッフル x1 P L マウントバッフルはセンサーに入る光のコント... - Page 350 PL マウントの取り付け 4.6K 4.6K SDI OUT SDI OUT FILTER FILTER AUTO AUTO LENS LENS レンズマウントの中央に PL バッ フルをゆっく りと挿 カメラに 0.10mm シムを取り付け、 その後 Blackmagic 入し、 バッ フルを手で回して固定します。 PL バッ フ URSA Mini Pro 4.6K の PL レンズマウントをカメラ ルツールの幅の広い方を使用してバッ フルを締め 本体に取り付けます。 Cooke /i Technology 用の PL ます。...
-
Page 351: Blackmagic Ursa Mini Pro B4 Mount
Blackmagic URSA Mini Pro B4 Mount B4 マウントを URSA Mini Pro 4.6K に取り付けることで、 電子ニュースや結婚式で広く使われるパー フォー カルレンズがマウントできるようになります。 パー フォーカルレンズはズーム倍率を変更してもフォーカス を維持し、 通常はマニュアルフォーカスやアイリスコントロールに対応しています。 またハンドグリップの ズームロッカーを使用すると簡単にスムーズなズームインやアウトができます。 ワンマンオペレーション では、 このようなレンズを使用することでショットを自在にコントロールできるので撮影が極めて早 く効率的に行えます。 B4 マウントキット同梱品: B4 マウント x1 B4 マウントを使用すると業界標準の ENG レンズが URSA Mini Pro 4.6K で使用可能となります。... - Page 352 SDI OUT SDI OUT FILTER FILTER AUTO AUTO LENS LENS カメラに 0.10mm シムを取り付け、 その後 Blackmagic Blackmagic URSA Mini Pro 4.6K を清潔でしっかり とした台にレンズを上にして置き、 マウントを URSA Mini Pro 4.6K の B4 レンズマウントをカメラ 垂直に差し込みます。 本体に取り付けます。 その際、 赤い点が 12 時の位 置になるようにしてください。 4.6K 4.6K SDI OUT...
-
Page 353: Blackmagic Ursa Mini Pro Ef Mount
Blackmagic URSA Mini Pro EF Mount EF マウントは、 カメラ出荷時に標準装備されているオリジナルの EF マウントを交換する必要がある 場合に購入できます。 EF マウントキット同梱品: EF マウント x1 EF マウントを使用すると一般的な EF スチルレンズが 使用可能となります。 シムセット x1 シムセットに は 、 下 記 の 厚 み の シム が 含 ま れて います: 0.50mm 0.18mm... - Page 354 FILTER FILTER AUTO AUTO LENS LENS Blackmagic URSA Mini Pro 4.6K を清潔でしっか Blackmagic URSA Mini Pro 4.6K の EF レンズマウ りとした台にレンズを上にして置き、 マウントを垂 ントをカメラ本体に取り付けます。 その際、 赤い点 直に差し込みます。 PL から EF マウントに変える場 が 12 時の位置になるようにします。 合は、 EF マウントを差し込む前に必ず PL バッ フル を取り外すようにしてください。...
-
Page 355: Blackmagic Ursa Mini Pro Shim Kit
Blackmagic URSA Mini Pro Shim Kit URSA Mini Pro 4.6K に PL または B4 マウントを取り付ける際には、 オリジナルの EF マウントの下に取り付 けられている 0.50mm および 0.10mm シムに、 0.10mm シムを追加します。 このシムは、 Blackmagic URSA Mini Pro Shim Kit に含まれています。 また、 キットには他の厚さのシムも含まれているので、 フォーカスマー クを正確に保つために、 わずかな調整を行う必要がある場合に使用できます。 シムキット同梱品: バッフルツール x1 URSA Mini Pro 4.6K に... -
Page 356: バッテリーのマウント
バッテリーのマウント サードパーティ製のバッテリープレートを装着し、 V マウント / ゴールドマウントバッテリーをマウント V マウント / ゴールドマウントバッテリーの取り付け 業界標準の V マウント / ゴールドマウントバッテリーを Blackmagic URSA Mini に簡単に接続できます。 バッテリーをマウントするには、 Blackmagic の V マウントバッテリープレートまたはサードパーティ製の V マウント / ゴールドマウントバッテリープレートを、 カメラのプレートマウントに装着する必要があります。 作業のこつ 標準の Blackmagic V マウントバッテリープレートは、 Switronix Hypercore/IDX Duo バッテリー ( SMBus モード) のパーセンテージ情報の表示をサポートしています... - Page 357 リアパネルにバッテリープレートをマウントする : 4 隅にあるネジを PH1 プラスドライバーで外して、 Blackmagic URSA Mini の molex 電源カバー をリアパネルから取り外すと、 Blackmagic URSA Mini の 12 way molex 55959-1230 電源コ ネクターがあります。 Blackmagic URSA Mini の 12 way molex 55959-1230 電源コネクターをサードパーティ製のバッ テリープレートに接続します。 サードパーティ製のバッテリープレートを、 Blackmagic URSA Mini のプレートマウントポイント に 4 個の M3 ネジで固定します。 ネジを締める際に、 プレート間でコネクターケーブルがつぶされ...
- Page 358 Batt Batt Batt Batt Monitor 1 Monitor0 +12V Out 11 EnableN アダプターの接続ハウジングの後面図。 各ピンに関してはワイヤーコンフィギュレーションの表を参照。 ワイヤーコンフィギュレーション ピン 信号 カラー 方向 製品概要 URSA へ 1, 2, 3, 4 Batt 12V - 20V 5, 6, 9, 10 Black – – アナログバッテリーレベル / オープン・ ドレイ URSA へ...
-
Page 359: Davinci Resolve の使用
DaVinci Resolve の使用 Blackmagic URSA Mini を使用した撮影は、 映画 / テレビコンテンツ制作の一過程であり、 メディアのバッ クアップ、 管理、 編集、 カラーコレクション、 最終マスター ファイルのエンコードと同じく非常に重要です。 Blackmagic URSA Mini は、 DaVinci Resolve Studio ( Mac OS/Windows 対応) を同梱しているため、 完結型のソリューションとして撮影からポスト プロダクションまでをカバーします! メモ URSA Mini カメラで撮影したクリップのカラーコレクションやグレーディングを正確に行う ために、 最新版の DaVinci Resolve を使用することを推奨します。 例えば、 バージョン 12.5.5 以降... -
Page 360: クリップの読み込み
クリップの読み込み クリップの編集を始めるには、 クリップをメディアプールに読み込む必要があります。 DaVinci Resolve を起動します。 DaVinci Resolve を初めて起動する場合は、 プロジェクトマネー ジャーが表示されるのを待ちます。 表示されたら、 「 Untitled Project 」 アイコンをダブルクリッ クします。 ログインウィンドウが表示される場合は、 Resolve の複数ユーザー環境が有効になっ ています。 この場合は、 ログインウィンドウの左下にある 「新規追加」 をクリックして、 ユーザー 名を入力し、 「ユーザーセットアップを保存」 をクリックして新規ユーザーを作成します。 作成し たユーザーアイコンをダブルクリックすると、 プロジェクトマネージャーに進みます。 次に 「新規 プロジェクト」 をクリックし、 プロジェクトのタイトルを入力して 「作成」 をクリックします。 これ で、... -
Page 361: Raw ファイルの使用
RAW ファイルの使用 RAW ファイルを読み込むと、 DaVinci Resolve はそれらのファイルに含まれているセンサーデータを撮影 時にカメラで使用された ISO 、 ホワイトバランス、 ティント設定に基づいてデコードします。 それらの設定 に基づいたルックに問題がなければ、 そのまますぐに編集を開始できます。 しかし RAW 収録のすばらしい点は、 これらの設定に束縛される必要がまったくないことです! RAW ファイルの使用においては幅広い処理オプションを選択できるため、 ユーザーは独自のワークフロー を作り上げることができます。 各クリップの 「クリップ RAW 設定」 を試してみると、 RAW での作業がいかに パワフルで柔軟性が高いか分かるでしょう。 RAW クリップは、 ポスト プロダクションにおいて最大の柔軟性を提供します。 ProRes や DNx ファ イルがセンサーデータをそれぞれのコーデックに変換するのに対し、 RAW クリップはセンサーか らのデータを変換することなく... -
Page 362: クリップの編集
プロジェクト RAW 設定 ホワイトバランスや ISO 設定の全体的な変更など、 すべてのクリップに共通した設定の変更が必要な場合、 「プロジェクト RAW 設定」 を使用すると複数のクリップに渡っ て包括的な変更を加えられます。 プロジェクト RAW 設定のセッティング : 「ファイル」 をクリックし、 「プロジェクト設定」 を選択して、 プロジェクト設定を開きます。 「 Camera RAW 」 タブを開くと、 右上の小さな矢印の横に RAW フォーマットが表示されています。 この設定は、 CinemaDNG になっ ているはずです。 URSA Mini で撮影した RAW クリッップを新し いタイムラインに初めてドロップする場合、 この設定は自動的に CinemaDNG になります。 さらに... -
Page 363: クリップのトリム
タイムラインで、 クリップを挿入したい位置に再生ヘッドを合わせます。 クリップをタイムラインに挿入するには、 ソースビューアの中でクリックし、 マウスでドラッグし てタイムラインビューアにドロップします。 編集オプションが表示されたら、 目的に応じて編集 の種類を選択します。 選択した編集の種類に応じて、 クリップがタイムラインに挿入されます。 編集の種類およびそれぞれの使 用方法については、 DaVinci Resolve マニュアルを参照してください。 クリップを編集にすばやく追加するには、 メディアプールからクリップをドラッグして、 タイムラインに直 接ドロップします。 その後、 イン点 / アウト点やクリップの位置を調整したり、 エフェクトやタイトルで各種 プラグインを使用したりできます。 このワークフローは、 タイムラインをアーティストのパレットとして使 用するような感覚です。 「エディット」 ページ。 タイムラインエディターを使用して、 クリップのトリム、 順番の変更、 移動、 トランジションの追加などが可能です。 クリップのトリム クリップの編集では、 クリップをトリムして、 各ショットの必要なシーンのみを使用できます。 クリップのト リムには様々な方法がありますが、... - Page 364 「エディット」 ページ。 タイムラインエディターを使用して、 クリップのトリム、 順番の変更、 移動、 トランジションの追加などが可能です。 キーボードショートカットのマッピング 他の編集ソフトウェアで使用するキーボードショートカットに馴染みがあれば、 DaVinci Resolve でも独 自のマッピングを簡単に行い、 ワークフローのスピードと正確性をアップできます。 自分専用のキーボードショートカットをマッピングする : DaVinci Resolve ワークスペースの右下にある、 プロジェクト設定の 「ギア」 アイコンをクリックし ます。 さらに設定リストから 「キーボードマッピング」 を選択します。 表示されるカテゴリーの中から、 変更したいショートカットを選択します (例: タイムラインのカッ ト / ペーストのショートカットは 「編集」 カテゴリーにあります) 。 ショートカットをクリックすると、 設定がハイライトされます。 ショートカットをダブルクリック すると、 設定を変更できます。 キーボードを使用して、...
- Page 365 「スナップ」 機能は、 微調整の際にはオフにできます。 トランジションの追加 トランジションは、 1 つのクリップから次のクリップへの移行を様々な方法で演出するビジュアルエフェク トです。 トランジションを追加することで、 編集をさらに魅力的なものにできます。 トランジションは、 常に 2 つのクリップをつなげるものではありません。 例えば、 「ディゾルブ」 トランジションをクリップの終 了点に加えれば、 スピーディで簡単なフェード ・ トゥ ・ ブラックを作成できます。 「トランジション」 パレットには、 様々なトランジションエフェクトが含まれています。 2 つのクリップの間にディゾルブ ・ トランジションを追加: タイムライン上に 2 つのクリップがあり、 それらが隣り合っ ていることを確認します。 エディット ページ上部、 UI ツールバーの 「エフェクトライブラリ」 ボタンをクリックして、 「ツールパネル」 ボックスを開きます。...
-
Page 366: タイトルの追加
トランジションは、 隣り合うクリップの間に簡単にドラッグ&ドロップできます。 タイトルの追加 タイトルは簡単に作成してイメージに追加できます。 クリップの場合と同様、 あらゆるビデオトラックにタ イトルを配置できます。 トラックが足りない場合は、 既存のトラックのトラック名エリアを右クリックして 「トラックを追加」 を選択し、 簡単にトラックを追加できます。 タイトルを作成する : メディアプールの下、 「エフェクトライブラリ」 のツールボックスの中間あたりまでスクロールし て下がると、 「タイトル」 ジェネレーターがあります。 スクロールバーを使用して、 「タイトル」 の オプションを表示します。 タイトルを表示させたいクリップの上に空のビデオトラックを作成し、 テキストタイトルをドラッ グ&ドロップします。 ブラックを背景にタイトルを表示する場合は、 「 Video 1 」 のクリップの隣 にタイトルをドロップすることもできます。 タイトルを表示するには、 タイムラインの再生ヘッド をタイトルに重ねます。 タイトルクリップをダブルクリックします。 「インスペクタ」 が開き、 タイトルの設定が表示されます。 「テキスト」... - Page 367 パワフルな編集ツールの使用に関する詳細は、 DaVinci Resolve マニュアルを参照してください。 新しいオーディオ / ビデオトラックを追加するには、 トラック名の隣で右クリックし、 「トラックを追加」 を選択します。 オーディオトラックでは、 トラックの種類を選択します。 クリップのカラーコレクション クリップのシーケンスの編集が終わったら、 カラーコレクションを開始できます。 ルックの一貫性を保つ ため、 カラーコレクションはシーケンスの編集が終わっ てから行うのが最善です。 しかし、 DaVinci Resolve の面白い点は、 編集ページとカラーページを行き来して、 微調整などを行い、 新しいクリエイティブな発 見が得られることです。 「カラー」 ページでは、 クリップのルックを完全にコントロールできます。 はじめに、 「カラー」 タブをクリックしてカラーページを開きます。 カラーホイール、 カーブパレット、 カラーコレクションツール全般、 プレビューウィンドウ、 ノードウィンドウ が表示されます。 表示される膨大なツール群に戸惑う必要はありません。 これらはすべて、 ユーザーが素 晴らしい映像を作成するのを手助けする機能です。...
-
Page 368: スコープの使用
つまり、 「リフト」 、 「ガンマ」 、 「ゲイン」 の設定を調整します。 この作業は、 クリーンで均等な作業開始点 を作成し、 映像のカラーグレーディングを開始して、 最も優れたルックを得るために役立ちます。 スコープの使用 クリエイティブなカラー選択を行う際、 カラリストの多くは作品に持たせたい感情 / ルックに焦点を当て、 モニターを使用してそのルックを完成させます。 日常的なオブジェクト、 それらと相互作用する様々な光を 見ることで、 映像に対してどのような効果を加えられるか、 実験しながらアイデアを生み出すこと ができます。 パレードスコープは、 ハイライト、 中間トーン、 シャドウの最適化に役立ちます。 リフト、 ガンマ、 ゲイン、 オフセットのカラーホイールで、 クリップのカラーおよびトーンの バランスを完全にコントロールできます。 各トーン領域のすべてのカラーに同じ調整を加え たい場合は、 カラーホイールの下のダイヤルを前後にドラッグします。 カラーグレーディングのもう一つのやり方に、 内蔵スコープを使用してショットのバランスを取る方法があ ります。 ビデオスコープは 「スコープ」 ボタンをクリックして開きます。 「スコープ」 ボタンは、 パレットツー ルバーで右から... -
Page 369: セカンダリーカラーコレクション
フト」 ダイヤルをクリックします。 ダイヤルを前後にスライドし、 イメージへの影響を確認します。 イメージ内の暗い領域で明るさが増減するのが分かります。 暗い領域の明るさを、 最適なレベ ルに設定します。 リフトを下げ過ぎるとブラックのディテールが失われます。 これを避けるには、 パレードスコープが役に立ちます。 波形で見るブラックの最適な位置は、 パレードスコープ の底辺のすぐ上です。 「ゲイン」 の調整 「ゲイン」 ダイヤルをクリックして、 前後にスライドします。 クリップの最も明るい部分であるハイ ライトを調整できます。 ハイライトは、 パレードスコープの波形の一番上の部分に表示されます。 照明が明るいショットでの最適な位置は、 波形スコープの一番上のラインのすぐ下です。 ハイラ イトが波形スコープの一番上のラインを超えている場合、 それらはクリップされ、 イメージ内の 最も明るい領域のディテールが失われます。 「ガンマ」 の調整 カラーホイールの下の 「ガンマ」 ダイヤルをクリックして、 前後にスライドします。 ガンマの値を上 げると、 イメージの明るさが上昇します。 ガンマを調整すると、 波形の中間の部分も動きます。 この部分は、... -
Page 370: Power Window を追加
カラーの特定 道路の側の芝生や空のブルーなどクリップ内のカラーを強調したり、 対象物のカラーを調整してオーディ エンスの注意を引いたりなど、 特定のカラーを強調することで様々な効果が得られます。 HSL クオリファ イアーツールを使用すれば、 カラーを簡単に特定できます。 HSL クオリファイアーを使用して、 イメージ内の特定のカラーを選択できます。 この機能は、 イメージを部分的に際立たせたり、 ショットの特定の部分に オーディエンスの注意を集めたい場合などに役立ちます。 カラーを特定する : 新しいシリアルノードを追加します。 「クオリファイアー」 パレットを開き、 「選択範囲」 で 「ピッカー」 ツールを選択します。 クリップ内の調整したいカラーをクリックします。 通常、 選択した領域のエッジを滑らかにし、 目的のカラーのみに制限するには多少の調整が必 要です。 選択した領域を確認するには、 「ハイライト」 ボタンを押します。 「色相」 ウィンドウの 「幅」 コントロールを調整して、 選択する色相の幅を調整します。 High 、 Low 、 ソフトネスコントロールを調整して、 選択領域への影響を確認してください。 これで、 カラー ホイールまたはカスタムカーブを使用して、... - Page 371 例えば、 人物に合わせたウィンドウをトラッキングして、 周囲に影響を与えず、 その人物のカラーとコント ラストのみを調整できます。 このようなカラーコレクションを行うことで、 オーディエンスの注意を集めた い部分のみを強調できます。 クリップに Power Window を追加する : 新しいシリアルノードを追加します。 「ウィンドウ」 パレットを開き、 シェイプアイコンをクリックしてウィンドウシェイプを選択します。 選択したウィンドウシェイプがノードに表示されます。 シェイプの周りの青いポイントをクリック&ドラッグして、 シェイプのサイズを調整します。 ピン クのポイントでは、 エッジのソフトネスを調整できます。 作成したシェイプは、 中央のポイントを クリック&ドラッグして位置を変更し、 分離したい領域に合わせられます。 中央のポイントとつ ながったポイントでは、 シェイプを回転できます。 これで、 必要な領域のみに制限したカラーコレクションが可能です。 Power Window を使用して、 イメージ内の特定の部分にセカンダリーコレ クションを適用できます。 ウィンドウのトラッキング カメラや被写体、 ショットの一部に、 動きがある場合があります。 そのため、 DaVinci Resolve のパワフル なトラッキング機能を使用して、...
- Page 372 動く対象物のウィンドウをトラッキングする : 新しいシリアルノードを作成し、 Power Window を追加します。 クリップを開始点に合わせ、 ウィンドウの位置・サイズを調整し、 目的の対象物 / 部分のみ に焦点を合わせます。 「トラッカー」 パレットを開きます。 「分析」 設定のパン、 ティルト、 ズーム、 回転、 遠近 3D から、 クリップ内の動きに最適なものを選択し、 チェックボックスをオンにします。 チェックボックスの左にある順方向への矢印をクリックします。 DaVinci Resolve がトラッキング ポイントをクリップに適用し、 動きを分析しながら以降のフレームへと進みます。 トラッキングが 終わると、 Power Window がクリップ内の動きのパスを追跡します。 トラッキングはほとんどの場合に成功しますが、 複雑なシーンや、 選択した領域の前を障害物が通るケー スでは、 トラッキングに影響が出る場合があります。 この問題は、 キー フレームエディターを使用して解決 できます。...
- Page 373 編集のマスタリング クリップの編集、 カラーコレクション、 グレーディングの作業が終わりました。 次は、 デリバーページで編 集をレンダリングして書き出します。 デリバーページでは、 書き出すクリップを選択し、 フォーマット、 コー デック、 解像度を指定します。 書き出しは、 8/10-bit 非圧縮 RGB/YUV 、 DNxHD 、 ProRes 、 H.264 などの コーデックを使用して、 QuickTime 、 AVI 、 MXF 、 DPX など様々なフォーマットで実行できます。 「デリバー」 ページでは編集を書き出します。 様々なビデオフォーマットとコーデックが選択可能です。 編集を単一のクリップとして書き出す: 「デリバー」 タブをクリックして、 デリバーページを開きます。 ページ左上の...
-
Page 374: Studio Camera Control の概要
力を URSA Mini の 12G-SDI 入力に繋ぐと、 カメラは SDI リンクでコントロールパケットを検出し、 カメラ自 体の機能をコントロールできます。 URSA Mini の接続 Blackmagic URSA Mini の 12G-SDI 出力を ATEM スイッチャーの SDI 入力のいずれかに接続します。 ATEM スイッチャーの SDI 出力 (ダウンコンバート出力および Multi View 出力以外) を、 URSA Mini の 12G-SDI 入力に接続します 。 カメラコントロール信号は、 Multi View およびダウンコンバート... - Page 375 REMOTE REMOTE All SDI and HDMI video con PUSH PUSH STEREO IN STEREO IN PUSH SD, HD and Ultra HD switchable unle PUSH CONTROL CONTROL CH 1 CH 2 CH 1 CH 1 CH 2 CH 2 USB 2.0 HDMI IN USB 2.0 HDMI IN SDI INPUTS...
- Page 376 カラーホイール カラーホイールは DaVinci Resolve カラーコレクターのパワフルな機能で、 各 YRGB チャンネルのリフト、 ガンマ、 ゲイン設定のカラー調整に使用します。 カラーホイールの上部にある 3 つの選択ボタンを押すと、 調整する設定を選択できます。 マスターホイール カラーホイールの下にあるマスターホイールを使用すると、 すべての YRGB チャンネルのコントラストを一 度に調整できます。 あるいは、 各リフト、 ガンマ、 ゲイン設定でルミナンスのみの調整も可能です。 リセットボタン 各カメラコントローラーの右上にあるリセットボタンを使えば、 リセット、 コピー、 あるいはペーストした いカラーコレクション設定を簡単に選択できます。 各カラーホイールにも、 それぞれ独自のリセットボタ ンが付いています。 ボタンを押すと、 設定をデフォルトの状態に戻す、 あるいは設定をコピー / ペースト できます。 ロックされているコントローラーは、 ペースト機能による影響を受けません。 カラーコレクターパネルの右上にあるマスターリセットボタンは、...
- Page 377 ペデスタルレベルを下げる / 上げるには、 コントロールを左右に動かします。 Mac では 「 command 」 キー、 Windows では 「 CONTROL 」 キーを押さえていれば、 ペデスタルレベルのみを調整できます。 該当のカメラがオンエアされている場合、 アイリス / ペデスタルレベル・ コントロールは赤く光ります。 ズームコントロール 電子ズーム機能に対応した互換性のあるレンズを使用している場合は、 ズームコントロールを使用してレ ンズをズームイン / アウトできます。 コントローラーは、 レンズのズームロッカーと同様に機能します。 一方 は望遠、 もう一方はワイドアングルです。 調整幅スライダーの上部にあるズームコントロールをクリックす ると、 上へドラッグしてズームイン、 下へドラッグしてズームアウトできます。 レンズにアクティブレンズコントロールがない場合、 またはカメラが SDI カメラコントロールプロトコルを 使用したズームコントロールに対応していない場合は、...
- Page 378 自動フォーカスボタン 自動フォーカスボタンは、 各カメラコントローラーの左下にあります。 電子フォーカス調整に対応するアク ティブ方式のレンズを使用している場合、 このボタンを押すと自動的にフォーカスを合わせることができ ます。 多くのレンズは電子フォーカスに対応していますが、 マニュアル対応、 あるいは自動フォーカスモー ド対応のレンズもあります。 使用するレンズが自動フォーカスモードになっ ていることを確認してください。 レンズのフォーカスリングをスライドさせて設定できる場合もあります。 サーボズームコントロールに対応 した B4 レンズでは、 ハンドグリップの下にあるスイッチを 「 Servo 」 に設定する必要があります。 自動フォーカスボタンを押すか、 マニュアルフォーカス調整を左 右にドラッグして互換性のあるレンズのフォーカスを合わせます。 マニュアルフォーカス調整 ATEM カメラコントールを使用してレンズのフォーカスをマニュアル調整したい場合は、 各カメラコントロー ラーの下にあるフォーカス調整を使用できます。 ホイールコントロールを左右にドラッグすればマニュアル でフォーカスを調整できます。 カメラからのビデオフィードで、 イ メージがシャープに見えるか確認できます。 マニュアルフォーカス調整は、 サーボフォーカスコントロールに対応した B4/PL レンズを使用している場合 にのみスイッチャーから実行できます。...
- Page 379 ATEM スイッチャーではゲインが dB で表示されます。 ゲインの dB 値はカメラの ISO 設定と以下のよ うに一致します : ゲイン 1600 URSA Mini 4.6K のゲインは 18dB に設定できますが、 URSA Mini 4K の最大ゲインは 12dB です。 シャッタースピード ・ コントロール シャッタースピード ・ コントロールは、 URSA Mini のシャッターアングルの変更に使用します。 同設定はゲインコントロールと同様、 フィルムカメラと放送用カメラで使われる用語の違いにより異なる 名前が付いています。 しかし機能的には、 シャッタースピードを上げることはシャッターアングルを下げる こととまったく同じです。 シャッタースピード...
- Page 380 シャッター シャッター シャッター シャッター シャッター シャッター シャッター アングル アングル アングル アングル アングル アングル スピード 23.98 fps 24 fps 25 fps 29.97 fps 50 fps 59.94 fps 1/50 172.7 172.8 215.8 360* 1/60 143.9 179.8 359.6 1/75 115.1 115.2 143.9 287.7 1/90 95.9 239.8...
-
Page 381: Davinci Resolve プライマリーカラーコレクター
DaVinci Resolve プライマリーカラーコレクター カラーコレクションの経験があるユーザーは、 カメラコントロールのインター フェースをスイッチャースタ イルの CCU インター フェースから、 ポスト プロダクションで使用するカラーグレーディングシステムのプ ライマリーカラーコレクター・ ユーザーインター フェースに変更することもできます。 Blackmagic URSA Mini は、 DaVinci Resolve のプライマリーカラーコレクターを内蔵しています。 Blackmagic URSA Mini でのグレーディングは DaVinci Resolve と全く同じなので、 ライブプロダクションでも DaVinci Resolve の経験を活かしたクリエイティブなカラーグレーディングが可能です。 カラーコレクターパネル はすべてのカメラコントローラーから拡張でき、 追加設定と完全なプライマリーカラーコレクター・イン ター フェースで、 より多彩なカラーコレクション ・ コントロールが可能になります。... - Page 382 幅な調整が可能です。 ‚ カラーリング内でダブルクリック : マスターホイール調整をリセットせずに、 カラー調整をリセットします。 ‚ カラーリング右上のリセットコントロールをクリック : カラーバランス ・ コントロールおよび対応するマスターホイールを両方リセットします。 カラーコレクションパネルのリフト / ガンマ / ゲイン・ カラーホイール。 マスターホイール カラーホイールの下にあるマスターホイールで、 各 YRGB チャンネルのリフト、 ガンマ、 ゲインコント ロールを調整できます。 マスターホイールを使った調整: ‚ マスターホイールを左右にドラッグ : 左にドラッグすると、 選択したイメージのパラメーターが 暗くなり、 右にドラッグするとパラメーターが明るくなります。 調整する際、 下部にある YRGB パ ラメーターに変更が反映されます。 Y のみ調整する場合は、 ALT あるいは Command キーを長押 しして左右にドラッグします。...
- Page 383 色相設定は、 カラーホイールの周囲のすべての色相をローテートします。 デフォルト設定は、 180 °になっ て おり、 オリジナルの色相を表示します。 この数値を上げ下げすると、 カラーホイールに表示される色相配 置に沿っ て、 すべての色相を両方向に回転できます。 ルマミックス設定 Blackmagic URSA Mini に内蔵されたカラーコレクターは、 DaVinci Resolve プライマリーカラーコレクター に基づいています。 DaVinci Resolve は 1980 年代初頭よりカラーコレクターを設計しており、 多くのハリウッ ド映画が DaVinci Resolve を使用してカラーグレーディングされています。 つまり、 Blackmagic URSA Mini に内蔵されたカラーコレクターには、 ユニークかつクリエイティブなパワ フルな機能が搭載されています。 YRGB 処理はこれらの機能のうちの 1 つです。...
-
Page 384: Blackmagic Camera Setup Utility
Blackmagic Camera Setup Utility カメラソフトウェアのアップデート - Mac Blackmagic Camera Setup ユーティリティソフトウェアをダウンロードし、 ダウンロードしたファイルを 解凍します。 ディスクイメージを開くと Blackmagic Camera Setup Installer が表示されます。 インストーラーを起動し、 画面に表示される指示に従います。 インストールが完了したら、 アプリケーシ ョンフォルダーへ行き、 Blackmagic Cameras フォルダーを開きます。 そこには当マニュアル、 Blackmagic Camera Setup ユーティリティ、 そして readme ファイルおよびインフォメーションを含むドキュメント フォ ルダーが入っ ています。 Blackmagic Camera Setup の最新バージョンにアップデートする際に必要なアン インストーラーも含まれます。... - Page 385 CFAST Blackmagic URSA Mini のメモリーカードスロット の上にある Mini-B USB 2.0 ポートを使って カメラソフトウェアをアップデート。 コンピューターに最新の Blackmagic Camera Setup ユーティリティをインストールし、 USB ケーブルでコ ンピューターと Blackmagic URSA Mini を接続します。 Blackmagic URSA Mini では、 USB ポートは、 カメラの左側パネルのメモ リーカードスロットの上に付いています。 ゴム製キャップを開けるとポート にアクセスできます。 Blackmagic Camera Setup ユーティリティを起動し、 画面に表示される指示に従っ てカメラソフトウェア をアップデートします。...
-
Page 386: ポストプロダクションワークフロー
ポスト プロダクションワークフロー CFast 2.0 カード /SD カードからのファイルでの作業 CFast カードをカメラから取り出し、 CFast 2.0 リーダー / ライター、 あるいは CFast ドライブを使用してコンピューターにマウントする と直接編集できます。 CFast 2.0 カード /SD カード からクリップをインポート : Blackmagic URSA あるいは URSA Mini から CFast カードを取り出します。 CFast 2.0 リーダー / ライター、 あるいは CFast ドライブを使用して、 CFast カードを Mac あるいは Windows コンピューターにマウントします。... -
Page 387: Final Cut Pro X を使う
Final Cut Pro X を使う Final Cut Pro X で Apple ProRes 422 HQ クリップを編集するには、 新しいプロジェクトを作成して、 適切な ビデオフォーマットおよびフレームレートを設定する必要があります。 ここでは ProRes 422 HQ 1080p25 を使用します。 Final Cut Pro のプロジェクト設定画面 Final Cut Pro X を起動してメニューバーへ行き、 「 File/New Project 」 を選択します。 プロジェク ト設定を含むウィンドウが開きます。 プロジェクトに名前を付け、... -
Page 388: Adobe Premiere Pro Cc を使う
Media Composer を起動すると 「 Select Project 」 ウィンドウが表示されます。 「 New Project 」 をクリックします。 「 New Project 」 ウィンドウでプロジェクトに名前を付けます。 「 Format 」 ドロップダウンメニューで 「 1080i/59.94 」 を選択します。 「 Color Space 」 ドロップダウンメニューで 「 YCbCr 709 」 を選択します。 「 Raster Dimension 」 ドロップダウンメニューで 「 1920 × 1080 」 を選択し、 「 OK 」 をクリックします。 「... -
Page 389: Autodesk Smoke 2013 を使う
Autodesk Smoke 2013 を使う Autodesk Smoke 2013 でクリップを編集するには、 新しいプロジェクトを作成して、 適切なビデオフォー マット、 ビット深度、 フレームタイプおよびフレームレートを設定します。 ここでは ProRes 422 HQ 1080p25 を使用します。 Autodesk Smoke 2013 Smoke を起動すると 「 Project and User Settings 」 ウィンドウが表示されます。 プロジェクト ヘディングの 「 New 」 ボタンをクリックします。 「 Create New Project 」 ウィンドウが開きます。 プロジェクトに名前を付けます。 「... -
Page 390: Blackmagic Ursa Mini B4 Mount
Blackmagic URSA Mini B4 Mount Blackmagic URSA Mini PL モデルの PL マウントは取り外し、 オプションの B4 マウントに交換できます。 このマウントは、 URSA Mini Pro 4.6K の B4 マウントとは若干異なります。 例えば、 URSA Mini Pro 4.6K の EF ボタンのリリースハウジングのためにネジ穴の位置が異なります。 例えば、 URSA Mini Pro 4.6K の EF ボタンのリリースハウジングのためにネジ穴の位置が異なります。 URSA Mini PL モデルの B4 マウントは、 Blackmagic Design 販売店で購入できます。... - Page 391 レンズマウントを注意深くカメラ筐体から取り外 装着されている 0.50mm シムは、 11 時の位置に します。 取り外したネジは、 レンズマウントと共 アライメントピンがあります。 に保管してください。 Blackmagic URSA Mini B4 Mount に同梱される 11 時の位置にあるアライントメントピンとスロッ 2 枚の 0.50mm シムを、 オリジナルの 0.50mm シム トを合わせ、 Blackmagic URSA Mini B4 Mount の上に重ねます。 これにより、 フランジ焦点距離 をカメラに乗せます。 を最適にするのに必要な間隔が得られます。 レンズマウントのベースと接触するまで、 6 つの PL トルクレンチと...
-
Page 392: Ursa Mini Pl のシム調整
シムは、 レンズマウントとカメラ筐体の間に設置して、 被写体からセンサーまでの距離をレンズのフォーカ スマークと一致させます。 これらは通常 PL レンズに使用されています。 こういったシネマレンズはマニュア ルでフォーカスを行ない、 レンズバレルの焦点距離のマークが極めて正確です。 URSA Mini Pro 4.6K の交 換可能なレンズマウントにもシムは使用できます。 Blackmagic URSA Mini には 0.50mm のシムが既に装着されています。 Blackmagic URSA Mini Pro 4.6K Shim Kit には様々な厚さのシムが含まれており、 Blackmagic Design の取り扱い販売店で購入 できます。 URSA Mini Pro 4.6K のすべてのマウントキットにも、 シムセットは含まれています。 後側焦点の要件に応じた厚さ のシムを使用してください。... - Page 393 装着されている 0.50mm シムを取り外します。 レン カメラに 0 .1 0 m m シムを取り付け、 その 後 ズのフォーカスマークを焦点距離と合わせるため Blackmagic URSA Mini Pro 4.6K の PL レンズマ に必要となる厚さのシムを装着します。 ウ ント を カ メラ 本 体 に 取 り 付 け ま す。 Cooke /i Technology 用の PL マウントのピンは...
-
Page 394: Ursa Mini Pro 4.6K のシム調整
レンズマウントのベースと接触するまで、 5 本のマ トルクレンチと 2.0mm の六角レンチを使い、 ネジ 1 ウントネジを緩く回します。 5 本のネジを締めるた を 1 度フル回転させます。 同様にネジ 2 、 3 、 4 、 5 、 6 めには、 PL ロックリングを回すことで隠れたネ を順に回転させていきます。 1 度に 1 回転ずつ上記 ジ穴が確認できます。 の順序で締めていき、 すべてのネジが最大トルク 0.45Nm に締まるまでこの作業を続けます。 URSA Mini Pro 4.6K のシム調整 URSA Mini Pro 4.6K のシム調整は... -
Page 395: デベロッパーの皆様へ
Blackmagic Design cameras. Please refer to the ‘Understanding Studio Camera Control’ chapter section of this manual, or the ATEM Switchers Manual and SDK manual for more information. These can be downloaded at www.blackmagicdesign.com/support. This document describes an extensible protocol for sending a uni directional stream of small control messages embedded in the non-active picture region of a digital video stream. - Page 396 The command id is an 8 bit unsigned integer which indicates the message type being sent. Receiving devices should ignore any commands that they do not understand. Commands 0 through 127 are Command id (uint8) reserved for commands that apply to multiple types of devices. Commands 128 through 255 are device specific.
- Page 397 Data types 129 through 255 are available for device specific purposes. The operation type specifies what action to perform on the specified Operation type (uint8) parameter. Currently defined values are: The supplied values are assigned to the specified parameter. Each element will be clamped according to its valid range.
- Page 398 Group Parameter Type Index Minimum Maximum Interpretation [0] = frame rate – – 24, 25, 30, 50, 60 [1] = M-rate – – 0=regular, 1=M-rate 0=NTSC, 1=PAL, 2=720, [2] = dimensions – – 3=1080, 4=2k, Video mode int8 5=2k DCI, 6=UHD 0=progressive, [3] = interlaced –...
- Page 399 Group Parameter Type Index Minimum Maximum Interpretation 0.0=minimum, Mic level fixed16 – 1.0=maximum 0.0=minimum, Headphone level fixed16 – 1.0=maximum 0.0=minimum, Headphone program mix fixed16 – 1.0=maximum 0.0=minimum, Speaker level fixed16 – 1.0=maximum Audio 0=internal mic, 1=line level input, Input type int8 –...
- Page 400 Group Parameter Type Index Minimum Maximum Interpretation 0.0=minimum, Peaking level fixed16 – 1.0=maximum 0=disable bars, Color bars display int8 – 1-30=enable bars with time (seconds) timeout (s) [0] = focus 0=Peak, Display – – assist method 1=Colored lines 0=Red, Focus Assist int8 1=Green, [1] = focus...
- Page 401 Group Parameter Type Index Minimum Maximum Interpretation [0] red default 0.0 [1] green default 0.0 Lift Adjust fixed16 [2] blue default 0.0 [3] luma default 0.0 [0] red default 0.0 [1] green default 0.0 Gamma Adjust fixed16 [2] blue default 0.0 [3] luma default 0.0 [0] red...
- Page 402 Example Protocol Packets Packet Operation Length Byte header command data trigger instantaneous auto focus on camera 4 turn on OIS on all cameras set exposure to 10 ms on camera 4 (10 ms = 10000 0x10 0x27 0x00 0x00 us = 0x00002710) add 15% to zebra level 0x33 0x01 (15 % = 0.15 f = 0x0133 fp)
- Page 403 Blackmagic Embedded Tally Control Protocol Version 1.0 (30/04/14) This section is for third party developers or anybody who may wish to add support for the Blackmagic Embedded Tally Control Protocol to their products or system. It describes the protocol for sending tally information embedded in the non-active picture region of a digital video stream.
- Page 404 uint8[0] bit 0: slave device 1 program tally status (0=off, 1=on) bit 1: slave device 1 device preview tally status (0=off, 1=on) bit 2-3: reserved (0b00) bit 4: slave device 2 program tally status (0=off, 1=on) bit 5: slave device 2 preview tally status (0=off, 1=on) bit 6-7: reserved (0b00) uint8[1]...
-
Page 405: ヘルプ
ヘルプ すぐに情報が必要な方は、 Blackmagic Design オンラインサポートページで、 Blackmagic Camera の 最新サポート情報を確認できます。 Blackmagic Design オンラインサポートページ 最新のマニュアル、 ソフトウェア 、 サポートノートは、 www.blackmagicdesign.com/jp/support の Blackmagic Design サポートセンターで確認できます。 Blackmagic Design サポートへの連絡 サポートページで必要な情報を得られなかった場合は、 サポートページの 「メールを送信」 ボタンを使用 して、 サポートのリクエストをメール送信してください。 あるいは、 サポートページの 「お住まいの地域の サポートオフィス」 をクリックして、 お住まいの地域の Blackmagic Design サポートオフィスに電話でお 問い合わせください。... -
Page 406: 規制に関する警告および安全情報
規制に関する警告および安全情報 規制に関する警告 欧州連合内での電気機器および電子機器の廃棄処分 製品に記載されている記号は、 当該の機器を他の廃棄物と共に処分してはならないことを示し ています。 機器を廃棄するには、 必ずリサイクルのために指定の回収場所に引き渡してください。 機器の廃棄において個別回収とリサイクルが行われることで、 天然資源の保護につながり、 健 康と環境を守る方法でリサイクルが確実に行われるようになります。 廃棄する機器のリサイクル のための回収場所に関しては、 お住いの地方自治体のリサイクル部門、 または製品を購入した 販売業者にご連絡ください。 この機器は、 FCC 規定の第 15 部に準拠し、 クラス A デジタル機器の制限に適合していることが確 認されています。 これらの制限は、 商用環境で機器を使用している場合に有害な干渉に対する 妥当な保護を提供するためのものです。 この機器は無線周波エネルギーを生成、 使用、 放出す る可能性があります。 また、 指示に従っ てインストールおよび使用しない場合、 無線通信に有害 な干渉を引き起こす恐れがあります。 住宅地域で当製品を使用すると有害な干渉を引き起こす 可能性があり、 その場合はユーザーが自己責任で干渉に対処する必要があります。 動作は次の... - Page 407 保証 限定保証 Blackmagic Design は、 お買い上げの日から 12 ヶ月間、 本製品の部品および仕上がりについて瑕疵がない ことを保証します。 この保証期間内に製品に瑕疵が見つかった場合、 Blackmagic Design は弊社の裁量 において部品代および人件費無料で該当製品の修理、 あるいは製品の交換のいずれかで対応いたします。 この保証に基づいたサービスを受ける際、 お客様は必ず保証期限終了前に Blackmagic Design に瑕疵を 通知し、 適応する保証サービスの手続きを行ってください。 お客様の責任において不良品を梱包し、 Blackmagic Design が指定するサポートセンターへ配送料前払で送付いただきますようお願い致します。 理由の如何を問わず、 Blackmagic Design への製品返送のための配送料、 保険、 関税、 税金、 その他すべ ての費用はお客様の自己負担となります。 不適切な使用、 または不十分なメンテナンスや取扱いによる不具合、 故障、 損傷に対しては、 この保証は 適用されません。...
-
Page 408: Français
Manuel d'utilisation et d'installation Blackmagic URSA Mini et URSA Mini Pro 4.6K Blackmagic Viewfinder et Studio Viewfinder Juin 2017 Français... - Page 409 Cher client, chère cliente, Nous vous remercions d'avoir fait l'acquisition d'une Blackmagic URSA Mini ! Depuis le lancement de notre première caméra numérique professionnelle, il y a quelques années, nous avons eu la chance de recevoir plus de conseils et de commentaires que pour n’importe quel autre produit ! Nous avons tous grandi en admirant le travail des plus grands réalisateurs et...
- Page 410 Préparer un support sur la Blackmagic URSA Mini Paramètres du moniteur (Monitor) Préparer un support sur la Paramètres Audio Blackmagic URSA Mini Pro 4.6K Paramètres de l'onglet Setup Préparer le support sur Mac Préréglages Préparer le support sur Windows Onglet LUTS Enregistrer Saisie des métadonnées...
- Page 411 Utiliser Adobe Premiere Pro CC Importation des clips Utiliser Autodesk Smoke 2013 Travailler avec des fichiers RAW Montage des clips Blackmagic URSA Mini B4 Mount Raccord des clips Calage des montures Mappage des raccourcis clavier Calage de la monture Ajout de transitions d’objectif PL sur votre URSA Mini...
-
Page 412: Quelle Caméra Utilisez-Vous
Vous verrez en lisant ce manuel que certaines fonctionnalités sont conçues spécialement pour une caméra Blackmagic URSA Mini en particulier. Toutes les caméras URSA Mini produisent des images d'une qualité exceptionnelle et disposent d'une large plage dynamique, tout en conservant le même boîtier. -
Page 413: Ursa Mini
URSA Mini, face gauche URSA Mini Pro 4.6K La caméra Blackmagic URSA Mini Pro 4.6K est légèrement différente. Cette caméra est uniquement disponible avec un capteur 4.6K et une monture EF. Mais vous pouvez aussi utiliser d'autres objectifs via la monture interchangeable. Pour plus d'informations sur la monture d’objectif interchangeable, consultez la section «... -
Page 414: Mise En Route
Mise en route Pour commencer à utiliser la Blackmagic URSA Mini, il vous suffit d’attacher la poignée, de monter l’objectif et d'alimenter la caméra. Monter un objectif Monter un objectif sur la caméra est similaire pour la URSA Mini 4K, la URSA Mini 4.6K et la URSA Mini Pro 4.6K, cependant, les montures EF, PL et B4 fonctionnent de manière légèrement différente. - Page 415 L'objectif ne doit pas pivoter. LENS Monter un objectif à monture PL sur la Blackmagic URSA Mini PL et le retirer. URSA Mini Pro 4.6K La monture PL de la URSA Mini Pro 4.6K comprend quatre broches placées en haut de la monture pour communiquer avec les objectifs qui prennent en charge la technologie /i Technology de Cooke.
- Page 416 Tournez la bague de blocage dans le sens des aiguilles d'une montre pour serrer l'objectif contre la monture et verrouiller sa position. LENS Monter un objectif à monture B4 sur la Blackmagic URSA Mini B4 et le retirer. Mise en route...
-
Page 417: Alimenter La Caméra
Alimentez la Blackmagic URSA Mini à l'aide de l'adaptateur AC vers 12V DC fourni. Vous pouvez utiliser des batteries externes tierces conformes aux normes de l'industrie, telles que les batteries V mount ou Gold Mount avec la URSA Mini. - Page 418 Appuyez sur le bouton Off et maintenez-le enfoncé pour éteindre la caméra. Pour allumer la URSA Mini Pro 4.6K : Sur la Blackmagic URSA Mini Pro 4.6K, ce bouton se trouve à l'arrière de l'écran LCD. Déplacer l'interrupteur sur On pour allumer la caméra.
- Page 419 XLR 1 XLR 2 XLR 1 XLR 2 Vous pouvez également maintenir les boutons d'enregistrement et d'avance rapide à l'arrière de l'écran LCD pour allumer et éteindre la caméra. CONSEIL Si le bouton de mise en marche de la caméra est activé, mais que la URSA Mini Pro 4.6K est éteinte, il se peut que vous l'ayez éteinte via Bluetooth ou via les boutons Rec et Forward Skip du panneau de contrôle.
-
Page 420: Support De Stockage
Support de stockage La Blackmagic URSA Mini prend en charge les cartes cfast 2.0 Pour enregistrer de la vidéo en 4.6K, 4k, ultra hd, 2k ou hd. La URSA Mini Pro 4.6Kpeut également enregistrer de la vidéo à l'aide de cartes sd uhs-ii et uhs-i. - Page 421 Les cartes CFast 2.0 de la série D-serie de Sandisk sont les seules à avoir été approuvées pour une utilisation avec la Blackmagic URSA Mini. Elles sont facilement reconnaissables grâce à l'icône D inscrite sur le dos de la carte dans le coin inférieur gauche.
- Page 422 64GB Lexar Professional 3400x 128GB Lexar Professional 3400x 256GB Pour retrouver les informations les plus récentes sur les cartes CFast prises en charge par la Blackmagic URSA Mini, consultez la page d'assistance de Blackmagic Design : www.blackmagicdesign.com/fr/support. Support de stockage...
-
Page 423: Cartes Sd
Cartes SD En plus des cartes CFast 2.0, les Blackmagic URSA Mini Pro 4.6K enregistrent sur des cartes SD UHS-I et UHS-II haut débit. Avec des cartes UHS-II SDXC, vous pouvez obtenir des clips Ultra HD en enregistrant vos images en ProRes HQ jusqu'à 2160p. - Page 424 Si vous utilisez Windows, vous devrez sélectionner le format de disque pour Windows exFAT. Les ordinateurs Mac peuvent également lire le format exFAT. Le tableau ci-dessous présente les cartes SD recommandées pour la Blackmagic URSA Mini Pro. Pour obtenir les informations les plus récentes, veuillez consulter la dernière version de ce manuel.
- Page 425 Ultimate UHS-II 180MB/s SDXC 64GB Wise 285MB/s UHS-II SDXC 64GB Pour retrouver les informations les plus récentes sur les cartes SD prises en charge par la URSA Mini Pro, consultez la page d'assistance de Blackmagic Design : www.blackmagicdesign.com/fr/support. Support de stockage...
-
Page 426: Préparer Le Support Pour L'enregistrement
Verrouiller et déverrouiller les cartes SD Les cartes SD peuvent être verrouillées afin d'éviter d'effacer des données. Lorsque vous insérez une carte, veillez à ce qu'elle ne soit pas protégée en écriture. La protection en écriture se désactive en déplaçant le petit poussoir en plastique situé à gauche de la carte. Une fois l'enregistrement terminé, vous pouvez réactiver la protection en écriture en faisant glisser le poussoir à... -
Page 427: Préparer Un Support Sur La Blackmagic Ursa Mini
SD ou CFast. Veuillez toujours vérifier les paramètres avant de formater les supports. Préparer un support sur la Blackmagic URSA Mini Appuyez sur un des supports en bas de l'écran tactile pour ouvrir le gestionnaire de stockage. -
Page 428: Préparer Un Support Sur La Blackmagic Ursa Mini Pro 4.6K
SD, consultez la section « Cartes SD » de ce manuel. Préparer un support sur la Blackmagic URSA Mini Pro 4.6K Pour préparer un support sur la URSA Mini Pro 4.6K, il faut suivre le même procédé qu'avec la URSA Mini. -
Page 429: Préparer Le Support Sur Mac
Pour plus d'informations sur cette opération, consultez la section « Cartes SD » de ce manuel. Préparer le support sur Mac Utilisez l'utilitaire de disque de Mac OS pour formater votre carte au format HFS+ ou exFAT. N'oubliez pas de sauvegarder toutes les informations importantes contenues sur votre carte CFast ou sur votre carte SD, car toutes les données seront perdues lors du formatage. - Page 430 Pour les faibles débits, réduisez la fréquence d'images et la résolution, ou utilisez un codec compressé, par exemple le codec ProRes. Pour plus d'informations, consultez le site Internet de Blackmagic Design : www.blackmagicdesign.com/fr Support de stockage...
-
Page 431: Enregistrer
REC de l'écran rabattable. Appuyez sur le bouton d'enregistrement pour démarrer l'enregistrement. Sur la Blackmagic URSA Mini Pro 4.6K, le bouton d'enregistrement externe est situé sur le panneau de contrôle avant afin de faciliter le tournage à l'épaule. - Page 432 Le tableau ci-dessous indique les différents codecs et résolutions disponibles, ainsi que la fréquence d'images maximale du capteur pour la URSA Mini 4.6K et la URSA Mini Pro 4.6K. Blackmagic URSA Mini 4.6K et URSA Mini Pro 4.6K Résolution Codec Type de capteur Fréquence d'images maximale...
- Page 433 Blackmagic URSA Mini 4.6K et URSA Mini Pro 4.6K Résolution Codec Type de capteur Fréquence d'images maximale 4608x1920 Lossless RAW Window 60 (dual card) 4608x1920 RAW 3:1 Window 4608x1920 RAW 4:1 Window 4608x1920 ProRes 444XQ Window 4.6K 2.4:1 4608x1920 ProRes 444...
- Page 434 Blackmagic URSA Mini 4.6K et URSA Mini Pro 4.6K Résolution Codec Type de capteur Fréquence d'images maximale 3072x2560 Lossless RAW Window 60 (dual card) 3072x2560 RAW 3:1 Window 3072x2560 RAW 4:1 Window 3072x2560 ProRes 444XQ Window 3K Anamorphosé 3072x2560 ProRes 444...
- Page 435 1920x1080 ProRes Proxy Full Sélectionner le codec et la résolution de votre choix sur la Blackmagic URSA Mini. Appuyez sur le bouton MENU du panneau de contrôle. Allez sur la première page du menu Record. Saisissez la combinaison de codec, qualité et résolution souhaitée.
-
Page 436: Enclenchement Automatique De Enregistrement
Enclenchement automatique de enregistrement La URSA Mini envoie automatiquement un signal via les sorties SDI. Ce signal enclenche alors l'enregistrement lorsque la caméra est connectée à du matériel qui prend en charge le démarrage de l'enregistrement via SDI, tel que le Blackmagic Video Assist. Ainsi, lorsque vous appuyez sur le bouton REC de votre caméra, le matériel SDI externe commence aussi à... - Page 437 Carte Fréquences CinemaDNG CinemaDNG CinemaDNG ProRes ProRes ProRes ProRes ProRes ProRes CFast d'images 444 XQ 422 HQ 422 LT 422 Proxy Durée Durée Durée Durée Durée Durée Durée Durée Durée 23.98 75 min 142 min 175 min 84 min 127 min 189 min 283 min 403 min...
- Page 438 3K Anamorphosé* Carte Fréquences CinemaDNG CinemaDNG CinemaDNG ProRes ProRes ProRes ProRes ProRes ProRes CFast d'images 444 XQ 422 HQ 422 LT 422 Proxy Durée Durée Durée Durée Durée Durée Durée Durée Durée 23.98 20 min 39 min 48 min 22 min 33 min 50 min 75 min...
- Page 439 4K 16:9* Carte Fréquences CinemaDNG CinemaDNG CinemaDNG ProRes ProRes ProRes ProRes ProRes ProRes CFast d'images 444 XQ 422 HQ 422 LT 422 Proxy Durée Durée Durée Durée Durée Durée Durée Durée Durée 23.98 17 min 32 min 40 min 18 min 27 min 41 min 62 min...
-
Page 440: Lecture
La Blackmagic URSA Mini dispose de boutons de lecture et de commandes de transport sur les panneaux de contrôle interne et ergonomique. REMARQUE La Blackmagic URSA Mini lira les clips dont la qualité du codec est différente, seulement si le codec, la fréquence d'images et la résolution sont identiques. Lecture... - Page 441 Les commandes de transport de la caméra fonctionnent de la même manière que celles d'un lecteur CD : le bouton d'avance rapide permettra de lire le clip suivant. Appuyez une fois sur le bouton de retour pour retourner au début du clip en cours ou deux fois pour lire le clip précédent. Maintenez ces boutons enfoncés pour lire en accéléré.
-
Page 442: Découvrir La Ursa Mini
« Paramètres » de ce manuel. Monture d'objectif Les caméras URSA Mini comprennent une monture EF ou PL. La Blackmagic URSA Mini Pro 4.6K est équipée d'une monture d’objectif interchangeable qui peut accueillir des objectifs EF, PL et B4. -
Page 443: Face Gauche - Ursa Mini
Balance des blancs automatique Le bouton balance des blancs automatique Auto W/B permet de régler la balance des blancs en fonction de ce qui se trouve au centre de l'écran. Par exemple, régler la balance des blancs automatique en plaçant une charte de gris devant l'objectif. Consultez la section «... - Page 444 Modèle URSA Mini Pro 4.6K, écran tactile rabattu Interrupteur de mise en marche Interrupteur permettant de mettre en marche la caméra. Il est également possible d'appuyer sur les boutons d'enregistrement et d'avance rapide simultanément pour allumer la caméra. Filtres ND La URSA Mini comprend trois filtres gris neutre pour régler la quantité...
-
Page 445: Face Droite
Interrupteur pour les supports de stockage Utilisez l'interrupteur pour choisir entre la carte CFast et la carte SD. Port USB Port USB de type C pour les mises à jour du logiciel interne. Pour plus d'informations, consultez la section Blackmagic Camera Setup Utility de ce manuel. Panneau de contrôle interne Lorsque l'écran rabattable de la URSA Mini Pro 4.6K est ouvert, vous pouvez accéder au panneau de contrôle interne. -
Page 446: Face Arrière
Face arrière Fixation pour batterie La Blackmagic URSA Mini est équipée de 4 pas de vis et de connecteurs molex sous un petit panneau afin d'attacher une fixation pour batterie V-mount ou gold mount en option. Pour plus d'information, consultez la section « Fixer la batterie » de ce manuel. -
Page 447: Face Supérieure
Vous pouvez également régler la caméra pour utiliser le signal de référence du mélangeur ATEM via l'entrée SDI Program. Ceci est particulièrement utile lorsque vous travaillez avec des mélangeurs ATEM, car les caméras peuvent recevoir le retour programme et les signaux de contrôle. -
Page 448: Commandes De La Ursa Mini
Commandes de la URSA Mini La Blackmagic URSA Mini est dotée d'un panneau de contrôle sur la face gauche. Il se situe derrière l'écran rabattable et comporte des boutons et des molettes pour régler les paramètres et les niveaux de contrôle audio. Contrôlez les niveaux audio à l'aide des vumètres situés sur l'écran tactile. - Page 449 « Menu Paramètres » de ce manuel. Enregistrement Le bouton d'enregistrement de la Blackmagic URSA Mini est situé derrière l'écran LCD, au dos de l'écran et sur la poignée latérale. Pour démarrer ou arrêter l'enregistrement, appuyez sur l’un de ces boutons. Pour plus d'informations, consultez la section « Enregistrement » de ce manuel.
-
Page 450: Poignée Latérale
Boutons de fonction Au dos de l'écran LCD de la Blackmagic URSA Mini se trouvent les boutons de fonction F1 et F2. Vous pouvez assigner ces boutons aux fonctions de votre choix à l'aide du menu Setup de la URSA Mini. - Page 451 à l'aide d'un tournevis à tête plate ou en tournant l'anneau en D. Refermez le capuchon en plastique. Attacher la poignée latérale à la Blackmagic URSA Mini. La URSA Mini est livrée avec un court câble LANC qui permet de contrôler la caméra à...
-
Page 452: Boutons De Contrôle De La Ursa Mini Pro 4.6K
Boutons de contrôle de la URSA Mini Pro 4.6K La Blackmagic URSA Mini Pro 4.6K possède des panneaux de contrôle sur son boîtier, ainsi que sur les faces externes et internes de l'écran tactile rabattable pour vous offrir un accès rapide à toutes les fonctions et aux outils de monitoring. - Page 453 Filtres ND La URSA Mini possède trois filtres gris neutre (ND) internes. Il est possible de désactiver le filtre ou de choisir entre les paramètres 2, 4 et 6 diaphragmes. Ces filtres permettent de réduire la quantité de lumière reçue par le capteur de la URSA Mini par un nombre donné de repères de diaphragme.
- Page 454 Molette Menu Lorsque les informations d'état sont activées sur la sortie SDI avant de la URSA Mini, vous pouvez utiliser la molette Menu pour naviguer dans les nombreuses fonctions de l'affichage semi-transparent, auxquelles vous avez habituellement accès depuis l'écran tactile LCD. Il suffit d'appuyer sur la molette Menu comme sur un bouton pour accéder à...
-
Page 455: Panneau De Contrôle Ergonomique
« Commandes tactiles » de ce manuel. Le bouton d'enregistrement REC de la Blackmagic URSA Mini Pro 4,6K est situé sur la face gauche de la caméra. Pour démarrer ou arrêter l'enregistrement, appuyez sur le bouton REC. - Page 456 Haut-parleur du moniteur Le petit haut-parleur situé à l'extérieur du panneau de contrôle permet d'écouter l'audio lors du tournage. Lorsque l’opérateur filme à l’épaule, le petit haut-parleur est positionné à hauteur d’oreille. Pour ajuster le volume du haut-parleur, il suffit de faire tourner la molette, comme décrit dans la section «...
- Page 457 ‚ Voyant batterie Si vous utilisez la URSA Mini Pro 4.6K avec une batterie, ce voyant affiche l'autonomie de la batterie par tranches de 25%. Chaque barre du voyant correspond à 25% de l'autonomie restante de la batterie. Lorsque la charge de la batterie passe au-dessous de 20%, le voyant d'état LED situé...
- Page 458 Commandes de l'écran d'état LCD Commandes de l'écran d'état LCD de la URSA Mini Pro 4.6K Still Appuyez sur ce bouton pour capturer une image fixe au format DNG non compressé. Cette image sera sauvegardée dans le dossier Stills dans le répertoire racine du support sur lequel vous enregistrez.
- Page 459 Boutons de contrôle et de lecture Boutons de contrôle et de lecturede la URSA Mini Pro 4.6K Iris Le bouton Iris active le réglage automatique de l'ouverture lorsque la caméra est utilisée avec un objectif compatible. Lorsque le mode Video est sélectionné dans les paramètres de la plage dynamique, une simple pression sur le bouton Iris règle l'exposition moyenne en fonction des hautes lumières et des zones d'ombre de la scène.
-
Page 460: Panneau De Contrôle Interne
Molettes de réglage des niveaux audio Utilisez les molettes de réglage intégrées pour régler les niveaux d'enregistrement audio des canaux 1 et 2. Tournez les molettes pour augmenter ou diminuer le niveau d'enregistrement audio de chaque canal. Sur l’écran, vérifiez le vumètre correspondant à... - Page 461 REMARQUE Il est recommandé de brancher le câble XLR avant d'activer l'alimentation fantôme. Il est également important de désactiver l'alimentation fantôme lorsqu'il n'y a plus de micro avec alimentation fantôme connecté. Si vous connectez des appareils dont les sorties XLR AES ne possèdent pas de protection contre l'alimentation fantôme et que vous envoyez de l'alimentation fantôme à...
- Page 462 Menu Appuyez sur le bouton Menu pour ouvrir le menu de navigation. Pour plus d'information concernant le menu de navigation et le réglage des paramètres, consultez la section « Menu Paramètres » de ce manuel. Pour démarrer ou arrêter l'enregistrement, appuyez sur l’un des boutons intitulés Rec. Pour plus d'informations, consultez la section «...
-
Page 463: Commandes De L'écran Tactile
Commandes de l'écran tactile Écran tactile L'écran tactile rabattable de 5” de la Blackmagic URSA Mini pivote afin de pouvoir filmer dans tous les angles de vues. Les boutons situés au dos de l'écran vous permettent de contrôler la URSA Mini lorsque l'écran est rabattu et quand la caméra est équipée du viseur URSA pour une utilisation à... - Page 464 Touchez l'indicateur zébra au sein des options de l'écran LCD pour ouvrir ce paramètre sur la URSA Mini. Dans l’onglet Zebra, touchez le bouton en bas à gauche de l'écran pour afficher le zébra sur l'écran tactile. Réglez le niveau d'exposition auquel les hachures apparaîtront en faisant glisser le curseur vers la gauche ou la droite, ou touchez les flèches pour incrémenter le pourcentage du zébra.
- Page 465 Repères de cadrage Ce paramètre affiche les repères de cadrage sur l'écran tactile. Vous pouvez choisir entre sept repères de cadrage pour chaque sortie de la URSA Mini. Les repères de cadrage offrent des formats d'image propres aux standards du cinéma, de la télévision et d'Internet.
- Page 466 ‚ 4:3 Affiche un rapport d'image de 4:3 compatible avec les écrans de télévision SD, ou en tant qu'aide de cadrage lorsque vous utilisez des adaptateurs anamorphiques 2x. CONSEIL Vous pouvez changer l'opacité des repères de cadrage. Pour plus d'information, consultez la section « Paramètres du moniteur » de ce manuel. REMARQUE Pour plus d'information concernant l'activation de l'aide à...
- Page 467 La grille selon de la règle des tiers s'adapte automatiquement à tous les repères de cadrage. ‚ Third Affiche une grille dotée de deux lignes verticales et de deux lignes horizontales divisant l'image en tiers. Cet outil très pratique structure la composition de vos plans. Comme le regard se pose naturellement près des points d'intersection de ces lignes, il est utile de cadrer des éléments importants dans ces zones-là.
- Page 468 La zone de sécurité est également utile pour cadrer un plan qui sera stabilisé en post-production et dont les bords peuvent être rognés. Elle est aussi pratique pour indiquer un rognage spécifique. Par exemple, en réglant ce paramètre sur 50% lorsque vous enregistrez en Ultra HD 3840x2160, vous verrez à...
- Page 469 La Blackmagic URSA Mini possède 8 paramètres de fréquence d'images dont 23.98, 24, 25, 29.97, 30, 50, 59.94 et 60 i/s. Pour régler la fréquence d'images du projet de la URSA Mini dans le menu FSP, touchez les flèches gauche et droite situées de part et d’autre de la fréquence d'images en bas de...
- Page 470 Fréquence d'images du capteur La fréquence d'images du capteur vous permet de régler le nombre d'images par seconde que le capteur enregistre. Cette fréquence d'images détermine la vitesse de lecture de votre vidéo en fonction de la fréquence d'images du projet. Lorsque le bouton off speed frame rate est activé, touchez les flèches situées de part et d’autre de la fréquence d'images du capteur ou déplacez le curseur pour régler le paramètre.
- Page 471 Shutter L'indicateur Shutter affiche l'angle d'obturation. Cet indicateur vous permet de changer manuellement l'angle d'obturation de la URSA Mini ou de choisir que l'angle d'obturation ait la priorité sur l'exposition automatique. Indicateur Shutter de la URSA Mini. Touchez cet indicateur pour accéder aux paramètres de l'obturateur.
- Page 472 Si vous tournez en extérieur ou si vous utilisez des lumières sans scintillement, vous pouvez également sélectionner un angle d'obturation en touchant deux fois l'indicateur de l'obturateur situé en bas de l'écran. Cela fera apparaître le clavier qui permettra de régler l'angle d'obturation entre 5 et 360 degrés.
- Page 473 Iris L'indicateur Iris affiche l'ouverture de l'objectif sélectionnée. En touchant cette icône, vous pouvez changer l'ouverture des objectifs compatibles et régler les modes d'exposition automatique qui modifient l'iris. Indicateur Iris de la URSA Mini. Touchez cet indicateur pour accéder aux paramètres de l'obturateur. REMARQUE Pour utiliser le contrôle de l'iris sur l'écran tactile, la URSA Mini doit être équipée d'un objectif qui prend en charge le changement d'ouverture via la...
- Page 474 Lorsque le mode Auto exposure qui modifie l'iris est activé, la lettre A apparait à côté de l'indicateur de l'iris en haut de l'écran URSA Mini. CONSEIL L'exposition automatique fonctionne de manière progressive avec des objectifs B4 ou PL compatibles conçus pour la production de films. Les objectifs EF peuvent produire une exposition saccadée lorsque vous changez l'ouverture.
- Page 475 Indicateur ISO de la URSA Mini. Touchez cet indicateur pour accéder aux paramètres ISO. Dans le menu ISO de la URSA Mini, ces paramètres apparaissent en bas de l'écran tactile. Toutefois, en fonction de la situation, vous pouvez choisir une sensibilité ISO plus ou moins élevée. Par exemple, si vous tournez en conditions de faible éclairage avec la URSA Mini 4.6K, vous pouvez régler l'ISO sur 1600, mais cela risque d'introduire du bruit.
- Page 476 vous maintenez ces flèches enfoncées, l'incrémentation est beaucoup plus rapide. Vous pouvez également déplacer le curseur qui se trouve dans le menu de balance des blancs. Pour régler votre image de façon plus précise, vous pouvez également régler le paramètre TINT. Ceci permet de régler le niveau de vert et de magenta dans l'image.
- Page 477 Alimentation L'état de l'alimentation de la URSA Mini est affiché en haut à droite de l'écran. Il existe quatre icônes : L'état de l'alimentation de la URSA Mini est affiché en haut à droite de l'écran. Si vous alimentez la caméra par batterie, touchez cette icône pour voir les affichages Tension ou Pourcentage.
- Page 478 Le côté gauche de l'histogramme représente les basses lumières, ou les noirs, et le côté droit représente les hautes lumières, ou les blancs. Lorsque vous ouvrez ou fermez l'ouverture de l'objectif, la distribution des informations sur l'histogramme change en conséquence vers la gauche ou vers la droite.
- Page 479 REMARQUE Vous pouvez régler la URSA Mini pour qu'elle interrompe l'enregistrement en cas de perte d'images afin d'éviter de continuer d'enregistrer une séquence inutilisable. Pour plus d'information, consultez la section « Paramètres d’enregistrement » de ce manuel. Temps d'enregistrement restant Les indicateurs de carte CFast sont situés au bas de l'écran tactile de la URSA Mini.
- Page 480 Vous pouvez également formater les cartes CFast à partir de ce menu. Pour plus d'informations sur le formatage des cartes CFast à l'aide de la URSA Mini, consultez la section « Préparer un support sur la Blackmagic URSA Mini » de ce manuel. CONSEIL Touchez le nom de la carte dans le menu Storage pour la rendre active.
- Page 481 Double-toucher pour zoomer Sur la URSA Mini, vous pouvez agrandir n'importe quelle zone de l'aperçu de l'image en touchant deux fois l'écran tactile. La zone que vous touchez sera agrandie et vous pourrez vous déplacer dans l'image en faisant glisser votre doigt sur l'écran. C'est une fonction très pratique pour vérifier la mise au point.
- Page 482 revenir au début du clip en cours de lecture, appuyez une fois sur le bouton Retour. Touchez deux fois le bouton Retour si vous souhaitez revenir au début du clip précédent. Les clips peuvent également être lus en boucle si l'icône de lecture en boucle est activée. Icône de lecture, d'avance rapide et de lecture en boucle.
-
Page 483: Menu Paramètres
Menu Paramètres Menu de navigation Appuyez sur le bouton Menu de la URSA Mini pour afficher le menu de navigation. C'est un menu à onglet qui contient des paramètres auxquels vous n'avez pas accès depuis l'écran de la URSA Mini. Les paramètres sont regroupés par fonction au sein des onglets Record, Monitor, Audio, Setup, Presets et LUTS. - Page 484 HQ dans le menu Codec and Quality, puis Ultra HD dans le menu Resolution. REMARQUE La Blackmagic URSA Mini prend en charge une large gamme de résolutions RAW CinemaDNG et Apple ProRes du 4.6K ou 4K sur la URSA Mini 4.6K et URSA Mini 4K, respectivement, jusqu'en HD.
- Page 485 ProRes HQ. En général, on fait coïncider la fréquence d'images avec la vitesse de lecture et la synchronisation audio utilisées dans le workflow de postproduction. La Blackmagic URSA Mini possède 8 paramètres de fréquence d'images dont 23.98, 24, 25, 29.97, 30, 50, 59.94 et 60 i/s.
- Page 486 Enregistrement en RAW sur les 2 cartes En enregistrant simultanément sur les deux cartes CFast de la Blackmagic URSA Mini, vous pouvez capturer des clips RAW CinemaDNG à des fréquences d'images plus élevées. Lorsque le paramètre Record RAW on 2 Cards est activé, la URSA Mini enregistre sur les deux cartes.
- Page 487 Paramètres d'enregistrement 3 La troisième page de l'onglet Record contient les paramètres suivants. Timelapse Ce paramètre active la fonction Time Lapse qui permet l'enregistrement automatique d'une image fixe aux intervalles suivants : ‚ Images 2 - 10 ‚ Secondes 1 - 10, 20, 30, 40, 50 ‚...
-
Page 488: Convention De Dénomination Des Fichiers
Ce réglage est principalement destiné à la production en direct pour laquelle il est impossible de passer par la postproduction. Nous vous recommandons de régler le paramètre sur Off si vous capturez des images qui seront ensuite envoyées en postproduction. Ce paramètre ne s'applique pas aux fichiers RAW, car ils nécessitent d'importants travaux de postproduction. - Page 489 Paramètres LCD, Front SDI et Main SDI de l'onglet Monitor 1 La première page de l'onglet Monitor contient des paramètres identiques pour chaque sortie. Par exemple, vous pouvez activer le zébra sur l'écran tactile, mais le désactiver sur les sorties SDI avant et principale.
- Page 490 REMARQUE Pour plus d'informations sur le chargement et l'utilisation des LUTs 3D, consultez la section LUTs de ce manuel. Zebra Touchez le bouton Zebra dans les menus LCD, Front SDI et Main SDI pour activer le zébra sur ces sorties. Pour plus d'informations sur le zébra et la configuration des niveaux de zébra, consultez la section «...
- Page 491 Paramètre Text Surrounds Image Ce paramètre n'est disponible que sur les modèles URSA Mini 4K et URSA Mini 4.6K. Touchez le bouton Text surrounds image dans le menu LCD pour redimensionner l'image de l'écran tactile à 75%. Cette fonction positionne l'image au centre de l'écran tactile, loin des informations affichées sur les bords supérieurs et inférieurs.
- Page 492 Paramètres Front SDI et Main SDI de l'onglet Monitor 2 La deuxième page des paramètres Front SDI et Main SDI de l'onglet Monitor contient des options permettant de régler les sorties SDI avant et principale. Informations d'état Il est pratique de pouvoir masquer les informations d'état et les vumètres affichés sur les sorties SDI avant et principale et ainsi conserver uniquement les informations nécessaires à...
- Page 493 Lorsque vous réglez les informations d'état sur Director au sein des paramètres Front SDI ou Main SDI de l'onglet Monitor, les informations d’état suivantes s’affichent : Affiche la fréquence d'images sélectionnée pour cette caméra. Si le paramètre Off Speed Recording est désactivé, seule la fréquence d'images du projet est affichée. Si le paramètre Off Speed Recording est activé, la fréquence d'images du capteur s'affiche, suivie de la fréquence d'images du projet.
- Page 494 Paramètre All de l'onglet moniteur 1 Les paramètres du moniteur qui affectent toutes les sorties de la URSA Mini sont regroupés au sein du menu All. Par exemple, si vous réglez le paramètre Safe area guide % sur 90% dans ce menu, la zone de sécurité...
- Page 495 Niveau de l'aide à la mise au point Pour régler le niveau de l'aide à la mise au point de l'écran tactile et des sorties SDI avant et principale, touchez les options Low, Medium ou High. REMARQUE Régler le niveau d'intensité de l'aide à la mise au point n'active pas l'aide à...
-
Page 496: Paramètres Audio
Safe Area Guide % Pour modifier la taille de la zone de sécurité sur l'écran tactile, la sortie SDI avant et la sortie SDI principale de la URSA Mini, touchez les flèches situées de part et d'autre de ce paramètre. Le pourcentage indique la taille de la zone de sécurité par rapport au cadre de l'image. - Page 497 Volume du casque Le curseur du paramètre Headphones Volume permet d'ajuster les niveaux de la sortie du casque connecté au jack de 3,5mm de la URSA Mini. Déplacez le curseur audio vers la gauche ou vers la droite pour ajuster les niveaux. Volume du haut-parleur Le curseur du paramètre Speaker Volume permet d'ajuster les niveaux de la sortie du haut-parleur intégré...
- Page 498 Entrée du canal 1 et du canal 2 Réglez les niveaux des signaux audio externes en touchant les paramètres Line ou Mic du canal 1 ou 2. Ces paramètres correspondent aux niveaux micro ou ligne avec une alimentation fantôme de 48V. Il est important de sélectionner le niveau approprié...
- Page 499 Paramètres audio de la URSA Mini Pro 4.6K Les paramètres audio de la URSA Mini Pro 4.6K sont regroupés sur deux pages et divisés entre les canaux 1 et 2. Deux canaux supplémentaires seront ajoutés lors d'une mise à jour logicielle ultérieure.
- Page 500 Recorded Channel 1/2 Level Utilisez ces curseurs pour ajuster les niveaux de l'enregistrement audio sur le canal 1 ou 2. Des vumètres sont affichés au-dessus de chaque curseur pour vous aider à régler le niveau audio approprié. Ces niveaux se mettent à jour lorsque vous ajustez l'audio à l'aide des molettes audio situées sur le panneau de contrôle ergonomique Pour obtenir une qualité...
-
Page 501: Paramètres De L'onglet Setup
Paramètres de l'onglet Setup L'onglet Setup contient les paramètres d'identification de la URSA Mini, la version du logiciel, les paramètres des boutons de fonction et d'autres paramètres de la caméra qui ne sont pas directement liés à l'enregistrement ou au monitoring. Ce menu possède quatre pages. Vous pouvez passer d'une page à... - Page 502 Affichage du niveau de charge de la batterie Sur la URSA Mini, vous pouvez choisir l'affichage du niveau de charge de la batterie. Les deux paramètres disponibles sont Percentage et Voltage. Lorsque vous utilisez une batterie et un support qui prennent en charge les niveaux de charge en pourcentage, réglez le paramètre Battery Display sur Percentage pour indiquer le pourcentage de charge restante de la batterie.
- Page 503 Paramètres de l'onglet Setup 2 La deuxième page de l'onglet Setup de la URSA Mini contient les options suivantes. Identification de la caméra sur l'ATEM Si vous utilisez la URSA Mini avec un mélangeur ATEM et si vous souhaitez que la caméra reçoive les signaux tally du mélangeur, il vous faudra personnaliser le numéro de la caméra.
- Page 504 Rythme de référence Le paramètre Reference Timing vous permet d'ajuster manuellement le rythme de référence défini par un nombre de lignes ou de pixels. Pour apporter des modifications, il suffit de toucher les flèches situées de part et d'autre des paramètres Lines et Pixels. Paramètres de l'onglet Setup 3 La troisième page de l'onglet Setup de la URSA Mini contient les options suivantes.
- Page 505 Pour configurer ces boutons, sélectionnez un bouton de fonction, puis sa fonction, un paramètre et une valeur pour ce paramètre. Bouton Fonction Paramètre Valeur Paramètre Function 1/2 Behaves as Une fois que vous avez sélectionné le bouton que vous souhaitez mapper, vous pourrez sélectionner une fonction.
- Page 506 Paramètres de l'onglet Setup 4 La quatrième page de l'onglet Setup de la URSA Mini contient les options suivantes. Door LED La URSA Mini est dotée d'un petit voyant LED situé sur la face extérieure de l'écran tactile. Ce voyant fournit des informations relatives au tally et à...
- Page 507 Lorsque vous sélectionnez le paramètre Factory Reset, un message s'affiche pour vous demander de confirmer l'action. Hardware ID Le paramètre Hardware ID affiche un identifiant à 8 caractères pour la URSA Mini. Chaque caméra possède un identifiant qui lui est propre. Une version de 32 caractères de cet identifiant est incluse dans les métadonnées pour la vidéo RAW et ProRes.
- Page 508 Paramètres de l'onglet Setup 5 La cinquième page de l'onglet Setup de la URSA Mini contient les options ssuivantes : Le nom de la caméra Bluetooth est composé de la lettre de la caméra comme réglé sur le clap, suivi des 8 caractères de l’identifiant de votre URSA Mini. Bluetooth Sur la URSA Mini Pro 4.6K, la fonction Bluetooth vous permet de contrôler la caméra à...
- Page 509 Si vous vous connectez pour la première fois avec l’application, il vous sera demandé d’entrer un code à 6 chiffres pour permettre à l’iPad de s’associer à la caméra. Ce code sera affiché sur l’écran LCD de la caméra. Saisissez ce code dans l’iPad. Les informations à...
- Page 510 REMARQUE Pour des raisons de sécurité, nous vous conseillons de désactiver la fonction Bluetooth de votre URSA Mini Pro 4.6K quand vous ne l’utilisez pas. Déconnecter l’appareil en cours Utilisez le paramètre Disconnect Current Device pour déconnecter votre URSA Mini Pro 4.6K de l’iPad associé.
- Page 511 Touchez l’icône du clap dans le coin inférieur gauche pour accéder aux fonctions du clap et le mettre à jour. La URSA Mini Pro 4.6K utilise la technologie Bluetooth Low Energy pour le contrôle à distance des appareils. Le protocole du Bluetooth est du même type que celui utilisé dans des appareils portables, ce qui permet d’optimiser l’utilisation de la batterie.
-
Page 512: Préréglages
Préréglages L'onglet Presets vous permet de sauvegarder et de rappeler toute une gamme de paramètres pour la URSA Mini. C'est très utile lorsqu'une caméra est utilisée sur plusieurs projets. Par exemple, vous pouvez utiliser la URSA Mini pour des documentaires ou des clips musicaux et avoir des paramètres très différents selon le projet. - Page 513 Saisissez un nom pour le préréglage à l'aide du clavier tactile en touchant l'icône Add de l'onglet Presets. Une fois le préréglage sauvegardé, touchez son nom dans le menu Presets afin de le sélectionner. Pour le charger, il suffit de toucher l'icône Charger. Sélectionnez un préréglage et touchez l'icône Charger pour le charger.
-
Page 514: Onglet Luts
REMARQUE Lorsque les emplacements pour les préréglages de la URSA Mini sont pleins, le menu d'importation ne sera plus disponible. Il faudra alors supprimer un préréglage pour faire de la place. Exporter des préréglages Pour exporter un préréglage sur une carte CFast ou SD, sélectionnez le préréglage souhaité, puis touchez l'icône Gérer. - Page 515 Il est facile de créer des LUTs 3D avec DaVinci Resolve ou d'autres logiciels d'étalonnage. De nombreuses LUTs sont également disponibles en ligne. La URSA Mini peut stocker jusqu'à six LUTs 3D à 17 ou 33 points, d'un maximum de 1,5 méga-octet chacune. Une fois la LUT chargée, vous pouvez l'afficher sur l'écran tactile de la caméra, sur la sortie SDI avant, sur la sortie SDI principale ou sur n'importe quelle combinaison de ces sorties.
- Page 516 Si la LUT que vous souhaitez importer porte le même nom qu'une autre LUT sauvegardée sur la caméra, vous pourrez remplacer la LUT existante ou garder les deux LUTs. En haut à droite de l'écran, vous verrez un nombre qui représente les LUTs vides, disponibles sur la caméra. Vous ne pourrez pas excéder ce nombre.
-
Page 517: Saisie Des Métadonnées
VFX aux séquences. La Blackmagic URSA Mini enregistre automatiquement certaines métadonnées, telles que les paramètres de la caméra, le timecode, la date et l'heure. Vous pouvez également utiliser le clap de la caméra pour ajouter des informations supplémentaires. - Page 518 Paramètre Slate for Ce paramètre désigne le clip auquel les métadonnées affichées dans l'onglet Clips se réfèrent. En mode de veille, il se réfère au prochain clip enregistré. Données concernant l'objectif Le paramètre Lens Data affiche des informations concernant l'objectif monté sur la caméra. De nombreux objectifs électroniques fournissent automatiquement des informations telles que le modèle de l'objectif, l'ouverture et la distance focale.
- Page 519 ‚ Distance Ce paramètre indique la distance focale de l'objectif pour le clip enregistré. Certains objectifs fournissent automatiquement cette information en millimètres. Vous pouvez également saisir manuellement cette donnée. ‚ Filtre Le paramètre Filter indique les filtres utilisés. Touchez l'icône crayon de ce paramètre pour saisir les données manuellement.
- Page 520 Le clap de la URSA Mini est divisé en deux onglets intitulés Clips et Project. Reel Le paramètre Reel indique le numéro de la bobine en cours. La URSA Mini incrémente automatiquement le numéro de bobine, il n'est donc généralement pas nécessaire de saisir cette information manuellement.
- Page 521 Lorsque vous saisissez les métadonnées de la scène, la URSA Mini proposera des incrémentations sur le côté gauche du clavier tactile, et des types de plans sur le côté droit. Prise Le paramètre Take indique le numéro de prise pour le plan en cours. Vous pouvez le faire augmenter ou le faire diminuer à...
- Page 522 Good Take Touchez le bouton Good Take pour marquer les bonnes prises afin de pouvoir les retrouver facilement en post-production. En mode de veille, ce paramètre s'applique au dernier clip enregistré. En mode de lecture, il s'applique au clip en cours de visionnement. Int / Ext Touchez les paramètres Int ou Ext pour ajouter un marqueur Intérieur ou Extérieur au clip suivant en mode de veille, ou au clip en cours en mode de lecture.
-
Page 523: Utiliser Des Objectifs À Zoom Motorisé
Utiliser des objectifs à zoom motorisé Équiper votre caméra URSA Mini d'objectifs à zoom motorisé est une solution très performante. Les bagues de réglage manuel du diaphragme, du zoom et de la mise au point situés sur l'objectif, ainsi qu'une poignée intégrée dotée d’un commutateur de zoom, permettent de réaliser des tournages très efficacement. - Page 524 Avec des objectifs qui disposent d’un contrôle motorisé de la mise au point, vous pouvez également déclencher l'autofocus à l’aide du bouton Focus de la URSA Mini. La mise au point peut être contrôlée à distance par un mélangeur ATEM avec le logiciel ATEM Software Control. Une fois que vous avez monté...
-
Page 525: Sortie Vidéo De La Caméra
Sortie vidéo de la caméra Sortie de monitoring HD Le connecteur de sortie 3G-SDI down-converti des Blackmagic URSA Mini achemine toujours de la vidéo HD 1080, vous pouvez ainsi facilement connecter la caméra à des grilles de commutation, des moniteurs, des appareils de capture SDI, des mélangeurs de diffusion et d'autres appareils SDI. - Page 526 Connexion à des moniteurs Le monitoring SDI peut être très pratique lorsque l'accès à l'écran rabattable est difficile, par exemple lorsque la caméra est installée sur une grue ou dans un véhicule. Affichez les informations de monitoring via la sortie de monitoring HD-SDI en ajustant le paramètre Front SDI Overlay dans le menu de paramétrage Display.
-
Page 527: Kit Épaulière Ursa Mini Shoulder Mount Kit
Kit épaulière URSA Mini Shoulder Mount Kit Fixer l'épaulière Le kit épaulière URSA Mini Shoulder Mount Kit vous permet de tourner à l'épaule. Ce kit comprend une poignée qui se fixe sur la face supérieure de la caméra, un support d'épaule, un bras pour la poignée latérale de la URSA Mini, un long câble LANC, un support pour le viseur et toutes les vis requises. - Page 528 Posez délicatement votre URSA Mini à l’envers sur une surface plate et stable afin d’accéder facilement à la face inférieure de la caméra. Vissez le support d'épaule à la URSA Mini à l'aide des deux vis de ¼” et du tournevis. Serrez les vis jusqu'à...
- Page 529 Fixer la poignée supérieure équipée du viseur URSA Viewfinder Poignée Protection pour le viseur supérieure URSA Viewfinder Posez délicatement votre URSA Mini sur une Retirez la protection pour le viseur URSA surface plate et stable afin d’accéder Viewfinder de la poignée en la soulevant facilement à...
- Page 530 Fixer le bras d'extension Lorsque vous utilisez le kit épaulière URSA Mini, la poignée latérale de la URSA Mini doit être repositionnée pour améliorer le confort d'utilisation lors de tournage à l'épaule. Utilisez le bras d'extension et le long câble LANC pour positionner la poignée latérale de façon ergonomique. Fixer le bras d'extension de la poignée latérale : Posez délicatement votre URSA Mini sur une surface plate et stable en laissant suffisamment d'espace à...
-
Page 531: Blackmagic Ursa Viewfinder
Le Blackmagic URSA Viewfinder est un viseur électronique performant, spécialement conçu pour la Blackmagic URSA Mini. L'écran couleur OLED HD 1080 et les lentilles de précision en verre offrent une image claire, nette et réaliste, vous pouvez ainsi effectuer rapidement la mise au point et voir tous les détails de vos images. -
Page 532: Ajuster L'œilleton
Connectez le câble SDI et le câble d'alimentation du viseur à la sortie de monitoring HD-SDI et à la sortie +12V de la caméra URSA Mini. Quand vous utilisez le URSA Viewfinder avec la URSA Mini, il est recommandé d'installer le URSA Mini Shoulder Mount Kit, car il comprend les pas de vis appropriés et une vis moletée de 1/4". -
Page 533: Menu De Paramétrage
Ces boutons possèdent également une fonction personnalisable, vous pouvez ainsi attribuer des raccourcis aux fonctions que vous utilisez fréquemment. Par exemple, vous pouvez attribuer la fonction False Color au bouton Zoom. Pour plus d'informations à ce sujet, consultez le paragraphe «... - Page 534 Meters Commute entre les différents outils de mesure affichés à l'écran. Les options proposées sont Histogram, Audio, Both ou None. Peaking Active et désactive la fonction Peaking. Zebra Active et désactive le zébra. Réglez les niveaux de zébra à l'aide des paramètres de la caméra.
- Page 535 Allez sur Exit et appuyez sur le bouton Menu pour fermer le menu à l'écran. Menu Shortcuts du URSA Viewfinder. Menu Setup Le menu Setup contient les fonctions suivantes : Brightness Adjustment Permet d'ajuster la luminosité de l'écran. Choisissez une valeur entre -10 et +10. Tally Brightness Permet d'ajuster la luminosité...
- Page 536 REMARQUE Lorsque la fonction Grid est activée dans le menu de paramétrage du URSA Viewfinder, le viseur affiche également les signaux tally envoyés à partir d'un mélangeur ATEM. La fonction Overlays doit également être activée dans le menu à l'écran. Status Text Affiche les informations d'état, telles que la balance des blancs, la fréquence d'images et l'ISO.
- Page 537 Mise à jour du logiciel interne du URSA Viewfinder Le viseur peut être mis à jour à l'aide du logiciel Blackmagic Camera Setup. Comme le viseur doit être alimenté pendant la mise à jour, nous vous recommandons d'installer le viseur sur la caméra URSA Minipendant toute la durée de la mise à...
-
Page 538: Blackmagic Ursa Studio Viewfinder
Blackmagic URSA Studio Viewfinder MENU BRIGHT CONTRAST BACK PEAKING Blackmagic URSA Studio Viewfinder Transformez votre URSA Mini en une véritable caméra numérique professionnelle grâce au URSA Studio Viewfinder. Le Studio Viewfinder comprend un écran de 7”, un voyant tally, des molettes de contrôle, de larges poignées, un pare-soleil et des attaches rotatives réglables. -
Page 539: Monter Et Connecter Le Viseur À La Blackmagic Ursa Mini
à la caméra de différentes façons. Vous pouvez monter le Blackmagic URSA Studio Viewfinder directement sur la face supérieure de la Blackmagic URSA Mini via le support V-lock. Celui-ci peut être facilement retiré du support pour poignée de la URSA Mini. - Page 540 Le Blackmagic URSA Studio Viewfinder monté sur le kit Support V-lock monté sur une caméra tierce. épaulière. Si vous souhaitez utiliser le URSA Studio Viewfinder avec une autre caméra, installez un support V-lock ou un support tiers à la caméra de votre choix (dotée de pas de vis 1/4”). Vous pouvez également monter le Blackmagic URSA Studio Viewfinder à...
-
Page 541: Régler Le Blackmagic Ursa Studio Viewfinder
Pour connecter le Blackmagic URSA Studio Viewfinder à la URSA Mini, il suffit de connecter les câbles du viseur à la sortie d'alimentation de 12V et à la sortie 3G-SDI situées à l'avant de la caméra. Le bouton d'alimentation du viseur permettra alors d'allumer le viseur instantanément lorsque la caméra est alimentée. - Page 542 La molette de gauche règle la tension du bras et la molette de droite verrouille le viseur une fois l’angle choisi. Ces molettes de tension offrent de nombreuses options d'ajustement et de résistance pour régler la rotation horizontale et l’inclinaison verticale du viseur de votre choix. Molettes de tension situées de chaque côté...
- Page 543 Pare-soleil Le pare-soleil permet de voir l'écran même en conditions très lumineuses et très ensoleillées. Pour attacher le pare-soleil, faites-le glisser sur la face supérieure du Blackmagic URSA Studio Viewfinder. Il doit être attaché avec les vis imperdables. La partie supérieure du pare-soleil est réglable, elle peut être soulevée ou abaissée pour disposer d’une variété...
-
Page 544: Boutons De Fonction
Boutons de fonction Les molettes situées sur le côté droit du viseur vous permettent de changer rapidement la luminosité, le contraste et le peaking. Elles sont placées de façon à pouvoir être facilement réglées même lorsque vous utilisez un pare-soleil. MENU BRIGHT CONTRAST... - Page 545 Voyant Tally Le voyant tally placé à l'arrière du Blackmagic URSA Studio Viewfinder permet de savoir quelle caméra est à l'antenne et si le signal d’enregistrement est isolé. Le voyant tally s'allume en rouge lorsque la caméra est à l'antenne, en vert pour la prévisualisation et en orange pour l’enregistrement isolé...
-
Page 546: Menu De Paramétrage
Menu de paramétrage Pour ouvrir le menu principal, appuyez sur le bouton-poussoir Menu et tournez la molette pour naviguer entre les différentes options. Appuyez de nouveau sur ce même bouton pour naviguer entre les menus Display, Shortcuts, Setup et Cursors. Une fois le menu sélectionné, faites défiler les paramètres à... - Page 547 Guides Le paramètre Guides permet d'afficher ou de masquer les repères. Les repères correspondent au réglage effectué dans la section All du menu Monitor de la URSA Mini. Le format de l'image, le niveau d'opacité des repères, le pourcentage de la zone de sécurité et le type de repères affichés correspondent aux réglages effectués au sein de la caméra.
- Page 548 Une fois les raccourcis configurés, vous pouvez sélectionner Exit et appuyer sur la molette Menu pour fermer l'affichage du menu, ou appuyer sur le bouton Back afin de quitter le menu. Le menu Shortcuts Menu Setup Le menu Setup permet de choisir la configuration du viseur. Front Tally Brightness Permet de régler la luminosité...
- Page 549 CONSEIL Il est recommandé de régler la luminosité du voyant LED sur High dans des conditions de forte luminosité, afin que les acteurs et les opérateurs puissent le voir facilement. En revanche, il est judicieux de régler la luminosité du voyant LED sur Low dans les environnements sombres.
- Page 550 Les curseurs affichés à l'écran Une fois les curseurs configurés, vous pouvez les activer ou les désactiver à partir du menu Cursors ou les assigner à un bouton de fonction pour y accéder rapidement. Cette fonction est très importante pour la production en direct, car elle permet à l'opérateur de la caméra de composer et de cadrer les prises avec précision.
-
Page 551: Monture D'objectif Interchangeable
Monture d'objectif interchangeable La caméra Blackmagic URSA Mini Pro 4.6K est vendue avec une monture pour objectifs EF. Cependant, vous n'êtes pas obligé d'utiliser des objectifs EF car les montures sont interchangeables. Vous pouvez donc retirer la monture EF, fournie à l'achat, et caler des montures PL ou B4, disponibles en option. -
Page 552: La Monture D'objectif Pl De La Blackmagic Ursa Mini
La monture d'objectif PL de la Blackmagic URSA Mini Grâce à la monture PL, vous pouvez travailler avec des objectifs haut de gamme et d'une excellente précision, adaptés pour le cinéma, les films et les émissions télévisées. Le kit de monture PL comprend :... - Page 553 Insérez délicatement le déflecteur PL au centre Intégrez la rondelle de 0.10mm à votre caméra de la monture d'objectif et tournez avec la main Blackmagic URSA Mini Pro 4.6K, puis jusqu'à ce qu'il soit assez serré. Utilisez positionnez la monture d'objectif PL sur le l'embout large de l'outil pour déflecteur afin de...
-
Page 554: La Monture D'objectif B4 De La Blackmagic Ursa Mini
La monture d'objectif B4 de la Blackmagic URSA Mini La monture B4 est idéale si vous avez besoin d’utiliser des objectifs focalisés pour des tournages mobiles ou pour filmer des événements, comme un mariage. Ces objectifs conservent la mise au point pendant le zoom. - Page 555 AUTO AUTO LENS LENS Placez la Blackmagic URSA Mini Pro 4.6K en Intégrez la rondelle de 0.10mm à la caméra, position verticale sur une surface solide et puis positionnez la monture d'objectif B4 de propre pour pouvoir insérer la monture laURSA Mini Pro 4.6Ksur le boîtier de la caméra...
-
Page 556: La Monture D'objectif Ef De La Blackmagic Ursa Mini
La monture d'objectif EF de la Blackmagic URSA Mini Si vous devez un jour remplacer la monture EF originale fournie avec votre caméra, la monture EF peut être trouvée dans le commerce. Le kit de monture EF comprend : 1x monture EF La monture EF vous permet de fixer des objectifs traditionnels. - Page 557 AUTO AUTO LENS LENS Placez la URSA Blackmagic URSA Mini Pro 4.6K Positionnez délicatement la monture d'objectif en position verticale sur une surface solide et EF de laURSA Mini Pro 4.6K sur le boîtier de la propre pour pouvoir insérer la monture caméra en faisant bien attention à...
-
Page 558: Kit De Calage Blackmagic Ursa Mini Pro
0,50mm et de 0,10mm qui se trouvent sous la monture EF d’origine. Les rondelles et leurs accessoires sont inclus dans le kit de calage Blackmagic URSA Mini Pro. D'autres épaisseurs de rondelles sont inclues dans le kit au cas où vous auriez besoin d'ajouter des rondelles à... -
Page 559: Fixer Des Batteries
Monter des batteries V-mount ou Gold Mount Il est très simple de fixer des batteries V-mount ou Gold Mount conformes aux normes de l'industrie sur la Blackmagic URSA Mini. Pour fixer une batterie, il suffit d'installer une fixation Blackmagic V-mount, une batterie V-mount ou gold mount tierce à... -
Page 560: Utiliser Votre Propre Support Pour Batterie
Connectez le connecteur d'alimentation molex 55959-1230 12 way de la Blackmagic URSA Mini à votre fixation tierce. Vissez la fixation tierce sur la face arrière de la caméra Blackmagic URSA Mini à l'aide de 4 vis M3. Vérifiez que le connecteur est correctement inséré dans l'emplacement prévu à cet effet et non pas simplement coincé... - Page 561 Batt Batt Batt Batt Monitor 1 Monitor0 +12V Out 11 EnableN Face arrière du boîtier de connexion. Veuillez vous référer au tableau de configuration des fils pour obtenir une description de chaque broche. Tableau de configuration des fils Broches Signal Couleur Direction Description...
-
Page 562: Utiliser Davinci Resolve
étalonner et finaliser votre projet au sein de DaVinci Resolve. Comme la plage dynamique de la Blackmagic URSA Mini est beaucoup plus étendue que celle de la plupart des caméras vidéo standard, DaVinci Resolve vous permettra de modifier vos prises pour obtenir le rendu souhaité. -
Page 563: Importation Des Clips
Importation des clips Avant de pouvoir monter vos clips, il faut les importer dans la bibliothèque de médias : Ouvrez DaVinci Resolve. Si vous ouvrez le logiciel pour la première fois, patientez jusqu'à ce que la fenêtre Project Manager apparaisse puis double-cliquez sur l'icône untitled project. -
Page 564: Travailler Avec Des Fichiers Raw
Travailler avec des fichiers RAW Quand vous importez des fichiers RAW, DaVinci Resolve décode les données du capteur contenues dans les fichiers, notamment, l'ISO, la balance des blancs et la teinte. Si les images vous plaisent vous pouvez d'ores et déjà commencer le montage. Le RAW Ne vous limite pas à... -
Page 565: Montage Des Clips
Paramètres RAW du projet Si vous souhaitez modifier un paramètre commun à tous les clips, par exemple la balance des blancs ou l'ISO, vous pouvez régler les clips afin qu'ils utilisent les paramètres RAW du projet. Vous pourrez ainsi apporter des changements à plusieurs clips en même temps. Pour régler les paramètres RAW du projet : Ouvrez le menu de paramétrage du projet, en cliquant sur File puis sur Project settings. -
Page 566: Raccord Des Clips
Allez sur la timeline et positionnez la tête de lecture de la timeline à l'endroit où vous souhaitez insérer votre clip. Pour insérer un clip dans la timeline, cliquez à l'intérieur du moniteur source et déplacez le pointeur de souris dans le moniteur de la timeline. Une liste d'options de montage apparaît. Sélectionnez le type de montage que vous souhaitez utiliser. -
Page 567: Mappage Des Raccourcis Clavier
Page Edit. Vous pouvez rogner les clips, changer leur ordre et leur ajouter des transitions dans la timeline. Mappage des raccourcis clavier Si vous avez l'habitude d'utiliser des raccourcis clavier avec d'autres logiciels de montage, vous pouvez facilement mapper vos propres raccourcis dans DaVinci Resolve pour être plus rapide et optimiser votre workflow. -
Page 568: Ajout De Transitions
Ajout de transitions Une transition est un effet visuel utilisé pour passer d'un clip à l'autre de manière fluide, par exemple, avec un fondu enchaîné, un effet de volet, etc. Les transitions ajoutent un plus à votre montage. Les transitions ne relient pas toujours deux clips, elles peuvent également être utilisées à la fin d'un clip, par exemple pour effectuer un fondu au noir. -
Page 569: Ajout De Titres
Ajout de titres Il est très facile de créer des titres pour votre montage. Vous pouvez ajouter un titre à n'importe quelle piste vidéo de la même façon que vous ajoutez un clip. Si aucune piste n’est disponible, vous pouvez facilement en ajouter une nouvelle en faisant un clic droit sur une piste existante (p. ex Video 1) et en sélectionnant l'option Add Track. -
Page 570: Étalonnage Des Clips
Pour ajouter une nouvelle piste audio ou vidéo, cliquez sur le nom de la piste et sélectionnez Add track. Pour l'audio, choisissez le type de piste que vous souhaitez. Étalonnage des clips Une fois la séquence de clips montée, vous pouvez commencer l'étalonnage. Il est préférable d'effectuer l'étalonnage lorsque le montage de la séquence est terminé... -
Page 571: Utilisation Des Scopes
Utilisation des scopes Les coloristes réalisent les corrections colorimétriques en fonction de l'émotion et du rendu qu'ils veulent donner aux programmes sur lesquels ils travaillent et n'utilisent en général qu'un simple écran pour effectuer les changements. Vous pouvez vous inspirer d'objets de tous les jours et la façon dont l'éclairage s'y reflète pour vos différents projets. -
Page 572: Correction Colorimétrique Secondaire
Ajuster le Gain Cliquez sur la roue Gain et faites-la tourner vers la gauche ou vers la droite. Cette roue règle les tons clairs, zones les plus lumineuses de l'image. Les tons clairs sont affichés dans la section supérieure du graphique dans le scope Parade. Pour une scène très lumineuse, la position optimale se situe juste en dessous de la ligne supérieure du scope Waveform. -
Page 573: Sélection D'une Couleur
Sélection d’une couleur Vous avez sans doute pu constater qu'il est souvent nécessaire de changer la couleur d'un seul élément de l'image, par exemple l'herbe sur le côté de la route, le bleu du ciel, ou tout autre élément sur lequel vous souhaitez attirer le regard du spectateur. Pour effectuer ces modifications, il est utile d'utiliser l'outil qualificateur HSL. -
Page 574: Tracking D'une Power Window
Vous pouvez, par exemple, créer une fenêtre qui suivra les mouvements d’une personne afin de changer le contraste et les couleurs sans affecter les zones alentour. Grâce à ces modifications, vous attirez l'attention du spectateur vers la zone que vous souhaitez. Ajouter une Power Window à... -
Page 575: Utilisation Des Plug-Ins
Suivre un objet à l'aide d'une fenêtre : Créez un nouveau nœud série et ajoutez une Power Window. Placez le curseur au début du clip, puis positionnez et dimensionnez la fenêtre pour ne sélectionner que l'objet ou la zone souhaités. Ouvrez la palette Tracker. -
Page 576: Mastérisation De La Séquence Montée
Mastérisation de la séquence montée Une fois les clips montés et étalonnés, et les couleurs corrigées, la séquence doit être rendue. Pour cela, ouvrez la page Deliver. Cette page vous permet de sélectionner les clips que vous souhaitez exporter et de choisir le format, le codec et la résolution souhaités. Vous pouvez exporter de nombreux formats, tels que QuickTime, AVI, MXF et DPX à... -
Page 577: Comprendre La Fonction Camera Control
Comprendre la fonction Camera Control Votre Blackmagic URSA Mini peut être utilisée en tant que caméra de studio et contrôlée à partir du mélangeur ATEM au moyen de la fonction Camera Control sur le logiciel ATEM Software Control. Cela permet d'ajouter une caméra équipée d'un grand capteur et d'une plage dynamique étendue à... -
Page 578: Utilisation De La Fonction Camera Control
REMOTE REMOTE All SDI and HDMI video con PUSH PUSH STEREO IN STEREO IN PUSH SD, HD and Ultra HD switchable unle PUSH CONTROL CONTROL CH 1 CH 2 CH 1 CH 2 CH 1 CH 2 USB 2.0 HDMI IN USB 2.0 HDMI IN SDI INPUTS... - Page 579 Roues chromatiques La roue chromatique est une fonctionnalité puissante du correcteur de couleurs DaVinci Resolve et permet d'effectuer des ajustements de couleur pour les paramètres Lift, Gamma et Gain de chaque canal YRGB. Pour sélectionner le paramètre à ajuster, il vous suffit de cliquer sur un des trois boutons de sélection situés au-dessus de la roue chromatique.
- Page 580 Si vous utilisez un objectif B4 ou PL connecté via le connecteur à 12 broches de la URSA Mini, assurez-vous que l'iris de l'objectif est réglé sur A ou sur Auto. Pour assombrir ou éclaircir le niveau de noir, déplacez le bouton vers la gauche ou vers la droite. En maintenant la touche Command (Mac) ou Control (Windows) enfoncée, vous pourrez ajuster uniquement le niveau de noir.
- Page 581 Indicateur de l'iris L'indicateur de l'iris est situé à gauche du bouton de contrôle de l'iris/niveau de noir et fait office de repère visuel vous permettant de visualiser l'ouverture de lentille. L'indicateur de l'iris est affecté par le paramètre Limite. Bouton de mise au point automatique Le bouton de mise au point automatique est situé...
- Page 582 Le mélangeur ATEM affiche le gain en dB. Sur la caméra, cela correspond au réglage ISO suivant : Gain 1600 Veuillez noter que le gain de la URSA Mini 4.6K peut être réglé sur 18dB, cependant, le gain maximal de la URSA Mini 4K est de 12dB. Contrôle de la vitesse d'obturation Le contrôle de la vitesse d'obturation est utile pour changer l'angle d'obturation de la URSA Mini.
- Page 583 Vitesse Angle Angle Angle Angle Angle Angle d'obturation d'obturation d'obturation d'obturation d'obturation d'obturation d'obturation (Shutter à à à à à à Speed) 23.98 i/s 24 i/s 25 i/s 29.97 i/s 50 i/s 59.94 i/s 1/50 172.7 172.8 215.8 360* 1/60 143.9 179.8 359.6...
-
Page 584: Outil D'étalonnage Primaire De Davinci Resolve
à celle d'un outil d'étalonnage primaire communément installé sur les systèmes d’étalonnage. Votre Blackmagic URSA Mini intègre l'outil d'étalonnage primaire de DaVinci Resolve. Si vous avez utilisé DaVinci Resolve auparavant, l'étalonnage sur la Blackmagic URSA Mini sera identique à celui de DaVinci, vous aurez donc l'opportunité... - Page 585 ‚ Cliquez en maintenant le bouton SHIFT enfoncé et déplacez-vous n'importe où dans le cercle de couleur : L'indicateur de la balance des couleurs se positionnera à l'endroit même où se trouve le pointeur, ce qui vous permet de faire des ajustements plus rapides et extrêmes. ‚...
- Page 586 maîtresses Lift et Gain. Par défaut, ce paramètre est réglé sur 50 %. Déplacez les curseurs vers la gauche ou vers la droite pour ajuster les paramètres Contraste, Saturation, Teinte et Lum Mix. Paramètre Saturation Le paramètre Saturation augmente ou réduit la quantité de couleur de l'image. Par défaut, ce paramètre est réglé...
-
Page 587: L'utilitaire Blackmagic Camera Setup
L'utilitaire Blackmagic Camera Setup Mise à jour du logiciel de la caméra sous Mac Après avoir téléchargé le logiciel Blackmagic Camera Setup et dézippé le fichier téléchargé, ouvrez l’image disque pour faire apparaître le Blackmagic Camera Setup Installer. Lancez le programme d'installation et suivez les instructions figurant à l’écran. Une fois l'installation terminée, allez sur le dossier Applications et ouvrez le dossier Blackmagic Cameras. - Page 588 Après avoir installé la dernière version du logiciel Blackmagic Camera Setup sur votre ordinateur, connectez un câble USB entre l’ordinateur et la caméra Blackmagic URSA Mini. Sur la Blackmagic URSA Mini, le port USB est situé sur la face gauche, au-dessus des fentes pour carte de stockage. Il suffit de soulever le capuchon en caoutchouc pour accéder au port.
-
Page 589: Workflow De Postproduction
Workflow de postproduction Travailler avec des fichiers provenant de cartes CFast 2.0 et de cartes SD Procédez au montage directement à partir de votre carte CFast en la retirant de votre caméra et en l'installant sur votre ordinateur à l'aide d'un lecteur/ graveur de carte CFast 2.0 ou d'un lecteur de carte CFast. -
Page 590: Utiliser Final Cut Pro X
Utiliser Final Cut Pro X Pour monter des clips Apple ProRes 422 HQ avec Final Cut Pro X, créez un nouveau projet et réglez le format vidéo et la fréquence d'images appropriés. Pour cet exemple, nous utiliserons le format ProRes 422 HQ 1080p25. Paramètre du projet dans Final Cut Pro X. -
Page 591: Utiliser Adobe Premiere Pro Cc
Lancez le logiciel Media Composer, la fenêtre de sélection du projet apparaît. Cliquez sur le bouton New Project. Nommez votre projet dans la fenêtre New Project. Allez sur le menu déroulant Format et sélectionnez 1080i/59.94. Allez sur le menu déroulant Color Space et sélectionnez YCbCr 709. Allez sur le menu déroulant Raster Dimension et sélectionnez p1920x1080. -
Page 592: Utiliser Autodesk Smoke 2013
Utiliser Autodesk Smoke 2013 Pour monter vos clips avec Autodesk Smoke 2013, créez un nouveau projet et réglez le format vidéo, la profondeur de bits, le type d'image et la fréquence d'image appropriée. Pour cet exemple, nous utiliserons le format ProRes 422 HQ 1080p25. Autodesk Smoke 2013 Lancez Smoke. -
Page 593: Blackmagic Ursa Mini B4 Mount
Blackmagic URSA Mini B4 Mount Vous pouvez enlever la monture PL fournie avec la Blackmagic URSA Mini PL et la remplacer par une monture B4 en option. Cette monture diffère légèrement des montures B4 de la URSA Mini Pro 4.6K. - Page 594 Placez les deux rondelles de 0,50mm fournies Placez la monture Blackmagic URSA Mini B4 avec la monture Blackmagic URSA Mini B4 sur Mount sur le boîtier de la caméra en faisant la rondelle de la caméra afin de donner du jeu bien attention à...
-
Page 595: Calage Des Montures
Les rondelles, dont l'épaisseur est variable, vous permettent d'ajuster précisément la distance entre la monture PL et le capteur de la caméra Blackmagic URSA Mini. On nomme cette distance tirage mécanique ou distance focale de bride. Elle peut être modifiée en fonction de divers facteurs tels que le nombre d'années de l'objectif et les conditions de tournage. - Page 596 Retirez la rondelle de 0,5mm et remplacez-la Intégrez la rondelle de 0,10mm à votre votre avec une rondelle dont l'épaisseur vous caméra Blackmagic URSA Mini Pro 4.6K puis permettra d'aligner les repères de mise au insérez la monture d'objectif PL dans le point de votre objectif avec la distance focale.
-
Page 597: Calage De La Ursa Mini Pro 4.6K
Vissez les cinq vis sans trop serrer jusqu'à ce À l'aide de la clé dynamométrique et de la clé que l'embase de la monture d'objectif touche Allen de 2,0mm, serrez la vis 1 d'un tour le boîtier de la caméra. Pour avoir accès aux complet, puis la vis 2 d'un tour complet, et cinq vis, tournez la bague de verrouillage PL, faites de même pour les vis 3 et 4, puis pour... -
Page 598: Informations Pour Les Développeurs
Blackmagic Design cameras. Please refer to the ‘Understanding Studio Camera Control’ chapter section of this manual, or the ATEM Switchers Manual and SDK manual for more information. These can be downloaded at www.blackmagicdesign.com/support. This document describes an extensible protocol for sending a uni directional stream of small control messages embedded in the non-active picture region of a digital video stream. - Page 599 The command id is an 8 bit unsigned integer which indicates the message type being sent. Receiving devices should ignore any commands that they do Command id (uint8) not understand. Commands 0 through 127 are reserved for commands that apply to multiple types of devices. Commands 128 through 255 are device specific.
- Page 600 The operation type specifies what action to perform on the specified Operation type (uint8) parameter. Currently defined values are: The supplied values are assigned to the specified parameter. Each element will be clamped according to its valid range. A void parameter may only be 0: assign value “assigned”...
- Page 601 Group Parameter Type Index Minimum Maximum Interpretation [0] = frame rate – – 24, 25, 30, 50, 60 [1] = M-rate – – 0=regular, 1=M-rate 0=NTSC, 1=PAL, 2=720, [2] = dimensions – – 3=1080, 4=2k, Video mode int8 5=2k DCI, 6=UHD 0=progressive, [3] = interlaced –...
- Page 602 Group Parameter Type Index Minimum Maximum Interpretation 0.0=minimum, Mic level fixed16 – 1.0=maximum 0.0=minimum, Headphone level fixed16 – 1.0=maximum 0.0=minimum, Headphone program mix fixed16 – 1.0=maximum 0.0=minimum, Speaker level fixed16 – 1.0=maximum Audio 0=internal mic, 1=line level input, Input type int8 –...
- Page 603 Group Parameter Type Index Minimum Maximum Interpretation 0.0=minimum, Peaking level fixed16 – 1.0=maximum 0=disable bars, Color bars display int8 – 1-30=enable bars with time (seconds) timeout (s) [0] = focus 0=Peak, Display – – assist method 1=Colored lines 0=Red, Focus Assist int8 1=Green, [1] = focus...
- Page 604 Group Parameter Type Index Minimum Maximum Interpretation [0] red default 0.0 [1] green default 0.0 Lift Adjust fixed16 [2] blue default 0.0 [3] luma default 0.0 [0] red default 0.0 [1] green default 0.0 Gamma Adjust fixed16 [2] blue default 0.0 [3] luma default 0.0 [0] red...
- Page 605 Example Protocol Packets Packet Operation Length Byte header command data trigger instantaneous auto focus on camera 4 turn on OIS on all cameras set exposure to 10 ms on camera 4 (10 ms = 10000 0x10 0x27 0x00 0x00 us = 0x00002710) add 15% to zebra level 0x33 0x01 (15 % = 0.15 f = 0x0133 fp)
- Page 606 Blackmagic Embedded Tally Control Protocol Version 1.0 (30/04/14) This section is for third party developers or anybody who may wish to add support for the Blackmagic Embedded Tally Control Protocol to their products or system. It describes the protocol for sending tally information embedded in the non-active picture region of a digital video stream.
- Page 607 uint8[1] bit 0: slave device 3 program tally status (0=off, 1=on) bit 1: slave device 3 device preview tally status (0=off, 1=on) bit 2-3: reserved (0b00) bit 4: slave device 4 program tally status (0=off, 1=on) bit 5: slave device 4 preview tally status (0=off, 1=on) bit 6-7: reserved (0b00) .
-
Page 608: Assistance
Après avoir vérifié la version du logiciel Blackmagic Camera Utility installée sur votre ordinateur, veuillez vous rendre sur la page d’assistance Blackmagic Design à l’adresse suivante www.blackmagicdesign.com/fr/support pour vérifier les dernières mises à jour. Même s'il est généralement conseillé d'installer les dernières mises à jour, il est prudent d’éviter d’effectuer ces mises à... -
Page 609: Avis Règlementaires Et Informations De Sécurité
Avis règlementaires et informations de sécurité Avis règlementaires Élimination des déchets d'équipements électriques et électroniques au sein de l'Union européenne. Le symbole imprimé sur cet appareil indique qu'il ne doit pas être jeté avec les autres déchets. Cet appareil doit être déposé dans un point de collecte agréé pour être recyclé. Le tri, l'élimination et le recyclage séparés de vos équipements usagés permettent de préserver les ressources naturelles et de s'assurer que ces équipements sont recyclés dans le respect de la santé... -
Page 610: Garantie
Garantie Garantie limitée Par la présente, Blackmagic Design garantit que ce produit sera exempt de défauts matériels et de fabrication pendant une durée de un an à compter de la date d'achat. Si un produit s’avère défectueux pendant la période de garantie, Blackmagic Design peut, à sa seule discrétion, réparer le produit défectueux sans frais pour les pièces et la main-d’œuvre, ou le remplacer. -
Page 611: Deutsch
Installations- und Bedienungsanleitung Blackmagic URSA Mini und URSA Mini Pro 4.6K Blackmagic Viewfinder und Studio Viewfinder Juni 2017 Deutsch... - Page 612 Willkommen Vielen Dank, dass Sie sich zum Kauf einer Blackmagic URSA Mini entschieden haben! Seit der Markteinführung unserer ersten Digitalfilmkamera genießen wir das Privileg, hervorragende Anregungen und bestes Feedback zu erhalten, wie für kein anderes unserer neuen Produkte jemals zuvor! Viele von uns sind in Bewunderung weltführender Filmemacher und DOPs aufgewachsen.
- Page 613 SD-Karten Dashboard Vorbereiten von Datenträgern RECORD-Einstellungen für die Aufnahme Dateinamenskonventionen Vorbereiten von Datenträgern MONITOR-Einstellungen mit der Blackmagic URSA Mini AUDIO-Einstellungen Vorbereiten von Datenträgern mit der Blackmagic URSA Mini AUDIO-Einstellungen für die Pro 4.6K URSA Mini Medien für den Mac-Einsatz AUDIO-Einstellungen für die vorbereiten URSA Mini Pro 4.6K...
- Page 614 Blackmagic URSA Studio Viewfinders Zoom-Steuerung Menü-Einstellungen DaVinci Resolve Primary Color Corrector Auswechselbarer Objektivanschluss Blackmagic URSA Mini Pro PL Mount Blackmagic Camera Setup Blackmagic URSA Mini Pro B4 Mount Utility (Dienstprogramm) Blackmagic URSA Mini Pro EF Mount Postproduktions-Workflow Blackmagic URSA Mini Pro Shim Kit Arbeiten mit Dateien von CFast-2.0- und SD-Karten...
-
Page 615: Mit Welcher Kamera Arbeiten Sie
Mit welcher Kamera arbeiten Sie? Im Verlauf dieses Handbuchs werden Ihnen gelegentlich Funktionen begegnen, die sich auf ein bestimmtes Blackmagic URSA Mini Kameramodell beziehen. Alle URSA Mini Kameras erzeugen sagenhafte Bilder mit einem breiten Dynamikumfang. Auch das Gehäuse ist vom Grundaufbau für alle Modelle gleich. -
Page 616: Ursa Mini
URSA Mini, Linksansicht URSA Mini Pro 4.6K Die Blackmagic URSA Mini Pro 4.6K unterscheidet sich etwas. Diese Kamera gibt es nur als 4.6K-Modell mit einem EF-Mount. Ihr auswechselbarer Objektivanschluss unterstützt jedoch auch andere Objektivtypen. Weitere Informationen zum auswechselbaren Objektivanschluss finden Sie im Abschnitt „Auswechselbarer Objektivanschluss“. -
Page 617: Erste Schritte
Erste Schritte Die ersten Arbeitsschritte mit Ihrer Blackmagic URSA Mini sind einfach: Befestigen Sie den seitlichen Griff, setzen Sie ein Objektiv auf und schalten Sie Ihre Kamera ein. Anbringen eines Objektivs Objektive an der URSA Mini 4K, URSA Mini 4.6K und URSA Mini Pro 4.6K werden auf dieselbe Weise angebracht. - Page 618 Anschlag und nehmen das Objektiv vorsichtig ab, indem Sie es direkt aus der Kamera herausziehen. Das Objektiv muss nicht abgedreht werden. LENS Anbringen und Abnehmen eines PL-Objektivs bei der Blackmagic URSA Mini PL URSA Mini Pro 4.6K Der PL-Mount der URSA Mini Pro 4.6K enthält vier Stifte auf der 12-Uhr-Position, um mit Objektiven zu kommunizieren, die über eine Schnittstelle des Typs Cooke /i Technology...
- Page 619 Vergewissern Sie sich, dass der Aufrichtungsstift in der Registrierkerbe eingerastet ist. Drehen Sie den Sperrring im Uhrzeigersinn, um das Objektiv am Bajonett zu befestigen und zu verankern. LENS Anbringen und Abnehmen eines B4-Objektivs bei der Blackmagic URSA Mini PL mit einem B4-Mount Erste Schritte...
-
Page 620: Stromversorgung Der Kamera
Akkutypen die passende Akkuträgerplatte befestigen. So schalten Sie Ihre URSA Mini ein: Drücken Sie die Ein-/Austaste und lassen Sie sie wieder los. Bei der Blackmagic URSA Mini befindet sich die Ein-/Austaste auf dem Bedienfeld hinter dem Ausklapp-LCD. Sie gelangen an das Bedienfeld, indem Sie einfach das LCD aufklappen. - Page 621 Sie die Taste, bis sich die Kamera ausschaltet. So schalten Sie Ihre URSA Mini Pro 4.6K ein: Auf der Blackmagic URSA Mini Pro 4.6K befindet sich auch über dem ausklappbaren LCD ein Ein-/Ausschalter. Stellen Sie den Schalter auf ON, um Ihre Kamera einzuschalten.
- Page 622 XLR 1 XLR 2 XLR 1 XLR 2 Falls erforderlich, können Sie die Kamera ein- und ausschalten, indem Sie die REC- und Vorlauftasten auf dem Bedienfeld hinter dem LCD gedrückt halten TIPP Sollte Ihre URSA Mini Pro 4.6K ausgeschaltet sein, der Ein-/Ausschalter jedoch auf ON stehen, kann es sein, dass Ihre Kamera über die Bluetooth-Steuerung oder durch Gedrückthalten der Aufnahme- und Vorlauftaste auf dem Bedienfeld ausgeschaltet wurde.
-
Page 623: Speichermedien
Karte ein, bis sie spürbar einrastet. Drücken Sie die Auswurftaste, um die CFast-Karte auszugeben. Die Speicherangabe am untern Rand des LCD-Touchscreens zeigt die Bezeichnung der erkannten CFast-Karten und die auf ihnen verbleibende Zeit an. Die Blackmagic URSA Mini hat zwei CFast-Steckplätze für unterbrechungsfreies Aufnehmen Speichermedien... - Page 624 Lese- und Schreibgeschwindigkeiten haben. Einige Karten zeichnen Video ununterbrochen in RAW auf, andere eignen sich für Aufnahmen in komprimierten Formaten wie ProRes und RAW mit Kompression. Die für das Filmen mit der Blackmagic URSA Mini empfohlenen CFast-Karten sind in den nachstehenden Tabellen aufgeführt.
- Page 625 Lexar Professional 3400x 32 GB Lexar Professional 3400x 64 GB Lexar Professional 3400x 128 GB Lexar Professional 3400x 256 GB Bitte informieren Sie sich über die aktuellsten Angaben zu empfohlenen CFast-Karten für die Blackmagic URSA Mini im Blackmagic Design Support-Center unter www.blackmagicdesign.com/ de/support. Speichermedien...
-
Page 626: Sd-Karten
Sie dafür, dass Ihr Auswahlschalter auf SD steht Auswahl einer schnellen SD-Karte Für Ultra-HD-Aufnahmen auf der Blackmagic URSA Mini Pro 4.6K empfehlen wir, die schnellsten Hochgeschwindigkeits-SD-Karten des Typs UHS-II zu verwenden. Es ist wichtig, für die Aufzeichnung in Ultra HD und HD schnelle UHS-II-SD-Karten zu verwenden. Für HD-Aufnahmen eignen sich auch UHS-1-Karten. - Page 627 Windows-Datenträgerformat exFAT verwenden. Dieses Format können jedoch auch Mac-Computer lesen. Die empfohlenen SD-Karten für das Filmen mit der Blackmagic URSA Mini Pro sind in den nachstehenden Tabellen aufgeführt. Sehen Sie in der aktuellsten Ausgabe dieses Handbuchs regelmäßig nach den neuesten Infos. Die aktuellste Version dieses Handbuchs finden Sie als Download auf der Blackmagic Design Website unter www.blackmagicdesign.com/de/support...
- Page 628 Exercia Pro UHS-II 270MB/s SDXC 128GB Toshiba Exercia Pro UHS-II 270MB/s SDXC 256GB Transcend Ultimate UHS-II 180MB/s SDXC 64GB Wise 285MB/s UHS-II SDXC 64GB Aktuellste Informationen zu unterstützten SD-Karten für die URSA Mini Pro finden Sie im Blackmagic Design Support Center unter www.blackmagicdesign.com/de/support. Speichermedien...
-
Page 629: Vorbereiten Von Datenträgern Für Die Aufnahme
SD-Karten sperren und entsperren SD-Karten können schreibgeschützt oder gesperrt werden, um zu verhindern, dass Daten überschrieben werden. Vergewissern Sie sich, dass eingelegte Karten nicht schreibgeschützt sind. Der Schreibschutz lässt sich durch Umlegen des kleinen Plastikschalters an der linken Kartenseite zu den Anschlüssen hin aufheben. -
Page 630: Vorbereiten Von Datenträgern Mit Der Blackmagic Ursa Mini
SD oder CFAST umzulegen. Überprüfen Sie die Einstellungen vor der Formatierung immer sorgfältig. Vorbereiten von Datenträgern mit der Blackmagic URSA Mini Tippen Sie auf eine der Speicheranzeigen am unteren Rand des LCD-Touchscreens, um den Storage Manager zu öffnen. -
Page 631: Vorbereiten Von Datenträgern Mit Der Blackmagic Ursa Mini Pro 4.6K
Vergewissern Sie sich vor dem Formatieren, dass Sie die richtige Karte ausgewählt haben Sie werden bei abgeschlossener Formatierung benachrichtigt. Tippen Sie auf „OK“, um zum Storage Manager zurückzugehen. Tippen Sie auf „Exit“, um den Storage Manager zu verlassen. Wenn Sie CFast- oder SD-Karten über den Storage Manager formatieren, verwendet Ihre URSA Mini für die Benennung der Karte die unter „Camera ID“... -
Page 632: Medien Für Den Mac-Einsatz Vorbereiten
Weitere Informationen darüber, wie Sie zwischen CFast- und SD-Speichermedien umschalten, finden Sie weiter oben in diesem Handbuch im Abschnitt „SD-Karten“. Medien für den Mac-Einsatz vorbereiten Benutzen Sie das unter Mac OS enthaltene Festplattendienstprogramm, um Ihre Karte im HFS+- oder exFAT-Format zu formatieren. Denken Sie daran, eine Sicherungskopie von wichtigen Inhalten auf Ihren CFast- oder SD-Karten zu erstellen, da beim Formatieren alle vorhandenen Daten gelöscht werden. - Page 633 Ihre Karte auf unserer Liste empfohlener Medien steht und ob sie für die benutzte Framegröße geeignet ist. Versuchen Sie Ihre Framerate oder Framegröße für geringere Datenraten zu reduzieren oder einen komprimierten Codec wie ProRes zu verwenden. Die aktuellsten Informationen finden Sie auf der Blackmagic Design Website unter www.blackmagicdesign.com/de Speichermedien...
-
Page 634: Aufzeichnen
REC-Taste befindet sich an der Außenseite des Ausklappmonitors. Drücken Sie erneut auf die REC-Taste, um die Aufzeichnung zu stoppen. Bei der Blackmagic URSA Mini Pro 4.6K befindet sich die externe REC-Taste zum Aufzeichnen auf dem vorderen Bedienfeld, um leichteren Zugriff zu gewähren, wenn Sie von der Schulter filmen. - Page 635 Maximale Sensor-Frameraten Die folgende Tabelle listet verfügbare Codecs, Auflösungen und ihre maximalen Sensor-Frameraten für die URSA Mini 4K auf: URSA Mini 4K Auflösung Codec Sensorfläche Max. Framerate 4000 x 2160 Verlustfreies RAW Voll 60 (Dualkarte) 4000 x 2160 RAW 3:1 Voll 4000 x 2160 RAW 4:1...
- Page 636 URSA Mini 4.6K und URSA Mini Pro 4.6K Auflösung Codec Sensorfläche Max. Framerate 4608 x 1920 Verlustfreies RAW Gefenstert 60 (Dualkarte) 4608 x 1920 RAW 3:1 Gefenstert 4608 x 1920 RAW 4:1 Gefenstert 4608 x 1920 ProRes 444 XQ Gefenstert 4.6K 2.4:1 4608 x 1920 ProRes 444...
- Page 637 URSA Mini 4.6K und URSA Mini Pro 4.6K Auflösung Codec Sensorfläche Max. Framerate 3072 x 2560 Verlustfreies RAW Gefenstert 60 (Dualkarte) 3072 x 2560 RAW 3:1 Gefenstert 3072 x 2560 RAW 4:1 Gefenstert 3072 x 2560 ProRes 444 XQ Gefenstert 3K Anamorphotisch 3072 x 2560 ProRes 444...
- Page 638 1920 x 1080 ProRes Proxy Voll So geben Sie bei der Blackmagic URSA Mini den Codec und die Auflösung nach Wunsch vor: Drücken Sie auf die MENU-Taste im Bedienfeld. Navigieren Sie zur ersten Seite des RECORD-Tabs. Tippen Sie auf Ihre gewünschte Kombination von Codec, Qualität und Auflösung.
-
Page 639: Trigger-Aufzeichnung
Trigger-Aufzeichnung Ihre URSA Mini gibt über die SDI-Ausgänge automatisch ein Signal aus, das auf angeschlossenen Geräten mit unterstützter SDI-Trigger-Aufzeichnungsfunktion den Aufnahmevorgang auslöst, zum Beispiel bei einem Blackmagic Video Assist. Sobald Sie die Aufnahmetaste Ihrer Kamera drücken, beginnen diese externen SDI-Geräte ebenfalls aufzuzeichnen. Ein erneutes Drücken der Aufnahmetaste stoppt auch diese Geräte Aktivieren Sie die Funktion zur Aufzeichnung per SDI-Trigger an angeschlossenen Geräten und prüfen Sie, dass diese auf das Auslösesignal von Ihrer URSA Mini reagieren. - Page 640 CFast- Frame- CinemaDNG CinemaDNG CinemaDNG ProRes ProRes ProRes ProRes ProRes ProRes Karten rate RAW 3:1 RAW 4:1 444 XQ 422 HQ 422 LT 422 Proxy Dauer Dauer Dauer Dauer Dauer Dauer Dauer Dauer Dauer 23.98 75 Min. 142 Min. 175 Min. 84 Min.
- Page 641 3K Anamorphotisch* CFast- Frame- CinemaDNG CinemaDNG CinemaDNG ProRes ProRes ProRes ProRes ProRes ProRes Karten rate RAW 3:1 RAW 4:1 444 XQ 422 HQ 422 LT 422 Proxy Dauer Dauer Dauer Dauer Dauer Dauer Dauer Dauer Dauer 23.98 20 Min. 39 Min. 48 Min.
- Page 642 4K 16:9* CFast- Frame- CinemaDNG CinemaDNG CinemaDNG ProRes ProRes ProRes ProRes ProRes ProRes Karten rate RAW 3:1 RAW 4:1 444 XQ 422 HQ 422 LT 422 Proxy Dauer Dauer Dauer Dauer Dauer Dauer Dauer Dauer Dauer 23.98 17 Min. 32 Min. 40 Min.
-
Page 643: Wiedergabe
CFAST URSA Mini Kamera URSA Mini Pro 4.6K Kamera TIPP Die Blackmagic URSA Mini verfügt über Wiedergabe- und Transporttasten auf dem internen sowie auf dem ergonomischen Bedienfeld. HINWEIS Die Blackmagic URSA Mini kann aber Clips mit unterschiedlichen Qualitätseinstellungen abspielen, sofern Codec, Framerate und Auflösung dieser Clips übereinstimmen. - Page 644 Die Steuertasten der Kamera funktionieren wie bei einem CD-Player. Durch Drücken der Vorlauftaste gelangen Sie zum Anfang des nächsten Clips. Drücken Sie einmal auf die Rücklauftaste, um an den Anfang des aktuellen Clips zu gelangen oder drücken Sie sie zweimal, um zum Anfang des vorhergehenden Clips zurückzugehen.
-
Page 645: Die Ursa Mini Vorgestellt
Die URSA Mini vorgestellt Branchenübliche BNC-Verbinder für Verbindungen via SDI befinden sich an der rechten Seite sowie an der Geräterückseite Ihrer URSA Mini. Ebenso sind zwei separate LANC-Eingänge vorhanden, einer für den Seitengriff, ein zweiter am Kamerarücken für die externe LANC-Steuerung. Für den Einsatz von professionellem symmetrischem Analogaudio stehen an der URSA Mini und der URSA Mini Pro 4.6K XLR-Buchsen auf der Geräteoberseite hinter den Befestigungspunkten zur Verfügung. -
Page 646: Ursa Mini - Linke Kameraseite
AUTO W/B Der Schalter für den automatischen Weißabgleich ist mit AUTO W/B beschriftet und kommt zum Einsatz, wenn Sie Ihren Weißabgleich danach ausrichten möchten, was aktuell in der Mitte des Bildschirms zu sehen ist. So zum Beispiel Weißabgleich-Einstellungen mit Graukarten als Bezugspunkt vor Ihrem Objektiv. Weitere Informationen finden Sie im Abschnitt „Bedienung der URSA Mini Pro 4.6K“. - Page 647 Das Modell URSA Mini Pro 4.6K mit eingeklapptem Touchscreen Ein-/Ausschalter Mit dem Ein-/Ausschalter schalten Sie die Kamera ein. Darüber hinaus kann die Kamera auf der Innenseite des Ausklappmonitors eingeschalten werden, indem Sie die REC-Taste und die Vorlauftaste gleichzeitig gedrückt halten. ND-Filter Ihre URSA Mini enthält drei interne Neutraldichtefilter, um zu steuern, wie viel Licht auf den Sensor fällt.
-
Page 648: Rechte Kameraseite
Sie in den Abschnitten „Blackmagic URSA Viewfinder“ und „Blackmagic URSA Studio Viewfinder“. LANC-Eingang Speziell für den Blackmagic URSA Mini Seitengriff vorgesehener 2,5mm-TRS-LANC-Verbinder. Siehe Abschnitt „Erste Schritte“ für weitere Informationen zum Anbringen des Seitengriffs. Steueranschluss für Broadcast-Objektive Über diesen Anschluss erfolgen die Stromversorgung und Steuerung kompatibler PL- und B4-Mount-Objektive mit 12-poligen Verbindern. -
Page 649: Kamerarückseite
Synchronisieren Sie die Blackmagic URSA Mini über ein gängiges Referenzsignal wie Tri-Level-Sync, indem Sie sie an den BNC-Referenzeingang REF IN anschließen. Dies gestattet Ihnen, die Blackmagic URSA Mini mit anderen SDI- Videogeräten zu synchronisieren, wenn Sie bspw. mehrere Kameras an einen Mischer angeschlossen haben. -
Page 650: Kameraoberseite
Alternativ können Sie auf Ihrer Kamera vorgeben, das Referenzsignal von einem ATEM Mischer über die Programm-SDI-Eingabe zu verwenden. Dies ist bei der Arbeit mit ATEM Mischern von Vorteil, weil alle Kameras das rückgespeiste Programm und Kamerasteuerungssignale empfangen und dann gemeinsam auf einem einzigen SDI-Signal basierend getaktet werden können. -
Page 651: Bedienung Der Ursa Mini
Ändern Sie Kameraeinstellungen mithilfe der inneren Bedientasten und des Touchscreens Bedientasten Zusätzlich zum internen Bedienfeld verfügt Ihre Blackmagic URSA Mini über Bedientasten an der Außenseite des LCDs sowie am Seitengriff. Die Tasten für Irisblende, Fokus und Wiedergabe erfüllen jeweils dieselben Funktionen. - Page 652 „Einstellungen“. Die Aufnahmetaste ist jeweils im Bedienfeld auf der Rückseite des LCD und am Seitengriff Ihrer Blackmagic URSA Mini zu finden und ist mit den Buchstaben REC gekennzeichnet. Drücken Sie irgendeine dieser Aufnahmetasten, um die Aufnahme zu starten und stoppen.
-
Page 653: Seitengriff
Handbuch.. Seitengriff Ihre Blackmagic URSA Mini wird mit einem Seitengriff geliefert, mit dem die Kamera bequem und sicher festgehalten werden kann. Bei kompatiblen EF-Objektiven können Sie über den Seitengriff die automatische Blenden- und Fokussteuerung aktivieren. Mit einem einfachen Knopfdruck können Sie außerdem die Aufnahme starten und stoppen. - Page 654 Schlitzschraubendreher oder durch Drehen des D-Rings fest. Schließen Sie die Gummikappe. Anbringen des Seitengriffs an die Blackmagic URSA Mini Das mit der URSA Mini gelieferte kurze LANC-Kabel ermöglicht Ihnen die Bedienung der Kamera anhand der Seitentasten am Griff. Koppeln Sie den LANC-Ausgang des Seitengriffs über dieses Kabel an den LANC-Eingang der Kamera.
-
Page 655: Bedienung Der Ursa Mini Pro 4.6K
Bedienung der URSA Mini Pro 4.6K Die Blackmagic URSA Mini Pro 4.6K wartet mit mehreren Bedienfeldern auf, die in das Gehäuse und in die Außen- und Innenseiten des Ausklapp-Touchscreens eingelassen sind. Sie bieten Ihnen schnellen und bequemen Zugriff auf alle relevanten Kamerafunktionen und auf leistungsstarke Monitoring-Tools. - Page 656 ND-Filter Ihre URSA Mini ist mit drei internen Neutraldichtefiltern – auch Graufilter genannt – versehen. Die verfügbaren Einstellungen sind CLEAR (Kein Filter), 2 STOPS, 4 STOPS und 6 STOPS. Diese Filter reduzieren die auf den Sensor der URSA Mini einfallende Lichtmenge um eine vordefinierte Anzahl von Blendenstufen, hier STOPS genannt.
- Page 657 Menürad Wenn die Funktion „Status Text“ für den Front-SDI-Ausgang Ihrer URSA Mini aktiviert ist, können Sie anhand des Menürads zu vielen Features des Head-up-Displays navigieren, auf die normalerweise über den LCD-Touchscreen zugegriffen wird. Drücken Sie das Menürad wie einen Knopf, um das Head-up-Display Ihrer URSA Mini Pro 4.6K auf einem externen Bildschirm wie einem Blackmagic SmartView, Video Assist oder URSA Viewfinder aufzurufen.
-
Page 658: Ergonomisches Bedienfeld
Durch Drücken der Auto-White-Balance-Taste AWB erscheint mitten auf dem LCD ein weißes Feld für den automatischen Weißabgleich, das fünf Sekunden lang eingeblendet bleibt. Das Feld wird auch auf allen SDI-Ausgängen angezeigt, für die „Status Text“ in den Menüeinstellungen aktiviert ist. Das weiße Feld zeigt die spezifische Bildpartie an, anhand derer der Weißabgleich berechnet wird. - Page 659 Monitorlautsprecher Über den kleinen, in die Außenseite des Bedienfelds eingelassenen Lautsprecher können Sie beim Dreh den Ton mithören. Der Lautsprecher ist dort verortet, wo sich beim Filmen mit geschulterter Kamera in der Regel das Ohr des Bedieners befindet. Drehen Sie zur Anpassung des Lautsprecherpegels einfach das Einstellungsrad, das im Abschnitt „Bedienung der URSA Mini Pro 4.6K“...
- Page 660 ‚ Akkuindikator Bei Gebrauch Ihrer URSA Mini Pro 4.6K mit Akkustrom zeigt Ihnen dieser Indikator die verbleibende Akkulaufzeit in 25%-Schritten an. Jeder der vier Akkuanzeigebalken entspricht 25 % der verbleibenden Akkulaufzeit. Sinkt der Akkustatus unter 20 % des verbleibenden Stroms ab, wechselt die LED neben der Aufnahmetaste die Farbe und beginnt zu blinken. Während der Aufzeichnung blinkt sie abwechselnd langsam rot und orangefarben.
- Page 661 Bedienelemente des Status-LCDs Die Status-LCD-Bedienelemente der URSA Mini Pro 4.6K STILL Drücken Sie diese Taste, um ein Standbild als einzelnen verlustfreien Frame in DNG zu erfassen. Gespeichert werden Bilddateien im Stills-Ordner im Stammverzeichnis des Speicherträgers, auf den aktuell aufgezeichnet wird. Die Dateinamen für gespeicherte Standbilder werden gemäß...
- Page 662 Steuer- und Wiedergabetasten Die Steuer- und Wiedergabetasten der URSA Mini Pro 4.6K IRIS Bei Einsatz kompatibler Objektive aktiviert die IRIS-Taste die automatische Blendeneinstellung. Bei Verwendung der Dynamikumfang-Einstellungen für „Video“ wird durch einmaliges Drücken der IRIS-Taste eine durchschnittliche Belichtungszeit basierend auf der Helligkeitsverteilung in Ihrer Aufnahme eingestellt.
-
Page 663: Internes Bedienfeld
Tonpegelregler Stellen Sie die Aufnahmepegel für die Audiokanäle 1 und 2 mithilfe der eingebauten Drehregler ein. Drehen Sie den jeweiligen Regler im oder gegen den Uhrzeigersinn, um den Aufzeichnungspegel für den entsprechenden Audiokanal anzuheben oder zu senken. Achten Sie dabei auf die Audiopegelmesser auf dem Display, damit Sie den für Sie günstigsten Wert einstellen können. - Page 664 HINWEIS Es ist übliche Praxis, immer erst das XLR-Kabel anzuschließen und anschließend die Phantomspeisung einzuschalten. Schalten Sie unbedingt auch die Phantomspeisung aus, wenn Sie kein phantomgespeistes Mikrofon mehr angeschlossen haben. Geräte anzuschließen, die keinen Schutz für die Phantomspeisung in die AES-XLR-Ausgänge integriert haben, während noch Phantomspeisung von den XLR-Audioeingängen der Kamera eingeht, kann Ihr Equipment beschädigen.
- Page 665 MENU Drücken Sie auf die MENU-Taste, um das Dashboard aufzurufen. Weitere Informationen über die Dashboard-Feature und Einstellungsmöglichkeiten finden Sie im Abschnitt „Einstellungen“. Drücken Sie irgendeine dieser Aufnahmetasten, um die Aufnahme zu starten und stoppen. Einzelheiten hierüber finden Sie im Abschnitt „Aufzeichnen“. Transporttasten für die Wiedergabe Mit den Transporttasten können Sie die Wiedergabe von Clips starten und stoppen sowie zum nächsten oder vorherigen Clip springen.
-
Page 666: Bedienung Per Touchscreen
Bedienung per Touchscreen Touchscreen Der ausklappbare 5 Zoll große LCD-Touchscreen Ihrer Blackmagic URSA Mini lässt sich schwenken, damit Sie aus unterschiedlichen Winkeln filmen können. Wenn Sie Ihre URSA Mini auf der Schulter tragen und den URSA Viewfinder benutzen, können Sie die Kamera über die Tasten an der Rückseite des eingeklappten Bildschirms bedienen. - Page 667 Tippen Sie in den LCD-Monitor-Optionen auf das Zebra- Icon, um auf die Zebra-Einstellungen zuzugreifen Die Zebra-Einstellung für den LCD-Touchscreen stellen Sie ein, indem Sie auf der Zebra-Registerkarte auf das Schalter-Icon unten links im Display drücken. Ziehen Sie den Schieberegler nun nach links oder rechts oder tippen Sie auf die Pfeilsymbole, um die gewünschte Prozentzahl für den Zebra-Modus einzustellen.
- Page 668 Frame Guides Die Frame-Guides-Einstellung passt das Erscheinungsbild von Bildrandmarkierungen auf Ihrem LCD-Touchscreen an. Sie können außerdem zwischen sieben Frame-Guide-Optionen für alle Ausgänge Ihrer URSA Mini wählen. Unter den Optionen für Bildrandmarkierungen finden Sie u. a. Seitenverhältnisse für verschiedene Kino-, TV- oder Online-Standards. Tippen Sie in den LCD-Monitor-Optionen auf das Frame-Guides-Icon, um auf die Bildrandmarkierungs-Einstellungen Ihrer URSA Mini zuzugreifen Um das Erscheinungsbild der Bildrandmarkierungen auf dem LCD-Touchscreen Ihrer URSA Mini...
- Page 669 ‚ 4:3 Zeigt das mit SD-Fernsehbildschirmen kompatible 4:3-Seitenverhältnis an. Das Format hilft zudem bei der Bildeinstellung, wenn 2 anamorphotische Adapter verwendet werden. TIPP Sie können die Deckkraft der eingeblendeten Bildrandmarkierungen ändern. Näheres finden Sie im Abschnitt „,Monitor'-Einstellungen“ in diesem Handbuch. HINWEIS Weitere Informationen zum Aktivieren der Bildrandmarkierungen auf den Front- und Haupt-SDI-Ausgängen Ihrer Kamera finden Sie im Abschnitt „Monitor-...
- Page 670 Das Drittel-Raster passt sich automatisch dem Maßstab jeder Bildrandmarkierung an ‚ Thirds Die Einstellung „Thirds“ zeigt ein Raster mit zwei vertikalen und zwei horizontalen Linien an, die das Bild in Drittel aufteilen. Mit dem Drittel-Prinzip lassen sich Shots sehr effektiv komponieren.
- Page 671 Schutzbereiche dienen auch der Kadrierung von Shots, wenn Sie bspw. wissen, dass ein Shot in der Postproduktion stabilisiert werden soll. Dadurch können die Kanten des Bilds abgeschnitten werden. Sie können auch dafür genutzt werden, einen bestimmten Zuschnitt anzuzeigen. Hier ein Beispiel: Bei einer Einstellung von 50 % können Sie beim Aufzeichnen in Ultra HD 3840 x 2160 sehen, wie eine Framegröße von 1920 x 1080 aussehen würde.
- Page 672 Framerate ist in der Regel so eingestellt, dass sie der in Ihrem Postproduktions-Workflow verwendeten Wiedergabegeschwindigkeit entspricht. Ihre Blackmagic URSA Mini verfügt über acht Projekt-Frameraten: 23,98; 24; 25; 29,97; 30; 50; 59,94 und 60 fps. Um die Projekt-Framerate Ihrer URSA Mini im FPS-Menü anzupassen, tippen Sie auf die Pfeilsymbole neben der derzeitig ausgewählten Framerate unten links auf dem Display.
- Page 673 Sensor Frame Rate Anhand der Sensor-Framerate wird vorgegeben, wie viele Vollbilder der Sensor pro Sekunde tatsächlich aufzeichnet. Diese Framerate wirkt sich darauf aus, wie schnell oder langsam Ihr Video bei Ihrer vorgegebenen Projekt-Framerate wiedergegeben wird. Aktivieren Sie zunächst „Off Speed Frame Rate“ und tippen Sie dann auf die Pfeilsymbole neben der Sensor-Framerate oder ziehen Sie den Schieberegler hin und her Standardmäßig sind die Projekt- und Sensor-Framerate auf eine natürliche Wiedergabegeschwindigkeit eingestellt.
- Page 674 SHUTTER Der Verschluss-Indikator zeigt den Verschlusswinkel an. Wenn Sie auf diesen Indikator tippen, können Sie den Verschlusswinkel Ihrer URSA Mini manuell ändern oder bevorzugte Auto-Exposure-Modi konfigurieren. Der Verschluss-Indikator Ihrer URSA Mini. Tippen Sie darauf, um auf die SHUTTER-Einstellungen zuzugreifen Der Verschlusswinkel bestimmt den Grad der Bewegungsunschärfe in Ihrem Video. Man kann damit wechselnde Lichtverhältnisse kompensieren.
- Page 675 Bewegungsunschärfe haben können. Beim Dreh in geschlossenen Räumen ist es zudem ratsam, nach etwaigem Flimmern Ausschau zu halten, das durch unterschiedliche Beleuchtungskörper hervorgerufen werden kann. Die Blendenautomatikfunktion der Blackmagic URSA Mini ist nicht verfügbar, wenn der Verschlussmodus AUTO EXPOSURE (Belichtungsautomatik) ausgewählt ist. Shutter + Iris Behält die korrekte Belichtungsstärke bei, indem zunächst der Verschluss und danach die...
- Page 676 IRIS Der IRIS-Indikator zeigt die derzeit ausgewählte Blendenöffnung an. Durch Antippen dieses Indikators lässt sich die Blendenöffnung an kompatiblen Objektiven anpassen und die blendenbasierten Belichtungsautomatik-Modi konfigurieren. Der IRIS-Indikator Ihrer URSA Mini. Tippen Sie darauf, um auf die SHUTTER-Einstellungen zuzugreifen HINWEIS Die Blende lässt sich über den LCD-Touchscreen steuern, wenn Ihre URSA Mini mit einem Objektiv versehen ist, das die Vornahme von Änderungen der Blendenwerte über die Kamera unterstützt.
- Page 677 Wenn sich der aktivierte Modus für automatische Belichtung auf die Blende auswirkt, erscheint oben am Touchscreen Ihrer URSA Mini neben dem Blendenindikator ein kleines „A“. TIPP Mit speziell für die Video- oder Filmproduktion konzipierten, kompatiblen B4- oder PL-Objektiven funktioniert die Belichtungsautomatik reibungslos. Bei EF-Objektiven kann es ggf.
- Page 678 Der ISO-Indikator Ihrer URSA Mini. Tippen Sie darauf, um auf die ISO-Einstellungen zuzugreifen Im ISO-Menü erscheinen die ISO-Einstellungen Ihrer URSA Mini entlang des unteren Rands des LCD-Touchscreens Je nach Situation mag eine niedrigere oder höhere ISO-Einstellung geeigneter sein. Ein ISO-Wert von 1600 kann bei schlechten Lichtverhältnissen zwar angemessen sein, wenn man mit der URSA Mini 4.6K filmt, führt dies aber ggf.
- Page 679 Durch jedes Antippen wird die Farbtemperatur um 50 K angehoben bzw. abgesenkt. Wenn Sie die Pfeilsymbole gedrückt halten, ändern sich die Werte schneller. Alternativ können Sie auch den Schieberegler in der Mitte des White-Balance-Menüs bewegen. Um Ihr Bild noch weiter anzupassen, können Sie zudem den Farbton anpassen. Dies verändert die Grün- und Magentaanteile in Ihrem Bild.
- Page 680 Stromversorgung Der Stromstatus Ihrer URSA Mini wird oben rechts auf dem LCD-Touchscreen angezeigt. Es gibt vier verschiedene Indikatoren: Der Stromindikator Ihrer URSA Mini befindet sich oben rechts auf dem LCD-Touchscreen. Bei Verwendung von Akkustrom schalten Sie durch Antippen dieses Indikators zwischen der Volt- und Prozentanzeige hin und her Wird angezeigt, wenn Ihre URSA Mini an den Netzstrom angeschlossen ist.
- Page 681 verschieben. Sie können somit die Schatten und Lichter Ihrer Bilder auf Clipping überprüfen. Wenn die linke und rechte Kante Ihres Histogramms abrupt abfallen und nicht graduell auslaufen, kann es sein, dass Details in den hellen und dunklen Bereichen verloren gehen. HINWEIS Ist unten links an Ihrem Touchscreen kein Histogramm zu sehen, sind Ihre LCD- Monitoreinstellungen möglicherweise auf die Anzeige von CODEC AND RESOLUTION...
- Page 682 HINWEIS Sie können Ihre URSA Mini so einstellen, dass sie aufhört aufzuzeichnen, sobald fallengelassene Bilder erkannt werden. So kann es Ihnen nie passieren, dass Sie Zeit mit dem Filmen unbrauchbarer Footage vertun, falls Sie mal den Indikator für ausgelassene Bilder übersehen sollten.
- Page 683 Über dieses Menü können Sie Ihre CFast-Karten formatieren. Weitere Informationen zur Formatierung von CFast-Karten mit Ihrer URSA Mini finden Sie im Abschnitt „Vorbereiten von Datenträgern mit der Blackmagic URSA Mini“ in diesem Handbuch. TIPP Durch Antippen eines Kartennamens im Speichermenü wird diese Karte als aktive vorgegeben.
- Page 684 Doppeltippen zum Zoomen Durch doppeltes Tippen auf den LCD-Touchscreen können Sie einen beliebigen Bereich des Vorschaubilds Ihrer URSA Mini vergrößern. Der Bereich, auf den Sie tippen, wird vergrößert. Wenn Sie Ihren Finger über den LCD-Touchscreen ziehen, können Sie das Bild bewegen. Das ist besonders hilfreich beim Überprüfen des Fokus.
- Page 685 gelangen. Tippen Sie auf den Rücklauf-Button, gelangen Sie zum Anfang des derzeitigen Clips. Wenn Sie zum vorherigen Clip springen möchten, müssen Sie zweimal auf den Rücklauf-Button tippen. Clips können zudem in Dauerschleife abgespielt werden, indem Sie auf den Loop-Button tippen. Die Rücklauf-, Wiedergabe-, Vorlauf- und Loop-Buttons Um vor- oder zurückzuspulen, halten Sie die Vor- oder Rücklauf-Buttons gedrückt.
-
Page 686: Einstellungen
Einstellungen Dashboard Durch Drücken der MENU-Taste an Ihrer URSA Mini gelangen Sie zum Dashboard der Kamera. Hierbei handelt es sich um ein Menü mit Registerkarten, auf denen Sie Einstellungen finden, die auf dem Head-up-Display nicht verfügbar sind. Das Einstellungsregister ist in Funktionen unterteilt, wie RECORD, MONITOR, AUDIO, SETUP, PRESETS und LUTS. - Page 687 Menü CODEC AND QUALITY aus. Wählen Sie anschließend im RESOLUTION-Menü „Ultra HD“. HINWEIS Die Blackmagic URSA Mini unterstützt ein breites Spektrum an CinemaDNG RAW- und Apple ProRes-Auflösungen von 4.6K oder 4K bei der URSA Mini 4.6K bzw. bei der URSA Mini 4K jeweils bis hinunter zu HD.
- Page 688 Frames pro Sekunde unter Verwendung von 4K ProRes HQ. Diese Framerate ist in der Regel so eingestellt, dass sie der in Ihrem Postproduktions-Workflow verwendeten Wiedergabegeschwindigkeit und der Audio-Synchronisation sowie den Auslieferungsvorschriften entspricht. Ihre Blackmagic URSA Mini verfügt über acht Projekt-Frameraten: 23,98; 24; 25; 29,97; 30; 50; 59,94 und 60 fps. Einstellungen...
- Page 689 Speicherplatz. RECORD RAW ON 2 CARDS Die Blackmagic URSA Mini ermöglicht es Ihnen, Clips in CinemaDNG RAW mit höheren Frameraten aufzuzeichnen, indem die Kamera auf beide CFast-Karten gleichzeitig aufnimmt. Wenn diese Einstellung aktiviert ist, zeichnet die URSA Mini, falls verfügbar, auf beide Karten auf. Ist nur eine CFast-Karte vorhanden, versucht die URSA Mini in der gewünschten Framerate auf diese einzelne...
- Page 690 RECORD-Einstellungen 3 Die dritte Seite der RECORD-Einstellungen beinhaltet die folgenden Einstellungen: TIMELAPSE Diese Einstellung aktiviert die Timelapse-Funktion, um automatisch Standbilder mit folgenden Intervallen aufzunehmen: ‚ Frames: 2–10 ‚ Sekunden: 1–10, 20, 30, 40, 50 ‚ Minuten: 1–10 Sie können bspw. festlegen, dass die Kamera alle 10 Frames, alle 5 Sekunden, alle 30 Sekunden oder alle 5 Minuten etc.
-
Page 691: Dateinamenskonventionen
Diese Einstellung eignet sich für Live-Produktionen, wo keine Zeit für die Postproduktion bleibt, weil das Bild live ausgestrahlt wird. Sollten Sie Ihre Bilder nach der Aufzeichnung weiter bearbeiten wollen, empfehlen wir, die Einstellung auf OFF zu belassen. Aus diesem Grund werden die Schärfeeinstellungen nicht auf RAW-Dateien angewandt, weil diese für die Postproduktion bestimmt sind. - Page 692 MONITOR-Einstellungen 1, LCD, Front SDI, Main SDI Die erste Seite der MONITOR-Registerkarte für„LCD“, „Front SDI“ und „Main SDI“ enthält identische Einstellungen für jeden Ausgang. Beispiel: Sie können Zebra für den LCD-Touchscreen aktivieren, aber für den Front- oder Haupt-SDI-Ausgang ausschalten. CLEAN FEED Tippen Sie auf das Schalter-Icon unter CLEAN FEED in den „LCD“-, „Front SDI“- und „Main SDI“-Menüs, um bis auf den Aufnahme-Tally-Indikator den gesamten Statustext und alle Overlays für den jeweiligen Ausgang zu deaktivieren...
- Page 693 Sind auf Ihrer URSA Mini 3D-LUTs aktiviert, können Sie diese in diesen Einstellungen auf Ihren LCD-Touchscreen, den Front- oder Haupt-SDI-Ausgang anwenden. HINWEIS Näheres zum Laden und Anwenden von 3D-LUTs finden Sie im Abschnitt „LUTS“ dieses Handbuchs. ZEBRA Tippen Sie auf das Schalter-Icon unter ZEBRA in den „LCD“-, „Front SDI“- und „Main SDI“- Menüs, um die Zebra-Funktion für diese Ausgänge zu aktivieren.
- Page 694 MONITOR-Einstellungen 2, LCD Die Einstellungen auf der zweiten Seite unter der MONITOR-Registerkarte beziehen sich ausschließlich auf den LCD-Touchscreen. TEXT SURROUNDS IMAGE Diese Einstellung ist nur bei den Modellen URSA Mini 4K und URSA Mini 4.6K verfügbar. Tippen Sie im LCD-Menü auf das Schalter-Icon unter TEXT SURROUNDS IMAGE, um das Bild auf Ihrem LCD-Touchscreen um 75 % zu verkleinern.
- Page 695 SCREEN BRIGHTNESS Ziehen Sie den Schieberegler unter SCREEN BRIGHTNESS im LCD-Menü nach links oder rechts, um die Helligkeit Ihres LCD-Touchscreens anzupassen. MONITOR-Einstellungen 2, Front SDI und Main SDI Die zweite Seite unter „Front SDI“ und „Main SDI“ auf der MONITOR-Registerkarte enthält Einstellungen, die sich nur auf den Front- und Haupt-SDI-Ausgang beziehen.
- Page 696 Wenn Sie unter STATUS TEXT für einen der SDI-Ausgänge die Regie-Option „Director“ wählen, werden die folgenden Informationen angezeigt: Zeigt die derzeit ausgewählte Framerate in Bildern pro Sekunde an. Ist OFF SPEED FRAME RATE deaktiviert, wird nur die Projekt-Framerate eingeblendet. Wird von einer OFF SPEED FRAME RATE Gebrauch gemacht, erscheint die Sensor-Framerate gefolgt von der Projekt- Framerate.
- Page 697 MONITOR-Einstellungen 1, All Monitoreinstellungen, die alle Ausgänge Ihrer URSA Mini betreffen, sind unter dem Menüpunkt „All“ zusammengefasst. Stellen Sie die Option SAFE AREA GUIDE bspw. auf 90 %, wird diese Einstellung auf das LCD, den Front- und den Haupt-SDI-Ausgang angewandt. Unter „All“...
- Page 698 HINWEIS Das Einstellen der Stärke der Fokussierhilfe lässt unberührt, ob Focus Assist für den LCD-Touchscreen oder für die SDI-Ausgänge Ihrer URSA Mini aktiviert ist. Sie müssen die Fokussierhilfe also in den Monitormenüs unter „LCD“, „Front LCD“ oder „Main LCD“ immer noch für jeden Ausgang einzeln einschalten. TIPP Die optimale Stärke der Fokussierhilfe richtet sich nach dem jeweiligen Shot.
-
Page 699: Audio-Einstellungen
SAFE AREA GUIDE % Um die Größe des Schutzbereich-Overlays auf dem LCD-Touchscreen sowie den Front- und Haupt-SDI-Ausgängen Ihrer URSA Mini anzupassen, tippen Sie auf die Pfeile links und rechts neben der Prozentangabe. Die Prozentzahl drückt die Größe des Schutzbereichs im Verhältnis zum Bildausschnitt aus. - Page 700 HEADPHONES VOLUME Über den Schieberegler können Sie die Lautstärke von an die 3,5mm-Klinkenbuchse der URSA Mini angeschlossenen Kopfhörern einstellen. Schieben Sie den Audio-Schieberegler zum Justieren der Pegel nach links oder rechts. SPEAKER VOLUME Dieser Schieberegler passt die Ausgabepegel der eingebauten Lautsprecher Ihrer URSA Mini an. Schieben Sie den Audio-Schieberegler zum Justieren der Pegel nach links oder rechts.
- Page 701 HEADPHONES VOLUME Mit dem Schieberegler passen Sie die Ausgabepegel für Kopfhörer an, die an die 3,5mm- Klinkenbuchse der URSA Mini angeschlossen sind. Schieben Sie den Audio-Schieberegler zum Justieren der Pegel nach links oder rechts. SPEAKER VOLUME Dieser Schieberegler passt die Ausgabepegel der eingebauten Lautsprecher Ihrer URSA Mini an. Schieben Sie den Audio-Schieberegler zum Justieren der Pegel nach links oder rechts.
-
Page 702: Audio-Einstellungen Für Die Ursa Mini Pro 4.6K
AUDIO-Einstellungen für die URSA Mini Pro 4.6K Die AUDIO-Einstellungen für Ihre URSA Mini Pro 4.6K sind über zwei Seiten verteilt und in Kanäle 1 und 2 unterteilt. Ein anstehendes Software-Update wird zwei weitere Kanäle beinhalten. Jeder Audiokanal kann einer anderen Quelle zugewiesen werden. Ebenso lassen sich diverse Einstellungen wie Padding und Tiefpassfilter anpassen. - Page 703 RECORDED CHANNEL 1/2 LEVEL Mit diesen Schiebereglern regeln Sie die Aufzeichnungspegel für Ihre ausgewählten Kanalquellen 1 und 2. Audiopegelmeter begleiten jeden Schieberegler, um Ihnen die korrekte Einstellung Ihrer Audiopegel zu ermöglichen. Diese Pegel werden automatisch aktualisiert, wenn Sie Audio mit den Drehreglern auf dem ergonomischen Bedienfeld verändern.
-
Page 704: Setup-Einstellungen
SETUP-Einstellungen Auf der Registerkarte SETUP finden Sie Identifikationseinstellungen, die Softwareversion, Einstellungsmöglichkeiten für die Funktionstasten und andere Kamera-Einstellungen Ihrer URSA Mini, die nicht im direkten Zusammenhang mit Aufzeichnung und Monitoring stehen. Dieses Menü besteht aus vier Seiten, zu denen Sie jeweils über die Pfeile am Rand des Touchscreens oder durch Wischen nach links oder rechts gelangen. - Page 705 BATTERY DISPLAY Ihre URSA Mini bietet verschiedene Möglichkeiten, wie der Akku-Indikator den verbleibenden Ladezustand des Akkus anzeigt. Zur Wahl stehen die Optionen „Percentage“ oder „Voltage“. Wenn Sie eine Kombination aus Akku und Akkuplatte verwenden, die akkurate Prozentangaben unterstützt, dann kann über „Percentage“ der prozentgenaue Ladezustand Ihres Akkus angezeigt werden. TIPP Eine Liste mit Akkus, die prozentgenaue Informationen zum Ladezustand unterstützen, finden Sie im Abschnitt „Anbringen von Akkus“...
- Page 706 SETUP-Einstellungen 2 Auf der zweiten Seite der SETUP-Registerkarte sind folgende Einstellungen enthalten: ATEM CAMERA ID Wenn Sie die URSA Mini in Verbindung mit einem ATEM Mischer verwenden und Sie möchten, dass die Kamera Tally-Signale von diesem Mischer empfängt, müssen Sie die Kameranummer auf Ihrer Kamera einstellen.
- Page 707 REFERENCE TIMING Diese Einstellungen erlauben Ihnen die manuelle Anpassung der Referenzzeitvorgabe nach Zeilen oder Pixeln. Tippen Sie einfach auf die Pfeile, um Anpassungen vorzunehmen. SETUP-Einstellungen 3 Auf der dritten Seite der SETUP-Registerkarte sind folgende Einstellungen enthalten: SET FUNCTION BUTTON Auf der Rückseite des LCD-Touchscreens Ihrer URSA Mini finden Sie zwei Funktionstasten F1 und F2. Diese lassen sich mit häufig verwendeten Funktionen belegen, die wiederum schnell abrufbar sind, wenn Sie Ihre Kamera ohne den LCD-Touchscreen verwenden, z. B.
- Page 708 Um diese Tasten zu belegen, wählen Sie zunächst eine Funktionstaste und dann ihr Verhalten, eine Einstellung und einen Parameter für diese Einstellung aus. Taste Verhalten Einstellung Parameter FUNCTION 1/2 BEHAVES AS Sobald Sie die eine Funktionstaste ausgewählt haben, die Sie belegen möchten, können Sie ihr Verhalten bestimmen.
- Page 709 SETUP-Einstellungen 4 Auf der vierten Seite der SETUP-Registerkarte sind folgende Einstellungen enthalten: DOOR LED Auf der Rückseite des LCD-Touchscreens Ihrer URSA Mini befindet sich eine kleine LED, die als Tally dient und Statusinformationen anzeigt. Diese können Sie durch Antippen des Schalter-Icons ein- oder ausschalten.
- Page 710 Wenn Sie FACTORY RESET antippen, werden Sie aufgefordert, Ihre Auswahl zu bestätigen HARDWARE ID Der Indikator HARDWARE ID zeigt einen achtstelligen Identifikationscode für Ihre URSA Mini an. Dieser ist einmalig und gilt nur für Ihre Kamera. Eine längere, 32-stellige Version dieses Codes ist außerdem in den Metadaten von RAW- und ProRes-Video enthalten.
- Page 711 SETUP-Einstellungen 5 Auf der fünften Seite der SETUP-Registerkarte sind folgende Einstellungen enthalten: Der Bluetooth-Name der Kamera setzt sich aus dem in der Slate vorgegebenen Buchstaben und der achtstelligen Hardware-ID Ihrer URSA Mini zusammen BLUETOOTH Die Bluetooth-Funktion der URSA Mini Pro 4.6K erlaubt es Ihnen, Ihre Kamera von tragbaren Geräten aus kabellos zu steuern.
- Page 712 Wenn Sie zum ersten Mal eine Verbindung zu Ihrer Kamera herzustellen versuchen, verlangt die Blackmagic Camera Control App einen sechsstelligen Code. Dieser Code wird auf dem LCD der Kamera eingeblendet. Geben Sie diesen Code auf dem iPad ein. Nun erscheint auf dem Bildschirm eine Bestätigung, dass Ihre URSA Mini Pro 4.6K mit Ihrem iPad verkoppelt ist.
- Page 713 HINWEIS Sollten Sie Ihre URSA Mini Pro 4.6K nicht per Bluetooth steuern, empfehlen wir Bluetooth aus Sicherheitsgründen auszuschalten. DISCONNECT CURRENT DEVICE Mit dieser Einstellung trennen Sie die Verbindung zwischen Ihrer URSA Mini Pro 4.6K und dem derzeitig verbundenen iPad. CLEAR PAIRED DEVICES Verwenden Sie diese Einstellung, um die Liste aller Geräte zu löschen, mit denen Ihre URSA Mini Pro 4.6K vorab verkoppelt war.
- Page 714 Tippen Sie auf das SLATE-Icon unten rechts, um auf die Slate zuzugreifen und um sie zu aktualisieren Die URSA Mini Pro 4.6K verwendet Bluetooth LE (Bluetooth Low Energy), um kabellos mit anderen Geräten zu kommunizieren. Da es sich dabei um denselben Protokolltyp wie für tragbare Geräte handelt, verwendet diese Technik nur minimalen Akkustrom.
-
Page 715: Presets-Einstellungen
PRESETS-Einstellungen Über die Registerkarte PRESETS können Sie eine ganze Sammlung an Einstellungen für Ihre URSA Mini als Voreinstellung speichern und wieder abrufen. Das ist nützlich, wenn Ihre Kamera für mehrere Projekte verwendet wird. Es könnte ja sein, dass Sie Ihre URSA Mini für eine ganze Reihe verschiedener Shots einsetzen, z. B. - Page 716 Tippen Sie auf der PRESETS-Registerkarte auf das Hinzufügen- Icon und geben Sie mithilfe der Tastatur einen Namen ein Wenn Sie ein gespeichertes Preset abrufen möchten, tippen Sie auf seinen Namen. Tippen Sie auf das Laden-Icon, um es zu laden. Wählen Sie ein Preset und laden Sie es über das Laden-Icon. Ausgewählte Presets färben sich komplett blau, während derzeit geladene Presets mit einer blauen Linie am unteren Rand des Icons markiert sind Sie können ein Preset aktualisieren, indem Sie das Aktualisieren-Icon betätigen.
-
Page 717: Luts-Einstellungen
HINWEIS Wenn alle Preset-Plätze Ihrer URSA Mini besetzt sind, ist das Importmenü nicht verfügbar. Schaffen Sie dann durch Löschen vorhandener Presets wieder Platz. Exportieren von Presets Wenn Sie ein Preset auf eine CFast- oder SD-Karte exportieren möchten, tippen Sie zunächst auf das Preset und dann auf das Verwalten-Icon. - Page 718 3D-LUTs lassen sich problemlos in DaVinci Resolve oder einer anderen Farbkorrektur-Software erstellen. Außerdem sind LUTs auch online erhältlich. Ihre URSA Mini kann bis zu sechs 17- oder 33-Punkt-3D-LUTs mit je bis zu 1,5 Megabytes speichern. Sobald eine LUT geladen ist, können Sie sie über die Ausgabe des LCD-Touchscreens, bzw.
- Page 719 Hat diese LUT denselben Namen wie eine bereits auf Ihrer Kamera gespeicherte LUT, werden Sie aufgefordert, die existierende LUT zu überschreiben oder beide zu behalten. Oben rechts auf dem Touchscreen sehen Sie die Anzahl der verbleibenden LUT-Plätze auf Ihrer Kamera. Sie können nur so viele LUTs laden, wie Plätze vorhanden sind.
-
Page 720: Eingabe Von Metadaten
Verzeichnungen automatisch zu entfernen oder VFX-Assets besser auf Matten abzustimmen. Ihre Blackmagic URSA Mini speichert Clips automatisch mit einigen Metadaten ab. Dazu gehören Kamera-Einstellungen, Timecode, Datum und Uhrzeit. Sie können die Filmtafelfunktion Slate Ihrer Kamera nutzen, um viele weitere Informationen hinzuzufügen. - Page 721 SLATE FOR Diese Einstellung zeigt an, auf welchen Clip sich die derzeit angezeigten Metadaten beziehen. Im Standby-Modus gelten diese Einstellung für den nächsten Clip, der aufgenommen wird. LENS DATA Hier werden Informationen zum Objektiv angezeigt, das zurzeit an Ihre Kamera angebracht ist. Viele elektronische Objektive stellen Informationen zu Modell, Blende und Brennweite automatisch zur Verfügung.
- Page 722 ‚ DISTANCE Zeigt die Einstellungen für den Fokusabstand für den aufgezeichneten Clip an. Einige Objektive liefern diese Informationen automatisch in Millimetern. Sie können diese Daten zudem manuell eingeben. ‚ FILTER Zeigt die derzeit verwendeten Objektivfilter an. Tippen Sie auf diese Einstellung, um Metadaten manuell einzugeben.
- Page 723 Die Einstellung SLATE ist in die Registerkarten CLIPS und PROJECT unterteilt REEL Der REEL-Indikator zeigt die derzeitige Bandnummer an. Ihre URSA Mini erhöht die Bandnummer in der Regel automatisch, sodass Sie dies nicht manuell tun müssen. Wenn Sie für ein neues Projekt mit Band 1 anfangen möchten, tippen Sie im PROJEKT-Tab der Slate auf „Reset Project Data“, um Ihre Projektdaten zurückzusetzen.
- Page 724 Beim Eintragen von SCENE-Metadaten können Sie die Hochzählungsarten links neben der Touch-Tastatur und die Shot-Typen rechts neben der Tastatur auswählen TAKE Der TAKE-Indikator zeigt die Take-Nummer des derzeitigen Shots an. Diese können Sie entweder durch Antippen der Pfeile neben der Take-Nummer oder über den Take-Nummern-Editor durch Tippen auf den Indikator erhöhen oder verringern.
- Page 725 GOOD TAKE Tippen Sie auf den Indikator GOOD TAKE, um gute Aufnahmesequenzen für ein schnelles Abrufen in der Postproduktion zu markieren. Diese Markierung bezieht sich entweder auf den letzten aufgezeichneten Clip, wenn Ihre URSA Mini im Standby-Modus ist, oder auf den Clip, der zurzeit im Wiedergabemodus abgespielt wird.
-
Page 726: Einsatz Von Servo-Zoom-Objektiven
Einsatz von Servo-Zoom-Objektiven Indem Sie Servo-Zoom-Objektive mit Ihrer URSA Mini kombinieren, erhalten Sie eine potente Kamera. Blenden-, Zoom- und Fokussierringe am Objektivtubus für die manuelle Einstellung sowie der eingebaute Haltegriff und die integrierte Zoomwippe helfen Ihnen dabei, Ihren Film mit Kompetenz zu drehen. -
Page 727: Hybride Zoom-Objektive Mit Compact-Servo
Bei Objektiven mit motorisierter Fokussteuerung können Sie sogar über die FOCUS-Taste Ihrer URSA Mini die Autofokus-Funktion aktivieren und diese dann mit der ATEM Software Control eines ATEM Mischers fernsteuern. Haben Sie ein B4-Objektiv angebracht, stellen Sie die Auflösung auf 2K 16:9 oder niedriger ein und aktivieren Sie den „Window Sensor“-Modus auf der RECORD-Registerkarte auf dem Dashboard. -
Page 728: Videoausgabe Der Kamera
Videoausgabe der Kamera HD-Monitoring-Ausgang Der abwärtskonvertierte 3G-SDI-Ausgang der Blackmagic URSA Mini gibt Video stets in 1080 HD aus. So können Sie die Kamera bequem an Kreuzschienen, Monitore, SDI-Aufzeichnungsgeräte, Broadcast-Mischer und andere SDI-Geräte anschließen. Dieser Ausgang ist im Einstellungsmenü des Touchscreens als „Front SDI“ gekennzeichnet. - Page 729 Anschließen von Monitoren SDI-Monitoring ist eine praktische Alternative, wenn Ausklappmonitor nur schwer oder umständlich einzusehen ist, weil die Kamera hoch oben an einer Fahrzeughalterung, einem Ausleger, Kran oder auf einem Fahrzeug angebracht ist. Monitoring-Informationen werden über Ihren HD-SDI-Monitoring-Ausgang angezeigt. Passen Sie dafür die Einstellungen unter „Front SDI Overlay“...
-
Page 730: Ursa Mini Shoulder Mount Kit
URSA Mini Shoulder Mount Kit Anbringen des Schulterauflage-Kits Mit dem URSA Mini Shoulder Mount Kit können Sie die URSA Mini auf Ihrer Schulter tragen und im Reportagenstil filmen. Im Kit enthalten sind ein Griff, eine Trägerplatte für die Schulterauflage, ein Verlängerungsarm für den URSA Mini Seitengriff, ein langes LANC-Kabel, eine Adapterplatte für den Sucher sowie alle benötigten Schrauben. - Page 731 Stellen Sie Ihre URSA Mini verkehrt herum auf eine ebene, stabile Oberfläche, sodass sie freien Zugang zum Kameraboden haben. Befestigen Sie die Trägerplatte für die Schulterauflage mithilfe der 2 x 1/4"-Flachkopfschrauben und des Schraubendrehers. Ziehen Sie die Schrauben fest, bis die Trägerplatte sicher befestigt ist und sich die Schrauben nicht mehr selbstständig lösen.
- Page 732 Anbringen des Griffs in Kombination mit dem URSA Viewfinder Oberer Griff URSA Viewfinder Kappe Stellen Sie Ihre URSA Mini auf eine ebene, Entfernen Sie die URSA Viewfinder Kappe vom stabile Oberfläche, sodass Sie freien Zugang Fuß des Griffs, indem Sie sie vorsichtig vom zur Oberseite Ihrer Kamera haben.
- Page 733 Anbringen des Verlängerungsarms Wenn Sie das URSA Mini Shoulder Mount Kit benutzen, müssen Sie den Seitengriff an einer anderen Stelle anbringen, um bequem von der Schulter aus filmen zu können. Verwenden Sie hierfür den mitgelieferten Verlängerungsarm und das längere LANC-Kabel, um den Seitengriff in eine ergonomisch günstigere Position zu bringen.
-
Page 734: Blackmagic Ursa Viewfinder
Blackmagic URSA Viewfinder Der speziell für die URSA Mini konzipierte Blackmagic URSA Viewfinder ist ein leistungsstarker elektronischer Sucher. Das farbige OLED-Display in 1080 HD und die Optiken aus Präzisionsglas liefern strahlend helle, lebensechte Bilder, die sich mit den feinsten Einzelheiten im Blick im Nu fokussieren lassen. -
Page 735: Anpassen Der Sucherlupe
Schließen Sie den Sucher mittels der SDI- und Stromkabel an den HD-SDI-Monitoring- und den 12V-Ausgang Ihrer URSA an Bei Einsatz eines URSA Viewfinders mit der URSA Mini raten wir dringend, auch ein URSA Schulterauflage-Kit zu installieren. Das Kit liefert passende Befestigungspunkte, eine 1/4"-Fingerschraube sowie eine Vorrichtung für die Höhenverstellung, um die Positionierung Ihres Suchers zu optimieren. -
Page 736: Menü-Einstellungen
Die Funktion der Tasten ist überdies benutzerdefinierbar und können mit Kurzbefehlen für häufig benutzte Features belegt werden. Beispiel: Vielleicht möchten Sie die Falschfarben-Funktion der Zoom-Taste zuweisen. Einzelheiten hierüber finden Sie im Abschnitt „Kurzbefehle“. ZOOM (F1) – Menü Die Zoom-Funktion erleichtert die präzise Scharfstellung, indem Sie in das Bild hineinzoomen. Drücken Sie die ZOOM-Taste, um hineinzuzoomen. - Page 737 Meters Schaltet zwischen den verschiedenen Metertypen um und zeigt diese in der Overlay-Ansicht an. Es besteht die Wahl zwischen „Histogram“, „Audio“, „Both“ (Beide) und „None“ (Keine). Peaking Aktiviert bzw. deaktiviert Focus Peaking. Zebra Aktiviert bzw. deaktiviert den Zebra-Modus. Geben Sie Ihre gewünschte Zebra-Schraffur anhand der Kameraeinstellungen vor.
- Page 738 Scrollen Sie zum Befehl „Exit“ und drücken Sie die MENU-Taste , um die Menü-Anzeige zu schließen. Einstellungen für Kurzbefehle im URSA Viewfinder Setup Das „Setup“-Menü bietet folgende Funktionen: Brightness Adjustment Ermöglicht Justierungen an der Display-Helligkeit auf einer Skala von -10 bis +10. Tally Brightness Ermöglicht die Helligkeitseinstellungen der Tally-LED-Leuchte.
- Page 739 HINWEIS Aktivieren Sie die GRIDS-Funktion (Raster) im Einrichtungsmenü Ihres URSA Viewfinders, um auf dem Sucher von einem ATEM Mischer gesendete Tally-Signale einzublenden. Auch die Overlay-Funktion muss im Displaymenü auf ON eingestellt sein. STATUS TEXT Wechselt zwischen den angezeigten Statustexten wie Weißabgleich, Framerate und ISO hin und her.
- Page 740 Aktualisieren der Produktsoftware des URSA Viewfinders Ein Update Ihres Suchers lässt sich über das Blackmagic Camera Setup Dienstprogramm vornehmen. Der Sucher muss für das Update mit Strom versorgt werden. Wir empfehlen, den Sucher während des Updates an Ihre URSA Mini angeschlossen zu lassen. Für diesen Vorgang muss Ihre URSA Mini durchgängig Strom liefern.
-
Page 741: Blackmagic Ursa Studio Viewfinder
Blackmagic URSA Studio Viewfinder MENU BRIGHT CONTRAST BACK PEAKING Blackmagic URSA Studio Viewfinder Der Blackmagic URSA Studio Viewfinder ist ein gewaltiger Suchermonitor, der Ihre Blackmagic URSA Mini in eine professionelle Live-Produktionskamera verwandelt. Der Studio Viewfinder hat einen hellen 7-Zoll-Bildschirm mit einem gut sichtbaren Tally-Licht, Steuerknöpfen, großen Haltegriffen, Gegenlichtblende und Schwenkpunkten mit variabler Spannung. -
Page 742: Blackmagic Ursa Mini
Anbringen und Anschließen des Viewfinders an die Blackmagic URSA Mini Wenn Sie den Blackmagic URSA Studio Viewfinder zusammen mit der Blackmagic URSA Mini einsetzen, können Sie ihn auf vielerlei Weise an der Kamera befestigen. Sie können den Blackmagic URSA Studio Viewfinder mithilfe der mitgelieferten V-Lock- Schnellwechselplatte direkt an der Oberseite der Blackmagic URSA Mini befestigen. - Page 743 Zusammen mit einem Schulterauflage-Kit montierter An eine Drittanbieter-Kamera angebrachte Blackmagic URSA Studio Viewfinder V-Lock-Platte Die V-Lock-Platte kann zudem an jeder anderen beliebigen Kamera befestigt werden, die Sie in Verbindung mit dem Blackmagic URSA Studio Viewfinder nutzen wollen, vorausgesetzt sie verfügt über 1/4"-Montagebohrungen.
-
Page 744: Anpassen Der Position Des Blackmagic Ursa Studio Viewfinders
Schließen Sie Ihren Blackmagic URSA Studio Viewfinder einfach über die am Sucher befindlichen Kabel an die 12V-Strom- und 3G-SDI-Ausgänge im vorderen Bereich Ihrer URSA Mini an. Wird Ihre Kamera mit Strom versorgt, lässt sich der Suchermonitor über den Ein-/ Ausschalter einschalten. Seitlich der URSA Mini Griffhalterung befinden sich Kabelklemmen, die Ihre Kabel ordentlich an ihrem Platz halten. - Page 745 Suchermonitors befinden sich weitere Spannschrauben für eine zusätzliche Reibungskontrolle. Hierbei lässt sich über die linke Spannschraube der Reibungswiderstand des Arms anpassen. Mithilfe der rechten Schraube fixieren Sie den Suchermonitor in dem von Ihnen benötigten Winkel. Dank des umfänglichen Einstellungsbereichs für die Spannung ist es möglich, den Widerstandswert gezielt zu justieren.
- Page 746 Gegenlichtblende Mit der Gegenlichtblende können Sie das Monitorbild auch in hellen und sonnigen Umgebungen noch sehen. Befestigen Sie die Gegenlichtblende, indem Sie sie auf die Geräteoberseite des Blackmagic URSA Studio Viewfinders schieben und sie mithilfe der beiden unverlierbaren Schrauben am Ansatz der Gegenlichtblende feststellen.
- Page 747 Die Funktionen der Tasten Über die haptischen Drehregler an der rechten Seite lassen sich die Optionen BRIGHT (Helligkeit), CONTRAST (Kontrast) und PEAKING schnell und mühelos einstellen. Dank des ergonomischen Designs lassen sich die Drehregler seitlich mit dem Daumen oder – für eine kontrolliertere Justierung –...
- Page 748 Tally-Licht Das große Tally-Licht an der Rückseite des Blackmagic URSA Studio Viewfinders zeigt sowohl Moderator als auch Kamerabediener an, welche Kamera auf Sendung ist bzw. auf Sendung geht und ob im ISO-Modus aufgezeichnet wird. Das Tally leuchtet rot, wenn die Kamera auf Sendung ist, grün, wenn sich der Studio Viewfinder in Verbindung mit der URSA Mini im Vorschaumodus befindet und orange, wenn im ISO-Modus aufgezeichnet wird.
-
Page 749: Menü-Einstellungen
Menü-Einstellungen Per Druck auf den Drehregler MENU erhalten Sie Zugriff auf das Menü. Durch Drehen des Reglers navigieren Sie durch die Menüoptionen. Wenn Sie auf den MENU-Drehregler drücken, während eine Menü-Überschrift markiert ist, können Sie zwischen den Untermenüs DISPLAY, SHORTCUTS, SETUP und CURSORS hin und her schalten. - Page 750 Guides Über diese Einstellung können Sie Hilfslinien anzeigen oder ausblenden. Die Hilfslinien entsprechen jenem Stil, der auf der URSA Mini im MONITOR-Menü im Abschnitt „All“ festgelegt wurde. Das Bildseitenverhältnis, die Sichtbarkeit der Bildrandmarkierungen, die Prozentzahl der sendesicheren Bereiche und die Art der angezeigten Gitter entsprechen jenen, die Sie auf der Kamera festgelegt haben.
- Page 751 Sobald Sie Ihre Shortcuts wie benötigt festgelegt haben, können Sie entweder zu „Exit“ scrollen und auf den MENU-Drehregler drücken oder die BACK-Taste betätigen, um die Menüanzeige zu schließen. Das Untermenü „Shortcuts“ Setup Im SETUP-Menü legen Sie die Grundeinstellungen Ihres Suchermonitors fest. Front Tally Brightness Passt die Helligkeit der Tally-LED an.
- Page 752 TIPP Für helle Lichtverhältnisse empfehlen wir eine hohe Einstellung der LED- Helligkeitswerte, damit Darsteller und Bediener das Tally besser erkennen können. Beim Filmen in dunkleren Umgebungen ist jedoch eine geringere LED-Helligkeit angebrachter, da man ein erleuchtetes Tally dann ohnehin besser sieht. FOCUS ASSIST Die Einstellung „Focus Assist“...
- Page 753 Eingeblendete Cursors Sobald Cursors eingerichtet wurden, können diese über das Menü CURSORS aktiviert bzw. deaktiviert oder einer der Funktionstasten zugeordnet werden. Das ist besonders bei Live- Produktionen wichtig, weil der Kameraoperator Shots somit akkurat zusammenstellen und kadrieren kann. Es können bis zu drei schwarze oder weiße Cursors erstellt werden, deren Höhe, Breite und Position sich variabel vorgeben lassen und dort platziert werden, wo später live oder bei der Übertragung Grafiken hinzugefügt werden.
-
Page 754: Auswechselbarer Objektivanschluss
Auswechselbarer Objektivanschluss Die Blackmagic URSA Mini Pro 4.6K wird mit einem angeschlossenen EF-Mount ausgeliefert. Sie sind jedoch nicht auf EF-Objektive beschränkt, weil die Kamera über einen auswechselbaren Objektivanschluss verfügt. Das bedeutet, Sie können Ihren originalen EF-Mount abnehmen und einen optionalen PL- oder B4-Mount anbringen. Blackmagic Design PL- und B4-Bajonett-Kits sind von Blackmagic Design Resellern erhältlich. -
Page 755: Blackmagic Ursa Mini Pro Pl Mount
Blackmagic URSA Mini Pro PL Mount Wenn Sie Ihre URSA Mini Pro 4.6K mit einem PL-Mount ausstatten, können Sie highendige Präzisionsfilmobjektive für Kinofilme und TV-Produktionen verwenden. Das PL-Mount-Kit enthält: 1 x PL-Mount Das PL-Mount wird mit einer Staubschutzkappe geliefert. 1 x Shim-Satz Der Shim-Satz enthält verschieden dicke... - Page 756 Ziehen Sie die Streulichtblende mit dem Objektivanschluss auf das Kameragehäuse der breiten Ende des Streulichtblenden-Tools leicht an. Blackmagic URSA Mini Pro 4.6K auf. Sorgen Sie Sie soll lediglich so fest angezogen werden, dass dafür, dass sich die Cooke /i Technology sie nicht wackelt.
-
Page 757: Blackmagic Ursa Mini Pro B4 Mount
Blackmagic URSA Mini Pro B4 Mount Haben Sie einen B4-Mount an Ihre URSA Mini Pro 4.6K angeschlossen, dann Sie können parfokale Zoomobjektive verwenden, die häufig für EB-Material und Hochzeiten zum Einsatz kommen. Diese Objektive bleiben auch über große Zoombereiche fokussiert und verfügen für gewöhnlich über manuellen Fokus und manuelle Blendensteuerung. - Page 758 FILTER AUTO AUTO LENS LENS Legen Sie die Blackmagic URSA Mini Pro 4.6K Legen Sie zunächst das 0,10mm-Einstellplättchen in Ihre vertikal auf eine stabile, saubere Arbeitsfläche, um Kamera ein und setzen dann den B4-Objektivanschluss der den Objektivanschluss in vertikaler Richtung Blackmagic auf das Kameragehäuse der URSA Mini Pro 4.6K...
-
Page 759: Blackmagic Ursa Mini Pro Ef Mount
Blackmagic URSA Mini Pro EF Mount Sollten Sie den mit Ihrer Kamera mitgelieferten EF-Mount jemals ersetzen müssen, können Sie einen neuen EF-Mount erwerben. Das EF-Mount-Kit enthält: 1 x EF-Mount Mit dem EF-Mount können Sie gängige EF- Fotoobjektive anbringen. 1 x Shim-Satz Der Shim-Satz enthält verschieden dicke... - Page 760 FILTER AUTO AUTO LENS LENS Legen Sie die Blackmagic URSA Mini Pro 4.6K Setzen Sie dann den EF-Objektivanschluss auf vertikal auf eine stabile, saubere Arbeitsfläche, das Kameragehäuse der Blackmagic URSA Mini um den Objektivanschluss in vertikaler Richtung Pro 4.6K auf und achten Sie darauf, dass sich der einsetzen zu können.
-
Page 761: Blackmagic Ursa Mini Pro Shim Kit
Wenn Sie PL- oder B4-Mounts an die URSA Mini Pro 4.6K anbringen, wird zu den originalen 0,50mm- und 0,10mm-Shims ein weiteres 0,10mm-Einstellplättchen unter dem originalen EF-Mount eingesetzt. Die Shims sind zusammen mit weiteren im Blackmagic URSA Mini Pro Shim Kit inbegriffen. Weitere verschieden dicke Shims sind im Kit inbegriffen, sodass Sie Ihre Kamera für den Einsatz von PL-Objektiven feinjustieren können, falls diese leicht andere... -
Page 762: Anbringen Von Akkus
Anbringen von Akkus Der Anschluss einer Fremdhersteller-Akkuträgerplatte gestattet Ihnen den Einsatz von V-Mount- oder Gold-Mount-Akkus Anbringen von V-Mount- oder Gold-Mount-Akkus Schließen Sie bequem branchenübliche V-Mount- oder Gold-Mount-Akkus an Ihre Blackmagic URSA Mini an. Ehe ein Akku aufgesteckt werden kann, müssen Sie zunächst eine Blackmagic V-Mount- Akkuplatte an die vorgesehene Vorrichtung Ihrer Kamera anbringen. -
Page 763: Gebrauch Eigener Akkuplatten
URSA Mini an Ihre Fremdhersteller-Akkuplatte an. Schrauben Sie die Fremdhersteller-Akkuplatte an den vier Befestigungspunkten der Blackmagic URSA Mini fest. Benutzen Sie vier Schrauben mit M3-Profil. Achten Sie beim Festschrauben darauf, dass das Verbindungskabel sicher im Kabelschacht verstaut ist und nicht zwischen den beiden Platten eingeklemmt wird. - Page 764 Batt Batt Batt Batt Monitor 1 Monitor0 +12V Out 11 EnableN Rückansicht des Verbindergehäuses des Adapters. Die Stifte sind in der Kabelkonfigurationstabelle einzeln beschrieben Kabelkonfigurationstabelle Stifte Signal Farbe Richtung Beschreibung 1, 2, 3, 4 Batt Zur URSA 12–20 V 5, 6, 9, 10 Schwarz –...
-
Page 765: Anwendung Von Davinci Resolve
Anwendung von DaVinci Resolve Das Filmen mit Ihrer Blackmagic URSA Mini ist nur ein Teil der Erzeugung von Film- und TV- Inhalten. Ebenso wichtig sind der Sicherungs- und Verwaltungsprozess von Medien sowie Schnitt, Farbkorrektur und die Kodierung finaler Masterdateien. Ihre Blackmagic URSA Mini wird mit einer Version von DaVinci Resolve für Mac OS und Windows geliefert, was Ihnen eine... -
Page 766: Importieren Von Clips
Importieren von Clips Um mit dem Schnitt von Clips zu beginnen, importieren Sie diese zunächst in den Media Pool: Starten Sie DaVinci Resolve. Wenn Sie DaVinci Resolve zum ersten Mal öffnen, warten Sie, bis das Fenster „Project Manager“ erscheint und doppelklicken Sie dann auf die Option „Untitled Project“... -
Page 767: Arbeiten Mit Raw-Dateien
Arbeiten mit RAW-Dateien Beim Importieren von RAW-Dateien entschlüsselt DaVinci Resolve die in diesen Dateien enthaltenen Sensordaten. Die Software verwendet dann die auf der Kamera zur Zeit der Aufzeichnung eingestellten ISO-, Weißabgleich- und Farbtonwerte. Wenn Ihnen der mit diesen Einstellungen erzielte Look gefällt, können Sie sofort mit dem Schnitt beginnen. -
Page 768: Schneiden Von Clips
RAW-Einstellungen für Projekte Wenn Sie für alle Clips gemeinsam eine Einstellung verändern müssen wie z. B. eine globale Änderung für Weißabgleich oder ISO, können Sie für Ihre Clips projektbezogene RAW-Einstellungen vorgeben und die globalen Änderungen von hier aus machen. Projetkbezogene RAW-Einstellungen vorgeben: Öffnen Sie das Projekteinstellungsmenü, indem Sie auf „File“... -
Page 769: Trimmen Von Clips
Gehen Sie in der Timeline mit dem Abspielkopf an jene Stelle, wo Ihr Clip eingefügt werden soll. Fügen Sie einen Clip in die Timeline ein, indem Sie einen Klick in der Quellanzeige ausführen und den Mauszeiger in die Timeline-Anzeige ziehen. Es erscheint eine Liste mit Schnittoptionen. -
Page 770: Einrichten Von Tastenkürzeln
Der „Edit“-Arbeitsraum. Hier trimmen Sie Clips, ändern ihre Reihenfolge, bewegen sie hin und her und fügen mit dem Timeline-Editors Übergänge zwischen Clips ein Einrichten von Tastenkürzeln Wer mit Tastenkürzeln und dem Gebrauch anderer Schnittsoftware vertraut ist, kann in DaVinci Resolve bequem eigene Kürzel anlegen. So arbeitet man schneller und optimiert seinen Workflow. So richten Sie eigene Tastenkürzel ein: Klicken Sie im DaVinci Arbeitsraum unten rechts auf das Zahnradsymbol zur Projekteinrichtung. -
Page 771: Hinzufügen Von Übergängen
Hinzufügen von Übergängen Ein Übergang ein auch als Blende bezeichneter visueller Effekt, der einen Clip optisch angenehm in den nächsten überleitet. Beispiele sind Überblendungen, Wischblenden, Dip-to-Color-Blenden und mehr. Schnitte lassen sich mithilfe von Übergängen spannender gestalten. Bei einer Blende werden nicht immer nur zwei Clips aneinander gefügt. -
Page 772: Hinzufügen Von Titeln
Hinzufügen von Titeln Es ist einfach, Titel für Ihren Schnitt zu erstellen. Sie können einen Titel auf jede beliebige Videospur legen, so wie Sie es mit einem Clip tun würden. Wenn keine Spuren übrig sind, können Sie mühelos neue hinzufügen, indem Sie neben einem vorhandenen Spurnamen einen Rechtsklick ausführen und „Add Track“... -
Page 773: Farbkorrigieren Von Clips
Um eine neue Audio- oder Videospur hinzuzufügen, führen Sie neben einem Spurnamen einen Rechtsklick aus und wählen Sie „Add Track“ (Spur hinzufügen). Geben Sie für den Ton die gewünschte Spurart vor Farbkorrigieren von Clips Sobald Sie Ihre Clipsequenz geschnitten haben, können Sie mit der Farbkorrektur beginnen. Für einen einheitlichen Look empfiehlt es sich, die farbliche Nachbearbeitung erst nach fertigem Schnitt vorzunehmen. -
Page 774: Verwenden Von Scopes
Verwenden von Scopes Die meisten Coloristen treffen kreative Farbentscheidungen, indem Sie sich auf die Emotionen und den Look konzentrieren, den sie ihrem Programm verleihen möchten. Mithilfe des Monitors arbeiten sie dann daran, dies umzusetzen. Sehen Sie sich alltägliche Gegenstände an und wie unterschiedliche Lichtquellen auf sie einwirken. -
Page 775: Sekundäre Farbkorrektur
Anpassen von „Gain“ (Weißtöne) Klicken Sie auf das Einstellrad für „Gain“ und schieben Sie es hin und her. Dies justiert die Lichter, die hellsten Bereiche in Ihrem Clip. Die Lichter werden im oberen Abschnitt des Kurvenverlaufs im Parade-Scope angezeigt. Für eine gut beleuchtete Aufnahme bringt man diese am besten direkt unter die obere Linie des Wellenform-Scopes. -
Page 776: Qualifizieren Einer Farbe
Qualifizieren einer Farbe Sie werden häufig feststellen, dass eine bestimmte Farbe in ihrem Clip optimiert werden kann, z. B. Gras am Straßenrand oder das Blau des Himmels. Vielleicht empfiehlt sich auch die Justierung der Farbe eines bestimmten Objekts, um die Aufmerksamkeit des Publikums darauf zu lenken. Mit dem HSL-Qualifizierer-Tool ist das problemlos möglich. -
Page 777: Tracking Mit Einem Power Window
Zum Beispiel können Sie mithilfe eines solchen Windows die Bewegungen einer Person verfolgen, um Farb- und Kontraständerungen ausschließlich an dieser Person vorzunehmen, ohne ihre Umgebung zu beeinflussen. Durch solche Korrekturen können Sie die Aufmerksamkeit des Publikums auf bestimmte Bereiche lenken. So versehen Sie Ihren Clip mit einem Power Window Fügen Sie einen neuen „Serial Node“... -
Page 778: Mit Plug-Ins Arbeiten
So verfolgen Sie ein sich bewegendes Objekt mit einem Power Window: Erstellen Sie einen neuen „Serial Node“ (Serieller Node) und fügen Sie diesem ein Power Window hinzu. Gehen Sie zum Anfang Ihres Clips, positionieren Sie ein Fenster auf einem gewünschten Objekt oder Bereich und passen Sie seine Größe an. Öffnen Sie die „Tracker“-Palette. -
Page 779: Mastern Ihres Schnitts
Mastern Ihres Schnitts Da Sie Ihre Clips nun geschnitten, farbkorrigiert und mit einem Look versehen haben, möchten Sie sicherlich das Produkt Ihres Schnitts über den „Deliver“-Arbeitsraum (Ausliefern) exportieren. In diesem Arbeitsraum wählen Sie die zu exportierenden Clips aus. Zusätzlich können Format, Codec und die gewünschte Auflösung eingestellt werden. -
Page 780: Betrieb Als Studiokamera Mit Camera Control
Betrieb als Studiokamera mit Camera Control Ihre Blackmagic URSA Mini lässt als Studiokamera verwenden und von einem ATEM Mischer über die Funktion „Kamerasteuerung“ in der Bediensoftware ATEM Software Control bedienen. So können Sie Ihrem Broadcast-Studio eine Kamera mit hoher Sensorbildqualität und einem großartigen Dynamikumfang hinzufügen und sie wie jede andere Studiokamera bedienen. -
Page 781: Arbeiten Mit Camera Control
REMOTE REMOTE All SDI and HDMI video con PUSH PUSH PUSH PUSH STEREO IN STEREO IN SD, HD and Ultra HD switchable unle CONTROL CONTROL CH 1 CH 2 CH 1 CH 2 CH 1 CH 2 USB 2.0 HDMI IN USB 2.0 HDMI IN SDI INPUTS... - Page 782 Farbrad Das Farbrad ist eine leistungsstarke Funktion des DaVinci Resolve Farbkorrektors zur Vornahme farblicher Anpassungen an den Einstellungen für „Lift“, „Gamma“ und „Gain“ einzelner YRGB-Kanäle. Die Auswahl der anzupassenden Einstellung erfolgt per Klick auf eine der drei Auswahlschaltflächen über dem Farbrad. Masterrad Passen Sie mithilfe des nachstehenden Farbrads die Kontraste aller YRGB-Kanäle auf einmal an oder justieren Sie nur jeweils die Leuchtdichte der Einstellungen für Lift, Gamma und Gain.
-
Page 783: Zoom-Steuerung
Ziehen Sie den Button nach links oder rechts, um die Schwarzabhebung zu vertiefen oder aufzuhellen. Bei gedrückt gehaltener Command-Taste (Mac) bzw. gedrückt gehaltener Steuerungstaste (Windows) lässt sich die Schwarzabhebung separat justieren. Eine rot leuchtende Blenden-/Schwarzabhebungssteuerung zeigt an, dass die jeweilige Kamera auf Sendung ist Zoom-Steuerung Bei Einsatz kompatibler Objektive mit elektronischer Zoomfunktion können Sie Ihr Objektiv mithilfe der Zoom-Steuerung ein- und auszoomen. - Page 784 Autofokus-Button Jedes Kamerabedienfenster weist unten links einen Autofokus-Button auf. Klicken Sie auf diesen Button, um bei Einsatz eines Objektivs mit elektronischer Blendensteuerung automatisch zu fokussieren. Wichtig: Die meisten Objektive unterstützten elektronische Fokussierung. Stellen Sie jedoch bei Objektiven, die automatisch und manuell fokussierbar sind, den Autofokusmodus ein. Bei manchen Objektiven erfolgt dies durch Vorwärts- oder Rückwärtsschieben des Fokusrings.
- Page 785 Ihr ATEM Mischer zeigt den „Gain“-Wert in dB an. Dies entspricht den ISO-Einstellungen Ihrer Kamera wie folgt: Gain 1600 Bitte beachten Sie, dass die URSA Mini 4.6K einen Gain-Wert von 18 dB zulässt, während die URSA Mini 4K einen Höchstwert von 12 dB unterstützt Verschlusszeit-Steuerung Über die Verschlusszeit-Steuerung wird der Verschlusswinkel Ihrer URSA Mini verändert.
- Page 786 1/50 172.7 172.8 215.8 360* 1/60 143.9 179.8 359.6 1/75 115.1 115.2 143.9 287.7 1/90 95.9 239.8 1/100 86.3 86.4 107.9 215.8 1/120 71.9 89.9 179.8 1/150 57.5 57.6 71.9 143.9 1/180 59.9 119.9 1/250 34.5 34.6 43.2 86.3 1/360 29.97 59.94 1/500...
- Page 787 Kamerasteuerung für eine Benutzeroberfläche optieren, die dem Tool für die primäre Farbkorrektur eines Postproduktions-Gradingsystems gleicht. Ihre Blackmagic URSA Mini ist mit einem integrierten DaVinci Resolve Tool für die primäre Farbkorrektur ausgestattet. Wenn Sie bereits mit DaVinci Resolve gearbeitet haben, können Sie Ihre Erfahrung auch für das Colorgrading bei Liveproduktionen mit der Blackmagic URSA Mini kreativ...
- Page 788 ‚ Führen Sie mittels Shift-Klick eine Ziehbewegung im Farbrad aus: Versetzt die Farbbalance-Anzeige auf die absolute Position des Mauszeigers und gestattet schnellere, extremere Anpassungen. ‚ Führen Sie einen Doppelklick im Farbrad aus: Setzt die Farbanpassung zurück, ohne die Anpassung des Masterrads für dieses Steuerelement zu beeinflussen.
- Page 789 Farbrad sichtbaren Farbtonverteilung gedreht werden. „Lum Mix“-Einstellung Der integrierte Farbkorrektor Ihrer Blackmagic URSA Mini basiert auf dem DaVinci Resolve Tool für die primäre Farbkorrektur. DaVinci baut seit Anfang der 1980er Jahre Farbkorrektursysteme und es werden mehr Hollywood-Spielfilme mit DaVinci Resolve gegradet als mit jeder anderen Applikation.
-
Page 790: Blackmagic Camera Setup
Blackmagic Camera Setup Utility (Dienstprogramm) Die Kamerasoftware auf einem Mac aktualisieren Laden Sie die Blackmagic Camera Setup Utility Software herunter, entpacken Sie die heruntergeladene Datei und lassen Sie sich die Installationsanwendung Blackmagic Camera Setup Installer anzeigen. Starten Sie die Installationsanwendung und folgen Sie den Anweisungen auf dem Bildschirm. Gehen Sie nach abgeschlossener Installation zu Ihrem Anwendungsordner und öffnen Sie den Ordner „Blackmagic Cameras“. - Page 791 Schließen Sie Ihren Computer nach erfolgter Installation des aktuellsten Blackmagic Camera Setup Dienstprogramms über ein USB-Kabel an Ihre Blackmagic URSA Mini an. Bei der Blackmagic URSA Mini ist der USB-Port an der linken Kameraseite über den Kartensteckplätzen angeordnet. Heben Sie einfach die Gummiabdeckung, um an den Port zu gelangen.
-
Page 792: Postproduktions-Workflow
Postproduktions-Workflow Arbeiten mit Dateien von CFast-2.0- und SD-Karten Schneiden Sie direkt von Ihrer CFast-Karte, indem Sie sie aus Ihrer Kamera entnehmen und über ein CFast-2.0-Lese-/Schreibgerät oder CFast-Laufwerk an Ihren Computer anschließen So importieren Sie Ihre Clips von einer CFast-2.0- oder SD-Karte: Entnehmen Sie die CFast-Karte aus Ihrer Blackmagic URSA bzw. - Page 793 Anwendung von Final Cut Pro X Um Clips im Format Apple ProRes 422 HQ in Final Cut Pro X zu bearbeiten, müssen Sie ein neues Projekt erstellen, das dem Videoformat und der Framerate Ihrer Clips entspricht. In diesem Beispiel wird ProRes 422 HQ 1080p/25 verwendet. Projekteinstellungen in Final Cut Pro X Starten Sie Final Cut Pro X, gehen Sie auf die Menüleiste und wählen Sie „File“...
- Page 794 Starten Sie Media Composer und das „Select Project“-Fenster (Projekt auswählen) wird angezeigt. Klicken Sie auf die Schaltfläche „New Project“ (Neues Projekt). Benennen Sie Ihr Projekt im „New Project“-Fenster. Gehen Sie auf das Dropdown-Menü unter „Format“ und wählen Sie 1080i/59,94 aus. Gehen Sie auf das Dropdown-Menü...
- Page 795 Anwendung von Autodesk Smoke 2013 Erstellen Sie zum Bearbeiten Ihrer Clips in Autodesk Smoke 2013 ein neues Projekt, das dem Videoformat, der Bittiefe, dem Frametyp und der Framerate Ihrer Clips entspricht. In diesem Beispiel wird ProRes 422 HQ 1080p/25 verwendet. Autodesk Smoke 2013 Starten Sie Smoke und es erscheint das Fenster „Project and User Settings“...
-
Page 796: Blackmagic Ursa Mini B4 Mount
Blackmagic URSA Mini B4 Mount Der mit Ihrer Blackmagic URSA Mini PL mitgelieferte PL-Mount kann entfernt und mit einem optionalen B4-Mount ersetzt werden. Dieser Objektivanschluss unterscheidet sich etwas vom B4-Mount der URSA Mini Pro 4.6K. Die Schraubenlöcher befinden sich bspw. an einer anderen Stelle, um das EF-Auslösergehäuse auf der URSA Mini Pro 4.6K zu berücksichtigen. - Page 797 Bajonett möglichst zusammen. Feinjustierungsstift in der 11-Uhr-Position. Legen Sie die beiden mit Ihrer Blackmagic URSA Setzen Sie den Blackmagic URSA Mini B4 Mini B4 gelieferten 0,50mm-Einstellplättchen Objektivanschluss auf das Kameragehäuse. Dabei (Shims) auf die ursprüngliche Shim. So wird die müssen Registrierkerbe und Justierungsstift in der...
-
Page 798: Feinjustierung Der Ursa Mini Pl
Blackmagic Shims sind dünne Plättchen unterschiedlicher Dicke, die zur Feinjustierung des Abstands zwischen Ihrem PL-Objektiv und dem Sensor der Blackmagic URSA Mini dienen. Dieser Abstand wird allgemein als Auflagemaß oder Backfokus bezeichnet und kann sich je nach Alter des Objektivs und den Umgebungsbedingungen Ihres Drehs leicht verändern. - Page 799 Platzieren Sie die Blackmagic URSA Mini PL auf Entfernen Sie die sechs Schrauben des PL- eine stabile, saubere Arbeitsfläche und entfernen Bajonetts mithilfe des 2mm- Sie das Objektiv bzw. die Sechskantschraubendrehers. Um an die Gehäuseverschlusskappe. Der Sensor wird von Schrauben zu gelangen, ist ggf. ein gelegentliches einem Glasfilter geschützt, der während der Dauer...
- Page 800 Drehen Sie die fünf Befestigungsschrauben locker Befestigen Sie Schraube 1 unter Druck mit einer fest, bis ein Kontakt mit der Schulter des Bajonetts kompletten Umdrehung des besteht. Um auf alle fünf Schrauben zuzugreifen, Drehmomentschlüssels und des 2.0-mm- müssen Sie den PL-Feststellring drehen, da einige Inbussschlüssels, gefolgt von einer kompletten Löcher verdeckt sind, wenn der Ring festgestellt Umdrehung für Schraube 2.
-
Page 801: Informationen Für Entwickler In
Blackmagic Design cameras. Please refer to the ‘Understanding Studio Camera Control’ chapter section of this manual, or the ATEM Switchers Manual and SDK manual for more information. These can be downloaded at www.blackmagicdesign.com/support. This document describes an extensible protocol for sending a uni directional stream of small control messages embedded in the non-active picture region of a digital video stream. - Page 802 The command id is an 8 bit unsigned integer which indicates the message type being sent. Receiving devices should ignore any commands that they do Command id (uint8) not understand. Commands 0 through 127 are reserved for commands that apply to multiple types of devices. Commands 128 through 255 are device specific.
- Page 803 The operation type specifies what action to perform on the specified Operation type (uint8) parameter. Currently defined values are: The supplied values are assigned to the specified parameter. Each element will be clamped according to its valid range. A void parameter may only be 0: assign value “assigned”...
- Page 804 Group Parameter Type Index Minimum Maximum Interpretation [0] = frame rate – – 24, 25, 30, 50, 60 [1] = M-rate – – 0=regular, 1=M-rate 0=NTSC, 1=PAL, 2=720, [2] = dimensions – – 3=1080, 4=2k, Video mode int8 5=2k DCI, 6=UHD 0=progressive, [3] = interlaced –...
- Page 805 Group Parameter Type Index Minimum Maximum Interpretation 0.0=minimum, Mic level fixed16 – 1.0=maximum 0.0=minimum, Headphone level fixed16 – 1.0=maximum 0.0=minimum, Headphone program mix fixed16 – 1.0=maximum 0.0=minimum, Speaker level fixed16 – 1.0=maximum Audio 0=internal mic, 1=line level input, Input type int8 –...
- Page 806 Group Parameter Type Index Minimum Maximum Interpretation 0.0=minimum, Peaking level fixed16 – 1.0=maximum 0=disable bars, Color bars display int8 – 1-30=enable bars with time (seconds) timeout (s) [0] = focus 0=Peak, Display – – assist method 1=Colored lines 0=Red, Focus Assist int8 1=Green, [1] = focus...
- Page 807 Group Parameter Type Index Minimum Maximum Interpretation [0] red default 0.0 [1] green default 0.0 Lift Adjust fixed16 [2] blue default 0.0 [3] luma default 0.0 [0] red default 0.0 [1] green default 0.0 Gamma Adjust fixed16 [2] blue default 0.0 [3] luma default 0.0 [0] red...
- Page 808 Example Protocol Packets Packet Operation Length Byte header command data trigger instantaneous auto focus on camera 4 turn on OIS on all cameras set exposure to 10 ms on camera 4 (10 ms = 10000 0x10 0x27 0x00 0x00 us = 0x00002710) add 15% to zebra level 0x33 0x01 (15 % = 0.15 f = 0x0133 fp)
- Page 809 Blackmagic Embedded Tally Control Protocol Version 1.0 (30/04/14) This section is for third party developers or anybody who may wish to add support for the Blackmagic Embedded Tally Control Protocol to their products or system. It describes the protocol for sending tally information embedded in the non-active picture region of a digital video stream.
- Page 810 uint8[1] bit 0: slave device 3 program tally status (0=off, 1=on) bit 1: slave device 3 device preview tally status (0=off, 1=on) bit 2-3: reserved (0b00) bit 4: slave device 4 program tally status (0=off, 1=on) bit 5: slave device 4 preview tally status (0=off, 1=on) bit 6-7: reserved (0b00) .
-
Page 811: Hilfe
Nachdem Sie überprüft haben, welche Version des Dienstprogramms Blackmagic Camera Utility auf Ihrem Computer installiert ist, besuchen Sie zum Auffinden der neuesten Updates bitte das Blackmagic Support Center www.blackmagicdesign.com/de/support. In der Regel empfiehlt es sich, die neuesten Updates zu laden. Vermeiden Sie jedoch Software-Updates mitten in einem wichtigen Projekt. -
Page 812: Gesetzliche Vorschriften Und
Gesetzliche Vorschriften und Sicherheitshinweise Gesetzliche Vorschriften Entsorgung von elektrischen und elektronischen Geräten innerhalb der Europäischen Union. Das auf dem Produkt abgebildete Symbol weist darauf hin, dass dieses Gerät nicht zusammen mit anderen Abfallstoffen entsorgt werden darf. Altgeräte müssen daher zur Wiederverwertung an eine dafür vorgesehene Sammelstelle übergeben werden. -
Page 813: Garantie
Garantie Eingeschränkte Garantie Für dieses Produkt gewährt die Firma Blackmagic Design eine Garantie auf Material- und Verarbeitungsfehler von 12 Monaten ab Kaufdatum. Sollte sich ein Produkt innerhalb dieser Garantiezeit als fehlerhaft erweisen, wird die Firma Blackmagic Design nach ihrem Ermessen das defekte Produkt entweder ohne Kostenerhebung für Teile und Arbeitszeit reparieren oder Ihnen das defekte Produkt ersetzen. -
Page 814: Español
Manual de instalación y funcionamiento Blackmagic URSA Mini y URSA Mini Pro 4.6K Blackmagic Viewfinder y Studio Viewfinder Junio 2017 Español... - Page 815 Bienvenido Gracias por haber adquirido este producto. Desde que lanzamos nuestra primera cámara cinematográfica digital hace algunos años, hemos tenido el privilegio de recibir sugerencias y comentarios sumamente útiles. Todos crecimos admirando el trabajo de los cineastas y directores de fotografía más destacados, y ha sido un honor poder conversar largo y tendido con estos reconocidos expertos sobre las características que nuestras cámaras deben ofrecer.
- Page 816 Panel de control interno Preparación de tarjetas para la grabación Controles de la pantalla táctil Preparación de tarjetas en el Pantalla táctil modelo Blackmagic URSA Mini Características de la pantalla táctil Preparación de Ajustes tarjetas en el modelo Ajustes de grabación Blackmagic URSA Mini Pro 4.6K...
- Page 817 Blackmagic URSA Viewfinder Seguimiento de Power Windows Montaje y conexión Complementos Masterización Ajuste del ocular Botones Descripción general sobre el control de cámaras Menú de ajustes Control de cámaras Blackmagic URSA Control del zoom Studio Viewfinder Herramientas de DaVinci Montaje y conexión Resolve para correcciones primarias Ajuste del visor Programa utilitario de la cámara...
-
Page 818: Uso De Un Modelo Específico
Es posible observar que, al leer este manual, se suele hacer referencia a una función específica de un modelo Blackmagic URSA Mini en particular. Todas las cámaras cuentan con el mismo armazón y permiten capturar imágenes excepcionales con un amplio rango dinámico. No obstante, existen algunas diferencias entre ellas. -
Page 819: Ursa Mini
URSA Mini, lateral izquierdo URSA Mini Pro 4.6K El modelo Blackmagic URSA Mini Pro 4.6K es un poco diferente. Solo está disponible con una montura EF, aunque es compatible con otros objetivos. Para obtener más información al respecto, consulte el apartado Montura intercambiable. -
Page 820: Primeros Pasos
Inserte el objetivo en la montura y gírelo hacia la derecha hasta que calce en su lugar. Para quitar el objetivo, mantenga presionado el botón de bloqueo, gire el objetivo hacia la izquierda hasta aflojarlo y retírelo con cuidado. LENS Cómo colocar y retirar un objetivo EF en el modelo Blackmagic URSA Mini EF Primeros pasos... - Page 821 Para colocar un objetivo con montura PL: Abra el aro de seguridad de la cámara girándolo hacia la izquierda hasta que se detenga. Haga coincidir una de las cuatro pestañas del objetivo con el perno de sujeción situado en la montura de la cámara. Compruebe que el objetivo esté alineado correctamente para poder ver sus marcas con facilidad.
- Page 822 La información registrada como metadatos mediante la interfaz Cooke's /i Technology puede resultar útil en la etapa de posproducción y en la creación de efectos especiales. Se recomienda saber qué tipo de objetivo se utilizó en la producción, así como los ajustes precisos, en caso de que sea necesario emplearlos de nuevo con posterioridad.
-
Page 823: Encendido De La Cámara
A fin de suministrar corriente eléctrica y controlar el objetivo desde la cámara, simplemente conecte el cable a la entrada denominada Lens que se encuentra en la parte frontal de la torreta en los modelos URSA Mini PL o URSA Mini Pro 4.6K. La mayoría de los objetivos B4 incluye un conector Hirose de 12 pines con un cable integrado para este fin. - Page 824 Para encender el modelo URSA Mini Pro 4.6K: El modelo Blackmagic URSA Mini Pro 4.6K incluye un interruptor de encendido sobre la pantalla plegable. Al mover el interruptor a la posición ON, se enciende la cámara.
- Page 825 XLR 1 XLR 2 XLR 1 XLR 2 Mantenga presionados los botones de grabación y avance situados detrás de la pantalla LCD para encender o apagar la cámara. SUGERENCIA: Si el interruptor del modelo URSA Mini Pro 4.6K se encuentra en la posición ON y la cámara está...
-
Page 826: Almacenamiento
Almacenamiento Los modelos URSA Mini utilizan tarjetas CFast 2.0 para almacenar material audiovisual en definición HD, 2K, UHD, 4K o 4.6K.La versión URSA Mini Pro 4.6K también admite tarjetas UHS-I y UHS-II. Tarjetas CFast Estas unidades son capaces de procesar datos a gran velocidad, de modo que son ideales para grabar contenidos con una alta frecuencia de imagen. - Page 827 CFast recomendadas para el modelo Blackmagic URSA Mini. ¿Qué tarjetas CFast son las más adecuadas para los modelos Blackmagic URSA Mini y URSA Mini Pro? Recomendamos las siguientes tarjetas para grabar en formato RAW 2160p a una velocidad máxima...
- Page 828 Solo se ha certificado el uso de tarjetas CFast 2.0 serie D de Sandisk en el modelo Blackmagic URSA Mini. Estas se identifican con la letra D, impresa en la esquina inferior izquierda de la parte trasera de la tarjeta. Asimismo, para facilitar su identificación, se incluye una lista con los números del modelo.
- Page 829 Tarjetas SD Por otro lado, el modelo Blackmagic URSA Mini Pro 4.6K también permite grabar en tarjetas UHS-I y UHS-II de alta velocidad. Al utilizar unidades UHS-II SDXC de alta gama, es posible procesar material ProRes HQ en resolución 2160p.
- Page 830 Las tablas que figuran a continuación muestran las tarjetas SD recomendadas para el modelo Blackmagic URSA Mini Pro. Es aconsejable consultar con regularidad la versión más reciente de este manual para obtener información actualizada al respecto. Esta puede descargarse desde la página www.blackmagicdesign.com/es/support...
- Page 831 Toshiba Exercia Pro UHS-II 270MB/s SDXC 256GB Transcend Ultimate UHS-II 180MB/s SDXC 64GB Wise 285MB/s UHS-II SDXC 64GB Para obtener información adicional sobre tarjetas SD compatibles con el modelo URSA Mini Pro, visite nuestra página de soporte técnico en www.blackmagicdesign.com/es/support. Almacenamiento...
-
Page 832: Preparación De Tarjetas Para La Grabación
Bloqueo y desbloqueo de tarjetas SD Es posible bloquear las tarjetas SD, a fin de evitar la sobreescritura de datos. Al insertar una tarjeta, compruebe que no se encuentre protegida. La protección contra la escritura de datos puede desactivarse moviendo el pequeño interruptor situado en el lado izquierdo de la unidad hacia la posición más cercana a los conectores. -
Page 833: Preparación De Tarjetas En El Modelo Blackmagic Ursa Mini
Se recomienda comprobar los ajustes antes de iniciar el proceso. Preparación de tarjetas en el modelo Blackmagic URSA Mini Pulse cualquiera de los indicadores correspondientes en la parte inferior de la pantalla para acceder a las opciones de la unidad. -
Page 834: Preparación De Tarjetas En El Modelo Blackmagic Ursa Mini Pro 4.6K
Antes de formatear la tarjeta, compruebe que la unidad seleccionada sea la correcta. Aparecerá una notificación en la pantalla cuando el procedimiento haya finalizado. Pulse OK para volver a la pantalla anterior. Pulse Exit para salir. Al formatear tarjetas CFast o SD en el modelo URSA Mini, la cámara asignará una denominación a la unidad según el nombre utilizado para identificarla y el número de rollo en la claqueta virtual. -
Page 835: Preparación De Tarjetas En Equipos Mac
Preparación de tarjetas en equipos Mac Utilice el programa «Utilidad de Discos» incluido en el sistema operativo Mac OS para dar formato HFS+ o exFAT a la tarjeta. Asegúrese de respaldar cualquier información importante que contenga la unidad, ya que al iniciar el proceso se borrarán todos los datos. Inserte la tarjeta SD o CFast 2.0 en la ranura correspondiente del equipo informático o utilice un dispositivo de lectura y/o escritura para este tipo de unidades. - Page 836 Ingrese un nombre para la unidad, marque la casilla Formato rápido y haga clic en Iniciar. Se dará formato a la tarjeta CFast rápidamente y esta quedará lista para usar. El cuadro de diálogo Formato en el sistema operativo Windows permite formatear tarjetas CFast mediante el sistema exFAT.
-
Page 837: Grabación
Presione el botón de grabación nuevamente para detener el registro de imágenes. En el modelo Blackmagic URSA Mini Pro 4.6K, el botón de grabación externo se encuentra en el panel de control frontal, a fin de acceder a este con mayor facilidad cuando se utiliza el soporte para el hombro. - Page 838 Frecuencias de imagen máximas La siguiente tabla indica los códecs, las resoluciones y las frecuencias de imagen máximas disponibles para el modelo URSA Mini 4K. URSA Mini 4K Resolución Códec Área del sensor Frecuencia máxima 4000 x 2160 RAW sin pérdida de información Completa 60 (dos tarjetas) 4000 x 2160...
- Page 839 URSA Mini 4.6K y URSA Mini Pro 4.6K Resolución Códec Área del sensor Frecuencia máxima 4608 x 1920 RAW sin pérdida de información Reducida 60 (dos tarjetas) 4608 x 1920 RAW 3:1 Reducida 4608 x 1920 RAW 4:1 Reducida 4608 x 1920 ProRes 444XQ Reducida 4.6K 2.4:1...
- Page 840 URSA Mini 4.6K y URSA Mini Pro 4.6K Resolución Códec Área del sensor Frecuencia máxima 3072 x 2560 RAW sin pérdida de información Reducida 60 (dos tarjetas) 3072 x 2560 RAW 3:1 Reducida 3072 x 2560 RAW 4:1 Reducida 3072 x 2560 ProRes 444XQ Reducida 3072 x 2560...
- Page 841 1920 x 1080 ProRes Proxy Completa Para seleccionar la resolución y el códec en el modelo Blackmagic URSA Mini: Presione el botón MENU en el panel de control. Acceda a la primera pantalla en la pestaña RECORD. Seleccione el códec, la calidad y la resolución.
-
Page 842: Grabación Automática
Grabación automática El modelo URSA Mini transmite una señal automáticamente desde las salidas SDI que permite iniciar la grabación al conectar un dispositivo compatible con dicha función, p. ej. un monitor Blackmagic Video Assist. De este modo, al presionar el botón de grabación en la cámara, la unidad externa inicia la captura de imágenes. - Page 843 Tarjeta Frecuencia CinemaDNG CinemaDNG ProRes ProRes ProRes ProRes ProRes ProRes CFast de imagen CinemaDNG 444 XQ 422 HQ 422 LT 422 Proxy Duración Duración Duración Duración Duración Duración Duración Duración Duración 23.98 75 min 142 min 175 min 84 min 127 min 189 min 283 min...
- Page 844 3K anamórfico Tarjeta Frecuencia CinemaDNG CinemaDNG ProRes ProRes ProRes ProRes ProRes ProRes CFast de imagen CinemaDNG 444 XQ 422 HQ 422 LT 422 Proxy Duración Duración Duración Duración Duración Duración Duración Duración Duración 23.98 20 min 39 min 48 min 22 min 33 min 50 min...
- Page 845 4K 16:9* Tarjeta Frecuencia CinemaDNG CinemaDNG ProRes ProRes ProRes ProRes ProRes ProRes CFast de imagen CinemaDNG 444 XQ 422 HQ 422 LT 422 Proxy Duración Duración Duración Duración Duración Duración Duración Duración Duración 23.98 17 min 32 min 40 min 18 min 27 min 41 min...
-
Page 846: Reproducción
URSA Mini URSA Mini Pro 4.6K SUGERENCIA: El modelo Blackmagic URSA Mini dispone de botones de reproducción en el panel de control interno y en el ergonómico. NOTA: El modelo URSA Mini reproducirá dichos clips con diferentes ajustes de calidad, siempre y cuando tengan el mismo códec, resolución y frecuencia de imagen. - Page 847 Los controles de la cámara funcionan de la misma manera que los de un reproductor de CD. Para adelantar la reproducción hasta el comienzo del siguiente clip, presione el botón de avance una vez. Oprima el botón de retroceso una vez para reproducir el clip actual desde el inicio, o dos veces para retroceder hasta el comienzo del clip anterior.
-
Page 848: Introducción Al Modelo Ursa Mini
Introducción al modelo URSA Mini El panel trasero de la cámara incluye conectores BNC convencionales y dos entradas LANC. Una de estas permite el uso de la empuñadura lateral, mientras que la otra se encuentra en la parte de atrás y facilita la conexión de controladores externos. -
Page 849: Ursa Mini, Lateral Izquierdo
Balance de blancos automático El botón Auto W/B se utiliza para establecer el balance de blancos según lo que se ve en el centro de la pantalla, por ejemplo, una tarjeta gris situada frente al objetivo. Consulte el apartado Botones de control del modelo URSA Mini Pro 4.6K para obtener más información al respecto. - Page 850 Modelo URSA Mini Pro 4.6K con la pantalla plegable cerrada Interruptor de encendido Interruptor utilizado para encender la cámara. Otra alternativa para encender la unidad es presionar simultáneamente los botones de grabación y avance, situados en el interior de la pantalla plegable.
-
Page 851: Lateral Derecho
Interruptor para seleccionar el soporte de almacenamiento Se utiliza para grabar en tarjetas SD o CFast. Puerto USB Puerto USB-C para actualizar el sistema operativo interno. Consulte el apartado Programa utilitario de la cámara para obtener más información al respecto. Panel de control interno Al abrir el monitor plegable, se obtiene acceso al panel de control interno, el cual permite configurar las entradas de audio y los ajustes del modo de alimentación fantasma. -
Page 852: Panel Trasero
Panel trasero Base para soporte de batería La cámara incluye cuatro orificios roscados y conector Molex que permite colocar soportes opcionales para baterías con tipo V-Lock o Gold Mount. Consulte el apartado Instalación de baterías para obtener más información al respecto. Entrada LANC Conector de 2.5 mm para controlar la cámara a distancia mediante el protocolo LANC. -
Page 853: Panel Superior
También es posible emplear la entrada SDI principal para utilizar una señal de referencia proveniente del mezclador. Esto resulta útil al trabajar con mezcladores de la línea ATEM, dado que dicha conexión facilita el control y la sincronización de las cámaras. Consulte el apartado Ajustes generales para obtener más información al respecto. -
Page 854: Controles Del Modelo Ursa Mini
Controles del modelo URSA Mini El modelo Blackmagic URSA Mini cuenta con un panel en el lateral izquierdo, detrás del monitor plegable, que incluye todos los controles necesarios para modificar diferentes ajustes y supervisar la intensidad del volumen. La pantalla táctil dispone de vúmetros digitales que facilitan esta tarea. - Page 855 Para ajustar la apertura en forma manual, presione los botones de avance y retroceso en el monitor plegable. Enfoque Presione el botón FOCUS para activar la función de enfoque automático en objetivos EF compatibles. La pantalla del monitor plegable mostrará un cuadrado blanco. Cualquier objeto que se encuentre dentro del mismo estará...
-
Page 856: Manija Lateral
Controles de reproducción Estos botones permiten comenzar y detener la reproducción, así como retroceder al clip anterior o avanzar al siguiente. En el modelo URSA Mini EF, los botones de avance y retroceso también pueden utilizarse para abrir o cerrar el diafragma al emplear objetivos compatibles. - Page 857 Para colocar la manija lateral en el modelo URSA Mini, siga los pasos descritos a continuación: Abra la tapa protectora de plástico situada a la derecha de la manija para acceder al tornillo de sujeción. Compruebe que la manija y la roseta lateral de la cámara estén alineadas. Coloque la empuñadura en la posición deseada y apriete el tornillo lateral con un destornillador de cabeza plana o gire la anilla en D con los dedos.
-
Page 858: Botones De Control En El Modelo Ursa Mini Pro 4.6K
Botones de control en el modelo URSA Mini Pro 4.6K El modelo Blackmagic URSA Mini Pro 4.6K incluye paneles de control en el armazón, así como en el interior y exterior del monitor plegable, a fin de facilitar el acceso a todas las funciones esenciales de la cámara y a las diversas herramientas de monitorización. - Page 859 Filtros de densidad neutra La cámara URSA Mini cuenta con tres filtros de densidad neutra internos. Las opciones disponibles son CLEAR, 2, 4 y 6 pasos. Estos filtros permiten reducir la luz que percibe el sensor de la cámara, según los pasos seleccionados. Al disminuir la exposición, es posible continuar grabando con una apertura amplia, por ejemplo, en exteriores durante un día soleado.
- Page 860 Rueda MENU Al activar la opción Status Text para la salida SDI frontal de la cámara, esta rueda permite acceder a las distintas opciones que están disponibles en la pantalla táctil. Basta con presionarla al igual que un botón para ver las opciones en monitores externos, tales como los modelos Blackmagic SmartView, Video Assist o URSA Viewfinder.
-
Page 861: Panel De Control Ergonómico
Balance de blancos automático Al presionar el botón AUTO W/B, se muestra un recuadro en el centro de la pantalla LCD durante cinco segundos. Asimismo, este se visualiza en cualquier monitor conectado a la salida SDI, si la opción Status Text está activada. El recuadro blanco indica el área específica de la imagen a partir de la cual se calculará... - Page 862 Altavoz El pequeño altavoz integrado en la parte externa del panel permite escuchar el audio durante la grabación. Está situado a la altura de la oreja cuando la cámara se utiliza sobre un soporte para hombro. Para ajustar el volumen del altavoz, basta con girar la rueda de ajustes, como se indica en el apartado Botones de control del modelo URSA Mini Pro 4.6K.
- Page 863 ‚ Indicador de batería Si se conecta una batería al modelo URSA Mini Pro 4.6K, este indicador muestra la carga restante de la misma en incrementos de 25 % representados por cuatro barras. Cuando dicho valor disminuye por debajo de 20 %, el led situado cerca del botón REC se encenderá...
- Page 864 Controles de la pantalla LCD Controles de la pantalla LCD en el modelo URSA Mini Pro 4.6K Captura de imágenes fijas Pulse el botón STILL para capturar una imagen estática como un único fotograma sin compresión en formato DNG. Los archivos se guardarán en la carpeta Stills ubicada en el directorio raíz del soporte de grabación.
- Page 865 Botones de control y reproducción Botones de control y reproducción en el modelo URSA Mini Pro 4.6K Diafragma El botón IRIS activa la función de apertura automática del diafragma en objetivos compatibles. Al utilizar el rango dinámico en el modo Video, presiónelo una vez para establecer un valor de exposición promedio según las partes más claras y oscuras de la imagen.
-
Page 866: Panel De Control Interno
Controles para la intensidad del audio Perillas para el volumen del audio en el modelo URSA Mini Pro 4.6K Permiten establecer la intensidad del volumen en los canales 1 y 2 durante la grabación. Gire las perillas hacia la derecha o la izquierda para aumentar o disminuir respectivamente la intensidad de la señal de audio en cada canal durante la grabación. - Page 867 NOTA: En general, siempre se conecta el cable XLR antes de activar el modo de alimentación fantasma. Es importante desactivar este modo de alimentación cuando ya no haya un micrófono conectado. Los dispositivos que no cuenten con la protección adecuada en las salidas AES XLR pueden resultar dañados al intentar suministrarles corriente eléctrica mediante las entradas XLR de la cámara.
- Page 868 Menú Presione el botón MENU para acceder al panel de opciones. Consulte el apartado Ajustes para obtener más información al respecto. Grabación Presione cualquier de los botones REC para comenzar o detener la grabación. Consulte el apartado Grabación para obtener más información al respecto. Controles de reproducción Estos botones permiten comenzar y detener la reproducción, así...
-
Page 869: Controles De La Pantalla Táctil
Controles de la pantalla táctil Pantalla táctil El monitor plegable del modelo URSA Mini puede inclinarse para captar imágenes desde diferentes ángulos. Los botones situados en la parte posterior permiten controlar la cámara al sostenerla sobre el hombro con la pantalla cerrada, cuando se utiliza el visor electrónico URSA Viewfinder. Características de la pantalla táctil La pantalla táctil incluye una interfaz intuitiva que responde a simples toques o desplazamientos del dedo para facilitar el uso de la cámara. - Page 870 Pulse la primera pestaña en la parte inferior de la pantalla para acceder a los ajustes de la función Cebra. Para activar la función Cebra, pulse el interruptor situado en la parte inferior izquierda de la pantalla en la pestaña Zebra. Mueva el control deslizante hacia la izquierda o la derecha para modificar la intensidad de las líneas.
- Page 871 Las guías de encuadre incluyen relaciones de aspecto para distintos estándares de cine, televisión e Internet, además de una cuadrícula de 3x3 (regla de los tercios) para mejorar la composición de las imágenes. Pulse la tercera pestaña en la parte inferior de la pantalla para acceder a los ajustes correspondientes a las guías de encuadre.
- Page 872 ‚ 4:3 Muestra una relación de aspecto 4:3 compatible con televisores SD o facilita el encuadre al utilizar adaptadores anamórficos 2x. SUGERENCIA: Es posible cambiar la opacidad de las guías de encuadre. Consulte el apartado correspondiente para obtener más información al respecto. NOTA: Para obtener más información sobre cómo activar las guías de encuadre en las imágenes transmitidas por la cámara, consulte el apartado correspondiente.
- Page 873 La cuadrícula correspondiente a la regla de los tercios se ajusta a las guías de encuadre visualizadas en la pantalla ‚ Tercios La opción Thirds muestra dos líneas verticales y dos líneas horizontales superpuestas en cada tercio de la imagen. Esta es una herramienta sumamente conveniente para componer planos.
- Page 874 Esta opción también puede ser útil para ayudar a encuadrar las imágenes si se tiene la certeza de que se van estabilizar durante la posproducción, ya que en este proceso se pueden cortar sus bordes. Asimismo, puede emplearse para indicar un recorte específico. Por ejemplo, si se ajusta al 50 % mientras se graba con calidad UHD a una resolución de 3840 x 2160, es posible ver cómo quedaría la imagen con resolución de 1920 x 1080.
- Page 875 Indicador de filtros de densidad neutra Al ajustar el filtro de densidad neutra en el modelo URSA Mini Pro 4.6K, el indicador ND aparece en la esquina superior izquierda de la pantalla táctil y en los monitores conectados a la salida SDI. El indicador se muestra durante cuatro segundos, según el formato seleccionado en el menú...
- Page 876 Frecuencia de imagen permitida por el sensor Este ajuste determina la cantidad de fotogramas que capta el sensor cada segundo, lo cual incide en la velocidad de reproducción de las imágenes según la frecuencia de reproducción establecida. Cuando la opción OFF SPEED FRAME RATE está activada, pulse las flechas situadas a los costados del valor correspondiente a la frecuencia de imagen del sensor o mueva el control deslizante para realizar ajustes.
- Page 877 Obturador El indicador SHUTTER muestra el ángulo de obturación. Al pulsarlo, es posible modificar este parámetro o seleccionar uno de los modos disponibles para la exposición automática. Pulse el indicador SHUTTER a fin de acceder a las opciones disponibles para el obturador. El ángulo del obturador define el rastro que dejan los objetos en movimiento y puede utilizarse para compensar los cambios en las condiciones de iluminación.
- Page 878 Al filmar en exteriores o bajo una fuente de luz que no causa este problema, el ángulo de obturación puede seleccionarse manualmente pulsando dos veces el indicador situado en la parte inferior izquierda de la pantalla. Aparecerá un teclado numérico que permite ingresar cualquier valor entre 5 y 360 grados.
- Page 879 Diafragma El indicador IRIS muestra la apertura del diafragma. Al pulsarlo, es posible modificar este valor en objetivos compatibles y seleccionar distintos modos para la exposición automática basados en este parámetro. Pulse el indicador IRIS a fin de acceder a las opciones disponibles para el obturador. NOTA: Para ajustar el diafragma desde la pantalla táctil, el modelo URSA Mini debe estar equipado con un objetivo que permita modificar su apertura mediante la...
- Page 880 SUGERENCIA: La exposición automática funciona sin problemas en objetivos B4 o PL compatibles que han sido diseñados para producciones audiovisuales. Sin embargo, en lentes EF es posible notar cambios bruscos en este parámetro al modificar la apertura del diafragma. Por esta razón, recomendamos utilizar solamente la opción de exposición automática Shutter al filmar con el modelo URSA Mini EF.
- Page 881 Pulse el indicador ISO a fin de acceder a las opciones disponibles para la sensibilidad fotométrica. Las opciones disponibles en este menú aparecen en la parte inferior de la pantalla. En función de las circunstancias, es posible seleccionar parámetros distintos. Por ejemplo, cuando la luz es escasa, un índice de 1600 puede resultar conveniente al rodar con el modelo URSA Mini 4.6K, aunque podría generar algo de ruido en la imagen.
- Page 882 También es posible modificar el matiz para realizar ajustes con mayor precisión. Esto brinda la posibilidad de cambiar la proporción de verde y magenta presente en la imagen. Por ejemplo, al añadir más magenta, se compensa la tonalidad verdosa de las luces fluorescentes. La mayoría de las configuraciones predeterminadas para el balance de blancos que ofrece el modelo URSA Mini presentan un cierto matiz.
- Page 883 Alimentación Este indicador se encuentra en la parte superior derecha de la pantalla. Existen cuatro opciones posibles: El indicador situado en la parte superior derecha de la pantalla permite visualizar el voltaje y la carga restante de la batería. Corriente Aparece cuando la cámara está...
- Page 884 El extremo izquierdo corresponde a las partes más oscuras de la imagen, mientras que el derecho representa las zonas más claras. Al modificar la apertura del diafragma, es posible ver cómo los valores se desplazan hacia la izquierda o la derecha, según corresponda. Esto brinda la posibilidad de comprobar que no se pierdan detalles en las partes más claras y oscuras de la imagen.
- Page 885 NOTA: En caso de que no note el indicador en la pantalla plegable, es posible configurar el modelo URSA Mini para que detenga la grabación al detectar la omisión de fotogramas, a fin de prevenir la captura de imágenes que no podrán utilizarse. Consulte el apartado correspondiente para obtener más información al respecto.
- Page 886 También permite formatear tarjetas CFast mediante este menú. Consulte el apartado correspondiente para obtener más información al respecto. SUGERENCIA: Solo basta con pulsar el nombre de la tarjeta en el menú de almacenamiento para activarla. Por lo tanto, el modelo URSA Mini utilizará dicha unidad en primera instancia.
- Page 887 Ampliación de la imagen Es posible ampliar cualquier parte de la imagen visualizada pulsando dos veces la pantalla. Deslice el dedo sobre la misma para desplazar la imagen. Esto es de suma utilidad al comprobar el enfoque. Para volver al tamaño original, pulse la pantalla nuevamente dos veces. Al ampliar la imagen, el indicador situado en la parte superior izquierda de la pantalla muestra el área visualizada.
- Page 888 está reproduciendo. Al pulsar este último dos veces, es posible retroceder hasta el comienzo del clip anterior. La reproducción continua de clips también puede activarse pulsando el ícono correspondiente. Muestra los íconos de retroceso, reproducción, avance rápido y reproducción continua Para avanzar o retroceder la reproducción, mantenga presionados los botones correspondientes.
-
Page 889: Ajustes
Ajustes Panel de opciones Al presionar el botón MENU en el modelo URSA Mini, es posible visualizar el panel de opciones en la pantalla de la cámara. Este incluye diferentes ajustes organizados en distintas pestañas según la función que cumplen. A su vez, algunas pestañas incluyen varias secciones. Para desplazarse de una a otra, pulse las flechas situadas a los costados de la pantalla o deslice el dedo sobre la misma hacia la izquierda o la derecha. - Page 890 CODEC AND QUALITY. A continuación, elija Ultra HD en el menú RESOLUTION. NOTA: El modelo Blackmagic URSA Mini brinda compatibilidad con una amplia variedad de resoluciones en formatos ProRes y RAW CinemaDNG, desde HD hasta 4.6K o 4K en las versiones URSA Mini 4.6K y URSA Mini 4K, respectivamente.
- Page 891 Rango dinámico Utilice las flechas en la opción DYNAMIC RANGE para cambiar el rango dinámico. La cámara ofrece dos modos: ‚ Film Este ajuste permite filmar contenidos audiovisuales utilizando una curva logarítmica con un rango dinámico de 12 a 15 pasos, según el modelo de la cámara, para aumentar los niveles de contraste y aprovechar al máximo las ventajas de los programas de etalonaje como DaVinci Resolve.
- Page 892 Velocidad de grabación distinta Por defecto, la frecuencia de imagen del sensor y del proyecto coinciden para que el material grabado se reproduzca a una velocidad normal. Sin embargo, al activar la opción OFF SPEED RECORDING, se pueden determinar valores diferentes para estos parámetros de manera independiente.
- Page 893 Ajustes de grabación 3 La tercera pantalla incluye las siguientes opciones: Grabación por intervalos La opción TIMELAPSE permite grabar automáticamente un fotograma en función de los siguientes intervalos: ‚ Fotogramas 2 - 10 ‚ Segundos 1 - 10, 20, 30, 40, 50 ‚...
-
Page 894: Convención Para La Nomenclatura De Archivos
Estas opciones resultan de utilidad al filmar en directo, cuando el contenido sale al aire directamente sin modificaciones. Recomendamos seleccionar Off si se pretende procesar las imágenes posteriormente durante la etapa de posproducción. Por tal motivo, este ajuste no se aplica al material en formato RAW destinado a la edición. - Page 895 Pantalla de ajustes 1 (LCD y salidas SDI) La primera pantalla de cada menú incluye las mismas opciones para cada entrada. Por ejemplo, es posible activar la función Cebra para la pantalla táctil y desactivarla en la señal transmitida a través de las salidas SDI.
- Page 896 Si hay una tabla de conversión activa en la cámara, utilice esta opción para aplicarla en forma independiente a la señal visualizada en la pantalla táctil o en los monitores conectados a las salidas SDI. NOTA: Consulte el apartado correspondiente para obtener más información al respecto.
- Page 897 Texto envolvente Solo disponible en los modelos URSA Mini 4K y URSA Mini 4.6K. La opción TEXT SURROUNDS IMAGE permite ajustar el tamaño de la imagen en la pantalla táctil al 75 %. Esto permite mantener los indicadores y los demás datos en la pantalla sin obstruir la visualización del material grabado.
- Page 898 Pantalla de ajustes 2 (salidas SDI) La segunda sección de los menús Front SDI y Main SDI incluye ajustes que se aplican solamente a las imágenes transmitidas a través de dichas salidas. Texto en pantalla En ocasiones puede resultar útil ocultar los indicadores y demás datos en la imagen transmitida a través de las salidas SDI, a fin de visualizar solo la información necesaria para realizar la composición del plano.
- Page 899 Al seleccionar la opción Director se mostrará la siguiente información: Frecuencia de imagen El indicador FPS muestra la frecuencia seleccionada para la cámara en fotogramas por segundo. Cuando la opción OFF SPEED FRAME RATE está desactivada, este valor hace referencia a la frecuencia de imagen seleccionada para el proyecto. Si dicha opción se encuentra activada, se indicarán ambos parámetros en forma alternada.
- Page 900 Pantalla de ajustes generales 1 La opción All contiene ajustes que afectan a todas las imágenes transmitidas por la cámara. Por ejemplo, al seleccionar 90 % en la opción SAFE AREA GUIDE %, se aplicará este valor para el área de seguridad de las imágenes visualizadas en la pantalla táctil o en los monitores conectados a las salidas SDI.
- Page 901 Intensidad del indicador de enfoque El menú FOCUS ASSIST LEVEL permite determinar la intensidad del indicador de enfoque en la imagen visualizada. Las opciones disponibles son Low, Medium y High. NOTA: Al activar el nivel de intensidad del indicador de enfoque, es irrelevante donde se transmiten las imágenes con dicha función seleccionada.
-
Page 902: Ajustes De Audio
Porcentaje del área de seguridad La opción SAFE AREA GUIDE % permite ajustar el tamaño del área de seguridad sobre la imagen mediante las flechas situadas a ambos costados del número. Este porcentaje hace referencia al tamaño de dicha área con relación a la imagen. El valor exigido por la mayoría de las teledifusoras es de 90 %. - Page 903 Volumen de los auriculares El control HEADPHONES VOLUME permite ajustar el volumen de los auriculares conectados a la cámara. Deslice el control hacia la izquierda o la derecha para modificarlo. Volumen del altavoz El control SPEAKER VOLUME permite modificar el volumen de salida para el altavoz integrado de la cámara.
- Page 904 Volumen de auriculares El control HEADPHONES VOLUME permite ajustar el volumen de los auriculares conectados a la cámara. Deslice el control hacia la izquierda o la derecha para modificarlo. Volumen del altavoz El control SPEAKER VOLUME permite modificar el volumen de salida para el altavoz integrado de la cámara.
-
Page 905: Ajustes De Audio En El Modelo Ursa Mini Pro 4.6K
Ajustes de audio en el modelo URSA Mini Pro 4.6K Los ajustes de audio para este modelo se distribuyen en dos pantallas y, a su vez, están divididos según los canales 1 y 2. Cabe señalar que se añadirán dos canales más en una próxima actualización del sistema operativo interno. - Page 906 Volumen de grabación en los canales 1 y 2 Los controles RECORDED CHANNEL 1 LEVEL y RECORDED CHANNEL 2 LEVEL permiten ajustar el volumen de grabación para las fuentes correspondientes a los canales 1 y 2. Cada uno incluye un vúmetro que facilita el ajuste.
-
Page 907: Ajustes Generales
Ajustes generales En la pestaña SETUP del modelo URSA Mini se incluyen los ajustes de identificación de la cámara y de configuración de los botones de función, la versión del software y otros parámetros que no están directamente relacionados a la grabación o supervisión de imágenes. Este menú cuenta con cuatro pantallas diferentes, a la cuales se puede acceder utilizando las flechas situadas a los laterales de la pantalla táctil LCD, o deslizando el dedo hacia la derecha o izquierda. - Page 908 Indicador de la batería En el modelo URSA Mini, es posible modificar la forma en que se visualiza la carga restante de la batería. Los dos ajustes con Percentage y Voltage. Si se está utilizando un soporte y una batería compatibles con mediciones precisas, al seleccionar Percentage, se verá...
- Page 909 Ajustes generales 2 En la segunda pantalla, se incluyen los siguientes parámetros. Identificación en mezcladores ATEM Al emplear el modelo URSA Mini con un mezclador ATEM, es preciso identificar la cámara con un número para que pueda recibir la señal que permite encender y apagar la luz piloto. Esto brinda la posibilidad de garantizar que el dispositivo envíe la señal a la cámara indicada.
- Page 910 Señales de referencia La opción REFERENCE TIMING permite ajustar manualmente el modo de referencia según líneas o pixeles. Las flechas situadas a los laterales de las opciones Lines y Pixels permiten seleccionar los ajustes correspondientes. Ajustes generales 3 En la tercera pantalla, se incluyen los siguientes parámetros. Configuración de los botones F1 y F2 En el exterior de la pantalla táctil LDC del modelo URSA Mini, se encuentran los botones F1 y F2, a los que es posible asignarles las funciones más utilizadas.
- Page 911 Para configurar estos botones, es necesario determinar las siguientes opciones: Botón Función Ajustes Parámetro Función Una vez que se selecciona el botón deseado, es posible determinar su función mediante la opción FUNCTION 1/2 BEHAVES AS. Las opciones disponibles son las siguientes: ‚...
- Page 912 Ajustes generales 4 En la cuarta pantalla, se incluyen los siguientes parámetros. Indicador en la pantalla plegable El modelo URSA Mini cuenta con una luz indicadora, situada en la parte externa de la pantalla plegable, que muestra cuando se está grabando y proporciona información sobre la señal. Pulse el interruptor de la opción DOOR LED para activarla o desactivarla.En el modelo URSA Mini Pro 4.6K, la luz indicadora se encuentra en el panel de control frontal.
- Page 913 Al seleccionar la opción FACTORY RESET, se indica si desea continuar Identificador La opción HARDWARE ID muestra ocho caracteres que identifican la cámara URSA MINI y los cuales son exclusivos de esta unidad. Por otra parte, los metadatos del archivo RAW y ProRes incluyen una versión de 32 caracteres de este identificador.
- Page 914 Ajustes generales 5 La quinta pantalla incluye las siguientes opciones: El nombre Bluetooth de la cámara está compuesto por su letra y una identificación de 8 caracteres. Bluetooth En el modelo URSA Mini Pro 4.6K, esta opción permite controlar la cámara desde un dispositivo portátil.
- Page 915 Al intentar conectarla por primera vez, la aplicación Blackmagic Camera Control le solicitará un código de seis dígitos para vincular la cámara. Este aparecerá en la pantalla de la unidad. Ingrese el código en el iPad. Verá un mensaje en la pantalla confirmando que la cámara está vinculada al dispositivo. En caso de error, aparecerá...
- Page 916 NOTA: Si no utiliza la función Bluetooth para controlar la cámara, recomendamos desactivarla por motivos de seguridad. Desconectar dispositivo La opción Disconnect Current Device permite desvincular la cámara del iPad al cual está conectada. Borrar dispositivos vinculados La opción Clear Paired Devices permite borrar la lista de dispositivos a los cuales la cámara se ha vinculado.
- Page 917 Pulse el ícono de la claqueta virtual, situado en la esquina inferior derecha, para acceder a ella y actualizarla. La cámara URSA Mini Pro 4.6K emplea tecnología Bluetooth de baja energía para intercambiar información de forma inalámbrica. Es el mismo tipo de protocolo que utilizan los dispositivos portátiles, de modo que requiere una cantidad mínima de batería.
-
Page 918: Ajustes Predeterminados
Ajustes predeterminados La pestaña PRESETS brinda la posibilidad de guardar y volver a utilizar un conjunto de ajustes en el modelo URSA Mini. Esto puede resultar muy útil cuando se emplea la cámara en varios proyectos. Por ejemplo, se puede emplear la cámara URSA Mini en diferentes tipos de rodajes, por ejemplo documentales o videoclips, que requieren distintos ajustes. - Page 919 Ingrese un nombre mediante el teclado que aparece al pulsar el primer ícono en la pestaña PRESETS Una vez que se almacena la configuración predeterminada, pulse su nombre para seleccionarla. Para cargarla, pulse el segundo ícono. Elija una configuración predeterminada y pulse el segundo ícono para cargarla. Las de color azul corresponden a las configuraciones seleccionadas, mientras que las que están cargadas presentan una línea de dicho color debajo del nombre.
-
Page 920: Tablas De Conversión
NOTA: Si la cámara no cuenta con más espacios libres para almacenar configuraciones predeterminadas, el menú para importar no está disponible. Por lo tanto, es necesario eliminar una configuración para liberar espacio. Exportar ajustes predeterminados Para exportar una configuración predeterminada, selecciónela y pulse el quinto ícono guardar los ajustes en una tarjeta SD o CFast. - Page 921 El modelo URSA Mini es compatible con tablas de conversión tridimensionales de 33 puntos en formato .cube creadas en DaVinci Resolve, y de 17 puntos convertidas a dicho formato mediante otros programas. La cámara procesa este tipo de LUT mediante una interpolación tetrahédrica de calidad excepcional.
- Page 922 NOTA: Si tiene algún problema al importar una tabla de conversión a la cámara, es posible que no sea del tamaño correcto. Utilice un editor de tablas (por ejemplo, Lattice) para verificar el tamaño o ábrala en un editor de texto desde el equipo informático. Junto a la etiqueta LUT_3D_SIZE, se muestra un número que indica el tamaño de la tabla.
-
Page 923: Ingreso De Metadatos
Claqueta virtual Blackmagic URSA Mini Al deslizar el dedo hacia la izquierda o derecha en la pantalla táctil, se accede a la claqueta virtual. Esta está dividida en dos pestañas: CLIPS y PROJECT. La primera incluye información que puede variar según el clip, mientras que en la segunda se ingresan datos comunes a varios clips, tales... - Page 924 Nombre del clip La opción SLATE FOR muestra el nombre del clip al cual corresponden los metadatos en la pantalla. En el modo de espera, se refiere al clip que se grabará a continuación. Información del objetivo La opción LENS DATA muestra la información correspondiente al objetivo montado en la cámara. Muchos objetivos electrónicos proporcionan los datos automáticamente, por ejemplo, el modelo, la apertura y la longitud focal.
- Page 925 ‚ Distancia La opción DISTANCE indica la distancia focal del objetivo para la secuencia grabada. Algunos objetivos brindan esta información automáticamente, en cuyo caso se expresa en milímetros. Asimismo, es posible ingresarla en forma manual. ‚ Filtro La opción FILTER muestra el filtro utilizado. Pulse esta opción para ingresar los datos en forma manual.
- Page 926 La claqueta virtual del modelo URSA Mini incluye las pestañas CLIPS y PROJECT. Rollo El indicador REEL muestra el rollo actual. El modelo URSA Mini aumenta en forma automática el número de rollo, por lo que no es necesario ingresarlo de forma manual. Al comenzar un proyecto nuevo, pulse la opción Reset Project Data para empezar nuevamente en 1.
- Page 927 Al ingresar metadatos sobre la escena, la cámara sugiere opciones de incremento a la izquierda del teclado y tipos de plano a la derecha. Toma La opción TAKE muestra el número de toma para el plano actual. Pulse las flechas situadas a ambos lados del número para incrementar o disminuir este valor, o el indicador para ingresar un número directamente.
- Page 928 Mejor toma Pulse la opción GOOD TAKE para identificar una buena toma, a fin de acceder a ella con mayor facilidad en la etapa de posproducción. Esta etiqueta se aplica al último clip grabado, si la cámara se encuentra en modo de espera, o al clip visualizado en modo de reproducción. Interior / Exterior Pulse las opciones INT o EXT para agregar estas etiquetas al siguiente clip en modo de espera, o al clip visualizado en modo de reproducción.
-
Page 929: Uso De Objetivos Con Servomecanismo
Uso de objetivos con servomecanismo Al utilizar objetivos B4 con el modelo URSA Mini, es posible lograr resultados excepcionales. El control manual del diafragma, los anillos de enfoque en el objetivo, la empuñadura lateral y el interruptor para la distancia focal permiten llevar a cabo una grabación mucho más eficiente y ofrecen un sinfín de técnicas dinámicas difíciles de lograr con otros objetivos. - Page 930 Asimismo, el botón FOCUS del modelo URSA Mini permite activar la función de enfoque automático en objetivos compatibles. Cabe señalar además que estas funciones pueden controlarse desde un mezclador ATEM mediante su programa de control. Después de colocar un objetivo B4, seleccione la opción 2K 16:9 (o menor) para la resolución y active la función Window Sensor en la pestaña RECORD del panel de opciones.
-
Page 931: Salida De Video
Salida de video Salida para supervisar señales HD La salida SDI 3G en los modelos URSA Mini permite transmitir imágenes en formato HD 1080, brindando de este modo la posibilidad de conectar las cámaras a matrices de conmutación, monitores, dispositivos de captura, mezcladores y otros equipos SDI. Dicha salida se denomina Front SDI en el menú... - Page 932 Conexión a monitores La supervisión de señales SDI puede resultar muy útil, especialmente cuando la cámara se coloca en un lugar que dificulta o impide el acceso al monitor plegable. A fin de transmitir la información necesaria para monitorizar las imágenes mediante la salida SDI, active esta función en la opción Front SDI Overlays del menú...
-
Page 933: Soporte Para El Hombro
Soporte para el hombro Instalación del soporte para el hombro El soporte opcional para el hombro del modelo URSA Mini permite utilizar la cámara en proyectos de captación electrónica de noticias. El kit completo incluye una base, una manija superior, un cable LANC de gran longitud, un adaptador para el visor Blackmagic Viewfinder y un brazo extensor donde se coloca la empuñadura lateral, además de todos los tornillos requeridos. - Page 934 Coloque la cámara sobre una superficie plana y firme con el panel inferior hacia arriba. Sujete la base del soporte para el hombro con los dos tornillos de 6.35 mm suministrados. Apriete los tornillos hasta que la base quede firme. Evite ejercer demasiada fuerza, ya que esto podría dañar las roscas.
- Page 935 Para sujetar la manija superior cuando el visor está instalado, siga los pasos descritos a continuación: Manija superior Cubierta de goma Coloque la cámara sobre una superficie Retire la cubierta de goma situada en la base plana y firme. de la manija levantando la tapa lateral y empujando hacia abajo.
- Page 936 Instalación del brazo extensor Al instalar el soporte para el hombro, es necesario cambiar la posición de la empuñadura lateral a fin de poder filmar cómodamente con la cámara al hombro. El brazo extensor y el cable LANC permiten situar dicho accesorio en forma más ergonómica. Para instalar el brazo extensor, siga los pasos descritos a continuación: Coloque la cámara sobre una superficie plana y firme, asegurándose de que haya espacio suficiente su alrededor para mover el brazo extensor hacia abajo.
-
Page 937: Blackmagic Ursa Viewfinder
Blackmagic URSA Viewfinder El visor electrónico Blackmagic URSA Viewfinder ha sido especialmente diseñado para la cámara URSA Mini. La pantalla OLED de alta definición incluye un sistema óptico de extraordinaria precisión que permite ver imágenes brillantes con un realismo excepcional, a fin de poder enfocar rápidamente y apreciar hasta los más mínimos detalles. -
Page 938: Ajuste Del Ocular
Conecte el visor a la salida SDI HD y al conector de +12 V en la parte frontal de la cámara mediante los cables suministrados. Al emplear el dispositivo con el modelo URSA Mini, es ampliamente recomendable utilizar el soporte para el hombro, ya que este dispone de orificios roscados, un tornillo moleteado de 6.35 mm y diferentes ajustes de altura que permiten colocar el visor en una posición óptima. -
Page 939: Menú De Ajustes
Por otra parte, es posible personalizarlos para que funcionen como accesos directos a aquellas prestaciones usadas con mayor frecuencia. Por ejemplo, la función False Color se puede asignar al botón ZOOM. Consulte el apartado Accesos directos para obtener más información al respecto. ZOOM (F1) - «menú»- Este botón permite lograr una mayor nitidez en el enfoque. - Page 940 Meters: Permite seleccionar el tipo de indicadores que se muestran en la pantalla. Las opciones son Histogram, Audio, Both (ambos) o None (ninguno). Peaking: Permite activar o desactivar el indicador de enfoque. Zebra Permite activar o desactivar la función Cebra. El nivel deseado puede determinarse mediante el menú...
- Page 941 Seleccione la opción Exit y presione el botón MENU para salir. Botones de acceso directo en el visor electrónico Configuración El menú Setup incluye las siguientes opciones: Ajuste del brillo: La opción Brightness Adjustment permite ajustar el brillo de la pantalla con un rango de -10 a +10.
- Page 942 NOTA: Al activar la función Grid en el menú de configuración del dispositivo URSA Viewfinder, es posible ver el indicador de cámara al aire si esta se encuentra conectada a un mezclador ATEM. Nótese que la opción Overlays también debe activarse en el menú...
- Page 943 Actualización del software interno El programa utilitario para cámaras de Blackmagic permite actualizar el sistema operativo interno del visor. El dispositivo debe estar encendido al realizar la actualización, de modo que se recomienda mantenerlo conectado a la cámara durante todo el proceso. A su vez, la cámara debe ser capaz de suministrar corriente eléctrica en forma constante, por lo que es necesario enchufarla a una fuente de alimentación externa.
-
Page 944: Blackmagic Ursa Studio Viewfinder
Blackmagic URSA Studio Viewfinder MENU BRIGHT CONTRAST BACK PEAKING Blackmagic URSA Viewfinder Este visor electrónico diseñado por Blackmagic permite convertir el modelo URSA Mini en una cámara profesional para llevar a cabo producciones en directo. Cuenta con una pantalla brillante de 7 pulgadas, luz piloto, varias perillas, manijas de gran tamaño, un parasol y una montura articulada de tensión regulable. -
Page 945: Montaje Y Conexión
Montaje y conexión Al utilizar el visor electrónico con el modelo URSA Mini, es posible montarlo a la cámara de diversas maneras. El visor también puede colocarse directamente sobre la parte superior de la cámara mediante la montura en V suministrada. Quite la montura en V de la manija empleando una llave Allen 3/16 y a continuación sujétela a la parte superior de la cámara mediante los tornillos de 0.25 pulgadas suministrados. - Page 946 Colocación del dispositivo en el soporte para el hombro Montura en V colocada en una cámara desarrollada por otros fabricantes. El visor puede colocarse en cualquier cámara que cuente con orificios roscados de 0.25 pulgadas mediante la montura suministrada u otras similares fabricadas por terceros. Asimismo, es posible montar el dispositivo en otras unidades que cuenten con un mecanismo de sujeción en V integrado.
-
Page 947: Ajuste Del Visor
Utilice los cables suministrados para conectar el Blackmagic URSA Studio Viewfinder a la salida SDI 3G de la cámara y a la conexión de 12 V situada en la parte frontal. El botón de encendido del dispositivo permite activarlo cuando la cámara está encendida. - Page 948 El rango de tensión de las perillas es sumamente amplio, lo cual permite seleccionar un grado de resistencia específico. Esto facilita el movimiento del visor en sentido horizontal o vertical hasta la posición deseada. Bloqueo de la inclinación vertical Esta perilla permite fijar Perillas de tensión regulable en ambos costados del visor el ángulo de inclinación vertical del visor.
- Page 949 Parasol El parasol permite ver la pantalla cuando la luz es muy brillante. Para colocarlo, deslícelo sobre la parte superior del visor hasta que calce en su lugar y sujételo con los dos tornillos cautivos insertándolos en la base del mismo. La parte superior de la visera es regulable, lo cual ofrece la posibilidad de subirla o bajarla para obtener ángulos de visión adicionales.
-
Page 950: Botones
Botones Los controles en la parte derecha de la pantalla permiten ajustar el brillo, el contraste y el indicador de enfoque con facilidad. Estos presentan un diseño ergonómico que brinda la posibilidad de moverlos con el dedo pulgar, cuando el parasol está instalado, o con dos dedos si es necesario realizar cambios de manera más sutil. - Page 951 Luz piloto Esta luz situada en la parte posterior del visor se enciende de color rojo si la cámara se encuentra al aire, verde si no lo está, o naranja si se está realizando una grabación aislada. Cuando se presiona uno de los botones en el mezclador para cambiar de cámara, la información se transmite a la unidad mediante una señal SDI, de modo que la luz se prenda o se apague según corresponda.
-
Page 952: Menú De Ajustes
Menú de ajustes Al presionar o girar el botón MENU, es posible acceder a los distintos ajustes y desplazarse entre las opciones disponibles en cada caso. Asimismo, permite alternar entre los menús DISPLAY, SHORTCUTS, SETUP y CURSORS cuando uno de ellos se encuentra seleccionado. Gire el botón para resaltar uno de los parámetros. - Page 953 Guías La opción Guides permite mostrar u ocultar las guías de encuadre. El formato de estas coincide con el seleccionado en el modelo URSA Mini, al igual que la relación de aspecto, la opacidad y el porcentaje del área de seguridad. A su vez, el menú...
- Page 954 Una vez asignadas las funciones a los botones, gire el control MENU para desplazarse hasta la opción EXIT y presiónelo para salir, u oprima el botón BACK en el dispositivo. Menú SHORTCUTS Configuración El menú SETUP permite configurar diversos ajustes del visor. Brillo de la luz piloto frontal La opción Front Tally Brightness permite determinar el brillo de la luz piloto frontal.
- Page 955 SUGERENCIA: En condiciones de gran intensidad lumínica, se recomienda aumentar el brillo para facilitar la visualización de la luz piloto por parte de todos los integrantes del equipo de filmación. Por el contrario, en ambientes oscuros, es aconsejable seleccionar un nivel de brillo inferior. Asistente de enfoque La opción Focus Assist permite activar o desactivar el indicador de enfoque.
- Page 956 Recuadros en la pantalla Una vez determinado el tamaño de cada uno, es posible activarlos o desactivarlos desde el menú CURSORS o asignarlos a uno de los botones programables para acceder a los mismos con mayor rapidez. Esto es importante al realizar producciones en directo, dado que permite al camarógrafo tener en cuenta diversos elementos al componer y encuadrar los planos.
-
Page 957: Montura Intercambiable
Montura intercambiable El modelo Blackmagic URSA Mini Pro 4.6K incluye una montura para objetivos EF. No obstante, es posible utilizar otros tipos de lentes, dado que la montura es intercambiable. En otras palabras, se puede sustituir la montura original por otra para objetivos PL o B4. Los distintos tipos de monturas pueden adquirirse en cualquier distribuidor de productos Blackmagic Design. -
Page 958: Montura Para Objetivos Pl
Montura para objetivos PL La montura PL en el modelo URSA Mini Pro 4.6K permite utilizar objetivos cinematográficos de gran calidad en largometrajes y producciones televisivas. El kit de instalación incluye las siguientes piezas: 1 montura PL La montura incluye una tapa protectora. 1 juego de anillos adaptadores El juego incluye anillos con los siguientes espesores:... - Page 959 Instalación de la montura PL 4.6K 4.6K SDI OUT SDI OUT FILTER FILTER AUTO AUTO LENS LENS Coloque con cuidado el deflector en el centro Agregue el anillo adaptador de 0.10 mm a la de la montura y ajústelo con la mano. Utilice la cámara y luego coloque la montura PL.
-
Page 960: Montura Para Objetivos B4
Montura para objetivos B4 La montura B4 en el modelo URSA Mini Pro 4.6K permite utilizar objetivos de distancia focal variable, frecuentemente empleados en bodas y en la recopilación electrónica de noticias. Estos modelos mantienen el enfoque en rangos de distancia focal más extensos y, por lo general, permiten ajustar este parámetro y la apertura del diafragma en forma manual. - Page 961 Instalación de la montura B4 4.6K 4.6K SDI OUT SDI OUT FILTER FILTER AUTO AUTO LENS LENS Coloque la cámara verticalmente sobre una Agregue el anillo adaptador de 0.10 mm a la superficie plana y limpia para garantizar la cámara y luego coloque la montura B4, de instalación correcta de la montura.
-
Page 962: Montura Para Objetivos Ef
Montura para objetivos EF Es posible adquirir una montura EF si es necesario reemplazar la original que incluye la cámara. El kit de instalación incluye las siguientes piezas: 1 montura EF Esta montura permite utilizar objetivos fotográficos EF comunes. 1 juego de anillos adaptadores El juego incluye anillos con los siguientes espesores: 0.50 mm... - Page 963 Instalación de la montura EF 4.6K 4.6K SDI OUT SDI OUT FILTER FILTER AUTO AUTO LENS LENS Coloque la cámara verticalmente sobre una Coloque con cuidado la montura EF en la superficie plana y limpia para garantizar la cámara, asegurándose de que el punto rojo instalación correcta de la montura.En caso de esté...
-
Page 964: Anillos Adaptadores Para El Modelo Ursa Mini Pro
Anillos adaptadores para el modelo URSA Mini Pro Al colocar las monturas PL o B4 en la cámara, es necesario agregar un anillo de 0.10 mm a los de 0.50 mm y 0.10 mm debajo de la montura EF original. El kit de instalación incluye estos anillos y otros adicionales de diferente espesor, en caso de que sea preciso instalar objetivos PL que requieran una distancia distinta para respetar las marcas del objetivo. -
Page 965: Instalación De Baterías
Instalación de baterías Para utilizar baterías tipo V-Mount o Gold Mount, es necesario colocar un soporte en la parte trasera de la cámara Instalación de baterías V-Lock o Gold Mount La cámara permite utilizar baterías con montura tipo V-Lock o Gold Mount. Para su instalación, es necesario colocar un soporte diseñado por Blackmagic u otros fabricantes en la parte trasera de la cámara. -
Page 966: Otros Soportes Para Baterías
Para instalar el soporte en el panel trasero de la cámara, siga los pasos descritos a continuación: Con un destornillador Phillips PH1, quite los cuatro tornillos ubicados en las esquinas para retirar la cubierta posterior y acceder al conector Molex 55959-1230. Enchufe dicho conector en el soporte para baterías. - Page 967 Batt Batt Batt Batt Monitor 1 Monitor0 +12V Out 11 EnableN Vista trasera del conector. Consulte la tabla de configuración de cables para obtener información sobre cada conexión. Tabla de configuración de cables Pines Señal Color Dirección Descripción 1, 2, 3, 4 Batt Hacia la cámara 12-20 V...
-
Page 968: Davinci Resolve
DaVinci Resolve La captura de imágenes con las cámaras URSA Mini es solo una parte del proceso para crear contenidos televisivos o cinematográficos. El respaldo y la organización del material grabado, la edición, el etalonaje y la codificación de los archivos finales son etapas que también cobran vital importancia. -
Page 969: Importar Clips
Importar clips Para comenzar a editar clips, primero es necesario agregarlos al Panel multimedia. Ejecute DaVinci Resolve. Si abre el programa por primera vez, aguarde a que aparezca el Organizador de proyectos y luego haga doble clic sobre el primer recuadro denominado Proyecto sin nombre. -
Page 970: Archivos Raw
Archivos RAW Cuando se importan archivos RAW por primera vez, DaVinci Resolve decodifica la información del sensor incluida en dichos archivos mediante el índice ISO, el balance de blancos y los ajustes de tinte utilizados por la cámara durante la grabación. Si el usuario está satisfecho con los parámetros, se puede comenzar con el proceso de etalonaje. -
Page 971: Editar Clips
Ajustes RAW del proyecto Si necesita modificar un ajuste común a todos los clips, por ejemplo, el balance de blancos o la sensibilidad ISO, es posible configurarlos para que utilicen los ajustes RAW del proyecto y realizar cambios a dichos parámetros. Para configurar los ajustes RAW del proyecto: Abra el menú... -
Page 972: Recortar Clips
En la línea de tiempo, coloque el cabezal de reproducción en la posición donde desea insertar el clip. Para insertar el clip, haga clic en el visor de medios originales, situado a la izquierda, y arrastre el puntero del ratón a la derecha hacia el visor de líneas de tiempo. Aparecerá una lista de opciones donde podrá... -
Page 973: Asignar Teclas De Acceso Rápido
El módulo Edición. El editor de líneas de tiempo permite recortar clips, cambiar su posición en la secuencia y agregar transiciones. Asignar teclas de acceso rápido Si está acostumbrado a utilizar teclas de acceso rápido en otros programas de edición, puede crear sus propias combinaciones en DaVinci Resolve para acelerar y optimizar los procesos de trabajo. -
Page 974: Agregar Transiciones
Agregar transiciones Una transición es un efecto utilizado para pasar de un clip a otro de forma más agradable evitando saltos en la imagen. Estos recursos incluyen fundidos, cortinillas y encadenados, entre otras opciones, y pueden darle un toque especial al material editado. También es posible agregar una transición al final de un clip, por ejemplo, para crear un fundido en negro con rapidez y facilidad. -
Page 975: Agregar Títulos
Agregar títulos Crear títulos es sumamente fácil y pueden agregarse a cualquier pista de video de la misma forma en que se añade un clip. Si no hay más pistas disponibles, haga clic con el botón derecho sobre el nombre de una pista existente y seleccione la opción Agregar pista para crear una nueva. Para crear un título, siga los pasos descritos a continuación: En la parte media del cuadro de herramientas en la biblioteca de efectos situada debajo del panel multimedia verá... -
Page 976: Etalonaje
Para agregar una nueva pista de audio o video, haga clic con el botón derecho junto a su nombre y seleccione Agregar pista. En el caso del audio, elija el tipo de pista deseado. Etalonaje Luego de editar la secuencia de clips, es necesario ajustar el color. En general, esta etapa se realiza luego de la edición a fin de mantener una apariencia consistente. - Page 977 Representaciones gráficas La mayoría de los coloristas toman decisiones creativas sobre el ajuste cromático con base en la carga emotiva y la apariencia que desean proyectar, y luego trabajan con las imágenes en un monitor a fin de lograr el resultado deseado. Observar objetos de uso cotidiano y analizar la interacción entre diferentes tipos de luz puede servir de inspiración para sacarle el mayor provecho al material.
-
Page 978: Correcciones Secundarias
Ajuste de luces Haga clic en el dial Gain y deslícelo hacia la izquierda o la derecha. De este modo, puede ajustar las zonas más claras de las imágenes, las cuales se muestran en la parte superior de la gráfica de crominancia. Si desea obtener una toma muy iluminada, las luces deben situarse justo por debajo de la línea superior de la gráfica correspondiente a la onda de la señal. -
Page 979: Ajuste De Colores Específicos
Ajuste de colores específicos Con frecuencia necesitará realzar un color particular dentro de un clip, como el césped al borde de una carretera o el color azul del cielo, o quizá requiera modificar la tonalidad de un objeto específico para captar la atención del público. La herramienta Colores específicos permite cumplir con este cometido en forma sencilla. -
Page 980: Seguimiento De Power Windows
Por ejemplo, es posible delimitar una ventana alrededor de una persona, a fin de realizar cambios en el color y el contraste exclusivos para este elemento, sin afectar las zonas adyacentes. Este tipo de ajustes pueden servir para captar la atención del público hacia áreas específicas. Para agregar una Power Window a un clip, siga los pasos descritos a continuación: Añada un nodo en serie. -
Page 981: Complementos
Para realizar el seguimiento de una Power Window vinculada a un objeto en movimiento, siga los pasos descritos a continuación: Cree un nodo en serie y agregue una Power Window. Vaya al comienzo del clip y ajuste la posición y el tamaño de la ventana para resaltar únicamente el objeto deseado o una zona particular de la imagen. -
Page 982: Masterización
Masterización Una vez finalizado el proceso de edición y etalonaje, es posible realizar una renderización de dichos ajustes mediante el módulo Entrega. Las opciones del mismo facilitan la selección de los clips que desea exportar, además del formato, el códec y la resolución. DaVinci Resolve brinda la posibilidad de emplear diversos formatos, tales como QuickTime, AVI, MXF y DPX, mediante códecs RGB/YUV sin compresión de 8 o 10 bits, ProRes, DNxHD y H.264, entre otras opciones. -
Page 983: Descripción General Sobre El Control De Cámaras
Descripción general sobre el control de cámaras El modelo URSA Mini puede manejarse desde un mezclador ATEM mediante el módulo de control del programa ATEM Software Control. Esto permite utilizar versiones con sensores que ofrecen una mayor calidad de imagen y un rango dinámico excepcional, y controlar las unidades al igual que cualquier cámara de estudio. -
Page 984: Control De Cámaras
REMOTE REMOTE All SDI and HDMI video con STEREO IN PUSH PUSH PUSH PUSH STEREO IN SD, HD and Ultra HD switchable unle CONTROL CONTROL CH 1 CH 2 CH 1 CH 1 CH 2 CH 2 USB 2.0 HDMI IN USB 2.0 HDMI IN SDI INPUTS... - Page 985 Círculo cromático El círculo cromático es una herramienta útil de DaVinci Resolve que permite ajustar el color en las luces, tonos intermedios y sombras de cada canal YRGB. Para seleccionar el parámetro que desea modificar, haga clic en una de las tres pestañas situadas en la parte superior del controlador. Control general El control general situado debajo del círculo cromático permite ajustar el contraste en todos los canales YRGB al mismo tiempo o la luminancia de las luces, tonos intermedios y sombras en forma...
-
Page 986: Control Del Zoom
Para oscurecer o incrementar el pedestal, arrastre el círculo hacia la izquierda o derecha. Al mantener presionada la tecla Command en Mac o Control en Windows mientras se mueve el círculo solo se modifica el pedestal. El control del diafragma/pedestal se enciende en rojo cuando la cámara está al aire. Control del zoom Este control brinda la posibilidad de acercar o alejar la imagen al utilizar objetivos compatibles con servomecanismos integrados. - Page 987 Botón de enfoque automático El botón de enfoque automático se encuentra en la esquina inferior izquierda del controlador. Presiónelo para ajustar el enfoque en forma automática si cuenta con un objetivo activo compatible con dicha función. Cabe destacar que, aunque la mayoría de los objetivos brindan la posibilidad de ajustar el enfoque electrónicamente, algunos igual disponen de un modo de ajuste manual, por lo cual es importante asegurarse de elegir el modo automático.
- Page 988 En el mezclador, este parámetro se indica en dB. La siguiente tabla ilustra la correspondencia entre ambas variables: Ganancia Sensibilidad ISO 1600 Nótese que la ganancia máxima para el modelo URSA Mini 4.6K es de 18 dB, mientras que en la versión URSA Mini 4K dicho valor es de 12 dB. Control de la velocidad de obturación Este control permite cambiar el ángulo del obturador en el modelo URSA Mini.
- Page 989 Ángulo del Ángulo del Ángulo del Ángulo del Ángulo del Ángulo del Velocidad obturador obturador obturador obturador obturador obturador obturación 23.98 f/s 24 f/s 25 f/s 29.97 f/s 50 f/s 59.94 f/s 1/50 172.7 172.8 215.8 360* 1/60 143.9 179.8 359.6 1/75 115.1...
-
Page 990: Herramientas De Davinci Resolve Para Correcciones Primarias
Herramientas de DaVinci Resolve para correcciones primarias La ventana del módulo de control de la cámara puede convertirse en una interfaz similar a la que contiene las herramientas para correcciones primarias en un programa de edición. Estas funciones de etalonaje están integradas en el modelo URSA Mini. Las herramientas son idénticas a las utilizadas en DaVinci Resolve, de modo que si el usuario está... - Page 991 ‚ Haga doble clic dentro del círculo: Se restablecen los valores originales sin reajustar el control general para dicho parámetro. ‚ Haga clic en el botón de reajuste situado en la esquina superior derecha: Se restablecen todos los ajustes. Círculos cromáticos para las luces, tonos intermedios y sombras en el panel de etalonaje Controles generales Los controles generales situados debajo de cada círculo cromático permiten ajustar las sombras, tonos intermedios y luces en cada canal YRGB.
- Page 992 Arrastre los controles hacia la izquierda o la derecha para ajustar el contraste, la saturación, el matiz y la mezcla de luminancia. Saturación Este control permite aumentar o disminuir la cantidad de color en la imagen. El valor predeterminado es 50 %. Matiz Este control permite modificar los matices de la imagen recorriendo el perímetro del círculo cromático.
-
Page 993: Programa Utilitario De La Cámara
Programa utilitario de la cámara Actualización del programa en Mac Luego de descargar el programa utilitario y descomprimir el archivo, haga clic en la imagen del disco para ver los contenidos. Ejecute el instalador y siga las instrucciones que aparecen en la pantalla. Una vez finalizada la instalación, seleccione la opción Aplicaciones y haga clic en la carpeta Blackmagic Cameras, que contiene este manual, el programa utilitario y otros archivos con información adicional. - Page 994 Actualización del software interno de la cámara CFAST CFAST Mediante el puerto USB 2.0 Mini-B es posible actualizar el sistema interno de las cámaras. Esta conexión se encuentra arriba de las ranuras para las tarjetas de memoria en los modelos URSA Mini. Luego de instalar la última versión del programa utilitario en el equipo informático, conéctelo a la cámara mediante un cable USB.
-
Page 995: Dinámicas De Trabajo En Posproducción
Dinámicas de trabajo en posproducción Acceso a archivos en tarjetas SD y CFast 2.0 Para editar el material audiovisual directamente desde la tarjeta CFast, retírela de la cámara y conéctela a un equipo informático mediante un dispositivo de lectura y/o escritura para este tipo de unidades. Para importar clips desde una tarjeta SD o CFast 2.0: Retire la tarjeta de la cámara. -
Page 996: Final Cut Pro X
Final Cut Pro X Para editar clips en formato Apple ProRes 422 (HQ) con Final Cut Pro X, es necesario crear un proyecto nuevo y seleccionar la frecuencia de imagen y el formato requeridos. A efectos ilustrativos, en este ejemplo emplearemos el formato ProRes 422 (HQ) 1080p25. Configuración del proyecto en Final Cut Pro X Ejecute el programa. -
Page 997: Premiere Pro Cc
Ejecute el programa para acceder a la ventana de selección de proyectos. Haga clic en el botón New Project. Ingrese un nombre para el proyecto en la ventana emergente. Seleccione la opción 1080i/59.94 en el menú Format. Seleccione la opción YCbCr 709 en el menú Color Space. Seleccione la opción 1920x1080 en el menú... -
Page 998: Smoke 2013
Smoke 2013 Para editar clips con Autodesk Smoke 2013, es necesario crear un proyecto nuevo y seleccionar los parámetros requeridos para formato, profundidad de bits, tipo de fotograma y frecuencia de imagen. A efectos ilustrativos, en este ejemplo emplearemos el formato ProRes 422 (HQ) 1080p25. Autodesk Smoke 2013 Al ejecutar el programa, se abrirá... -
Page 999: Montura Para Objetivos B4
Montura para objetivos B4 Es posible quitar la montura PL en el modelo Blackmagic URSA Mini PL y sustituirla por una B4. Esta es un tanto diferente a la versión para el modelo URSA Mini Pro 4.6K. Por ejemplo, los orificios para los tornillos se encuentran en otra posición, a fin de dejar espacio disponible para el botón EF. - Page 1000 Separe cuidadosamente la montura del Observe la alineación del anillo de 0.50 mm armazón de la cámara. Deje los tornillos en un instalado. El punto de referencia se encuentra lugar seguro cerca de la montura. en la posición horaria de las once en punto. Coloque los dos anillos incluidos con la Disponga la montura sobre el armazón de la montura B4 sobre anillo el original.
Need help?
Do you have a question about the Blackmagic URSA Mini and is the answer not in the manual?
Questions and answers