Table of Contents
Advertisement
Advertisement
Table of Contents

Related Manuals for Intellijel Plonk

Summary of Contents for Intellijel Plonk
- Page 1 Plonk Manual v 1.00 Plonk Physical Modeling Percussion Synthesizer...
- Page 2 Plonk Manual v 1.00 Table of Contents Table of Contents Overview Features Installation Before Your Start Installing Your Module Quick Start Front Panel Controls Inputs and Outputs Parameter Menus Pitch Parameters Octave Quantize Exciter Parameters Mallet / Noise Mix...
- Page 3 Plonk Manual v 1.00 Noise Envelope Type Object Parameters Resonator Type Resonator Decay Resonator Low Cut Resonator Position Resonator Tone Resonator Inharmonicity Resonator Pitch Envelope Amount Resonator Pitch Envelope Time Polyphony VAR X and Y Destinations MOD Destinations Choke Resonator / Noise / Both...
- Page 4 Plonk Manual v 1.00 Calibration Technical Specifications Page 3...
- Page 5 Plonk does this by breaking sound creation into two distinct elements — the e xciter and the resonator . The exciter is a mathematical model of the device used to strike a particular surface.
- Page 6 (unless you want it to, of course)! Plonk stores up to 128 patches in its internal memory, and ships with many presets programmed by professional sound designers and composers. You may overwrite these patches if you wish, and banks of patches may be transferred via MIDI System Exclusive over Plonk’s built-in mini-USB port to facilitate offline storage by programs or websites that support...
-
Page 7: Installation
Plonk Manual v 1.00 Installation Intellijel Eurorack modules are designed to be used with a Eurorack-compatible case and power supply. Before Your Start Before installing a new module in your case you must ensure your case’s power supply has sufficient available capacity to power the module: ●... - Page 8 The other end of the cable, with a 16-pin connector, connects to the power bus board of your Eurorack case. Ensure the red stripe on the cable lines up with the -12V pins on the bus board. On Intellijel power supplies the pins are labelled with the label “-12V” and a thick white stripe: Page 7...
- Page 9 Plonk Manual v 1.00 If you are using another manufacturer’s power supply, check their documentation for instructions. Once connected, the cabling between the module and power supply should resemble the picture below: Before reconnecting power and turning on your modular system, double check that the ribbon cable is fully seated on both ends and that all the pins are correctly aligned.
-
Page 10: Quick Start
1.00 Quick Start Make some noise: 1. When you start up your Eurorack system with Plonk the very first time it will load the default patch. 2. Connect the jack labelled O UT to your system’s audio output. -
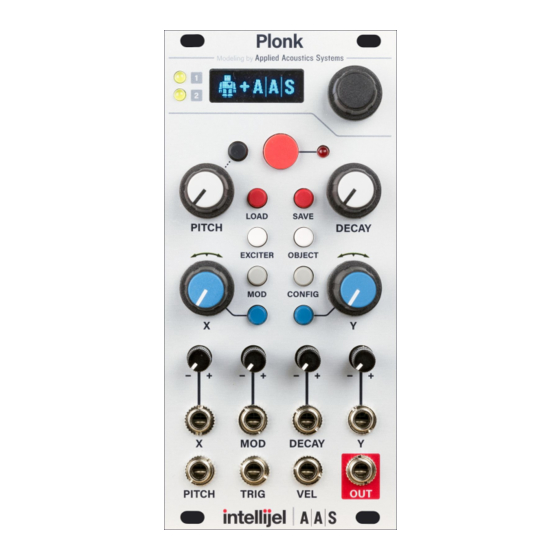
Page 11: Front Panel
Plonk Manual v 1.00 Front Panel Page 10... - Page 12 Plonk Manual v 1.00 Controls 1. DISPLAY - Used to display the parameters and settings menus. To conserve screen lifetime there is a screensaver which activates after 15 minutes and blanks the screen. Pushing any button or turning the encoder will turn the screen back on and reset the timer.
-
Page 13: Inputs And Outputs
Plonk Manual v 1.00 14. CONFIG Button - Accesses the C ONFIG menu. 15. X Button - Accesses the V AR X assignment screen. This is described in more detail in the V AR X and Y Destinations... -
Page 14: Parameter Menus
P ITCH knob to step through notes of the chromatic scale. Exciter Parameters Plonk sounds can use two exciters: a mallet and noise. The mallet is a momentary impulse while the noise is white noise that can be shaped by a lowpass filter, highpass filter, and amplitude envelope. - Page 15 Plonk Manual v 1.00 (resonator) is being used, notice that the resulting sounds are dramatically different. That’s the sonic characteristic controlled by the Mallet Stiffness parameter. Noise Density Controls the rate at which the random noise is generated. At lower values, individual clicks can be heard, which can sound like particles hitting the surface of the resonator.
-
Page 16: Object Parameters
Object Parameters The resonator parameters menu is accessed by pushing the O BJECT button. In Plonk, sounds are produced by feeding the output of the Exciter into an acoustic object model called a resonator. Mathematically, a complex sound can be decomposed into elementary components called partials ... - Page 17 Plonk Manual v 1.00 Resonator Decay Sets the resonator decay time. This affects all partials equally. Resonator Low Cut Attenuates the lower partials when clearer or brighter sounds are desired. Set to 0 to hear the full spectrum of the resonator.
- Page 18 Plonk Manual v 1.00 Polyphony Sets the polyphony of the resonator, either 1 or 2. If polyphony is set to 1 and a trigger is received while a sound is decaying, the first sound will be choked before the new one begins.
- Page 19 A : B where A and B are numbers that indicate the first and last preset controlled by the selection. Now whenever Plonk receives a trigger it will read the voltage on the M OD input and switch to a new preset before making a sound.
-
Page 20: Config Settings
1.00 Morph With Mod Destination set to “Morph,” Plonk uses the M OD input CV to morph between the Exciter and Object settings of the current preset and a destination preset you select with the encoder knob. Specifically: 1. -
Page 21: Loading And Saving Presets
Because of the large number of parameters involved in physical modelling, Plonk has an onboard flash memory that allows storage of up to 128 preset settings. The preset storage functions are accessed via the S AVE and L OAD buttons. When Plonk first starts it will load the last used preset. - Page 22 Plonk Manual v 1.00 So when auditioning Plonk presets, remember to tweak all the knobs while you listen — real instruments are dynamic in nature, and Plonks presets are designed to reflect that dynamism — loading not just a static snapshot of a sound, but a range of sonic nuances that can be achieved (through modulation) by a single preset.
- Page 23 Uploading Presets from a Computer To upload presets to the Plonk from a .syx file simply play back the file to the Plonk’s USB-MIDI interface from a computer using the SysEx transfer program of your choice. Ensure you are not triggering the Plonk while uploading presets as the module may be too busy processing DSP to accept all the SysEx messages, causing some presets to not be uploaded correctly.
-
Page 24: Technical Specifications
Plonk Manual v 1.00 It is also recommended you leave a pause between messages of 500ms to give Plonk time to save a preset before transmitting the next one. This delay should be configurable in the preferences of your SysEx transfer program. -
Page 25: Firmware Changelog
Plonk Manual v 1.00 Firmware Changelog 1.0 (July 20, 2017) ● Initial release Page 24...
Need help?
Do you have a question about the Plonk and is the answer not in the manual?
Questions and answers