Table of Contents
Advertisement
Quick Links
SonoFlat Systems
Installation Guidelines
Congratulations on purchasing a SonoFlat™ SFS-112™ System from Auralex
You're now on your way to creating a world class listening environment.
SonoFlat Systems offer a sophisticated look by utilizing a specialized flat-faced cut of
Auralex's industry-leading Studiofoam. The SFS-112 system contains both SonoFlat Panels
and SonoColumns, which when used together, provide incredibly effective broadband
absorption in any room. Use the SFS-112 alone for treatment of small to medium-sized
rooms or in combination with other Auralex products for full control of larger spaces.
Thank you for Purchasing
Auralex
Total Sound Control
®
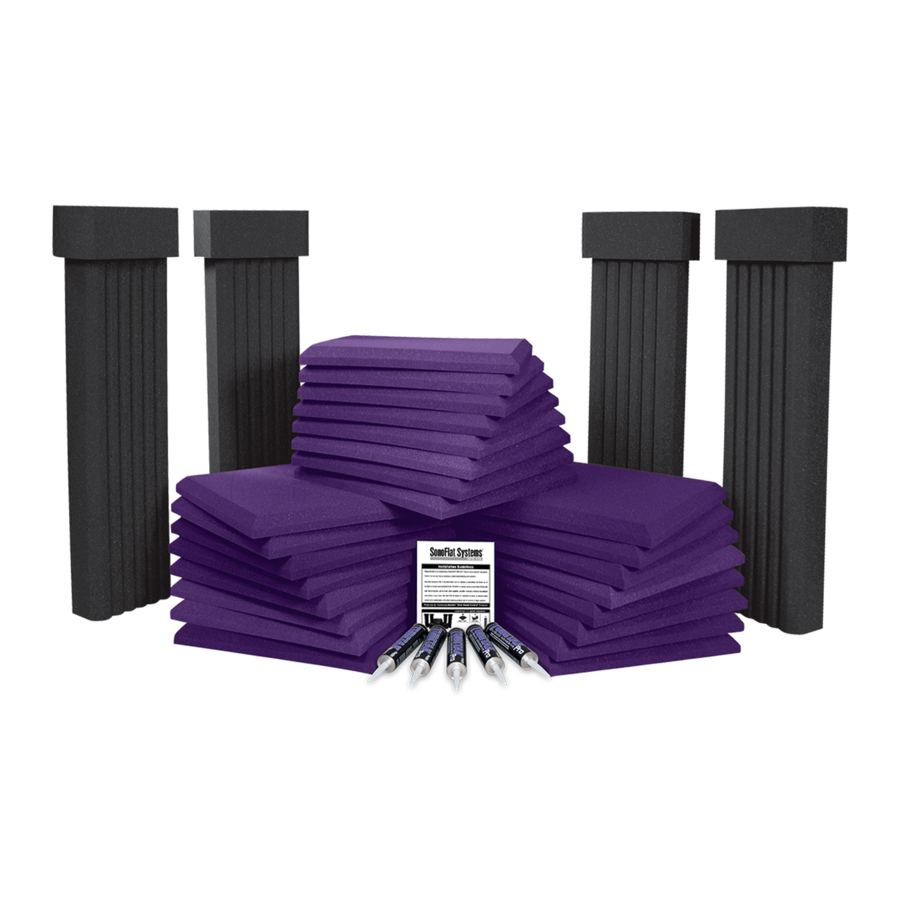
SonoFlat SFS-112 System Components
24
SonoFlat Panels™
™
SFS-112
Acoustics.
®
®
Products!
4
SonoCollars™
5
Tubetak Pro™
843-606 | Rev. 1 | 062606 EF
4
SonoColumns™
Advertisement
Table of Contents

Related Manuals for Auralex Acoustics SonoFlat System SFS-112


Summary of Contents for Auralex Acoustics SonoFlat System SFS-112
- Page 1 SonoFlat Systems Installation Guidelines Congratulations on purchasing a SonoFlat™ SFS-112™ System from Auralex You’re now on your way to creating a world class listening environment. SonoFlat Systems offer a sophisticated look by utilizing a specialized flat-faced cut of Auralex’s industry-leading Studiofoam. The SFS-112 system contains both SonoFlat Panels and SonoColumns, which when used together, provide incredibly effective broadband absorption in any room.
- Page 2 SonoFlat SFS-112 General Information Recommended Additional Installation Materials • Caulk-gun (for Tubetak Pro) • Carpenters Level • Pencil Optional Additional Installation Materials • Foamtak Spray Adhesive* * This system includes Tubetak Pro Adhesive, which is safe to use on all included products. You may wish to use Auralex’s Foamtak Spray Adhesive for quicker drying times.
- Page 3 SonoColumn Installation Guide Continued ➌ Carefully press SonoColumn to the marked location of the wall or ceiling. Maintain continuous pressure. Depending on environmental and surface conditions, it will take anywhere from 2-4 minutes to hold. For a stronger hold, with the adhesive applied, press SonoColumn firmly into place, immediately remove it and press it firmly again into the same spot.
- Page 4 SonoFlat Installations SonoFlat System Installations See the Auralex Acoustics website, www.auralex.com, for more information ® about these and other Total Sound Control products. ® These are general recommendations. Should you have any additional questions about the installation of your SonoFlat™ System, feel free to contact an Auralex Application Specialist...
Need help?
Do you have a question about the SonoFlat System SFS-112 and is the answer not in the manual?
Questions and answers