
Related Manuals for Smeg ECF01


Summary of Contents for Smeg ECF01
-
Page 1: Instruction Manual
INSTRUCTION MANUAL ESPRESSO MACHINE MANUEL D’UTILISATION MACHINE À CAFÉ MANUAL DE USO MÁQUINA DE CAFÉ... - Page 2 A Smeg appliance always goes perfectly with the other products of the line and at the same time can be an object of design in the kitchen. We hope you fully enjoy all the features of your appliance.
-
Page 3: Table Of Contents
Contents 1 Instructions 1.1 Introduction 1.2 This user’s manual 1.3 Intended use 1.4 Manufacturer's liability 1.5 Identification plate 1.6 Disposal 2 Description 2.1 Product Description 3 Use 3.1 Before first use 3.2 First use 3.3 How to make espresso 3.4 How to make cappuccino 3.5 How to heat water 3.6 Accessing the programming menus and changing the settings 3.7 How to cool down the boiler... - Page 4 Important Safeguards RECOGNIZE SAFETY INFORMATION This is a safety alert symbol. This symbol alerts you to potential hazards that can result in severe personal injury or death. UNDERSTAND SIGNAL WORDS A signal word - DANGER, WARNING or CAUTION - is used with the safety alert symbol.
- Page 5 Important Safeguards WARNING To reduce the risk of fire, electrical shock, personal injury, or damage when using the appliance, follow basic safety precautions, including the following: Follow all safety precautions to ensure safe • Do not use the appliance if the power use of the appliance.
-
Page 6: Save These Instructions
Important Safeguards For this appliance • Do not use abrasive cleaners or sharp • Always unplug the espresso machine if objects to clean the espresso machine. left unattended, before assembly and disassembly of components and before • A short power cord is provided to cleaning. -
Page 7: Instructions
Important Safeguards 1 Instructions 1.2 This user’s manual This user's manual is an integral part of the 1.1 Introduction appliance and must be kept intact and available to the user throughout its life cycle. Key information for the user: 1.3 Intended use Warnings •... -
Page 8: Manufacturer's Liability
Important Safeguards 1.4 Manufacturer's liability 1.6 Disposal The manufacturer accepts no liability for Power voltage damage to persons and property caused Risk of electric shock • using the appliance in ways other than • Unplug the appliance. those provided; • Unplug the cord from the wall outlet. •... -
Page 9: Description
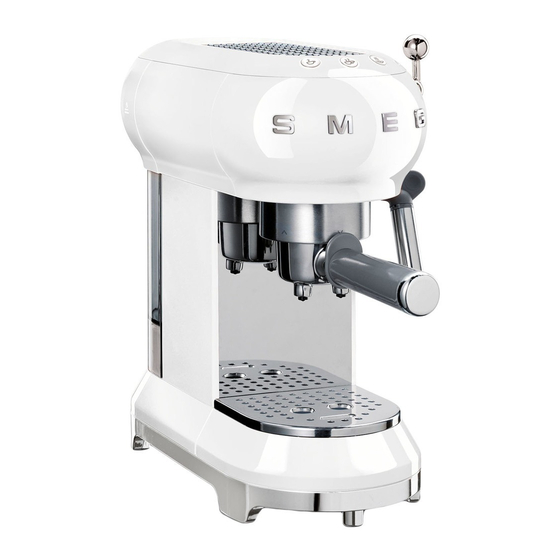
Description 2 Description 2.1 Product Description Model ECF01 - Espresso Machine 1 Cup warmer tray 11 Water tank (1 liter) 2 Grouphead 12 Measuring scoop/tamper 3 Filter holder 13 Pod filter basket 4 Steel cup tray 14 1-cup ground coffee filter basket... -
Page 10: Use
3 Use 4. Fill the tank (2) with fresh, clean water directly from the faucet or by using a 3.1 Before first use pitcher, being careful not to exceed the maximum level indicated on the tank. 1. Remove any labels and stickers from the espresso machine. -
Page 11: First Use
3.2 First use 3. Place a container under the hot water/ steam wand (4). 1. Turn on the espresso machine using the ON/OFF switch (1): the lights of the 4. Turn the steam valve (5) to the three buttons (2), (3) and (4) will flash in position and dispense 1/2 cup of water. -
Page 12: How To Make Espresso
Then proceed with rinsing the “steam” 3.3 How to make espresso circuit: Ground coffee: 9. Place a container under the hot water 1. Place the ground coffee filter basket (1) in the filter holder (2), choosing the one- spout and turn the steam valve to the or the two-cup basket position. - Page 13 3. Wipe off any excess ground coffee 4. Place the cup or cups under the filter from the edge of the filter holder. holder spouts and press the coffee Attach the filter holder by aligning the button handle with and turning it to the right to the position.
-
Page 14: How To Make Cappuccino
Coffee pods: 4. When the light stops flashing, place 1. Insert the coffee pod filter basket an empty container under the the filter holder. cappuccino frother (1) and turn the 2. Insert the pod in the filter holder trying to steam valve (2) to the position to center it as much as possible. -
Page 15: How To Heat Water
6. Once the volume of the milk has 3.5 How to heat water doubled, dip the cappuccino frother 1. Turn the machine on using the ON/OFF deep into the milk and heat to 140°F switch. (60°C). Stop the frothing process by 2. - Page 16 Setting the coffee temperature 4. Release the button as soon as you reach the desired amount of coffee. 1. Access the programming menu. 5. The light will flash to indicate that the 2. Press the button to select the selected quantity has been saved. temperature of the coffee.
- Page 17 Setting the auto shut-off time Restoring the factory settings For energy saving reasons, the espresso To restore factory settings: machine is equipped with an auto shut-off 1. Access the programming menu. feature that activates when the machine has 2. Turn the steam valve to the position.
-
Page 18: How To Cool Down The Boiler
3.7 How to cool down the boiler The boiler must be cooled down if you want to make coffee immediately after frothing milk for cappuccino. If the boiler is not cooled down, the coffee will be burned. 1. Place a container under the cappuccino frother and open the steam valve to dispense hot water. -
Page 19: Cleaning And Maintenance
Cleaning and maintenance 4 Cleaning and maintenance 4.3 Cleaning the parts of the espresso machine 4.1 Warnings Cleaning the drip tray Misuse The drip tray is fitted with a red floater (1) Risk of electric shock that protrudes from the cup tray as soon as the maximum level of liquid is exceeded. - Page 20 Cleaning and maintenance Cleaning the cappuccino frother 5. Wash the cappuccino frother and the nozzle with warm water. Clean the cappuccino frother immediately after use. 6. Check that the hole (4) is not obstructed. 1. Turn the steam valve to release a little steam and to clean out the milk remaining inside it.
-
Page 21: Descaling
• Use a descaling solution recommended been interrupted. by Smeg to avoid damage to the 10. Remove the water tank, empty it and espresso machine. rinse it. 11. Fill the tank up to the maximum level Descaling and rinsing the grouphead and put it back in place. -
Page 22: What To Do If
Cleaning and maintenance 4.5 What to do if... Problem Possible cause Solution No water in the tank. Fill the tank. Clean the filter basket by The filter holes are blocked. using a brush or a pin. The coffee does not come The tank is not inserted correctly. - Page 23 Cleaning and maintenance Problem Possible cause Solution The filter holder does not Use the measuring scoop latch into the espresso The filter basket is too full. provided and use the machine correct filter basket. The espresso machine Unplug the espresso does not work and all the Possible fault.
- Page 24 Cleaning and maintenance Problem Possible cause Solution The ground coffee has been Tamp the coffee less. tamped too hard. There is too much ground coffee. Decrease the amount. The espresso’s crema is The grouphead or the filter basket Clean the outlet and the dark and comes out too is clogged.
- Page 25 Cleaning and maintenance Problem Possible cause Solution No water in the tank. Fill the tank. The grouphead or the filter basket Clean the grouphead and is clogged. the filter. The tank is not inserted correctly. Insert the tank correctly. If the problem has not been resolved or there are other types of faults, contact your local authorized service center.
- Page 26 The manufacturer reserves the right to make any changes deemed useful for improvement of its products without prior notice. The illustrations and descriptions contained in this manual are therefore not binding and are merely indicative. Le fabricant se réserve la faculté d’apporter, sans préavis, toutes les modifications qu’il jugera utiles pour l’amélioration de ses produits.
- Page 27 9 1 4 7 7 7 3 6 7 / C...
Need help?
Do you have a question about the ECF01 and is the answer not in the manual?
Questions and answers