
Related Manuals for OneTouch VERIOPRO +


Summary of Contents for OneTouch VERIOPRO +
- Page 1 Yellow = 5mm margin, Red = 7mm margin Blood glucose monitoring system Meter Operator’s Guide Yellow = 5mm margin, Red = 7mm margin AW05948101B_OT_VerioPro+_OB_Insides_R1.indd 1 4/3/12 3:07 PM...
- Page 2 Thank you for choosing OneTouch®. The OneTouch® Verio™Pro+ Blood Glucose Monitoring System is one of the latest product innovations from LifeScan®. Every OneTouch® meter is designed to make it easy to test your patient’s blood glucose and help you manage their diabetes.
- Page 3 Yellow = 5mm margin, Red = 7mm margin Symbols Cautions and Warnings. Refer to the Meter Operator’s Guide and inserts that came with the system for safety-related information. Direct current Consult instructions for use Battery low Number [Insert additional local symbols as required] Yellow = 5mm margin, Red = 7mm margin AW05948101B_OT_VerioPro+_OB_Insides_R1.indd 3 4/3/12 3:07 PM...
-
Page 4: Table Of Contents
Yellow = 5mm margin, Red = 7mm margin Table of Contents Getting to know the system Setting up the meter Performing a control solution test Performing a blood glucose test Reviewing past results Performing a linearity test Care and maintenance Yellow = 5mm margin, Red = 7mm margin AW05948101B_OT_VerioPro+_OB_Insides_R1.indd 4 4/3/12 3:07 PM... - Page 5 Yellow = 5mm margin, Red = 7mm margin Batteries Troubleshooting Detailed information about the system Index Yellow = 5mm margin, Red = 7mm margin AW05948101B_OT_VerioPro+_OB_Insides_R1.indd 5 4/3/12 3:07 PM...
-
Page 6: Before You Begin
Before you begin Before using this product to test a patient’s blood glucose, carefully read this Meter Operator’s Guide, and the inserts that come with the OneTouch® Verio™ Test Strips and OneTouch® Verio™ Control Solutions and OneTouch Verio™Pro+ Linearity Solutions. -
Page 7: Test Principle
Yellow = 5mm margin, Red = 7mm margin Test principle Glucose in the whole blood sample mixes with chemicals in the test strip and a small electric current is produced. The strength of this current changes with the amount of glucose in the whole blood sample. The meter measures the current, calculates the patient’s blood glucose level, displays the blood glucose result, and stores it in its memory. -
Page 8: Batteries
Yellow = 5mm margin, Red = 7mm margin The OneTouch® Verio™Pro+ Blood Glucose Monitoring System The OneTouch® Verio™Pro+ System Kit OneTouch® Verio™Pro+ Meter (batteries included) Meter Storage Case Yellow = 5mm margin, Red = 7mm margin AW05948101B_OT_VerioPro+_OB_Insides_R1.indd 8 4/3/12 3:07 PM... - Page 9 OneTouch® Verio™ High Control Solution (Red cap) OneTouch® Verio™ Test Strips The OneTouch® Verio™ Control Solutions and Test Strips are available separately. Follow your institution’s procedure for obtaining additional test strips and control solutions. Use only OneTouch® Verio™ Control Solutions and Test Strips with the OneTouch® Verio™Pro+ Meter.
- Page 10 OneTouch® Verio™Pro+ Linearity Solution Level 4 (Red cap) OneTouch® Verio™Pro+ Linearity Solution Level 5 (Purple cap) The OneTouch® Verio™Pro+ Linearity Solutions are available separately. Follow your institution’s procedure for obtaining additional linearity solutions. Use only OneTouch® Verio™Pro+ Linearity Solutions with the OneTouch® Verio™Pro+ Meter.
-
Page 11: Yellow = 5Mm Margin, Red = 7Mm Margin
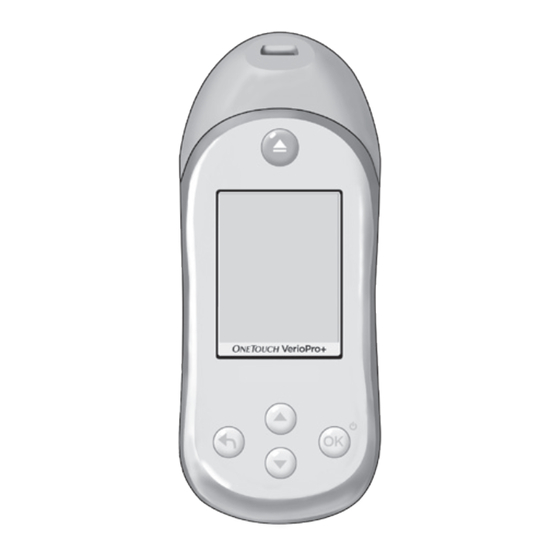
Yellow = 5mm margin, Red = 7mm margin Getting to know the system Getting to know the OneTouch® Verio™Pro+ Blood Glucose Monitoring System Meter Test strip port Insert test strip here to turn meter on Low battery icon Indicates time to change batteries... -
Page 12: Test Strip
Yellow = 5mm margin, Red = 7mm margin Getting to know the system Test strip Front Back Channel to apply sample Silver prongs Silver prongs should face you when you insert test strip into test strip port Yellow = 5mm margin, Red = 7mm margin AW05948101B_OT_VerioPro+_OB_Insides_R1.indd 12 4/3/12 3:07 PM... - Page 13 Yellow = 5mm margin, Red = 7mm margin Getting to know the system Turning the meter on Press and hold until the start-up screen appears. Once the start-up screen is displayed, release VerioPro If the meter does not turn on, check the meter batteries. See pages 80-82. NOTE: When turning the meter on for the first time, it will automatically start at the Set Language screen to set the language, time and date (see pages 16-18).
- Page 14 Yellow = 5mm margin, Red = 7mm margin Getting to know the system A bar highlights the current selection on the Main Menu. 30 Apr 08:00 Example History (mmol/L) Main Menu with Settings History highlighted Last Result: 19:00 NOTE: • When History is highlighted, the result from the most 01 Apr 12:45 recent blood glucose test appears at the bottom of the...
-
Page 15: Turning The Meter Off
Yellow = 5mm margin, Red = 7mm margin Getting to know the system Using the display backlight The backlight comes on automatically whenever the meter is turned on. After a few seconds of no activity, the backlight will dim. Pressing any button will turn the backlight back on without affecting the current screen. - Page 16 Yellow = 5mm margin, Red = 7mm margin Setting up the meter Setting the meter language, time and date When turning on the meter for the first time, it will automatically start at the Set Language screen. NOTE: You will not be able to perform a test when in the Settings mode. 1.
-
Page 17: Setting Up The Meter
Yellow = 5mm margin, Red = 7mm margin Setting up the meter NOTE: The time and date formats are pre-set. These settings cannot be changed. Set Time 2. Set the time of day In the Set Time screen, press to set the hour and press . - Page 18 Yellow = 5mm margin, Red = 7mm margin Setting up the meter 4. Confirm the meter settings Settings If the settings are correct, press with Done highlighted. The settings will be Time: 12:45 saved. Date: 01 Apr 2011 Language: If a setting is not correct, press to highlight the incorrect setting and English press...
- Page 19 Yellow = 5mm margin, Red = 7mm margin Setting up the meter Adjusting settings after setting up the meter for the first time 01 Apr 12:45 Adjust the settings in the meter as needed. History (mmol/L) Highlight Settings on the Main Menu screen and press Settings Serial #: BCXFF2HK...
- Page 20 Yellow = 5mm margin, Red = 7mm margin Setting up the meter Viewing information about the meter Settings The meter serial number, software version, unit of measure and date of last data Time: 10:05 transfer are stored in the meter and can be viewed at any time. Date: Highlight Meter Care on the Settings screen and press 10 Dec 2011...
- Page 21 Yellow = 5mm margin, Red = 7mm margin Setting up the meter The information is displayed. Press and hold to return to the Main Menu. Meter Info Serial #: BCXFF2HK So ware: XX.YY.ZZ.AA Units: mmol/L Meter Care Last PC Transfer: 03 Mar 2011 Yellow = 5mm margin, Red = 7mm margin AW05948101B_OT_VerioPro+_OB_Insides_R1.indd 21...
- Page 22 Performing a control solution test Checking the meter with control solution OneTouch® Verio™ Control Solution is used to check that the meter and test strips are working together properly and the test is performed correctly. Control solution is available separately. Follow your institution’s procedure for obtaining control solution.
-
Page 23: Performing A Control Solution Test
Yellow = 5mm margin, Red = 7mm margin Performing a control solution test • When opening a new vial of control solution, record the discard date (date opened plus 6 months) on the vial label. • When opening a new vial of test strips, record the discard date (date opened plus 6 months) on the label. - Page 24 Yellow = 5mm margin, Red = 7mm margin Performing a control solution test • Do Not return the used test strip to the vial after performing a test. • Do Not use a test strip with bent or broken silver prongs. •...
-
Page 25: Do A Control Solution Test
Yellow = 5mm margin, Red = 7mm margin Performing a control solution test Do a control solution test • Whenever opening a new vial of test strips. • Whenever using a new batch or lot of test strips. • If you suspect that the meter or test strips are not working properly. •... - Page 26 Insert a test strip into the test strip port with the gold side of the test strip and the two silver prongs facing you. Unlike some blood glucose meters, no separate step to code the OneTouch® Verio™Pro+ Meter is required. Test strip port NOTE: Do Not press or the eject button during a test.
- Page 27 Yellow = 5mm margin, Red = 7mm margin Performing a control solution test 2. Prepare the control solution Remove the vial cap and place it on a flat surface with the top of the cap pointing up. Squeeze the vial to discard the first drop. Example Wipe both the tip of the control solution vial and the top of the cap with a clean, damp tissue or cloth.
- Page 28 Yellow = 5mm margin, Red = 7mm margin Performing a control solution test Squeeze a drop into the small well on the top of the cap or onto another clean, non-absorbent surface. 3. Apply the control solution Hold the meter so that the side edge of the test strip is at a slight angle to the drop of control solution.
- Page 29 Yellow = 5mm margin, Red = 7mm margin Performing a control solution test • Do Not apply more control solution to the test strip after you have moved the test strip away. • Do Not remove the test strip until the result is displayed or the meter will turn off. 4.
- Page 30 Yellow = 5mm margin, Red = 7mm margin Performing a control solution test If the Level selected does not match the result of the control solution test, you will be prompted to change the Level. If this screen appears, this means: Please verify.
- Page 31 Yellow = 5mm margin, Red = 7mm margin Performing a control solution test 5. Read the Result 30 Apr 19 : 00 Once a control solution level has been selected, the meter will display the control solution result along with the date, time, unit of measure and the level of control solution selected.
- Page 32 Yellow = 5mm margin, Red = 7mm margin Performing a control solution test Viewing control solution test results 01 Apr 12:45 1. From the Main Menu, press to select Settings and press History (mmol/L) Settings Serial #: BCXFF2HK 2. Next, press to choose Meter Care and press Settings Time:...
- Page 33 Yellow = 5mm margin, Red = 7mm margin Performing a control solution test 3. Select Control Results and press Meter Care Control Reminder Control Results Linearity Test Linearity Results Meter Info The meter can display up to 5 control solution test results at a time, starting with Control Results the most recent.
- Page 34 Yellow = 5mm margin, Red = 7mm margin Performing a control solution test NOTE: If the control solution result is shown without a level beside the , a level Control Results was not selected for this result. When completing a control solution test, if the mmol/L Mon, 29 Apr meter times out or the meter is turned off before a level is selected, the result will...
- Page 35 Yellow = 5mm margin, Red = 7mm margin Performing a control solution test Receiving reminders to perform a control solution test Settings The meter can be set to send a reminder when it is time to perform a control Time: solution test.
- Page 36 Yellow = 5mm margin, Red = 7mm margin Performing a control solution test 3. Press with Reminder highlighted Control Reminder Reminder: Off Reminder Settings No. of Days: Time: --:-- 4. Press to select On or Off and press Reminder Of f Turn On to set and receive Control Solution...
- Page 37 Yellow = 5mm margin, Red = 7mm margin Performing a control solution test Set the number of days in between each control solution Control Reminder test, and the time of day the reminder will appear Reminder: NOTE: To set the number of days and time of day, the Control Reminder feature Reminder Settings must be turned on.
- Page 38 Yellow = 5mm margin, Red = 7mm margin Performing a control solution test 3. Next, highlight Time on the Control Reminder screen and Control Reminder press Reminder: Reminder Settings No. of Days: Time: 09:00 4. Press to set the hour and press Reminder Time When finished, press to return to the Control Reminder screen.
- Page 39 Yellow = 5mm margin, Red = 7mm margin Performing a control solution test Receiving reminders Reminder Whenever turning the meter on and it is time for a control solution test to be Perform a control solution performed, this Reminder screen will appear, within an 8-hour window of the test soon.
-
Page 40: Performing A Blood Glucose Test
• Unlike some blood glucose meters, no separate step to code the OneTouch® Verio™Pro+ Meter is required. • Make sure the meter and test strips are at about the same temperature before testing. The OneTouch® Verio™Pro+ Blood Glucose Monitoring System cannot be used outside the operating temperature range (6°C-44°C). - Page 41 Yellow = 5mm margin, Red = 7mm margin Performing a blood glucose test • Do Not test if there is condensation (water build-up) on the meter. Move the meter and test strips to a cool, dry spot and wait for the meter surface to dry before testing. •...
- Page 42 Yellow = 5mm margin, Red = 7mm margin Performing a blood glucose test • Use clean, dry hands to remove a test strip from the vial. The test strip may be touched anywhere on its surface. Do Not bend, cut or modify the test strip in any way. •...
- Page 43 Yellow = 5mm margin, Red = 7mm margin Performing a blood glucose test Personal Protective Equipment Health care professionals should follow their institution’s policy and procedure guidelines for hand hygiene. In addition, follow the Centers for Disease Control recommendations regarding hand hygiene and the use of disposable gloves when performing glucose testing on patients.
-
Page 44: Test Strips
Performing a blood glucose test Test Strips OneTouch® Verio™ Test Strips are intended for single use only. They should be disposed of in an appropriate biohazard container immediately after use. Test strips must be handled with dry hands. Handling test strips with wet hands may result in an Error 2 message. - Page 45 Yellow = 5mm margin, Red = 7mm margin Performing a blood glucose test When testing multiple patients, follow these guidelines for disease control: • Never reuse lancets. Restrict use of fingerstick capillary whole blood sampling devices to individual patients. Use only single-use lancets that permanently retract upon puncture. •...
- Page 46 CAUTION • The OneTouch® Verio™Pro+ Blood Glucose Monitoring System should not be used for patients within 24 hours of receiving a D-xylose absorption test, as it may cause inaccurately high results. • Do Not use test strips if the vial is damaged or left open to air. This could lead to error messages or inaccurate results.
- Page 47 Yellow = 5mm margin, Red = 7mm margin Performing a blood glucose test m CAUTION (continued) • If unable to test due to a problem with the testing supplies (see page 40), contact Customer Service and/or LifeScan® sales representative. Failure to test could delay patient treatment decisions and lead to a serious medical condition.
- Page 48 Insert a test strip into the test strip port with the gold side of the test strip and the two silver prongs facing you. Unlike some blood glucose meters, no separate step to code the OneTouch® Verio™Pro+ Meter is required. Test strip port NOTE: Do Not press or the eject button during a test.
- Page 49 Yellow = 5mm margin, Red = 7mm margin Performing a blood glucose test Getting a whole blood sample from the fingertip Follow your institution’s policy and procedure guidelines for whole blood collection and blood glucose monitoring. Prior to testing, the puncture site should be cleaned with warm, soapy water, rinsed and dried.
- Page 50 Yellow = 5mm margin, Red = 7mm margin Performing a blood glucose test Getting a venous or arterial blood sample Follow your institution’s policy and procedure guidelines for venous or arterial whole blood collection. Use only fresh whole blood when performing a blood glucose test using an arterial or venous blood sample.
- Page 51 Yellow = 5mm margin, Red = 7mm margin Performing a blood glucose test NOTE: When applying a whole blood sample from the finger, syringe or pipette, keep the meter pointed down to prevent blood from entering the test strip port. Fingerstick Holding the meter at a slight angle, guide the channel to the blood drop.
- Page 52 Yellow = 5mm margin, Red = 7mm margin Performing a blood glucose test Syringe Gently apply pressure to the plunger to expel a drop of blood. Touch the blood drop to the opening of the channel. Alternatively, dispense the blood from the syringe into a test tube, then apply blood to the test strip using a narrow bore pipette.
- Page 53 Yellow = 5mm margin, Red = 7mm margin Performing a blood glucose test 2. Wait for the channel to fill completely The blood drop will be drawn into the narrow channel. The channel should fill completely. The channel turns red and the meter will count down from 5 to 1. Blood should not be applied on the top of the test strip or to the top edge of the test strip.
- Page 54 Yellow = 5mm margin, Red = 7mm margin Performing a blood glucose test 3. Read the result on the meter The blood glucose result appears on the display, along with the unit of measure, and the date and time of the test. After a few seconds, View Previous will appear on the display.
- Page 55 Yellow = 5mm margin, Red = 7mm margin Performing a blood glucose test Interpreting unexpected test results Refer to the following cautions whenever blood glucose results are higher or lower than what you expect. m CAUTION Low blood glucose results This may require immediate treatment.
- Page 56 Yellow = 5mm margin, Red = 7mm margin Performing a blood glucose test m CAUTION (continued) High blood glucose results 30 Apr Re-test the blood glucose. If the result is EXTREME HIGH GLUCOSE again, this 19 : 00 indicates a severe problem with the patient’s blood glucose control. Follow your EXTREME institution’s policy regarding treatment of hyperglycemia.
- Page 57 Yellow = 5mm margin, Red = 7mm margin Performing a blood glucose test After getting a blood glucose result 30 Apr 19 : 00 Once you have a blood glucose result, you may: • Press to view the previous result, then press to hide the previous result.
-
Page 58: Reviewing Past Results
Yellow = 5mm margin, Red = 7mm margin Reviewing past results The meter stores the most recent 980 patient blood glucose test results and displays them in several ways. If you have just completed a test, press to get to the Main Menu from the blood glucose result screen. If the meter is off, press and hold until the start-up screen appears. - Page 59 Yellow = 5mm margin, Red = 7mm margin Reviewing past results • When there are no results stored in History, (e.g., when no tests have been History performed or the results have been deleted after downloading, see pages 60-61) mmol/L No results No results is displayed.
-
Page 60: Downloading Results To A Computer
Downloading results to a computer OneTouch® Diabetes Management Software (DMS) can be used to download and store all of the meter records. To learn more about OneTouch® DMS, visit www.OneTouchDiabetes.com. To order the software from LifeScan®, contact Customer Service and/or your LifeScan® sales representative. - Page 61 Yellow = 5mm margin, Red = 7mm margin Reviewing past results Once the command to start the download is sent from the computer to the meter, the meter display will show PC Connected indicating that the meter is in communication mode. Do Not perform a test while the meter is connected to a computer.
- Page 62 Perform evaluation of system linearity between the temperature ranges of 18°C-28°C at non-condensing relative humidity between 30% and 70%. • Use only OneTouch® Verio™Pro+ Linearity Solution (Levels 1 through 5) with the OneTouch® Verio™Pro+ Meter. Refer to the linearity solution vial label to determine the appropriate level for testing.
-
Page 63: Performing A Linearity Test
Yellow = 5mm margin, Red = 7mm margin Performing a linearity test • When opening a new vial of linearity solution, record the discard date (date opened plus 6 months) on the vial label. • When opening a new vial of test strips, record the discard date (date opened plus 6 months) on the label. - Page 64 Yellow = 5mm margin, Red = 7mm margin Performing a linearity test • Do Not open the test strip vial until ready to remove a test strip and perform a test. Use the test strip immediately after removing it from the vial, especially in high humidity environments. A test strip left out of the vial in excess of two minutes before testing can lead to inaccurate results.
- Page 65 Yellow = 5mm margin, Red = 7mm margin Performing a linearity test m CAUTION • Do Not apply linearity solution to the skin or eyes as it may cause irritation. • Do Not use linearity solution after the expiration date (printed on the vial label) or the discard date (date opened plus 6 months), whichever comes first, or test results may be inaccurate.
- Page 66 Yellow = 5mm margin, Red = 7mm margin Performing a linearity test 2. Next, press to choose Meter Care and press Settings Time: 12:45 Date: 01 Apr 2011 Language: English Meter Care 3. Select Linearity Test and press Meter Care Control Reminder Control Results Linearity Test...
- Page 67 Silver prongs Unlike some blood glucose meters, no separate step to code the OneTouch® Verio™Pro+ Meter is required. Test strip port Yellow = 5mm margin, Red = 7mm margin AW05948101B_OT_VerioPro+_OB_Insides_R1.indd 67...
- Page 68 Yellow = 5mm margin, Red = 7mm margin Performing a linearity test Wait for the Apply Solution screen to appear on the meter display. NOTE: Do Not press or the eject button during a test. 6. Prepare the linearity solution Remove the vial cap and place it on a flat surface with the top of the cap pointing up.
- Page 69 Yellow = 5mm margin, Red = 7mm margin Performing a linearity test Wipe both the tip of the linearity solution vial and the top of the cap with a clean, damp tissue or cloth. NOTE: These steps are performed to reduce the risk of contamination which may lead to inaccurate linearity solution results.
- Page 70 Yellow = 5mm margin, Red = 7mm margin Performing a linearity test 7. Apply the linearity solution Hold the meter so that the side edge of the test strip is at a slight angle to the drop of linearity solution. Keep the meter pointed down to prevent linearity solution from entering the test strip port.
- Page 71 Yellow = 5mm margin, Red = 7mm margin Performing a linearity test 8. Read the result 30 Apr The meter will count down from 5 to 1. The result is displayed along with the date, 19 : 00 time, unit of measure and the linearity solution level. If mmol/L does not appear with the linearity test result, contact Customer Service and/or LifeScan®...
- Page 72 Yellow = 5mm margin, Red = 7mm margin Performing a linearity test 9. Press to continue the linearity test The Eject Strip screen appears on the meter display. Hold the meter pointed down. Press the eject button and the test strip will come out. Used test strips may be considered biohazardous waste in your area.
- Page 73 Yellow = 5mm margin, Red = 7mm margin Performing a linearity test 10. Select a level and insert a new test strip to continue the linearity solution test Return to Step 4 (see page 67). NOTE: If the linearity test is complete, press and hold to return to the Main Menu.
- Page 74 Yellow = 5mm margin, Red = 7mm margin Performing a linearity test Viewing linearity solution test results 01 Apr 12:45 1. From the Main Menu, press to select Settings and press History (mmol/L) Settings Serial #: BCXFF2HK 2. Next, press to choose Meter Care and press Settings Time:...
- Page 75 Yellow = 5mm margin, Red = 7mm margin Performing a linearity test 3. Select Linearity Results and press Meter Care NOTE: Follow your institutions policy and guidelines for interpreting linearity Control Reminder solution results. Control Results Linearity Test Linearity Results Meter Info For the current day, the number of tests performed using each level of linearity Linearity Results...
- Page 76 Yellow = 5mm margin, Red = 7mm margin Performing a linearity test To view the time of day and actual test result (mmol/L) for a specific level of Level 1 Results solution on any given day, highlight the level on the Linearity Results screen and mmol/L Tue, 30 Apr press...
-
Page 77: Care And Maintenance
Yellow = 5mm margin, Red = 7mm margin Care and maintenance Storing the system Store the meter in the meter case. Keep in a dry place between 5°C and 30°C, with a relative humidity of less than 65%. Keep all items away from direct sunlight and heat. Store test strips under these same conditions. - Page 78 Yellow = 5mm margin, Red = 7mm margin Care and maintenance It is recommended that a 10% bleach solution or pre-saturated wipes, containing a minimum of 0.55% sodium hypochlorite, be used to disinfect the outer surfaces of the meter. Equivalent disinfecting agents may be used as specified by the local regulations or guidelines and must be effective against Hepatitis B, HIV and other blood borne pathogens as per the manufacturer’s labeling for the disinfectant.
- Page 79 Yellow = 5mm margin, Red = 7mm margin Care and maintenance Hold the meter with the test strip port pointed down. Use either a soft cloth dampened with the recommended disinfectant solution or a pre-saturated wipe to completely pre-clean the meter surface of all gross debris/contamination. Disinfect by using a new soft cloth dampened with the recommended disinfectant solution or pre-saturated wipe to dampen the outer surfaces of the meter.
- Page 80 Batteries Batteries The OneTouch® Verio™Pro+ Meter uses two AA alkaline batteries. See Troubleshooting, pages 92-93 for information on when to change the meter batteries. IMPORTANT: Use only new AA alkaline batteries with the meter. Do Not use rechargeable batteries. Use of an incorrect battery type may result in the meter providing fewer tests than normal from when the battery icon or the LOW BATTERY screen first appears.
-
Page 81: Replacing The Batteries
Yellow = 5mm margin, Red = 7mm margin Batteries Replacing the batteries 1. Remove the old batteries Start with the meter turned off. Gently push down on the blue circle and slide the cover to remove. m WARNING To avoid a possible shock, Do Not change the batteries while the meter is connected to a computer. - Page 82 Yellow = 5mm margin, Red = 7mm margin Batteries 2. Insert the new batteries Insert two new AA alkaline batteries into the battery compartment. The icons in the battery compartment will guide you in placing the batteries. Lower cover onto the back of the meter, push down on the blue circle, and slide back into place.
- Page 83 Troubleshooting Troubleshooting The OneTouch® Verio™Pro+ Meter displays messages when there are problems with the test strip, or with the meter. Improper use may cause an inaccurate result without producing an error message. NOTE: If the meter is on but does not operate (locks-up), contact Customer Service and/or LifeScan®...
- Page 84 Yellow = 5mm margin, Red = 7mm margin Troubleshooting (continued) Warning What it means for Linearity Solution Testing Temperature Meter is too hot (above 28°C) to work correctly. too high. Out of operating range. What to do for Linearity Solution Testing See Meter Operator’s Guide.
- Page 85 Yellow = 5mm margin, Red = 7mm margin Troubleshooting What it means for Blood and Control Solution Testing Warning Meter is too cold (below 6°C) to work correctly. Temperature What to do for Blood and Control Solution Testing too low. Out of Move the meter and test strips to a warmer area.
- Page 86 Yellow = 5mm margin, Red = 7mm margin Troubleshooting (continued) Warning What it means for Linearity Solution Testing Meter is too cold (below 18°C) to work correctly. Temperature too low. Out of operating range. What to do for Linearity Solution Testing See Meter Move the meter and test strips to a warmer area.
- Page 87 Yellow = 5mm margin, Red = 7mm margin Troubleshooting What it means Warning The meter has detected an incorrect sample when doing a linearity test. Incorrect Sample What to do Detected. Repeat the linearity test with a new test strip, see linearity testing (pages 62-73). Retest with a new strip.
- Page 88 Yellow = 5mm margin, Red = 7mm margin Troubleshooting What it means 30 Apr The blood glucose level may be very low (severe hypoglycemia), below 1.1 mmol/L. 19 : 00 What to do EXTREME LOW GLUCOSE This may require immediate treatment. Although this message could be due to a (below 1.1 mmol/L) test error, it is safer to treat first and then do another test.
- Page 89 Yellow = 5mm margin, Red = 7mm margin Troubleshooting What it means ERROR 1 There is a problem with the meter. Meter problem. What to do Contact Customer Do Not use the meter. Contact Customer Service and/or LifeScan® sales Service. representative.
- Page 90 Yellow = 5mm margin, Red = 7mm margin Troubleshooting What it means ERROR 3 The sample was applied before the meter was ready. Meter was not What to do ready. Retest with a new strip. Repeat the test with a new test strip. Apply a whole blood sample, control, or linearity solution only after Apply Blood or Apply Solution appears on the display.
- Page 91 Yellow = 5mm margin, Red = 7mm margin Troubleshooting What it means ERROR 4 One of the following may apply: • Not enough whole blood, control, or linearity solution was applied or more was Strip f ill problem. Retest with a added after the meter began to count down.
- Page 92 Yellow = 5mm margin, Red = 7mm margin Troubleshooting What it means ERROR 5 The meter has detected a problem with the test strip. Possible cause is test strip damage. Strip problem. Retest with a What to do new strip. Repeat the test with a new test strip;...
- Page 93 Yellow = 5mm margin, Red = 7mm margin Troubleshooting What it means Battery power is low but there is still enough power to perform a test. What to do Press to continue but replace the batteries as soon as possible. Low Battery Replace soon.
-
Page 94: Detailed Information About The System
Yellow = 5mm margin, Red = 7mm margin Detailed information about the system Technical Specifications Reported result range 1.1-33.3 mmol/L Calibration Plasma-equivalent Sample Fresh capillary, venous, and arterial whole blood Sample volume 0.4 µL Test time 5 seconds Assay method GDH-FAD glucose dehydrogenase Unit of measure mmol/L... - Page 95 Yellow = 5mm margin, Red = 7mm margin Detailed information about the system Technical Specifications (continued) Size 120 mm x 51 mm x 31 mm Weight Approximately 137 grams Operating ranges Temperature: 6°C to 44°C Relative humidity: non-condensing 10-90% Altitude: up to 3048 meters Hematocrit: 20-60% Battery type Two replaceable AA alkaline batteries...
- Page 96 4.2 mmol/L, and within 20% of a laboratory method when the glucose concentration is 4.2 mmol/L or higher. Samples from 100 patients were tested using both the OneTouch® Verio™Pro+ System and the YSI 2300 glucose analyzer laboratory instrument. System Accuracy Results for Glucose Concentrations <4.2 mmol/L Percent (and number) of meter results that match the laboratory test Within ±0.28 mmol/L...
- Page 97 Percent (and number) of meter results that match the laboratory test Within ±0.83 mmol/L or ±20% 99.7% (598/600) Therefore, 99.7% of the total results obtained with the OneTouch® Verio™Pro+ System achieved the goal suggested by the diabetes experts. Yellow = 5mm margin, Red = 7mm margin AW05948101B_OT_VerioPro+_OB_Insides_R1.indd 97...
- Page 98 Yellow = 5mm margin, Red = 7mm margin Detailed information about the system Regression Statistics Samples were tested in duplicate on three test strip lots. Results indicate that the OneTouch® Verio™Pro+ System compares well with a laboratory method. # of Subjects...
- Page 99 Yellow = 5mm margin, Red = 7mm margin Detailed information about the system Precision Within Run Precision (300 Venous Blood Tests) Target Glucose Mean Glucose Standard Deviation Coefficient of Variation (mmol/L) (mmol/L) (mmol/L) 0.06 2.55 0.10 1.88 0.14 1.90 11.1 10.8 0.22 2.01...
- Page 100 Yellow = 5mm margin, Red = 7mm margin Detailed information about the system Precision Total Precision (600 Control Solution Tests) Glucose Level Ranges Mean Glucose Standard Deviation Coefficient of Variation (mmol/L) (mmol/L) (mmol/L) Low (1.4-2.7) 2.11 0.04 2.11 Mid (5.7-7.7) 6.50 0.10 1.53...
- Page 101 Yellow = 5mm margin, Red = 7mm margin Detailed information about the system Fingertip Results for Glucose Concentrations <4.2 mmol/L Percent (and number) of meter results that match the laboratory test Within ±0.28 mmol/L Within ±0.56 mmol/L Within ±0.83 mmol/L 25% (2/8) 63% (5/8) 100% (8/8)
- Page 102 Yellow = 5mm margin, Red = 7mm margin Detailed information about the system Venous Results across the entire Glucose Range Percent (and number) of meter results that match the laboratory test Within ±0.83 mmol/L or ±20% 100% (177/177) Arterial Results across the entire Glucose Range Percent (and number) of meter results that match the laboratory test Within ±0.83 mmol/L or ±20% 99.5% (199/200)
- Page 103 Detailed information about the system Guarantee LifeScan® guarantees that the OneTouch® Verio™Pro+ Meter will be free of defects in material and workmanship for three years, valid from the date of purchase. The guarantee extends only to the original purchaser and is not transferable.
-
Page 104: Index
Yellow = 5mm margin, Red = 7mm margin Index Backlight Batteries Battery Empty message Blood glucose test Buttons on meter Control solution, discard and expiration dates 23, 24 Control solution testing, reminder Control solution, testing Control solution test results, viewing Dehydration Date setting Disinfecting the meter... - Page 105 Yellow = 5mm margin, Red = 7mm margin Index Error messages History Hyperglycemia 56, 88 Hypoglycemia 55, 88 Guarantee Intended use Interfering substances Kit components 8, 9, 10 Lancing device 40, 43 Language, setting Linearity solution, discard and expiration dates 63, 65 Linearity solution, testing Linearity solution test results, viewing...
- Page 106 11, 31, 54, 71, 94 Mini USB cable Mini USB data port 11, 60 Plasma calibration Results, reviewing past Settings [DMS Available <Software, OneTouch® Diabetes Management>] Start-up screen 13, 58 Storing the system Symbols Technical specifications Temperature 22, 40, 62, 83, 84, 85, 86, 95...
- Page 107 Yellow = 5mm margin, Red = 7mm margin Index Turning meter off 15, 57 Turning meter on 13, 26, 48, 58 Unexpected blood glucose results 55, 56 Unit of measure 11, 31, 54, 71, 94 Unusual red blood cell count (hematocrit) Yellow = 5mm margin, Red = 7mm margin AW05948101B_OT_VerioPro+_OB_Insides_R1.indd 107 4/3/12 3:08 PM...
- Page 108 Yellow = 5mm margin, Red = 7mm margin Notes Yellow = 5mm margin, Red = 7mm margin AW05948101B_OT_VerioPro+_OB_Insides_R1.indd 108 4/3/12 3:08 PM...
- Page 109 GC AW Template Title: Rev. Date: Round Number: Template, OneTouch Lion, Owner’s Booklet 4/3/12 GC AW Template Number: AW 05948101B LifeScan Contact: Marcello Centofanti x4839 GC Document Number: Job No: LSGSUR4 GC 059481 ADS-03/LCB-03 ADS Reference Number: Number of Colors:...
Need help?
Do you have a question about the VERIOPRO + and is the answer not in the manual?
Questions and answers