
Summary of Contents for PRO SMOKE PSMKOFFSET
- Page 1 PRO SMOKE OFFSET SMOKER Owner’s Manual ASSEMBLY, CARE & SAFETY INSTRUCTIONS Code: PSMKOFFSET...
- Page 3 Do not lean over or into the firebox smoker. or grill when lighting or operating the smoker. This - Do not modify the Pro Smoke Offset Smoker. Any smoker has an open flame. Be careful of loose changes to the smoker will void the warranty.
-
Page 4: Parts List
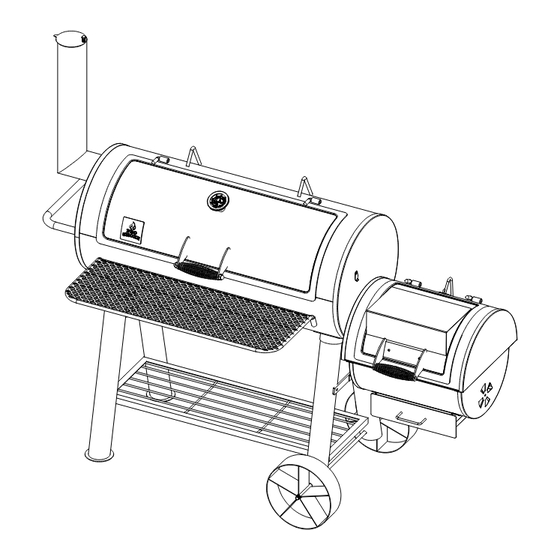
A. PARTS LIST Name Name Name Cooking Grates (3) Ash Tray Side Handle Baffle A Firebox Support Smoke Stack Gasket Warming Rack Wheels (2) Smoke Stack Firebox Cooking Grills (2) Short Legs (2) Cooking Chamber Lid Firebox Charcoal Grate Wheel Axle Temperature Guage Firebox Lid Stop Bottom Shelf... -
Page 5: Hardware Pack
B. HARDWARE PACK Name 55PCS M6*12mm 2PCS M12 LOCK NUT 29PCS M6 HEX FLANGE NUT 2PCS M6 LOCK NUT TOOLS REQUIRED: 1 x Phillips Head Screwdriver 2 x Adjustable Spanners... - Page 6 C. ASSEMBLY INSTRUCTIONS Choose a good, cleared assembly area and get a friend to help you put your smoker together. Lay card board down to protect the exterior finish. Before assembling your new smoker, unpack all parts from the box. Carefully remove all packing material and lay out all the parts for easy access and identification.
- Page 7 STEP 4 — Align the bottom shelf (18) by inserting the location pins into the holes on the legs. With the bottom wire rack in place, bolt the other two legs to the main cooking chamber (23) using 8 x M6*12mm bolts and M6 flange nuts.
- Page 8 STEP 7 — On the firebox top (9) fit the firebox lid stop (6) into the slot near the opening and bolt to lid using 1 x M6*12mm bolt & 1 x M6 flange nut. fig. 7 STEP 8 — To the firebox base (10) fit the ash tray bracket (11) using 6 x M6*12mm bolts. fig.
- Page 9 STEP 10 — Turn the firebox top (9) upside down and fit the firebox base (10) to it using 6 x M6*12mm bolts. fig. 10 STEP 11 — Screw 2 x M6*12mm bolts halfway into the holes at the side of the elliptical cut out leaving a space of 5mm.
- Page 10 STEP 13 — Fit the side handle (24) to the main cooking chamber (23) end using 4 x M6*12mm bolts and 4 x M6 flange nuts. fig. 15 STEP 14 — Attach the smoke stack (26) to the end of the main cooking chamber (23) by fitting the sealing gasket (25) and using 4 x M6*12mm bolts and 4 x M6 flange nuts.
- Page 11 STEP 16 — Slide the ash drawer (13) into the firebox ash drawer bracket (11). fig. 19 STEP 17 — Fit the firebox lid handle (7) to firebox lid (8) using 2 x M6*12mm bolts and 2 x M6 flange Nuts. fig.
- Page 12 STEP 18 — Fit the 3 charcoal trays (29) into the bottom of the main cooking chamber (23). — Fit the 3 charcoal grates (30) into the bottom of the main cooking chamber (23). — Fit one baffle A (2) and four baffles B (32) onto the ledge above the charcoal grates (30) in the main cooking chamber (23).
- Page 13 STEP 20 — Fit the cooking chamber lid (27) to the main cooking chamber (23) and secure with the hinge locking screws. fig. 25 STEP 21 — Fit the thermometer (28) into the main cooking chamber lid (27) Secure with the nut provided inside the lid.
- Page 14 Assembly of your Pro Smoker Offset Smoker is now complete. fig. 28 below shows how the assembled unit should look. fig. 28...
- Page 15 (STEP 22). The bucket must be placed under the grease hole at all times and will need to be checked regularly to ensure it is not full. Always wait until the smoker has fully cooled before emptying or replacing the bucket. — Your Pro Smoke Offset Smoker is now ready for use.
- Page 16 Use a protective grill cover to prolong life and store your Pro Smoke Offset Smoker in a covered area. Use a couple of sponges under the cover to promote ventilation and minimise mould.
-
Page 17: Lighting Your Fire
F. LIGHTING YOUR FIRE Lighting your fire directly on the charcoal grates — Remember, patience is a virtue! Cooking with charcoal and wood is more complicated than using gas but you will get a much better result. Always allow plenty of time to prepare the fire prior to cooking. - Page 18 — To set your Pro Smoke Offset Smoker for direct grilling, spread the charcoal across the bottom of the charcoal grate, then place the cooking grills on top so that you are able to place the food directly above the coals.
-
Page 19: Heat Control
Note: The Smoke Stack (26) is simply a rain cap. It should never be used for temperature control. Always have the Smoke Stack (26) fully or at least half open when using the Pro Smoke Offset Smoker, particularly when establishing your fire. -
Page 20: Replacement Parts
• FOR OUTDOOR USE ONLY REPLACEMENT PARTS This appliance must not be modified in any way and only authorised spare parts are to be used. This will protect your warranty coverage for parts replaced under warranty. AFTER SALES SERVICE Servicing must be carried out by Barbeques Galores’ authorised personnel. For all enquiries regarding servicing or spare parts, please call 1300 301 392. - Page 21 Distributed by Barbeques Galore Call 1300 301 392 for your nearest store and for after sales service and support. www.barbequesgalore.com.au...
Need help?
Do you have a question about the PSMKOFFSET and is the answer not in the manual?
Questions and answers