Table of Contents
Advertisement
INSTRUCTION MANUAL
SENSIT
Combustible Gas Detector
Read and understand
instructions before use.
II 3 G
EEx ic IIB T3
IP 20
ATEX File No. NA45026-01X
⚠
Warning: To reduce the risk of ignition of a
flammable atmosphere, batteries must only be changed in
an area known to be nonflammable.
®
851 Transport Drive • Valparaiso, IN 46383 (USA)
Phone: 219.465.2700 • www.gasleaksensors.com
HXG-3P
Advertisement
Table of Contents

Related Manuals for Sensit HXG-3P


Summary of Contents for Sensit HXG-3P
- Page 1 INSTRUCTION MANUAL SENSIT HXG-3P ® Combustible Gas Detector Read and understand instructions before use. II 3 G EEx ic IIB T3 IP 20 ATEX File No. NA45026-01X ⚠ Warning: To reduce the risk of ignition of a flammable atmosphere, batteries must only be changed in an area known to be nonflammable.
-
Page 2: For Your Safety
1000ppm) or exhaust gases. Continuously low calibration check results or fluctuation of zero readings may indicate sensor end of life or failure. Consult Sensit Technologies with any questions. For best accuracy always zero in clean air environments similar in temperature and relative humidity to the environment where the instrument will be used. -
Page 3: Table Of Contents
CONTENTS Preparation For Your Safety .............. ii Parts and Accessories ...........5 General Description ............6 Sensor Specifications ............7 Product Specifications ...........7 Product Features ............. 8-10 Sensor Type ..............11 Basic Operation Battery Installation/Replacement .........12 Operation and Use ..........13-16 Calibration Check ............17 User Menu and Detailed Operation User Menu / Function Descriptions ......18 Printing to Optional IR Printer ........19... - Page 4 CONTENTS Tests and Calibration Bump Test ..............24 Smart-Cal .............. 25-26 Gas Type ..............27 Calibration Notes, Preparing For Calibration ....28 Combustible Gas Calibration ......... 29-30 (50% LEL Methane, 50% LEL Propane or 50% LEL Pentane) Factory Adjustble Features ..........31 Warranty ............Back Cover...
-
Page 5: Parts And Accessories
PARTS AND ACCESSORIES Standard Accessories (Included) 872-00001 Hard Carrying Case 360-00040 Wrist Strap 310-00004 3”C” Alkaline Batteries 750-00028 Instruction Manual Accessories and Replacement Parts 375-2611-01 LEL Sensor 870-00018 Sensor Cap with “O” Rings (1) 870-00019 Sensor Cap with “O” Rings (6 Pack) 870-00012 Extension Adapter 870-00004... -
Page 6: General Description
GENERAL DESCRIPTION The SENSIT® HXG-3P is designed to detect combustible gases. All SENSIT® HXG-3P instruments incorporate an advanced low power semiconductor sensor to measure combustible gases in LEL (Lower Explosive Limit) range. LEL resolution can be factory set between 0.1% and 2%. The ppm display is simultaneously shown in 1 or 10ppm increments (resolution). -
Page 7: Sensor Specifications
-20° to 40° C (-4 to 104° F) Battery Life: Alkaline: 12 hrs. continuous The SENSIT® HXG-3P instrument is approved for the ATEX Directive EN60079-0:2004 & EN60079-11:2007 when used with Duracell™ PC1400 or VARTA# 4914 Alkaline cells. II 3 G... -
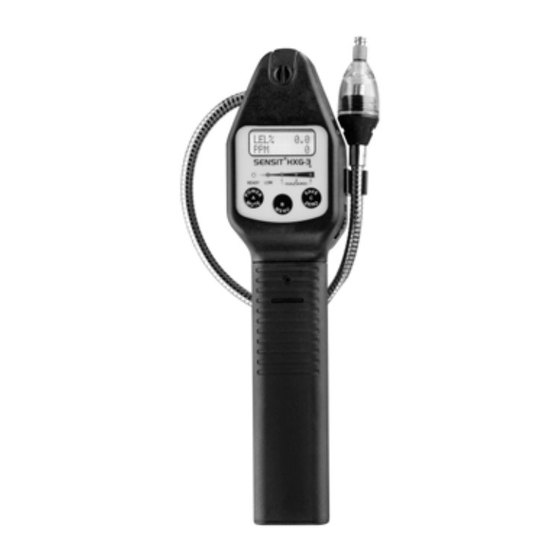
Page 8: Product Features
PRODUCT FEATURES SENSOR BACKLIT LCD DISPLAY WARNING LEDS OPERATION BUTTONS TICK CONTROL FLEXIBLE GOOSENECK BATTERY COMPARTMENT... - Page 9 PRODUCT FEATURES SENSIT® HXG-3P instruments are constructed of durable Nylon 66 plastic to withstand the rigors of field use. Incorporated in the hand grip area is the battery compartment. All SENSIT® HXG-3P instruments require 3 “C” type alkaline batteries. Duracell PC1400 batteries provide approximately 12 hours of continuous use.
- Page 10 Below the display is a series of LEDs that are preset to indicate combustible gas concentrations. During an alarm condition the red Hazard 3 LED will flash and an audible warning will sound. There are 3 operational button pads on the front of all SENSIT® HXG-3P instruments. BUTTON (A) POWER/MUTE Operates POWER and MUTE features and exit menu items.
-
Page 11: Sensor Type
SENSOR TYPE Combustible Gas Sensor All SENSIT® HXG-3P instruments incorporate a highly sensitive semiconductor type sensor. The function and accuracy of the sensor are monitored and controlled by specialized circuitry and a microprocessor. This sensor is capable of measuring concentrations of 1ppm or 10ppm of methane (natural), propane or pentane gas up to 100% LEL. -
Page 12: Battery Installation/Replacement
BATTERY INSTALLATION/REPLACEMENT ⚠ CAUTION: Always change batteries in an environment free of combustible gases. ⚠ Warning: Do not mix batteries of different type or age. Battery replacement is necessary when the display reads BAT LOW, an audible alarm sounds and the green ready LED flashes. When the instrument remains in BAT LOW, a countdown will appear starting at 300 seconds (5 minutes) which is the maximum time remaining to shutdown. -
Page 13: Operation And Use
OPERATION AND USE ⚠ CAUTION: Always start any SENSIT® HXG-3 in a gas free environment to insure a proper zero. 1. Press and hold the POWER/MUTE button (A) until the display illuminates. 2. If the display fails to illuminate or BAT LOW is shown on the display replace the batteries. - Page 14 Manually zeroing the instrument will clear the PK% reading. ⚠ CAUTION: Always start any SENSIT® HXG-3 in a gas free environment to insure a proper zero. 6. When testing high areas or overhead lines the use of the optional extension adapter will allow a broom handle or painters stick to extend the instrument to the area where sensing must be accomplished.
- Page 15 OPERATION AND USE 7. When a gas is sensed the display will update. Additionally, a series of LEDs on the front of the instrument will illuminate when the preset concentrations of the calibration gas are reached. If an alarm condition exists, based on a preset alarm point, the red (HAZ 3) LED will flash and the alarm will sound.
- Page 16 OPERATION AND USE Continued from previous page. This will slow down the tick and allow the operator to find a higher concentration using the same procedure. If the tick goes away you have moved away from the leak or there is no more gas present. For best results always use the leak detector prior to using any liquid leak detection fluids as these sensors will detect their presence.
-
Page 17: Calibration Check
CALIBRATION CHECK To verify the accuracy of any SENSIT® HXG-3P, it must be exposed to a known concentration of test gas. Any sensor that does not meet the specifications listed in this manual may require calibration or replacement. A calibration check does not update the calibration due date. Full calibration is required to update this feature. -
Page 18: User Menu / Function Descriptions
USER MENU The SENSIT® HXG-3P has several features in the user menu. These include: PRINT MENU: SESSION LOG - print data that was saved. CAL LOG - print last 4 successful calibrations. SMART CAL - access to Smart-Cal Calibration Station. -
Page 19: Printing To Optional Ir Printer
USER MENU OPERATION PRINT MENU From the working display access the user menu by pressing and holding the MENU button (B) until the top line of the display reads USER MENU. The bottom line will read PRINT MENU. Press the MENU button (B) to access the print menu options. -
Page 20: Calibration, Power Off
USER MENU OPERATION CALIBRATION (see page 28 for complete instructions) From the working display access the user menu by pressing and holding the MENU button (B) until the top line of the display reads USER MENU. Press and release the SAVE/ZERO button (C) until the bottom line displays CALIBRATION. -
Page 21: Set Clock
USER MENU OPERATION SET CLOCK From the working display access the user menu by pressing and holding the MENU button (B) until the top line of the display reads USER MENU. Press and release the SAVE/ZERO button (C) until the bottom line displays SET CLOCK. -
Page 22: Show Calibration Log
USER MENU OPERATION SHOW A CALIBRATION LOG From the working display access the user menu by pressing and holding the MENU button (B) until the top line of the display reads USER MENU. Press and release the SAVE/ZERO button (C) until the bottom line displays SHOW CAL LOG. -
Page 23: Show Session Log
USER MENU. Pressing the POWER/MUTE button (A) once more returns the instrument to the working display. The number of stored session log saves is factory set at 6. It can store up to 100 by changing a factory setting (contact SENSIT TECHNOLOGIES for instructions). -
Page 24: Tests And Calibration
If the instrument fails, the display will read BUMP TEST FAILED and a beep will sound. Repeated bump test failure indicates possible need for instrument repair. Contact SENSIT Technologies for instructions. At the end of any bump test press the POWER/MUTE button (A) to... - Page 25 TESTS AND CALIBRATION SMART-CAL (Methane and/or Propane Calibration Only) From the working display access the menu by pressing and holding the MENU button (B) until the top line of the display reads USER MENU. Press and release the SAVE/ZERO button (C) until the bottom line displays SMART CAL.
-
Page 26: Smart-Cal
TESTS AND CALIBRATION SMART-CAL SHORTCUT TO ACCESS SMART-CAL: Place the instrument into the cradle provided on the left side of the Smart-Cal calibration Station. Attach the tubing from the station to the instrument sensor. While in the working display press the POWER/MUTE button (A) for 2-3 seconds and release. -
Page 27: Gas Type
TESTS AND CALIBRATION GAS TYPE From the working display access the user menu by pressing and holding the MENU button (B) until the top line of the display reads USER MENU. Press and release the SAVE/ZERO BUTTON (C) until the bottom line displays GAS TYPE. -
Page 28: Calibration Notes, Preparing For Calibration
Calibration is the process of setting the readings of the sensors in the instrument to equal the value of certified calibration gases. NOTES: Using calibration kits other than recommended by SENSIT TECHNOLOGIES may cause inaccurate readings. Repairs are required if any sensor fails to calibrate. Consult SENSIT TECHNOLOGIES for details. -
Page 29: Combustible Gas Calibration
CALIBRATION COMBUSTIBLE GAS CALIBRATION PROCEDURE (50%LEL METHANE, 50%LEL PROPANE OR 50%LEL PENTANE) The calibration gas used for this procedure should match the Gas Type selected for your instrument. Refer to Gas Type in the Menu section of this manual. Instruments set to methane will calibrate with 50% LEL (2.5% V/V) methane/air. - Page 30 If calibration is unsuccessful, the display will flash BAD CAL before returning to the calibration menu. In the event of a BAD CAL, remove the instrument from service and contact SENSIT Technologies for assistance. NOTE: Calibration will be based on the last successful calibration. The calibration due date will not be updated until successful calibration has occurred.
-
Page 31: Factory Adjustble Features
FACTORY ADjUSTABLE FEATURES (Factory Only) FEATURE RANGE DEFAULT Session Saves 1-100 Alarm - LEL 0-100% PPM Display Option 1ppm or 10ppm 10ppm Cal Due interval 30, 45, 60, 90, 180, 360 Days 30 Days Show Session Log* 1-100 Warm-up Time 10-30 sec. -
Page 32: Warranty
WARRANTY Your SENSIT® HXG-3P is warranted to be free from defects in materials and workmanship for a period of two years after purchase (excluding calibration and batteries). If within the warranty period, your instrument should become inoperative from such defects, the unit will be repaired or replaced at our option.
Need help?
Do you have a question about the HXG-3P and is the answer not in the manual?
Questions and answers