Table of Contents

Related Manuals for Teledex M10010


Summary of Contents for Teledex M10010
- Page 1 M SERIES ANALOG USER GUIDE For M1005, M10010, M100TRM, M2005, M20010, M200TRM, M1035, M10353, M10356, M10310, M103103, M103106, M103HDKT, M1033HDKT, M1036HDKT, M2035, M20353, M20356, M20310, M203103, M203106, M203HDKT, M2033HDKT, M2036HDKT...
-
Page 2: Table Of Contents
Table of Contents M Series Analog Phone Map (Corded) ......Installation ..........M Series Analog Phone Map (Cordless) . -
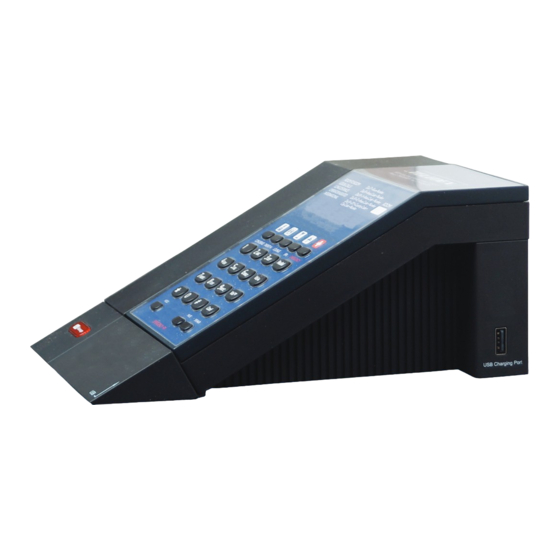
Page 3: M Series Analog Phone Map (Corded)
M Series Analog Phone Map (Corded) (Faceplate Removed) BASE FEATURES AND CONTROLS 1. OneTouch message-waiting light 2. Handset cord 3. Guest service keys 4. Submerged FLASH button 5. Submerged STORE button 6. HOLD key 7. LINE 1 key 8. LINE 2 key 9. -
Page 4: M Series Analog Phone Map (Cordless)
M Series Analog Phone Map (Cordless) (Faceplate Removed) BASE FEATURES AND CONTROLS 1. OneTouch message-waiting light 2. Charge light 3. Guest service keys 4. Submerged FLASH button 5. Submerged STORE button 6. HOLD key 7. LINE 1 key 8. LINE 2 key 9. -
Page 5: M Series Analog Redidock And Trimline Phone Maps
M Series Analog RediDock and Trimline Phone Maps BASE FEATURES AND CONTROLS 1. Base 2. Charging light 3. Handset 4. Begin call button/ON 5. Guest service keys 6. End call button/OFF 7. USB charging ports (2x) 8. Base 9. Handset M SERIES ANALOG USER GUIDE www.teledexeurope.com... -
Page 6: Caution Information
Caution Information Features • Never install telephone or network wiring 1. Speed-Dial Memory Keys: 5 or 10 user during a lightning storm . programmable speed-dial keys with 32-digit • Never install telephone or Ethernet jacks in capacity. [Flash] and [Pause] are storable wet locations unless the jack is speci cally Speed-dial memory is non-volatile RAM, so designed for wet locations . -
Page 7: Installation
8. USB Charging Ports: Two side ports RINGER VOLUME CONTROL support smart device recharging . Not The ringer volume control switch is on the top available on M100TRM . end of the phone (right side for the M100TRM) . 9. Faceplate: A convenient clear plastic The setting is either Low or HI (High) faceplate module encapsulates the printed paper faceplate . -
Page 8: Programming
Programming PROGRAMMING PAUSE TIMING Pause timing options are 1 second through 5 PROGRAM SPEED DIALS USING seconds, programmable in 1 second increments SUBMERGED [STORE] AND [FLASH] The default pause timing is 3 .5 seconds . [Store] and [Flash] programming keys are located 1. -
Page 9: M103 & Redidock
M103 & RediDock Installation CONNECTING THE POWER LINE CORD Two line cords are provided: 1-RJ45 and 1-RJ11 Unpacking Your Telephone To install, simply plug one end of the RJ45 cord into the modular jack at the top end of the base unit This package should contain the following: and the other end into the RJ45 phone jack on the •... -
Page 10: Faceplate
INSTALLING THE BATTERY INTO THE HANDSET When the handset is o -hook or the Speaker key engaged on speakerphones, press the volume 1. Hold the handset and gently push up the control keys to increase or decrease the volume handset back shell . The handset volume control is a 5-step operation 2. -
Page 11: Usb Charging Ports
2. For most applications the TYPE position sync with the new base station . After this the will work . This is the factory default handset is no longer synced with its original base setting . Always try the TYPE position station, which means that if a cordless handset is rst: If the message lamp blinks when a accidentally moved into a di erent room, then the... -
Page 12: Programming
Programming PROGRAMMING PAUSE TIMING Pause timing options are 1 second through 5 seconds, programmable in 1 second increments SUBMERGED [STORE] AND [FLASH] The default pause timing is 3 .5 seconds . [Store] and [Flash] programming keys are located 1. Leave handset in cradle/on-hook . under the faceplate and overlay . -
Page 13: In Case Of Power Outage
M200 & M200TRM In Case of Power Outage The phone base will function without commercial power (but the handset will not operate). Unpacking Your Telephone Ringer: When receiving a new call, the phone base will ring, but not the handset . This package should contain the following: Pick up: Press the line key to pick up/go o -hook •... -
Page 14: Installation
3. Activate the conference by joining the calls 8. HOLD Key: Controls the “local hold” together when you press the Conf key . function. Each press of the [Hold] key toggles the local hold mode on or o . An LED indicator located above the [Hold] key PLACES A SECOND CALL displays the on-hold status... -
Page 15: Operation
faceplate over the buttons . Then replace the PLACING A CALL USING THE SPEAKERPHONE plastic overlay . The M Series speakerphones are equipped with a high-quality speakerphone feature to allow Operation hands-free operation . To use, simply press the VOLUME Speaker key when placing or answering a call The telephone line will activate automatically . -
Page 16: Programming Flash Timing
5. If additional numbers are to be stored, repeat steps 3 through 5 . The Flash function is used to access PBX features 6. Hang up the handset . or Telco line features such as Call Waiting . The Flash function is a 600 ms timed line break . -
Page 17: M203 & Redidock
M203 & RediDock Installation CONNECTING THE POWER LINE CORD Two line cords are provided: one RJ45 and one Unpacking Your Telephone RJ11 . To install, simply plug one end of the RJ45 cord into This package should contain the following: the modular jack at the top end of the base unit •... -
Page 18: Faceplate
INSTALLING THE BATTERY INTO THE HANDSET 1. Hold the handset and gently push up the Base unit: To get a dial tone with o -hook status, handset back shell . press a line key or the Speaker key to pick up with 2. -
Page 19: Conference
LR1 or LR2 . The correct position of the handset buttons designated switch will cause the message lamp to be HS6–HS11 . Keep in mind that the handset simply on continuously when a message is in the mimics the base as far as programming goes . -
Page 20: Usb Charging Ports
PROGRAMMING FLASH TIMING TO TERMINATE A CONFERENCE CALL Pressing a Line key will maintain the connection Flash timing options are 100 ms through 1000 with that line while dropping the other line . To ms, programmable in 100 ms increments . -
Page 21: Message Waiting And Retrieval
MESSAGE WAITING AND RETRIEVAL 4. Do not use this product near water—for example, near a bathtub, wash bowl, Pressing the touch button automatically turns kitchen sink or laundry tub, in a wet on the speakerphone, and then dials into a basement, or near a swimming pool . -
Page 22: Fcc Interference Information
Adjust only those controls that are If this equipment does cause harmful interference covered by the operating instructions, as to radio or television reception, which can be improper adjustment of other controls determined by turning the equipment o may result in damage and may require on, the user is encouraged to try to correct the extensive work by a quali ed technician interference by one or more of the following... -
Page 23: Requirements Of Part 15-Fcc Rules
Canada technical speci cations were met . It does REN: Z not imply that Industry Canada approved the For warranty and service in Canada, please equipment. contact: Before installing this equipment, users should Williams Telecommunications ensure that it is permissible to be connected to 5610 Kennedy Road the facilities of the local telecommunications Mississauga, Ontario, L4Z2A9... -
Page 24: Requirements Of Part 68-Fcc Rules
. It is designed to be repair or warranty information, please contact connected to a compatible modular jack that is Teledex at (800) 462-9446 . If the equipment also compliant . See installation instructions for is causing harm to the telephone network, details . -
Page 25: Technical Speci Cations
These telephone devices are intended for If additional User Guides are needed, please go commercial use only, primarily in hotel guestrooms to www.teledex .com to download the PDF . They must be used with a PBX (private branch Service exchange), and are not intended to be connected... - Page 26 Telephone: +31 23 5670000 Fax: +31 23 5670009 info@stheurope.com www.teledexeurope.com © 2017 teledexeurope.com | Product speci cations and descriptions in this document subject to change without notice...
Need help?
Do you have a question about the M10010 and is the answer not in the manual?
Questions and answers