
Related Manuals for Uniden B6440D


Summary of Contents for Uniden B6440D
- Page 1 SET UP GUIDE Wired Video Security DVR System This Set Up Guide applies to the following models: B6440D G6440D G6440D G6840D1 G6860D2 G6880D2 © 2016. Uniden America Corporation Issue 1, November 2016 Irving, Texas Printed in China...
- Page 2 Uniden surveillance products are not manufactured and/or sold with the intent to be used for illegal purposes. Uniden expects consumer’s use of these products to be in compliance with all local, state and federal law. For further information on video surveillance and audio recording legal requirements, please consult your local, state and federal law.
-
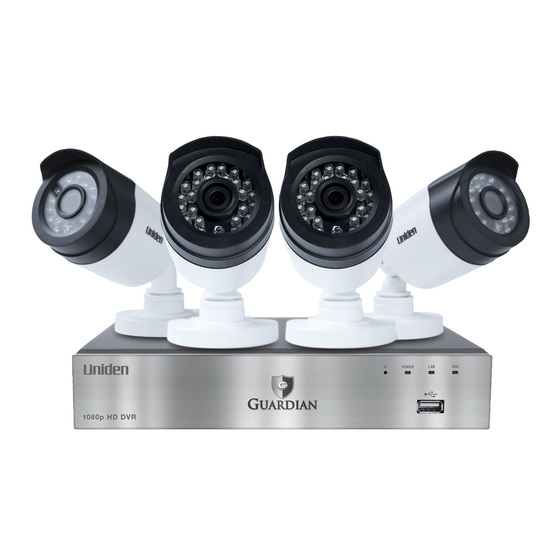
Page 3: Included In The Box
ABOUT YOUR VIDEO SECURITY SYSTEM Thank you for purchasing Uniden's Guardian Video Security DVR. This state of the art surveillance system provides high quality synchronous audio and video. TCP/IP network technology lets you monitor and operate your system remotely. This Setup Guide provides basic setup and operation information so you can quickly get your system up and running. -
Page 4: Connect Dvr To Power
HDMI cable to Monitor HDMI cable to DVR (example) 2. Connect monitor to surge protector plugged into 120V indoor power. 3. The DVR beeps as it powers up. After the UNIDEN welcome screen displays, the Wizard screen displays. 4. Select Exit for now; we will return to the Wizard later in the setup process. -
Page 5: Connect Ethernet Cable
VGA cable to Monitor (example) 2. Connect monitor to surge protector plugged into 120V indoor power. 3. The DVR beeps as it powers up. After the UNIDEN welcome screen displays, the Wizard screen displays. 4. Select Exit for now; we will return to the Wizard later in the setup process. TV with BNC Port (VIDEO IN) 1. -
Page 6: Install Cameras
3. Connect the extention cable's other blue BNC end (female) to DVR's Video In connector (male). Female The Video In ports on the back of the DVR Male are numbered. Do not connect cameras to ports that your system does not support. If you have 1 - 4 cameras, use ports labeled 1 - 4, etc. - Page 7 • If you position cameras indoors, avoid pointing the camera at a glass window to see outside. This may result in a bright white ring in the night vision image because the light from the night vision LEDs may reflect off the window glass. Take the following placement suggestions under consideration: • Cabling Distance From DVR to Camera.
-
Page 8: Basic Configuration
4. The second Wizard screen sets up 8091 DVR monitoring through the internet. Set the Http Port to 8091 and the server port to 5000. Click Obtain an IP address automatically to get network information or fill in the fields manually. Refer to the Owner’s Manual at www. uniden.com for internet access details. Click Next. -
Page 9: Set Password
The user name, admin, is already entered. There is no password required so select Login (set a password after you log in). NOTE: Uniden strongly recommends that you set a password for your system. 3. The Main Menu screen displays. SET PASSWORD 1. -
Page 10: Set Motion Sensitivity
2. Select Change Password. (At this point, there are no other users added to the system.) In the Change Password screen, enter a new password and confirm it using the popup keyboard, selecting Enter each time. Select OK to save the new password. 3. The User Management screen displays again. 4. -
Page 11: Basic Operation
BASIC OPERATION This section covers the most common operations related to recording and viewing video files. See the detailed Owner's Manual on www.uniden.com for more information on all operations and specifications for this system. MANUAL RECORDING 1. From the menu shortcut list, select CAMERA01 Start Record. -
Page 12: View Recorded Files
1. Go to Main Menu>Setup>Record, Record tab. Check the Record and Audio boxes for each camera you want to be able to record. 2. Go to Main Menu>Setup>Schedule, Schedule tab. Select a channel, then select the blocks of time you want the camera to record. -
Page 13: Remote Access
REMOTE ACCESS SMARTPHONE View live and recorded video remotely using an iOS or Android device and Uniden’s ProHD App. iOS screens are similar to the Android screens and are not shown. 1. From the Apple App Store, Google Play, or the Amazon App store, download the Uniden ProHD app. -
Page 14: Fcc Part 15/Ic Compliance
Select OK. 6. The Device List displays again, with your system now listed. Select your system and live video displays on your device. Go to www.uniden.com to download the complete User’s Manual for detailed information. FCC PART 15/IC COMPLIANCE FCC PART 15 COMPLIANCE This device complies with Part 15 of the FCC rules. -
Page 15: One-Year Limited Warranty
(E) used in any conjunction with equipment or parts or as part of any system not manufactured by Uniden, or (F) installed or programmed by anyone other than as detailed by the Operating Guide for this product.
Need help?
Do you have a question about the B6440D and is the answer not in the manual?
Questions and answers