zSpace zView User Manual
Hide thumbs
Also See for zView:
- Assembly instructions (2 pages) ,
- Assembly instructions (2 pages) ,
- Assembly instructions (2 pages)
Table of Contents
Advertisement
Quick Links
Advertisement
Table of Contents

Subscribe to Our Youtube Channel
Related Manuals for zSpace zView


Summary of Contents for zSpace zView
- Page 1 User’s Guide Version 2.2 zspace.com zView User’s Guide 20150115...
- Page 2 Inc. All other trademarks are the property of their respective owners. © zSpace, Inc. 2015...
-
Page 3: Table Of Contents
Contents Introduction zView Modes zView Requirements zView Setup Connecting to a Second Display Setting up the Camera Configuring zView Capturing a zSpace Session 11 Recording a zView Session 13 Downloading Updates zView-Enabled Software visit us online at zpace.com... -
Page 4: Introduction
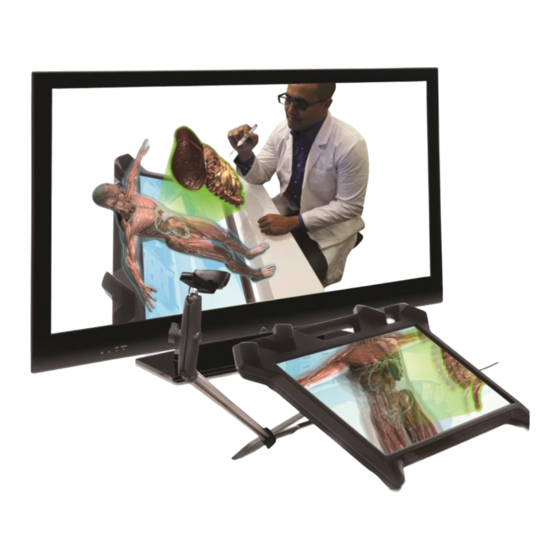
You can use zView to display the application in real time or record the zSpace session for later sharing. -
Page 5: Zview Requirements
A zSpace camera mount or a tripod You can purchase a zView kit from zSpace, which includes the zView software, a webcam, and a zSpace camera mount for attaching the webcam to the zSpace display. If you already have the zView software, you can purchase the webcam and camera mount separately as well. -
Page 6: Zview Setup
Choose Adjust Resolution. Check that the Control Panel shows the two displays in the same left-to-right order as your displays are physically placed. For example, in the window below, the zSpace display is to the right of the other display. -
Page 7: Setting Up The Camera
If you are using Standard View only, you can skip this step. Before you set up the camera, position the camera mount. This can be the zSpace camera mount, which attaches to the zSpace display, or it can be your own tripod. Next, plug the camera into your PC. - Page 8 Assembling the zSpace Camera Mount The zView kit includes the following pieces: zView Camera Mount Parts Left-to-right, these are the extender pole; a screw and 2 sides of the extender clamp, two pivot balls, and the pivot clamp. Screw a pivot ball onto the extender pole, as shown below.
- Page 9 Attach the extender clamp to the display’s leg as shown below. Extender pole Display leg Attach Extender Clamp Insert the extender pole into the appropriate notch in the clamp. Tighten the screw to secure the pole. Insert Extender Pole Attach pivot clamp to the extender pole by squeezing the spring-end and fitting the ball into the notch.
-
Page 10: Configuring Zview
Mount Camera Placing the Tripod Set the camera on the tripod so that the entire zSpace display screen is visible to the camera. Adjust the tripod so that you capture as much or as little of the user as you want. - Page 11 Check that lighting does not cause a glare on the zSpace display. Adjust the display in the zView window, either by moving or scaling it, if needed. Tip: If the Setup Wizard does not automatically appear, select the Tools -> Setup menu option.
- Page 12 Plug in your camera if you have not done so. On the USB Camera Setup screen, make sure your camera is listed. Choose the desired resolution. Click Next to continue. Camera Setup The zView Display Detection screen appears and is semi-transparent. Display Detection...
- Page 13 Alternatively, select the Tools -> Adjust Overlay Position menu option. Click on Finish to complete setup. When you start up zView another time, you will be prompted to reuse the current settings or run the Setup Wizard again. If your application includes zView controls, next time you run your application, you can start the application first...
-
Page 14: Capturing A Zspace Session
If the application does not fill the screen, or the image in zView is not centered, you can black out the zSpace display. To do so, select the Tools -> Blackout zSpace Display menu option. - Page 15 Overlay Out of Position Overlay Correctly Adjusted If you plan to record, you can hide the display bounds by deselecting the Tools -> Show Display Bounds menu option.
-
Page 16: Recording A Zview Session
Recording a zView Session You can share your zView session in real time, or record it for later sharing. You can record in either Standard View or Augmented Reality View. First, start zView, then your zView-enabled application. If you changed the camera position, rerun the Setup Wizard. -
Page 17: Downloading Updates
Downloading Updates To check if you have the latest version of zView, select the Help -> Update menu option. If a new version is available, you are prompted to download it. When download is complete, you are prompted to install it. Follow the prompts on the installer. -
Page 18: Zview-Enabled Software
Cyber Science 3D Tip: The first three – the zSpace STEM applications – are fully integrated with zView, so you can launch zView from within the application itself. If you are a software developer, zSpace provides two options for enabling your application for use with zView: ...
Need help?
Do you have a question about the zView and is the answer not in the manual?
Questions and answers