Advertisement
Quick Links
Advertisement

Related Manuals for Orion TeleTrack 9441


Summary of Contents for Orion TeleTrack 9441
- Page 1 Manual orion teletrack ® altazimuth tracking Mount #9441 customer support (800)‑676‑1343 E‑mail: support@telescope.com Corporate Offices (831)‑763‑7000 89 Hangar Way, Watsonville, CA 95076 Providing Exceptional Consumer Optical Products Since 1975 IN 295 Rev. C 02/09...
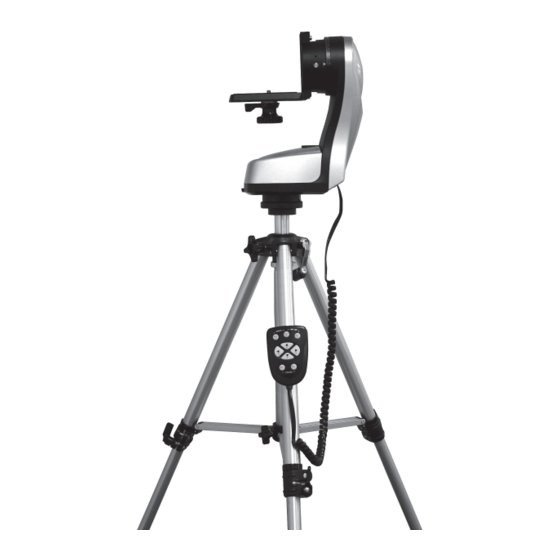
- Page 2 Altazimuth Fork Arm 1⁄4”-20 L-bracket Tripod Hand Controller Figure 1. The TeleTrack Altazimuth Tracking Mount...
-
Page 3: Parts List
Congratulations on your purchase of a quality Orion product. Your new TeleTrack Altazimuth Tracking Mount allows high performance support for terrestrial or astronomical observations. The TeleTrack is an “altazimuth” type of mount which can move in altitude (up and down) and azimuth (left and right) with respect to the ground. Designed for use during day or night, your TeleTrack mount features a smooth altazimuth fork arm, adjustable tripod, and multi-function hand controller for convenient operation. - Page 4 2 amps. 6. The TeleTrack’s hand controller has a modular plug at If you are using a portable battery like the Orion Dynamo, use the end of its cord. To attach the hand controller to the the Dynamo’s supplied 12V DC power cable (cigarette lighter...
-
Page 5: Instrument Orientation
Powering by ac adapter attaching the l‑bracket to the Mount In addition, the mount can be powered by an AC adapter rated The L-bracket has a short dovetail plate that slides into the at 12V DC, 750mA, tip positive. Plug the adapter cord into the corresponding dovetail mount on the fork arm. - Page 6 5. using the Hand Directional Buttons The directional buttons allow complete control of the mounted controller optical instrument’s position during slewing or tracking. The “LEFT” and “RIGHT” directional buttons control movements This section describes the basic hand controller procedures about the azimuth axis. The “UP” and “DOWN” directional but- needed to operate the TeleTrack mount.
- Page 7 3. Press the “FAST” speed button then the “UP” or “DOWN” Note: For Southern Hemisphere operation, the procedure to set your latitude is similar to the above, but with the 0 mark directional buttons to roughly level the telescope. and latitude value reversed. First slew the mount so the indi- 4.
- Page 8 your telescope and viewing through it. If the object is not allows you to automatically slew the mount to any of the 6 positions you have set. “Cruise and Shoot” mode is centered in the eyepiece, make careful adjustments using the “GUIDE”...
-
Page 9: Technical Specifications
Erasing a set Mount Position for cruise Modes the mount slews to it. “Cruise and shoot” mode will repeat its cycle after approximately 3 minutes. You can bypass this wait- If you want to permanently erase a cruise mode position that ing period by pressing the “FAST”... - Page 10 This device complies with Part 15 of the FCC Rules. Operation is subject to the following two conditions: (1) this device may not cause harmful interference, and (2) this device must accept any interference received, including interference that may cause undesired operation. Changes of modifications not expressly approved by the party responsible for compliance could void the user’s authority to operate the equipment.
-
Page 12: One-Year Limited Warranty
Orion’s option, any warranted instrument that proves to be defective, provided it is returned postage paid to: Orion Warranty Repair, 89 Hangar Way, Watsonville, CA 95076. If the product is not registered, proof of purchase (such as a copy of the original invoice) is required.
Need help?
Do you have a question about the TeleTrack 9441 and is the answer not in the manual?
Questions and answers