Table of Contents
Advertisement
Advertisement
Table of Contents

Related Manuals for Propel Trampolines Tie advanced x1


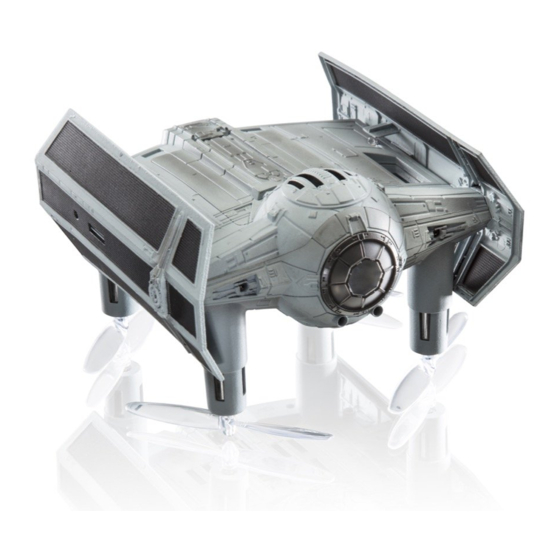
Summary of Contents for Propel Trampolines Tie advanced x1
- Page 2 Please refer to enclosed safety instructions. Package contains: - tie advanced x1 - 2.4 gHz wireless controller - 2 tie advanced Batteries - instruction Booklet - cHarger + usB caBle + wall adaPter...
-
Page 3: Table Of Contents
taBle of contents page 01. features fold-out page (after Pg. 4) 02. Pilot s gear ’ 03.vehicle stats 04. removing the tie advanced from the box 05. display case functions 06. controller battery installation 07. ship battery installation 08. charging your ship s battery ’... -
Page 4: Features
features • B uilt-in 6-axis gyroscope keeps the tie advanced extremely stable in all conditions • 4 -channel flight controls allow for incredible maneuvering including 360 rolls • l ed directional lights make your ship easy to follow • H and-painted to model-quality finish •... - Page 5 life leds front lights calibrate gyro Bluetooth sync for future app integration Barometric pressure sensor on/off Handle grip Battery auto-start / auto-land turn on/off leds Battery lock speaker Headphone Jack neck strap attachment (lanyard not included) controller Power on/off Propeller Battery cover ir transmitter (front of the ship)
-
Page 6: Vehicle Stats
removing tHe tie advanced veHicle stats from tHe display case carefully remove the top cover of the box and the acrylic window from the packaging, and place them somewhere safe. to free the ship from the support, gently pull up on the body of the ship and release the motors from the rubber grommets. -
Page 7: Controller Battery Installation
remote control Battery installation 1. on the back of the controller, unscrew and slide off the battery cover. - there is a screwdriver hidden in the right side arm of the controller. use alkaline or 1.5v 2. install 4 aa alkaline batteries (1.5v recHargeaBle Batteries rechargeable batteries are preferred) into the controller. -
Page 8: Ship Battery Installation
sHip Battery installation 1. during your first installation, pull the clasp to the unlocked position (as shown in illustration) to unlock the battery. next, remove the battery cover that comes in the package, as this cover is cosmetic and used for display purposes only. 2. -
Page 9: Charging Your Ship S Battery
cHarging your sHip’s li-poly Battery 1. insert the correct wall socket extension into the wall adapter depending on the country you are in (see illustration a). 2. next, connect the usB charging cord to the wall adapter and the charger. Plugged in steady red ->... -
Page 10: Replacing The Propeller Blades
propeller installation and replacement your tie advanced s propeller system is a precision ’ instrument that may need repair or replacement from time to time for optimal flight function. crash landing from high-speed aerial flights may cause damage to your propellers. 1. -
Page 11: Syncing Your Ship
warning! do not fly your ship in foul weather! important! when syncing your ship with the controller, always check that the ship is on a flat level surface. this ensures that the 6-axis gyro is properly calibrated. your ship utilizes an automatic 2.4 gHz channel selection system 2 second pusH that allows up to 12 people to fly side-by-side... - Page 12 music mode music mode lets you adjust the volume on your speaker or headphones or choose a background track. to enter music mode, hold down button 2 and button 4 for two seconds. the life leds will glow blue (or red in simulation mode). Push both buttons again for two seconds to exit music mode.
- Page 13 screwdriver this handy screwdriver attaches to your controller and can be used to remove screws from the battery cover or to tighten the screw on the phone holder. it can also be used to remove parts on your drone if repairs are needed. speaker the controller s speaker will play every sound,...
-
Page 14: Controller Functions
Barometric pressure sensor on/off (repulsorlift on/off) the barometric pressure sensor maintains the altitude of your ship above the ground, simulating the anti-gravity effect of a repulsorlift engine. this also lets you adjust your altitude incrementally during flight. Push the gimbal up or down and then release it, and your ship will hover at the new altitude. -
Page 15: Learning How To Fly (T-Mode)
learning How to fly (t-mode) if this is your first time flying please read the following instructions. if you are an experienced pilot feel free to skip ahead to the next section. t-mode is a special flying mode intended to help ease new pilots into learning basic flight controls in a safe environment. -
Page 16: Protective Cage
protective cage for beginner pilots we strongly suggest using the protective cage. make sure you install your protective cage before flight. this cage protects the propeller blades and the outside of the ship from taking damage when crashing into walls and other objects. -
Page 17: Preparing For Flight
for multi-person play Before beginning, ensure that all ships and controllers are powered off. make sure that no other 2.4gHz devices are in the area. each person must sync their vehicle individually, one at a time, in order to avoid interference. follow steps on page 11 ( sync to sHiP: for speed 1... -
Page 18: Flight Controls
fligHt control these are the basic flight functions for your ship. while learning to fly it is best to begin with a large space, at least until you get used to the basics. once you master your ship you can tackle more advanced maneuvers. Practice makes perfect! once you have these steps mastered, move to the next level. -
Page 19: Flying Tips
flying tips operate your ship in a wide space. ideally, the space will have at least a 100 foot radius. if you are flying your ship with others, make sure spectators are located behind you. for best performance, it is recommended that you operate the ship during zero wind conditions, as wind can greatly affect flight performance. -
Page 20: Turn On/Off Leds & Auxiliary Weapons
speed cHange when the controller is powered on, it will always start on speed mode 1. if the controller was in speed mode 3 before turning it off, it will return to speed mode 1 when it is turned back on. speed 1 speed 2 Push the button to change speeds between modes... -
Page 21: Auto-Start And Auto-Land
auto-start/auto-land when repulsorlifts are activated, push button once when on the ground to auto- start. Push button for 2 seconds when in the air to auto-land. auto-start auto-start only works when the barometric pressure sensor is activated. if barometric pressure sensor is activated, auto-start will work only if the left stick (gimbal) is in the center position. -
Page 22: Combat
clockwise roll (a) Push the right trigger button while flying and your ship will perform a 360-degree roll in a clockwise motion while continuing its current movement. if the ship is flying forward it will continue to move forward as it performs the roll, and will perform similarly with any directional movement. - Page 23 Battling when battling with your vehicle it is best to fly outside in a wide open space of about 200-300 feet, in an open field with no obstruction such as trees, houses, open water, or power lines. when battling indoors it is recommended to do so in a very large open area such as a gymnasium or sports center with high ceilings and no obstructions.
- Page 24 life led’s when the controller s power is turned on, all 3 ’ life leds will flash. once synced, all 3 life leds will glow red. reactions to being hit: when the ship is hit by an opponent, it will react and alter its flight. no additional hits can be inflicted on the ship during this time.
- Page 25 tHird Hit auto landing: this is the final hit in battle. when you have been hit a 3rd time your drone will enter into auto-land mode and descend in a downward spiral. taking over landing seQuence Pulling your left throttle stick all the way down during auto-landing sequence will activate user controlled landing mode.
- Page 30 ay no to memory wIped stromecHs...
-
Page 31: Warnings
tie advanced warning your tie advanced is designed for indoor or outdoor use. the tie advanced blades revolve at high speeds and can cause harm to the user, spectators, and animals. stand clear of the ship to reduce the risk of getting into its flight path. - Page 32 Battery warnings this ship uses a li-poly rechargeable battery. if the battery no longer stays charged, dispose of it properly according to local disposal requirements. controller requires 4“aa batteries (not included). Please read the important battery safety warning below. do not mix alkaline, standard (carbon-zinc) and rechargeable batteries (nickel metal Hydride).
-
Page 33: Fcc Notice
fcc part 15 c notice caution: changes or modifications not expressly approved by the party responsible for compliance could void the user’s authority to operate the equipment. note: this equipment has been tested and found to comply with the limits for a class B digital device, pursuant to Part 15 of the fcc rules. -
Page 34: Warranty And Legal Information
propel uk returns policy at Propel, we make premium products using the very best components. there are, on occasions, reasons for customers to return products to us. Propel uk offers a 90-day warranty to cover these eventualities, the details of which can be found on the Propel uk website at propelrc.co.uk. - Page 35 propel uk returns policy returned items failing witHin tHe warranty period if a fault occurs within the first 90 days from the date of purchase (and the fault is covered under the manufacturer's guarantee) then you will need to go to propelrc.co.uk and select the "customer care"...
- Page 36 propel uk returns policy items damaged during transit in the event that you purchased online, and later signed for, an item that has clearly been damaged in transport, you should add a comment to your signature for the items with the courier. you must also still inform us within the 7-working-day period if you have accepted goods which were clearly damaged when you received them by completing the returns authorisation form with all the required information.
- Page 37 limited 90-day warranty nortH america rooftoP Brands warrants to the original consumer that this product is free from any electrical or mechanical defects for a period of 90 days from the date of purchase. if any such defect is discovered within the warranty period, rooftoP Brands will repair or replace the unit free of charge upon receipt of the unit, shipped postage prepaid and insured to our warranty center.
- Page 38 industry canada notice canada only this device complies with industry canada licence-exempt rss standard(s). operation is subject to the following two conditions: (1) this device may not cause interference, and (2) this device must accept any interference, including interference that may cause undesired operation of the device. le présent appareil est conforme aux cnr d’industrie canada applicables aux appareils radio exempts de licence.
-
Page 39: Pilot S Log
pilot’s log...
Need help?
Do you have a question about the Tie advanced x1 and is the answer not in the manual?
Questions and answers