Table of Contents
Advertisement
Advertisement
Table of Contents

Subscribe to Our Youtube Channel
Related Manuals for ZKTeco MultiBio 700


Summary of Contents for ZKTeco MultiBio 700
-
Page 1: User Manual
Security at Fingertips User Manual MultiBio700 www.esslsecurity.com... -
Page 2: Product Overview
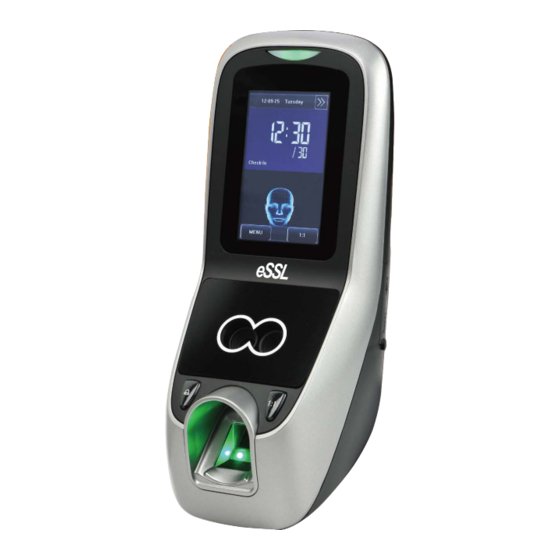
Fingerprint and PIN recognition and optional with RFID mode. It performs up to 20 verification methods all in a single device conveniently. MultiBio 700 stores 1500 faces and 2000 fingerprint templates and identifies users by 1:N mode. When users glance into the MutiBio700 camera, it captures the relative position, size, and shape of user’s eyes, nose, cheekbones, and jaw features. -
Page 3: Table Of Contents
MultiBio700- User Manual Table of Contents 1. Instructions for Use......................5 1.1 Standing Position, Posture and Face Expressions.............5 1.2 Enrollment Face Expressions..................6 1.3 Finger Placement......................6 1.4 Use of the Touch Screen....................8 1.5 Touch Operations.......................9 1.6 Appearance of Device....................10 1.7 Main Interface......................11 1.8 Verification Modes....................12 1.8.1 Fingerprint Verification...................12 1.8.2 Face Verification....................14... - Page 4 MultiBio700- User Manual 3.10 Enrolling an ID card ★ ..................33 4. User Management.....................34 4.1 Edit a User........................34 4.2 Delete a User......................35 4.3 Query a User......................35 5. Communication Settings..................36 5.1 Network Settings.......................37 5.2 Wiegand Output......................38 5.2.1 Wiegand 26-bits Output Description..............39 5.2.2 Wiegand 34-bits Output Description..............40 5.2.3 Customized Format....................42 5.3 Wiegand Input......................46 6.
- Page 5 MultiBio700- User Manual 6.7.7 Anti-Pass back setting...................60 6.8 Update ........................61 7. Data Management.....................62 8. Date/Time Setting ....................64 8.1 Set Date/Time......................64 8.2 Bell Setting ★ ......................65 9. Auto Test........................67 10. USB Disk Management ..................69 11. System Information....................70 12. Appendix ........................71 Appendix 1 T9 Input Instructions ...................71 Appendix 2 Introduction of Wiegand................72 Appendix 3 Photo ID Function..................74 Appendix 4 Multi-combination Authentication Mode ★...
-
Page 6: Instructions For Use
MultiBio700- User Manual 1. Instructions for Use 1.1 Standing Position, Posture and Face Expressions 1. Recommended standing-distance from device: For users 5-6 feet tall (1.5m-1.85m) we recommend users stand about 2 feet (0.5m) from the wall. W hen viewing your image on the device display window, step away if your image appears too bright. -
Page 7: Enrollment Face Expressions
MultiBio700- User Manual 1.2 Enrollment Face Expressions During the enrollment, position your head such way that your face appears in the center of the device display window. The device will prompt you how to move your head. Follow the voice prompts by first gently turning your head left, then right. Then your head gently down, then up, and so on. - Page 8 MultiBio700- User Manual 2. Improper finger placement: Not flat to the surface Off-center Slanting Off-center Please enroll and verify your fingerprint by using the proper finger placement mode. We shall not be held accountable for any consequences arising out of the degradation in verification performance due to improper user operations.
-
Page 9: Use Of The Touch Screen
MultiBio700- User Manual 1.4 Use of the Touch Screen Touch the screen with one of your fingertips or the edge of a fingernail, as shown in the following figure. A broad point of contact may lead to inaccurate pointing. When the touch screen is less sensitive to the touch, you can perform a screen calibration through the following menu operations. -
Page 10: Touch Operations
MultiBio700- User Manual 1.5 Touch Operations 1. Enter numbers: Press the [User ID] key. The system will automatically display the number input interface. After entering the user ID, press [OK] to save or press [X] to cancel and return to the previous interface. 2. -
Page 11: Appearance Of Device
MultiBio700- User Manual 3. Modify parameters: Press the default value of a parameter and the system will automatically switch to another value of this parameter. 1.6 Appearance of Device eSSL Pvt. Ltd. Page 10... -
Page 12: Main Interface
MultiBio700- User Manual 1.7 Main Interface eSSL Pvt. Ltd. Page 11... -
Page 13: Verification Modes
MultiBio700- User Manual 1. Date: The current date is displayed. 2. Screen Shortcut Keys: Press these shortcut keys to display the attendance status. Users can customize the function of each shortcut key. For details, see 6.6 Keyboard Definitions. 3. Time: The current time is displayed. Both 12-hour and 24-hour time systems are supported. - Page 14 MultiBio700- User Manual 4. If the verification is not successful, the device will prompt “Please try again”. 2. 1:1 fingerprint verification In the 1:1 fingerprint verification mode, the device compares current fingerprint collected through the fingerprint sensor with that in relation to the user ID entered through the keyboard. Adopt this mode only when it is difficult to recognize the fingerprint.
-
Page 15: Face Verification
MultiBio700- User Manual 4. If the verification is successful, the device will prompt “Verified”, otherwise the device will prompt “Please try again”. 1.8.2 Face Verification 1:1 face verification In the 1:1 face verification mode, the device compares current face collected through the camera with that in relation to the user ID entered through the keyboard. -
Page 16: Password Verification
MultiBio700- User Manual 4. If the verification is successful, the device will prompt“Verified”. The system will return to the main interface if the verification is not passed within 20 seconds. 1.8.3 Password Verification In the password verification mode, the device compares the password entered with that in relation to the user ID. -
Page 17: Id Card Verification
MultiBio700- User Manual 4. If the verification is successful, the device will prompt “Verified”, otherwise the device will prompt “Verify fail” and return to password input interface. 1.8.4 ID Card Verification ★ Note: Only the products with the built-in ID card module support the ID card verification. -
Page 18: Combination Verification
MultiBio700- User Manual 1.8.5 Combination Verification ★ The device supports up to 20 verification modes, including FACE&PIN/FP/RF/PW , FP&PW,FP&RF,FACE&FP,FACE&PW,FACE&RF,FP,PW,RF,FACE&PIN,FP/RF,P W/RF,FP/PW,PW&RF,PIN&FP,FP&PW&RF,PIN&FP&PW,FP&RF/PIN,FACE&FP& RF,FACE&FP&PW etc. For the detail, please refer to Appendix 4 Multi-combination Authentication Mode. Note: RF means ID card verification. Only the products with the built-in ID card module support the ID card verification. - Page 19 MultiBio700- User Manual Here is the combination verification operation; we will use the FACE&FP verification for an example. If you verify the fingerprint first and then the face, the operations are as follows. (1) The default main interface is the fingerprint verification mode, see the figure below. (2) Press your finger on the fingerprint sensor by adopting the proper finger placement.
-
Page 20: Main Menu
MultiBio700- User Manual 2. Main Menu There are two types of rights respectively granted to two types of users: the Ordinary users and administrators. Ordinary users are only granted the rights of face, fingerprint, password or card verification, while administrators are granted access to the main menu for various operations apart from having all the privileges granted to ordinary users. - Page 21 MultiBio700- User Manual System: Through this submenu, you can set system-related parameters, including the basic parameters, interface parameters, fingerprint, face and attendance parameters, Keyboard definitions, Access settings, firmware update etc. to enable the device to meet the user’s requirements to the greatest extent in terms of functionality and display. Data Mgt.: Through this submenu, you can perform management of data stored on the device, for example, deleting the attendance records, all data, clear administrator, restore to factory settings and query records.
-
Page 22: Add User
MultiBio700- User Manual 3. Add User Press [Add] on the [User Mgt.] interface to display the [Add User] interface as shown below. User ID: Enter a user ID. 1 to 9 digits user IDs are supported by default. Name: Enter a user name. 12 characters user names are supported by default. -
Page 23: Entering A User Id
MultiBio700- User Manual 3.1 Entering a User ID The device automatically allocates an ID starting from 1 for every user in sequence. If you use the ID allocated by the device, you may skip this section. 1. Press [User ID] on the [Add User] interface to display the user ID management interface. -
Page 24: Entering A Name
MultiBio700- User Manual 3.2 Entering a Name Use T9 input method to enter the user name through the keyboard. 1. Press [Name] on the [Add User] interface to display the name input interface. 2. On the displayed keyboard interface, enter a user name and press [X]. -
Page 25: Enrolling A Fingerprint
MultiBio700- User Manual 3. 3 Enrolling a Fingerprint 1. Press [Fingerprint] on the [Add User] interface to display the [Enroll Fingerprint] interface. 2. On the displayed [Enroll Fingerprint] interface, place your finger on the fingerprint sensor properly according to the system prompt. For details, see 1.3 Finger Placement. -
Page 26: Enrolling A Password
MultiBio700- User Manual 3. 4 Enrolling a Password 1. Press [Password] on the [Add User] interface to display the password management interface. 2. On the displayed keyboard interface, enter a password and press [OK]. Re-enter the password according to the system prompt and then press [OK]. -
Page 27: Enrolling A Face
MultiBio700- User Manual 3. 5 Enrolling a Face 1. Press [Face] on the [Add User] interface to display the face enrollment interface. 2. On the displayed face enrollment interface, turn your head to the left and right slightly, raise and lower your head according to the voice prompts, so as to enroll different parts of your face into the system to assure the accurate verification. -
Page 28: Entering A Group No
MultiBio700- User Manual 3.6 Entering a Group No. During face enrollment, the device automatically allocates a group No. starting from 1 for every user in sequence. When the number of users in Group No. 1 reaches the upper limit, the subsequent users will under Group No. -
Page 29: Modifying User Rights
MultiBio700- User Manual 3.7 Modifying User Rights Note: There are two types of rights respectively granted to two types of users: the ordinary users and administrators. Ordinary users are only granted the rights of face, fingerprint, or password verification, while administrators are granted the access to the main menu for various operations apart from having all the privileges granted to ordinary users. -
Page 30: Enroll Photos
MultiBio700- User Manual 3.8 Enroll Photos If you had enrolled your photo in the system, the system will display your enrolled photo in addition to your ID and name after you pass the verification. 1. Press [Photo] on the [Add User] interface to display the photo enrollment interface. -
Page 31: User Access Settings
MultiBio700- User Manual 3.9 User Access Settings Press [User Access] on the [Add User] interface to display the user access settings interface. User Access settings are to set the user’s rights to verify and open the door, such as the Verify Type, Time Zone and Duress FP management. - Page 32 MultiBio700- User Manual 2. Time Zone: (1) Group Time Zone: If the user uses the group time zone that he belong to. (2) Individual time zone: Select the time zone of this user instead of the group time zone. That will not affect other users in the group. (3) Duress FP: Enroll a new duress fingerprint or cancel an existing one.
- Page 33 MultiBio700- User Manual 2. Cancel duress FP: Press [Can. Duress FP] on the [User Access] interface to popup the confirm message. Select [YES] to delete the enrolled duress FP, otherwise select [NO] to cancel the operation. eSSL Pvt. Ltd. Page 32...
-
Page 34: Enrolling An Id Card
MultiBio700- User Manual 3.10 Enrolling an ID card ★ 1. Press [Card] on the [Add User] interface to display the [Enroll Card] interface. 2. The [Punch Card!] interface pops up as shown below. Swipe your ID card properly in the swiping area. For details, see 1.6 Appearance of the Device. -
Page 35: User Management
MultiBio700- User Manual 4. User Management Browse the user information, including the user ID, name, fingerprint, face, ID card, password, rights, group No. and user access settings through this interface. To add, edit or delete the basic information of users. Press [User Management] on the main menu interface to display the user management interface. -
Page 36: Delete A User
MultiBio700- User Manual 4.2 Delete a User On the [User Info] interface, you can delete all or partial user information. 1. Press [Delete] to delete a user. 2. On the displayed interface, click [YES] to delete the current user or [NO] to return to the previous interface. -
Page 37: Communication Settings
MultiBio700- User Manual 5. Communication Settings You can set related parameters for the communication between the device and PC, including the IP address, gateway, communication mode, subnet mask, baud rate, device ID, and communication key. eSSL Pvt. Ltd. Page 36... -
Page 38: Network Settings
MultiBio700- User Manual 5.1 Network Settings When the device communicates with the PC over Ethernet, you need to check the following settings: IP Address: The IP address is 192.168.1.201 by default and can be changed as required; the IP address of the device and that of the PC cannot be duplicated. Subnet Mask: The subnet mask is 255.255.255.0 by default and can be changed as required. -
Page 39: Wiegand Output
MultiBio700- User Manual you need to enter this password before connecting the PC software with the device; otherwise, the connection is unsuccessful. 1 to 6 digits passwords are supported Considering the massive data including the fingerprint and face templates stored in the device, it is recommended to transfer the data between the device and PC over network to enhance the transfer speed. -
Page 40: Wiegand 26-Bits Output Description
MultiBio700- User Manual 5.2.1 Wiegand 26-bits Output Description The system has a built-in Wiegand 26-bits format. Press [Wiegand Format], and select “Standard Wiegand 26-bits”. The composition of the Wiegand 26-bits format contains 2 parity bits and 24 bits for output contents (“User ID” or “Card Number”). The binary code of 24-bits represent up to 16,777,216 (0–16,777,215) different values. -
Page 41: Wiegand 34-Bits Output Description
MultiBio700- User Manual For example, for a user with the user ID of 12345, the enrolled card number is 0013378512 and the failed ID is set to 1. 1. When the output is set to “User ID”, the Wiegand output is as follows upon successful verification: 0 0 0 0 0 0 0 0 0 0 0 1 1 0 0 0 0 0 0 1 1 1 0 0 1 1 Even parity bit... - Page 42 MultiBio700- User Manual The composition of the Wiegand 34-bits format contains 2 parity bits and 32 bits for output contents (“User ID” or “Card Number”). The binary code of 32-bits represent up to 4,294,967,296 (0–4,294,967,295) different values. 33 34 Even Parity Bit User ID/Card Number Odd parity bit Table 2 Definition of Fields...
-
Page 43: Customized Format
MultiBio700- User Manual Even parity bit User ID=Binary code of 123456789 Odd parity bit 2. When the output is set to “Card Number”, the Wiegand output is as follows upon successful verification: Even parity bit User ID=Binary code of 0013378512 Odd parity bit 3. - Page 44 MultiBio700- User Manual For example, the Wiegand26 can be customized as follows: Definition of data bits: pssssssssccccccccccccccccp Definition of parity bits: eeeeeeeeeeeeeooooooooooooo Note: Wiegand26 consists of 26 bits. The first bit is the even parity bit of bits 2 to 13; the 26th bit is the odd parity bit of bits 14 to 25;...
- Page 45 MultiBio700- User Manual Characters used to define data bits and their meanings: c: Indicates the card number, that is, the output contents, it can be set to User ID/Card Number through menu operations. f: Indicates the facility code which is 0 by default. It is not configurable.
- Page 46 MultiBio700- User Manual Wiegand37a Data bits: pmmmmsssssssssssscccccccccccccccccccp Parity bits: oeobeobeobeobeobeobeobeobeobeobeobeoe Note: Wiegand37a consists of 37 bits. The first bit is the odd parity bit of bits 3, 4, 6, 7, 9, 10, 12, 13, 15, 16, 18, 19, 21, 22, 24, 25, 27, 28, 30, 31, 33, 34 and 36; the 37th bit is the odd parity bit of bits 2, 4, 5, 7, 8, 10, 11, 13, 14, 16, 17, 19, 20, 22, 23, 25, 26, 28, 29, 31, 32, 34 and 35;...
-
Page 47: Wiegand Input
MultiBio700- User Manual 5.3 Wiegand Input Wiegand Format: The system has two built-in formats Wiegand 26-bits and Wiegand 34-bits, and also supports the format customization function to meet individualized requirements. About the Wiegand format, please refer to 5.2 Wiegand Output. Bit counts: Wiegand data digit length. -
Page 48: System Configuration
MultiBio700- User Manual 6. System Configuration Through the [System] menu, you can set system-related parameters, including the General, Display, Fingerprint, Face, Log settings, Shortcut Def, Access Control Set, and Firmware Update, to enable the device to meet user requirements to the greatest extent in terms of functionality and display. -
Page 49: Interface Parameters
MultiBio700- User Manual 6.2 Interface Parameters Language: This parameter is used to display the current language used by the device. For multilingual-capable devices, you can switch between different languages through this parameter. Toolbar: This parameter is used to display the style of the shortcut keys on the initial interface. -
Page 50: Face Parameters
MultiBio700- User Manual The recommended thresholds are as follows: Threshold (FRR) (FAR) 1: N 1: 1 High Medium Medium High Algorithm Version: This parameter is used to select the fingerprint algorithm version between 9.0 and 10.0. Please select the algorithm version with caution because the fingerprint templates of these two algorithm versions are incompatible. -
Page 51: Log Settings
MultiBio700- User Manual otherwise, the matching is not successful. The valid value scope is 65─120. The higher the threshold, the lower the FAR and the higher the FRR are, and vice versa. The recommended thresholds are as follows: Threshold 1: N High Medium Medium... -
Page 52: Keyboard Definitions
MultiBio700- User Manual 6.6 Keyboard Definitions Define touch screen functional shortcut keys. 1. Press [Shortcut Def] to display the [Edit] interface, as shown below. 2. If you want to cancel the shortcut key, press [Status] to enter the edit interface, select the value to “Undefined”. -
Page 53: Time Zone Setting
MultiBio700- User Manual the same access control with other group, to open the door together). The new enrolled user is under the first group by default, and use the No. 1 group time zone, the No. 1 access control group. The new enrolled user is in unlocking state (if you have modified the related settings of access control, the system will be changed with the modification). -
Page 54: Holiday Setting
MultiBio700- User Manual 6.7.2 Holiday setting Special access control time may be needed during holidays. It is different to modify everybody’s access control time. So a holiday access control time can be set, which is applicable for all employees. 1. Add holiday: (1) Enter holiday add interface, press the key to edit the items. - Page 55 MultiBio700- User Manual 2. Edit holiday Select the holiday to be edited and enter the edit interface. The edit operation is similar to add holiday. After editing, press [Save] to save and return to the previous interface. Notice: If holiday access control time is set, user’s open door time zone during holiday is subject to the time zone here.
-
Page 56: Group Time Zone Setting
MultiBio700- User Manual 6.7.3 Group time zone setting Grouping is to manage employees in groups. Employees in group use group time zone by default. Group members can also set user time zone. Every group can hold three time zones. The new enrolled user belongs to Group 1 by default and can also be allocated to other groups. - Page 57 MultiBio700- User Manual Notice: 1. If the holiday is valid, only when there is an intersection between group zone and holiday time zone, can the group member open the door. 2. If the holiday is invalid, the access control time of group member won’t be affected by holiday.
-
Page 58: Unlock Combination Setting
MultiBio700- User Manual 3. Delete group time zone Select the line to be deleted. Press [Delete] to popup the confirm interface as follows. Select [Yes] to delete this holiday, otherwise select [No] to cancel the operation. 6.7.4 Unlock Combination Setting Make various groups into different access controls to achieve multi-verification and improve security. - Page 59 MultiBio700- User Manual 2. Edit Unlock Combination Select the line to be edited. Press the item directly to enter the edit interface. After editing, press [Save] to save the current information and return to the previous interface; press [Exit] directly to return to the previous interface without saving the current information.
-
Page 60: Access Control Parameter
MultiBio700- User Manual 6.7.5 Access control parameter Through the [Access] menu, you can set the parameters of the electronic locks and related access control devices. Lock Delay: Indicates the duration for the device to place the electric lock in open state. (Value scope: 1-10 seconds) Door Sensor Delay: Indicates the delay for checking the door sensor after the door is opened. -
Page 61: Duress Alarm Parameters
MultiBio700- User Manual 2. If the normally open or normally closed Time Zone is not defined yet by the time, the equipment will prompt that you to define the Time Zone, and transfer you to the Time Zone interface to add. 6.7.6 Duress Alarm Parameters There are duress alarm parameters setting in the device. -
Page 62: Update
MultiBio700- User Manual the items. (2) Press the touch screen number key to set the value, after setting, press [OK] to save, and press [X] for exit and return to the previous interface. (3) Press [Save] to save the current information and return to the previous interface; press [Exit] directly to return to the previous interface without saving the current information. -
Page 63: Data Management
MultiBio700- User Manual 7. Data Management Through the [Data Mgt.] menu, you can perform management of data stored on the device, for example, delete the attendance records, delete all data, clear administrator, restore the device to factory settings, and query user records. - Page 64 MultiBio700- User Manual After setting the query conditions, press [Query] and the records that meet the specified query conditions will be displayed on screen. Select the row where the desired record is located, you can query the detailed information of this record. For example, press User ID and enter the edit interface, input the ID number and press [Query], the query result will display as below.
-
Page 65: Date/Time Setting
MultiBio700- User Manual 8. Date/Time Setting 8.1 Set Date/Time The date and time of the device must be set accurately to ensure the accuracy of attendance time. 1. Press [Menu] on the initial interface to display the main menu interface. 2. -
Page 66: Bell Setting
MultiBio700- User Manual 8.2 Bell Setting ★ Lots of companies need to ring their bells to signal the start and end of work shifts, and they usually manually ring their bells or use electric bells. To lower costs and facilitate management, we integrated the time bell function into the device. - Page 67 MultiBio700- User Manual Repeat: This parameter is used to set the alarm times. State: This parameter is used to set whether to enable the bell. Bell Type: You can select between internal ringing and external ringing. For internal ringing, the ring tone is played by the loudspeaker of the device. For external ringing, the ring tone is played by an external electric bell that is connected with the device.
-
Page 68: Auto Test
MultiBio700- User Manual The auto test enables the system to automatically test whether functions of various modules are normal, including the screen, sensor, voice, face, keyboard and clock tests. 1. Test Screen: The device automatically tests the display effect of the color TFT display by displaying full color, pure white and pure black and checks whether the screen displays properly. - Page 69 MultiBio700- User Manual The Screen Calibration Operation: (1) Press [Menu] on the initial interface to display the main menu interface. (2) Press [Calibration] on the [Auto Test] interface to display the screen calibration interface. (3) Touch the center of the cross “+”. (4) Repeat Step 3 following the move of the “+”...
-
Page 70: Usb Disk Management
MultiBio700- User Manual 10. USB Disk Management Through the [Dn/Upload] menu, you can download user information and attendance data stored in a USB disk to related software or other fingerprint recognition equipment. 1. Download Transactions: Download all the attendance data from the device to a USB disk. -
Page 71: System Information
MultiBio700- User Manual 11. System Information You can check the storage status as well as version information of the device through the [System Information] option. Records: The number of enrolled users, administrators and passwords are displayed on the [Records] interface; the total fingerprint storage capacity and occupied capacity as well as the total attendance storage capacity and occupied capacity are graphically displayed respectively. -
Page 72: Appendix
MultiBio700- User Manual 12. Appendix Appendix 1 T9 Input Instructions The device supports to input English characters, numbers and symbols. Press related button to input text. For example, press [Name] to display the text input interface, as shown in the figure: eSSL Pvt. -
Page 73: Appendix 2 Introduction Of Wiegand
MultiBio700- User Manual To enter a name, proceed as follows: 1. Press [Name] on the [Add] interface, as shown in figure below. 2. Enter the letter characters, and a list of characters in relation to the letter is presented in the text display area. 3. - Page 74 MultiBio700- User Manual Digital Signals The figure below is a sequence diagram in which the card reader sends digital signals in bit format to the access controller. In this sequence diagram, Wiegand follows the SIA’s access control standard protocol for the 26-bit Wiegand card reader (one pulse time ranges between 20 us and 100 us, and the pulse jump time ranges between 200us and 20ms).
-
Page 75: Appendix 3 Photo Id Function
MultiBio700- User Manual Appendix 3 Photo ID Function The Photo ID function is used to display the photo enrolled by a user or stored in a USB disk on the screen in addition to such information as the user ID and name. [Operation Steps] 1. -
Page 76: Appendix 4 Multi-Combination Authentication Mode
MultiBio700- User Manual Appendix 4 Multi-combination Authentication Mode ★ Besides this function only is owned by the fingerprint access control machine that has been appointed, most of the fingerprint machines only have two ways to verify by fingerprint and password, we provide a personal or group Multi-combination Authentication Mode for high security Access control area, verification type main include five elements that are User Number (PIN), Fingerprint (FP), Face (FACE), Password (PW) and RF card (RF), which can combine into multi-combination. - Page 77 MultiBio700- User Manual FP + PW are verified 1) FP(1:N)+PW+“OK” FP&PW 2) PIN+FP(1:1)+PW+“OK” 3) PIN+PW+“OK”+FP FP + RF are verified 1) RF+FP(1:1) FP&RF 2) FP(1:N)+RF 3) PIN+FP(1:1)+RF FACE + FP are verified 1) FP(1:N)+FACE 2) FACE(1:N)+FP FACE&FP 3) PIN+FACE(1:1)+FP 4) PIN+FP(1:1)+FACE FACE + PW are verified 1) FACE(1:N)+PW+“OK”...
- Page 78 MultiBio700- User Manual FACE + PIN are verified FACE&PIN PIN+FACE(1:1) FP or RF is verified 1) PIN+FP(1:1) FP/RF 2) RF(1:N) 3) FP(1:N) FP or RF is verified 1) PIN+PW+“OK” PW/RF 2) RF(1:N) FP or PW is verified 1) PIN+FP(1:1) FP/PW 2) FP(1:N) 3) PIN+PW+“OK”...
- Page 79 MultiBio700- User Manual 1) FACE(1:N)+FP+RF 2) FP+FACE(1:1)+RF 3) RF(1:N)+FACE+FP 4) PIN+FP(1:1)+FACE+RF 5) PIN+FACE(1:1)+FP+RF FACE + FP + PW are verified 1) FACE(1:N) +PW+“OK”+FP 2) FP+PW+“OK”+FACE(1:1) FACE&FP&PW 3) PIN+FP(1:1) +PW+“OK”+FACE 4) PIN+FACE(1:1) +PW+“OK”+FP 5) PIN+PW+“OK”+FP+FACE Note: For combined verification, it is better to enroll all the elements in need for using verification mode, or verification will fail.
-
Page 80: Appendix 5 Anti-Pass Back
MultiBio700- User Manual Appendix 5 Anti-Pass Back ★ 【overview】 Sometimes, some illegal people follow the other one into the gate, which will cause the security problems. To prevent such risks, this function is enabled. The In record must match the Out record, or the gate won’t open. This function needs two machines to work together. - Page 81 MultiBio700- User Manual will be refused by “anti-pass back” function. For example, a user’s recent record is “in”, his second record can be “out” or “in”. His third record is based on his second record. Out record and in record must match.(Notice: If customer has no record before, then he can come in but cannot go out.
- Page 82 MultiBio700- User Manual 4. Enroll user The user must be on master machine and slave machine at the same time, and user PIN must be the same. Therefore, it is necessary to enroll user on master machine and slave machine at the same time. 5.
-
Page 83: Appendix 6 Environment-Friendly Use Description
MultiBio700- User Manual Appendix 6 Environment-Friendly Use Description The Environment Friendly Use Period (EFUP) marked on this product refers to the safety period of time in which the product is used under the conditions specified in the product instructions without leakage of noxious and harmful substances. The EFUP of this product does not cover the consumable parts that need to be replaced on a regular basis such as batteries and so on. - Page 84 #24,Shambavi Building, 23rd Main,Marenahalli, JP Nagar 2nd Phase, Bangalore - 560078 Phone: 91-8026090500 | Email : sales@esslindia.com www.esslsecurity.com...
Need help?
Do you have a question about the MultiBio 700 and is the answer not in the manual?
Questions and answers