
Related Manuals for Cardio Zone Fast Track


Summary of Contents for Cardio Zone Fast Track
- Page 1 OWNER’S MANUAL Super Gym’s Fitness Blowout.com 2210 S. Sepulveda Blvd. Los Angeles, CA 90064 Phone: 800-FIT-4-LESS Or 800-348-4537 Fax: 310-235-2008 For service, please visit http://www.fitnessblowout.com/service...
-
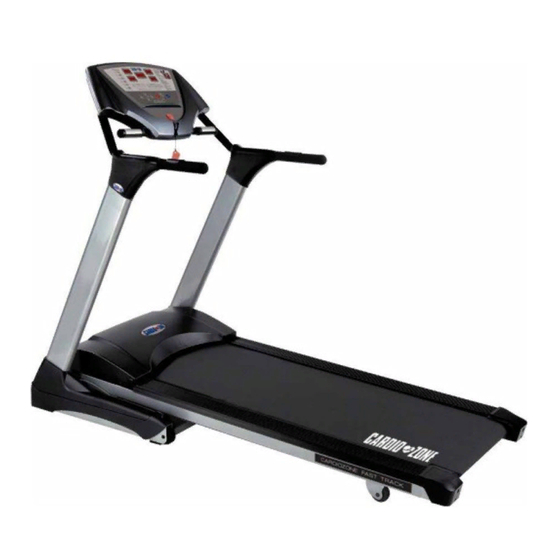
Page 2: Overview Drawing
1. OVERVIEW DRAWING... -
Page 3: Important Safety Instructions
1. IMPORTANT SAFETY INSTRUCTIONS When using an electrical appliance, basic precautions should always be followed, including the followings: Read all instructions before using the treadmill. DANGER- To reduce the risk of electric shock: Always unplug this appliance from the electrical outlet immediately after using and before cleaning. -
Page 4: Grounding Instructions
1. GROUNDING INSTRUCTIONS This product must be grounded. If malfunction or breakdown occurs, grounding provides a path of least resistance for electric current to reduce the risk of electric shock. This product is equipped with a cord having an equipment-grounding conductor and a grounding plug. -
Page 5: Motorized Treadmill Pre-Assembly
2. MOTORIZED TREADMILL PRE-ASSEMBLY Handrail control button and heart rate strap are optional items in the package 1.Heart rate can be measured in this treadmill. Attach strap to chest during exercise, the heart rate value will display on the PULSE window. 2. -
Page 6: Assembly Steps
3. ASSEMBLY STEPS Assembly requires two or more persons during the process . 1. Pot Holder assembly Put Tea Pot Holder (M) on the Upright Bar (D), secure the Bolt (b) inserted and fixed with fastening. Ps. Personal option, the Tea Pot Holder may Put on the other side of Upright Bar. - Page 7 3. Then assemble together the side covers (E, F) with the body frame, please follow the directions shown on the drawing. Tighten the screw (a) provided. 4. The assembly of Handrails(L & R): Now, connect the hadrail (I, J) set with the computer pipe (G, H) as shown in figure.
- Page 8 5. Insert the control wire from the upright bar into thecomputer pipe. Insert thru the hole under the computer pipe. Make sure to tighten with bolts (d) provided. And the computer wire is reached the upright bars. Ps. Pay attention not to damage the wire as fix the bolts.
- Page 9 7. As the above steps have been completed, connect the control wire and the switch cable with the outlet from the computer console; insert the excessive wire or cable into the console. Align the screw holes and connect the computer to the computer pipe. Tighten up with bolts (d).
- Page 10 4. CAUTIONS Note: The cylinder contains high pressure; please avoid contact with any objects. Note: If the cylinder is damaged, the frame would not be stable and may cause serious danger during folding up process. This treadmill is foldable. All operation should be stopped when folding (include stopping walking belt, disconnecting power cord), then fold up treadmill as shown on the drawing.
- Page 11 5. MAINTENCE 1. If the Walking Belt tracks off center to the right or left of the deck, first turn the power off. Then use a 6mm wrench to tighten the rear roller bolt on the side of the treadmill toward which the belt is moving.
-
Page 12: Computer Instruction
6. Computer Instruction A. General Operation 1. Turn on the switch. 2. Put the safety key into the recess of the console. The beeper will make an alerting sound, meanwhile the LED windows shows “----“. The treadmill is ready. 3. Press to begin “MANUAL”... - Page 13 MODE B. Function of 1. In Ready Mode, press , the MANUAL LED will flash and you can press " to select the desired programs P1 – P6. 2. MANUAL function : When MANUAL LED is flash you can press and the MANUAL will stop to flash and light.
Need help?
Do you have a question about the Fast Track and is the answer not in the manual?
Questions and answers