
Related Manuals for Reliable Steamboy T1


Summary of Contents for Reliable Steamboy T1
- Page 1 The T1 Steamboy™ Steam Floor Mop INSTRUCTION MANUAL GUIDE D’UTILISATION MANUAL DE INSTRUCCIONES...
- Page 2 ENGLISH FRANÇAIS ESPAÑOL...
- Page 3 THE T1 STEAMbOy STEAM FLOOR MOP INSTRUCTION MANUAL ENGLISH...
- Page 4 CONGRATULATIONS We would like to thank you, and congratulate you for purchasing the Steamboy™ steam floor mop from Reliable Corporation. This Steamer is a new way of cleaning that is effective and far more hygienic than conventional methods. The Steamer achieves a high degree of hygiene and cleaning power by converting water into steam.
-
Page 5: Important Safety Instructions
IMPORTANT SAFETy INSTRUCTIONS When using an electric appliance, basic precautions should always be followed, including the following: READ ALL INSTRUCTIONS bEFORE USING THIS STEAM CLEANER WARNING: Danger of scalding TO REDUCE THE RISk OF FIRE, ELECTRIC SHOCk, OR INjURy: • This product is designed for domestic use only. -
Page 6: Instructions For Use
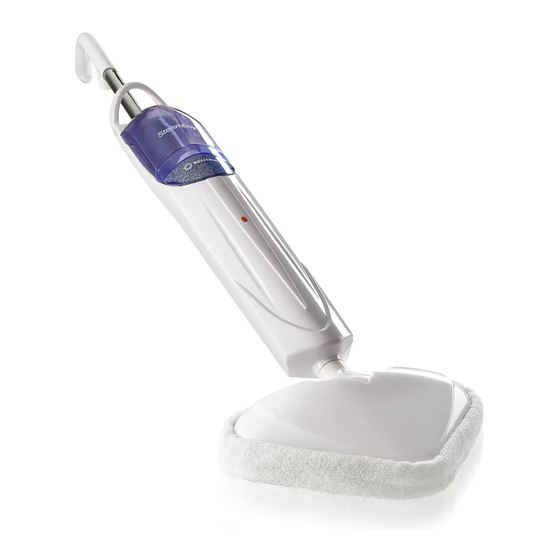
kEy FEATURES OF THE STEAMbOy A. Steamer Handle B. Trigger C. Quick Release Cord Wrap D. Carry Handle E. Water Tank Filter G. Steamer Body H. LED Lower Cord Wrap Power Cord K. Steamer Head L. Cloth Pad M. Carpet Glider THE FOLLOWING INFORMATION IS PROVIDED FOR SERVICE by A qUALIFIED ELECTRICIAN ONLy: Rated voltage: 110~120V, 60HZ, 1500W This appliance must be grounded. Use only the proper type outlet when plugging in the appliance, do not attempt to override the ground wire feature. -
Page 7: How To Assemble And Use
HOW TO ASSEMbLE AND USE • Attach steamer head to steamer body. • Secure steamer head with the small Philips Head Screw until is fully tightened. • Insert steamer handle down into the steamer body. • Screw the Large Philips Head screw through the opening at the back of steamer body into the rear of the steamer handle and tighten until secure. • Place the steamer head in cloth pad, fasten pad by pulling the cord while pressing on Toggle. NOTE: Do not operate without a floor cloth in place. • Remove Water tank by lifting straight up and away from the unit, unscrew cap of the Water tank, remove the insert assembly, fill with cool tap water, replace the insert assembly and replace and tighten the cap. Replace Water Tank back to the unit. • Twist the Quick Release Cord Wrap clockwise to unwrap the Power Cord completely and plug into a grounded outlet. • The LED will illuminate when the steamer is connected to power socket. Please wait for 20 seconds (heat up period) before pressing trigger. The steam unit is now ready for use. NOTE: It is recommended that another high wattage appliance is not operated on the same circuit to avoid a circuit overload. -
Page 8: Cleaning And Maintenance
INSTRUCTIONS FOR USE OF CARPET GLIDER ACCESSORy • Please ensure micro fiber cloth is attached as outlined previously. • Please place carpet glider on the floor in an upright position with the triangular flat surface facing downwards. • Please place Floor Steamer head on the glider as illustrated • The Carpet Glider is now ready for use. IMPORTANT The Carpet Glider is designed not to be fixed to the floor head for safety reasons including preventing burns. The carpet glider is designed for use on soft carpeted areas only. It is not designed for use on hard floor surfaces. -
Page 9: Troubleshooting
TROUbLESHOOTING CAUTION: Prior to troubleshooting isolate the unit by removing the cord from the power socket. PRObLEM REMEDy LED is not on 1. Ensure Steamer power cord is correctly plugged into power outlet. 2. Ensure circuit breaker is operational. 3. Try operating the steamer from another power outlet. No Steam 1. Ensure the water tank has correct level of water. Pale residue left on the floor 1. Can be removed with household white vinegar (Caused by leaving the floor or a decalcifying product. steamer in the same position 2. Alternatively reheat the area for one minute and for too long) residue should be removed. CAUTION: DO NOT... - Page 10 For a period of one year from date of purchase we will, free of charge, repair defects in material or workmanship LIMITED 1 YEAR WARRANTY which appear in the mechanical or electrical parts of all Reliable™ brand products excluding all wear and tear com- ponents.
- Page 11 STEAMbOy™ T1 VADROUILLE à VAPEUR MANUEL D’INSTRUCTIONS FRANÇAIS...
- Page 12 FÉLICITATIONS Nous vous remercions et vous félicitons pour l’achat de la dernière vadrouille à vapeur Steamboy™ de Reliable Corporation. La vadrouille à vapeur est une nouvelle façon de nettoyer qui est plus efficace et beaucoup plus hygiénique que les méthodes conventionnelles.
-
Page 13: Importantes Mesures De Sécurité
IMPORTANTES MESURES DE SÉCURITÉ Les précautions de base suivantes doivent toujours être respectées lorsque vous utilisez un appareil électrique : LIRE TOUTES LES INSTRUCTIONS AVANT D’UTILISER CETTE VADROUILLE à VAPEUR MISE EN GARDE : Danger de brûlure POUR DIMINUER TOUT RISqUE DE FEU, DÉCHARGE ÉLECTRIqUE OU DE bLESSURE : • Ce produit a été conçu seulement pour un usage ménager. • Ne pas utiliser à l’extérieur de la maison. • Ne pas laisser la vadrouille en marche et sans surveillance. Débranchez le cordon d’alimentation lorsque l’appareil n’est pas utilisé ou avant tout entretien. -
Page 14: Instructions D'utilisation
• Ranger votre vadrouille à l’intérieur dans un endroit sec et frais. • Garder votre surface de travail bien éclairée. • Ne jamais mettre des détergents nettoyants dans la Vadrouille. Ceci rendra le fonctionnement non sécuritaire et endommagera l’appareil. • Utiliser seulement comme décrit dans ce manuel. Utiliser seulement les accessoires recommandés par le fabricant. CONSERVER CES INSTRUCTIONS CARACTÉRISTIqUES PRINCIPALES DE STEAMbOy A. Poignée de la Vadrouille B. Gâchette C. Cordon Enroulable à Dégagement Rapide D. Poignée de Transport E. Réservoir d’Eau Filtre G. Corps de la Vadrouille H. Voyant DEL Enrouleur de Cordon Inférieur Cordon d’Alimentation K. Tête de la Vadrouille L. Lingette M. Patin à Tapis L’INFORMATION SUIVANTE EST FOURNIE POUR LE SERVICE DONNÉ... - Page 15 d’utilisation et de précaution sur la surface du fabricant du plancher pour vous assurer l’adéquation à la vadrouille à vapeur. Pour la première utilisation de l’appareil, veuillez tenir l’interrupteur afin de per- mettre que l’eau soit pompée au réservoir de vapeur. La pompe fera un son plus fort au cours de cette première opération. COMMENT L’ASSEMbLER ET L’UTILISER • Attachez la tête de la vadrouille au corps. • Fixez la tête de la vadrouille avec la petite vis à tête Philips jusqu’à ce qu’elle soit complètement serrée. • Insérez la poignée de la vadrouille dedans le corps de la vadrouille. • Visez la grande vis à tête Philips à travers l’ouverture à l’arrière du corps de la vadrouille, à l’arrière de la poignée, et resserrez jusqu’à ce qu’elle soit fixée. • Placez la tête de la vadrouille dans la lingette, fermez la lingette en tirant sur le cordon d’alimentation tout en appuyant sur l’interrupteur à bascule. AVERTISSEMENT : Ne pas utiliser sans que les serpillières soient bien en place.
-
Page 16: Nettoyage Et Entretien
MISE EN GARDE : NE jAMAIS FAIRE FONCTIONNER LA VADROUILLE à VAPEUR SANS L’EAU. NE jAMAIS DIRIGER DE VAPEUR SUR UNE PERSONNE OU UN ANIMAL. UTILISER LA VADROUILLE à VAPEUR SEULEMENT SUR LE PLANCHER DUR SCELLÉ. • Lorsque la vadrouille à vapeur arrête d’émettre de vapeur, ce qui se produit après environ 30 minutes d’utilisation, il suffit d’enlever le réservoir d’eau, le recharger et continuer le nettoyage. •... -
Page 17: Pièces De Rechange
PIÈCES DE RECHANGE 2 Joints toriques extralarges – Peuvent être utilisés pour remplacer les joints au bas du réservoir d’eau. 1 Joint torique extrapetit – Peut être utilisé pour remplacer le joint au bas du filtre. DÉPANNAGE ATTENTION : Avant du dépannage, isolez l’appareil en débranchant le cordon de la prise d’alimentation. PRObLÈME SOLUTION Voyant DEL n’est pas affiché 1. Assurez-vous que le cordon d’alimentation soit correctement branché dans la prise électrique. 2. Assurez-vous que le disjoncteur soit en fonctionnement. 3. Essayer de faire fonctionner la vadrouille dans une autre prise électrique. Pas de vapeur 1. Assurez-vous que le réservoir d’eau ait le niveau approprié d’eau. Présence d’un résidu pale dans le 1. Peut être enlevé à l’aide d’un peu de vinaigre blanc plancher (Provoqué en laissant la ménager ou un produit décalcifiant. - Page 18 For a period of one year from date of purchase we will, free of charge, repair defects in material or workmanship GARANTIE LIMITÉE D’UN AN which appear in the mechanical or electrical parts of all Reliable™ brand products excluding all wear and tear com- ponents.
- Page 19 STEAMbOy™ T1 LIMPIA PISOS CON VAPOR MANUAL DE INSTRUCCIONES ESPAÑOL...
- Page 20 FELICIDADES Nosotros le felicitamos y le damos las gracias por comprar el limpia pisos de vapor Steamboy™ de Reliable Corporation. Este limpiador de vapor le dará una nueva manera de limpiar que es efectiva y mucho mas higiénica que los méto- dos convencionales.
- Page 21 NOTICIA IMPORTANTE PARA SU SEGURIDAD Cuando use cualquier maquina eléctrica siempre debe seguir las instrucciones de precaución y seguridad, incluyendo lo siguiente: LEA TODAS LAS INSTRUCCIONES ANTES DE UTILIZAR ESTE LIMPIADOR DE VAPOR ADVERTENCIA: puede quemarse la piel PARA REDUCIR EL RIESGO DE INCENDIOS, ELECTROCHOqUE O DE LESIONES: • Este producto se ha diseñado solo para el uso domestico.
-
Page 22: Instrucciones Para Su Uso
• No utilice la maquina en las escaleras. • Guarde su limpiador de pisos dentro, en un lugar fresco y seco. • Use buena luz cuando este trabajando con el limpia pisos. • Nunca introduzca ningún detergente de limpiar al limpiador de pisos de vapor. Eso hace que la operación sea insegura y también dañara el equipo. • Use la maquina solo tal como esta estipulado en este manual. Solo utilice los accesorios recomendados por el fabricante. GUARDE ESTAS INSTRUCCIONES CARACTERISTICAS PRINCIPALES DEL STEAMbOy A. Asa para Aguantar el Equipo B. Disparador de Vapor C. Desenroscador del Cordon con Rapides D. Asa para Cargar la Maquina E. Tanque de Agua Filtro G. Cuerpo de la Maquina de Vapor H. Piloto de DEL (Diodo Electrico de Luz) Enroscador del Cordon de Abajo Cordon de la Corriente K. Cabeza por Donde Sale el Vapor L. Paño de Limpiar M. Base para Limpiar Alfombras LA INFORMACIóN SIGUIENTE SE PROPORCIONA PARA EL MANTENIMIENTO DE LA MAqUINA SOLO POR UN ELECTRICISTA CALIFICADO:... - Page 23 le recomendamos que revise las instrucciones del uso y del cuidado del piso del fabricante de su piso para asegurar que se pueda limpiar con vapor. La primera vez que use la maquina, por favor aguante el interruptor para permitir que el agua llegue al compartimiento de vapor. La bomba hará un ruido mas fuerte durante esta operación inicial. COMO ENSAMbLAR y UTILIZAR • Adjunte la cabeza de vapor al cuerpo de la maquina de vapor. • Fijar la cabeza de vapor con el tornillo pequeño de estrellas hasta que este apretado. • Introducir el tubo del asa al cuerpo de la maquina. •...
-
Page 24: Limpieza Y Mantenimiento
quitar estos residuos utilizando un producto descalcificador o unas gotas de vinagre. (Ver la guiá de que hacer cuando existe un problema). ADVERTENCIA: nunca use la maquina si no tiene agua. Nunca levante el vapor hacia las personas o animales. Use la maquina de vapor solo en pisos sellados duros. -
Page 25: Partes De Repuesto
PARTES DE REPUESTO 2 x Aro ` ` O ` ` Grandes – Se pueden usar para remplazar el aro O en el fondo del tanque de agua. 1 x Aro ` ` O ` ` Pequeño – Se puede usar para remplazar el aro O en el fondo del filtro. GUIA DE qUE HACER CUANDO EXISTE UN PRObLEMA PRECAUCION: Antes de hacer cualquier revision del problema, quitar el cordon de la corriente. PRObLEMA SOLUCION No se enciende el piloto DEL... - Page 26 For a period of one year from date of purchase we will, free of charge, repair defects in material or workmanship GARANTÍA LIMITADA DE 1 AÑO which appear in the mechanical or electrical parts of all Reliable™ brand products excluding all wear and tear com- ponents.
- Page 27 1 800 268 1649 www.reliablecorporation.com...
Need help?
Do you have a question about the Steamboy T1 and is the answer not in the manual?
Questions and answers
Why doesn’t the pad feel hot