LG LSXC22486 SERIES Owner's Manual
Hide thumbs
Also See for LSXC22486 SERIES:
- Owner's manual (64 pages) ,
- Owner's manual (60 pages) ,
- Owner's manual (61 pages)
Table of Contents
Advertisement
Advertisement
Table of Contents
Troubleshooting

Related Manuals for LG LSXC22486 SERIES


Summary of Contents for LG LSXC22486 SERIES
-
Page 1: Side By Side
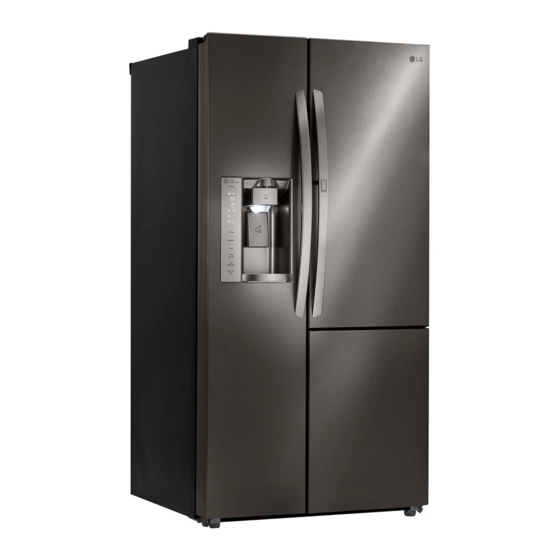
SIDE BY SIDE REFRIGERATOR Please read this owner’s manual thoroughly before operating and keep it handy for reference at all times. Model name: (* = color) LSXC22486* LSXC22436* LSXC22426* P/No. MFL67653465-1 www.lg.com Copyright © 2017 LG Electronics Inc. All Rights Reserved. -
Page 2: Table Of Contents
TABLE OF CONTENTS TABLE OF CONTENTS PRODUCT FEATURES OPERATION Before Use IMPORTANT SAFETY Control Panel INSTRUCTIONS - Airflow - Control Panel Features COMPONENTS Smart Functions Automatic Icemaker Refrigerator Exterior - When You Should Turn the Icemaker O Refrigerator Interior - Normal Sounds You May Hear - Preparing for Vacation INSTALLATION - Power Failure... -
Page 3: Product Features
PRODUCT FEATURES PRODUCT FEATURES *Your model may include some of the following features. DOOR-IN-DOOR REFRESHMENT CENTER The Door-in-Door Refreshment Center provides a convenient area for frequently-used items that require easy access. FRESH ZONE DRAWERS The Fresh Zone drawers are designed to help keep fruits and vegetables fresh. -
Page 4: Important Safety Instructions
IMPORTANT SAFETY INSTRUCTIONS IMPORTANT SAFETY INSTRUCTIONS READ ALL THE INSTRUCTIONS BEFORE USING THE APPLIANCE. This guide contains many important safety messages. Always read and obey all safety messages. This is the safety alert symbol. It alerts you to safety messages that inform you of hazards that can kill or hurt you or others, or cause damage to the product. -
Page 5: Important Safety Instructions
IMPORTANT SAFETY INSTRUCTIONS IMPORTANT SAFETY INSTRUCTIONS READ ALL INSTRUCTIONS BEFORE USING THE APPLIANCE. To reduce the risk of fire, electric shock, or personal injury when using your product, basic safety precautions should be followed, including the following: This product is not to be used for special Do not operate the refrigerator or touch purposes such as the storage of medicine the power cord with wet hands. - Page 6 If the appliance's power cord is damaged, your LG Electronics Service Center. the cord must be replaced by the manu- The insulation in this unit contains facturer or its service agent or a similarly cyclopentane or a pentane like blowing hazard.
-
Page 7: Components
COMPONENTS COMPONENTS Use this page to become more familiar with the parts and features of your refrigerator. Refrigerator Exterior for Door-In-Door Models Freezer Refrigerator Preserves frozen food. Preserves food. Door-in-Door Control Panel Sets the refrigerator and freezer temperatures, the dispenser mode. Filtered Water and Ice Dispenser water and ice. -
Page 8: Refrigerator Interior
COMPONENTS Refrigerator Interior for Door-In-Door Models Freezer Refrigerator Compartment Compartment Dairy Corner LED Lamp Filter LED Lamp Automatic Icemaker Shelf Shelf Refreshment Center Shelf Door Bin Freezing Zone Fresh Zone Door Bin Door Bin NOTE Parts, features and options vary by model. Your model may not include every option. - Page 9 COMPONENTS Refrigerator Interior for Standard Models Freezer Refrigerator Compartment Compartment Dairy Corner LED Lamp Filter LED Lamp Automatic Icemaker Door Bin Shelf Shelf Shelf Door Bin Door Bin Door Bin Freezing Zone Fresh Zone Door Bin Door Bin NOTE Parts, features and options vary by model. Your model may not include every option.
-
Page 10: Installation
INSTALLATION INSTALLATION Installation Overview to another location. 1 Unpacking the refrigerator 2 Choosing the proper 3 Disassembling/Assembling and removing vinyl if location applicable. WARNING Connect to potable water 4 Connecting the water 5 Leveling and Door supply only. supply and water line. Alignment Specifications Side by Side Refrigerator Model... -
Page 11: Unpacking The Refrigerator
INSTALLATION Unpacking the Refrigerator The refrigerator should always be plugged into its own individual properly grounded electrical outlet. WARNING This provides the best performance and Use two or more people to move and also prevents overloading house wiring install the refrigerator. Failure to do so can result in back or other injury. -
Page 12: Removing/Assembling The Refrigerator Door Handles
INSTALLATION Top View LSXC22**** List A Depth without handle 29 2/5" (747mm) B Width 35 9/10" (912mm) C Height to Top of Case 68 9/10" (1750mm) D Height to Top of Hinge 70" 3/10" (1785mm) E Back Clearance 2" (50 mm) F Depth without Door 24 3/5"... -
Page 13: Removing/Assembling The Refrigerator Doors
PRODUCT FEATURES Removing/Assembling the Removing the Left (Freezer) Door with Water Line Connection Refrigerator Doors 1. Loosen the hinge cover screws and remove When it is necessary to move the refrigerator the hinge cover. Disconnect all wire harnesses. through a narrow opening, removing the doors is the recommended procedure. -
Page 14: Reinstalling The Right (Refrigerator) Door
INSTALLATION 3. Rotate the hinge lever clockwise (1). Lift the Reinstalling the Left (Freezer) Door upper hinge free of the hinge lever latch (2). 1. Feed the water tubes through the lower hinge pin and place the door onto the hinge lever upper lower hinge pin. -
Page 15: Connecting The Water Line
INSTALLATION Connecting the Water Line CAUTION Wear eye protection during installation to Before You Begin prevent injury. This water line installation is not covered by the refrigerator warranty. Follow these instructions If the water pressure from the reverse osmosis carefully to minimize the risk of expensive water system is less than 21 psi or 1.5 kgf/cm2 (takes damage. - Page 16 INSTALLATION If your existing copper water line has a red tting at the end, you will need an adapter (available at plumbing supply stores) to connect the water line to the refrigerator OR you can cut o the ared tting with a tube cutter and then use a compression tting.
-
Page 17: Water Line Installation Instructions
INSTALLATION Water Line Installation Instructions FASTEN THE SHUTOFF VALVE WARNING pipe with the pipe clamp. Electrical Shock Hazard: TIGHTEN THE PIPE CLAMP When using any electrical device (such as a Pipe Clamp power drill) during installation, be sure the device is battery powered, double insulated or grounded in a manner that will prevent the hazard of electric shock. -
Page 18: Leveling
INSTALLATION CONNECT THE TUBING TO THE VALVE TURN THE WATER ON AT THE Place the compression nut and ferrule SHUTOFF VALVE (sleeve) for copper tubing onto the end of Tighten any connections that leak. the tubing and connect it to the shuto valve. -
Page 19: Turning On The Power
INSTALLATION NOTE: To make adjusting the legs easier, Using a 3/4” (19mm) wrench, turn the keeper have someone push backward against the nut counter clock wise to loosen it. top of the refrigerator. Using a 5/16” (8mm) wrench, turn the adjustment hinge pin clockwise or coun- Height terclockwise to level the refrigerator door. -
Page 20: Operation
OPERATION OPERATION Before Use Clean the refrigerator. shipping. CAUTION Do not scratch the refrigerator with a sharp object or use a detergent that or adhesive from the refrigerator. on the rear surface of the refrigerator. NOTE Open refrigerator and freezer doors to ventilate the interior. tape from inside the refrigerator and open the refrigerator and freezer doors for ventilation. -
Page 21: Control Panel
OPERATION IMPORTANT: Control Panel Because air circulates between both sections, The refrigerator control functions as the ther- any odors formed in one section will transfer to mostat for the entire appliance (refrigerator and the other. You must thoroughly clean both sec- freezer sections). -
Page 22: Control Panel Features
OPERATION Control Panel Features Ice Type Select Crushed Ice or Cubed Ice by pressing the Depending on the model, some of the Ice Type button repeatedly to choose the selection following functions may not be available. desired. The Crushed Ice or Cubed Ice icon will light up to indicate your selection. -
Page 23: Smart Grid
Grid text illumi- Display Off Mode nates. Wi-Fi The Wi-Fi button, when used with the LG opened or a button is pressed. Once on, the Smart ThinQ Applications for smarthphones, display will remain on for 20 seconds. -
Page 24: Smart Functions
To verify the Wi-Fi connection, check that the Wi-Fi icon on the control panel is lit. Smart ThinQ Application x LG Smart ThinQ is not responsible for any network The Smart ThinQ application allows you to connection problems or any faults, malfunctions, or errors caused by network connection. - Page 25 Consult the dealer or an experienced radio/TV LG Electronics will also provide open source code technician for help. to you on CD-ROM for a charge covering the cost of performing such distribution (such as the cost of This device complies with part 15 of the FCC Rules.
- Page 26 LG Open API If the refrigerator receives a Demand Response signal from the utility company, the refrigerator will You can manage Smart Grid features for the LG turn on the Grid LED on the refrigerator display and Smart Refrigerator. control its power consumption according to the signal.
- Page 27 LG Customer Information Center. NFC or Wi-Fi equipped models can also transmit data to a smartphone using the LG Smart ThinQ application. Smart Diagnosis™ through the Customer Information Center...
-
Page 28: Automatic Icemaker
OPERATION Automatic Icemaker WARNING Ice is made in the automatic icemaker and sent Personal Injury Hazard to the dispenser. The icemaker will produce 7 DO NOT place ngers or hands on the auto- cubes per cycle - approximately 70-120 cubes in matic ice making mechanism while the refrig- a 24-hour period, depending on freezer compart- erator is plugged in. -
Page 29: Removing The Ice Bin
OPERATION Automatic Icemaker (continued) In-Door Ice Bin The icemaker stops producing ice when the indoor CAUTION ice bin is full. To make room for additional ice, empty the ice bin into another location in the freezer water dispensed may compartment. During use, the ice may stack unevenly include particles or odor from the water in the bin, causing the icemaker to misread the level supply line or the water tank. -
Page 30: Ice And Water Dispenser
OPERATION Ice and Water Dispenser Incorrect Way Correct Way Depending on the model, some of the following functions may not be available. CAUTION Water Keep children away from the dispenser . Children may play with or damage the controls. Dispenser Structure Water Switch CAUTION Throw away... -
Page 31: Storing Food
OPERATION Storing Food Food Preservation Location Store your food in the optimal space to enjoy the freshest taste. Adjustable refrigerator shelf Ice storage bin Adjustable shelves to meet If a large amount your individual storage needs. of ice is needed, transfer the ice in the storage bin to another container. - Page 32 OPERATION Storing Food Food Preservation Location Each compartment inside the refrigerator is designed to store di erent types of food. Store your food in the optimal space to enjoy the freshest taste. Ice storage bin Adjustable refrigerator shelf Adjustable shelves to meet If a large amount your individual storage needs.
-
Page 33: Food Storage Tips
OPERATION Food Storage Tips Storing Frozen Food The following tips may not be applicable NOTE depending on the model. Check a freezer guide or a reliable cookbook Wrap or store food in the refrigerator in airtight for further information about preparing food and moisture-proof material unless otherwise for freezing or food storage times. -
Page 34: Detaching And Assembling The Storage Bins
OPERATION Storing Frozen Food (continued) Detaching and Assembling the Storage Bins Packaging Successful freezing depends on correct Fresh Zone Drawers packaging. When you close and seal the The Fresh Zone drawers provide storage for fruit package, it must not allow air or moisture in or and vegetables. -
Page 35: Water Tank
OPERATION To Remove the Fresh Zone Cover Water Tank Hold the cover with both hands and pull it out. CAUTION: You will see the water tank while removing the Fresh Zone drawer. Do not remove the water tank or water leakage may occur. -
Page 36: Door-In-Door
OPERATION Door-in-Door Door-in-Door Door Bins (Door-in-Door Model) The Door-in-Door compartment allows for easy The Door-in-Door inner and outer door bins are access to commonly used food items. The outer removable for easy cleaning. Door-in-Door door includes three additional door bins. Door-in-Door Compartment 1 To remove the door bins, lift up and pull out. -
Page 37: Adjusting The Refrigerator Shelves
OPERATION Adjusting the Refrigerator Suggested Placement of Shelves Shelves The shelves in your refrigerator are adjustable to meet your individual storage needs. Adjusting the shelv erent heights will mak exact item you want easier. Doing so will also reduce the amount of time the refrigerator door is open which will save energy. -
Page 38: Maintenance
MAINTENANCE MAINTENANCE Cleaning Both the refrigerator and freezer sections defrost automatically; however, clean both sections about once a month to prevent odors. Wipe up spills immediately. Always unplug the refrigeratior before cleaning. General Cleaning Tips Inside Walls (Allow the freezer to warm up so that the cloth will not stick.) Unplug refrigerator or disconnect power. -
Page 39: Replacing The Water Filter
Visit your local dealer or distributor to pull it out. Make Web: Find Parts & Accessories from sure to rotate the Support section of lg.com Call : 1-800-243-0000 (USA) before pulling it out of the manifold hole. 1-888-542-2623 (Canada) -
Page 40: Performance Data Sheet
MAINTENANCE Performance Data Sheet Model: LG ADQ73613401-S Replacement cartridge: ADQ73613401 The concentration of the indicated substances in water entering the system was reduced to a concentration less than or equal to the permissible limit for water leaving the system as specifi ed in NSF/ANSI Standard 42 and Standard 53. - Page 41 EPA Establishment # 070595- MEX-001 Manufactured for LG Electronics by MCM Co., Ltd. 45-10, Nowon-Ri, Yiwol-Myun, Jinchun-Kun, Chung-Buk, Korea.
- Page 42 MAINTENANCE...
-
Page 43: Smart Diagnosis
Only use the Smart Diagnosis feature when Freezer button. instructed to do so by the LG call center agent. The transmission sounds that you will hear are Keep the phone in place until the tone normal and sound similar to a fax machine. -
Page 44: Troubleshooting
TROUBLESHOOTING TROUBLESHOOTING Common Product Questions How do I unclog the ice dispenser How long will it take for my ice bin chute? to fill completely? Eliminate the frost ice fragments by Once the ice supply in the bin has been removing the ice bin and clearing the completely exhausted, it may take up chute with a plastic utensil. -
Page 45: Noises You Might Hear
TROUBLESHOOTING Noises You Might Hear Clicking The defrost control will click when Normal Operation the automatic defrost cycle begins and ends. The thermostat control (or refrigerator control on some models) will also click when cycling on and Rattling Rattling noises may come from the Normal Operation flow of refrigerant, the water line on the back of the unit, or items stored... -
Page 46: Before Calling For Service
TROUBLESHOOTING Before Calling for Service Review this section before calling for service; doing so will save you both time and money. Cooling Refrigerator The refrigerator control is set Turn the control ON. Refer to the Setting the and Freezer to OFF (some models). Controls section for proper temperature set tings. - Page 47 TROUBLESHOOTING Cooling Refrigerator or Refrigerator was recently It may take up to 24 hours for each compartment Freezer section installed. to reach the desired temperature. The air vents are blocked. Locate air vents by using your hand to sense is too warm. Cold air circulates from the airfl...
- Page 48 TROUBLESHOOTING Cooling Interior moisture Doors are opened often or for When the doors are opened often or for long buildup. long periods of time. periods of time, warm, humid air enters the compartment. This raises the temperature and moisture lev el within the compartment. To lessen the e ect, reduce the frequency and duration of door openings.
- Page 49 TROUBLESHOOTING Cooling/Ice & Water Frost or ice Condensation from food This is normal for food items with a high water crystals with a high water content content. on frozen has frozen inside of the food (inside food package. of sealed Food has been left in the Do not store food items with high water content in package).
- Page 50 TROUBLESHOOTING Ice & Water Icemaker is not Refrigerator was recently It may take up to 24 hours for each compartment to making enough installed or icemaker recently reach the desired temperature and for the icemaker ice (continued). connected. to begin making ice. Icemaker not turned on.
- Page 51 TROUBLESHOOTING Ice & Water Ice is not Doors are not closed Ice will not dispense if any of the refrigerator doors dispensing. completely. are left open. Infrequent use of the Infrequent use of the ice dispenser will cause dispenser. the cubes to stick together over time, which will prevent them from properly dispensing.
- Page 52 TROUBLESHOOTING Ice & Water Water is not New installation or water line Dispense 2.5 gallons of water (fl ush for dispensing. recently connected. approximately 5 minutes) to remove trapped air and contaminants from the system. Do not dispense the entire 2.5 gallon amount continuously.
- Page 53 TROUBLESHOOTING Ice & Water/Parts & Features Water has bad Water supply contains A water filter may need to be installed to eliminate taste or odor. minerals such as sulfur. taste and odor problems. W ater fi lter has been Replacing the water filter is recommended: exhausted.
- Page 54 TROUBLESHOOTING Parts & Features The interior of The refrigerator is located Make sure that the refrigerator is not located the refrigerator near a fire source, such as a near a fire source, such as a fire place , chimney or is covered with fire place, chimney, or candle.
-
Page 55: Warranty (Usa)
Should your LG Refrigerator (“Product”) fail due to a defect in materials or workmanship under normal home use, during the warranty period set forth below, LG will at its option repair or replace the product. This limited warranty is valid only to the original retail purchaser of the product and applies only when purchased and used within the United States including U.S. - Page 56 WARRANTY Should your LG Refrigerator (“Product”) fail due to a defect in material or workmanship under normal home use during the warranty period set forth below, LG Canada will at its option repair or replace the Product upon receipt of proof of origin al retail purchase.
- Page 57 NOTES...
- Page 58 NOTES...
- Page 60 LG Customer Information Center For inquiries or comments, visit www.lg.com or call: 1-800-243-0000 USA, Consumer User 1-888-865-3026 USA, Commercial User 1-888-542-2623 CANADA Register your product Online! www.lg.com...
Need help?
Do you have a question about the LSXC22486 SERIES and is the answer not in the manual?
Questions and answers