Advertisement
Quick Links
ASSEMBLY AND INSTALLATION
T0099 / T0100
WARNING:
NOTES: 1. Before installing, consult local electrical codes for wiring and grounding requirements.
2. READ AND SAVE THESE INSTRUCTIONS.
Hardware Package (included):
Mounting Screw (A)
Mounting Screw (B)
Important to Know:
1. If you are not familiar with state and local electrical
codes, it is recommended that you consult with a
qualified electrician.
2. This fixture requires a 120 VAC, 60 Hz power
source.
3. For general safety and to avoid any possible
damage to the sensor, be sure the power is
switched "off" before adjustment.
Maximum Wattage: 25.5 W
Working Temperature Range: -4
Note: Fixture can be wall mounted or eave mounted.
Wall Mounted
Light fixture and sensor should be mounted as shown above when installed (depending upon type of installation)
Before installing the light fixture under an eave, the sensor head must be rotated as shown in the next two steps for
proper operation and to avoid the risk of electrical shock.
For eave mounted only:
Swing the sensor head towards the mounting bracket.
INSTRUCTIONS
TO AVOID RISK OF ELECTRICAL SHOCK, BE SURE TO SHUT OFF
POWER WHILE INSTALLING OR SERVICING THIS FIXTURE.
Mounting Screw (C)
Mounting Bracket Screw (D)
0 F ~ 113 0 F
Mounting Bracket
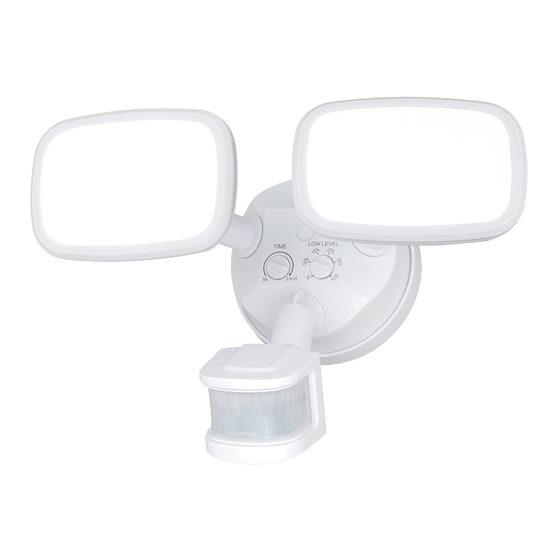
Controls
T0099 / T0100 --- Page 1 / 5
Mounting Strap (E)
Decorative cover (F)
Features:
1. Energy saving LED fixture.
2. Motion sensor: turns light ON automatically when
motion is detected and turns light OFF automatically
when motion stops.
3. Photocell keeps the light OFF during daylight hours.
4. When in manual override mode, use wall switch
to keep the light ON during the night.
Eave Mounted
Rotate the sensor head clockwise 180˚ so the controls face down.
Fixture Mounting Screw (G)
Wire Nut (H)
Controls
Controls
140919
Advertisement

Related Manuals for Vaxcel T0099


Summary of Contents for Vaxcel T0099
- Page 1 For eave mounted only: Rotate the sensor head clockwise 180˚ so the controls face down. Swing the sensor head towards the mounting bracket. Mounting Bracket Controls Controls Controls T0099 / T0100 --- Page 1 / 5 140919...
-
Page 2: Installation Steps
CAUTION: Be sure to caulk completely where the mounting bracket meets the wall surface to prevent water from seeping into the outlet box. Turn on the power at the main fuse or circuit breaker box. Adjusting the Sensor Head: sensor Fig. 2 T0099 / T0100 --- Page 2 / 5 140919... -
Page 3: Adjusting The Light Head
The light will turn off automatically at dawn. Note: You can adjust the low level brightness (0~50%) by using the low level brightness knob. (See Fig. 7) T0099 / T0100---- --- Page 3 / 5 140919... - Page 4 5. To reduce possible nuisances, do not mount the fixture near a heat source like an air conditioner, vent or furnace exhaust, or in a direction facing any reflecting object or Sensor other light source. Most sensitive Least sensitive T0099 / T0100 --- Page 4 / 5 140919...
-
Page 5: Troubleshooting
Troubleshooting ---The light does not come on at all: 1. Make sure the wall switch and circuit breaker are on. 2. Make sure the wiring is correct. 3. Cover the sensor with dark color cloth to verify that the ambient light level is not too high. ---In TEST mode, the light stays on over 5 seconds after motion is no longer detected: 1.