Table of Contents
Advertisement
Available languages
Available languages
Quick Links
ASSEMBLY AND INSTALLATION
T0727
W
WARNING:
NOTE: 1. Before installing, consult local electrical codes for wiring and grounding requirements.
2. Read and save these instructions.
Hardware Package (included):
Mounting Arm Crossbar (A)
Important to Know:
1. If you are not familiar with state and local electrical
codes, it is recommended that you consult with a
qualified electrician.
2. This fixture requires a 110-240 VAC, 60 Hz power
source.
3. For general safety and to avoid any possible damage
to the sensor, be sure the power is switched "off"
before adjustment.
4. Do not use this fixture with dimmers.
Maximum Wattage: 42 W
Working Temperature Range: -
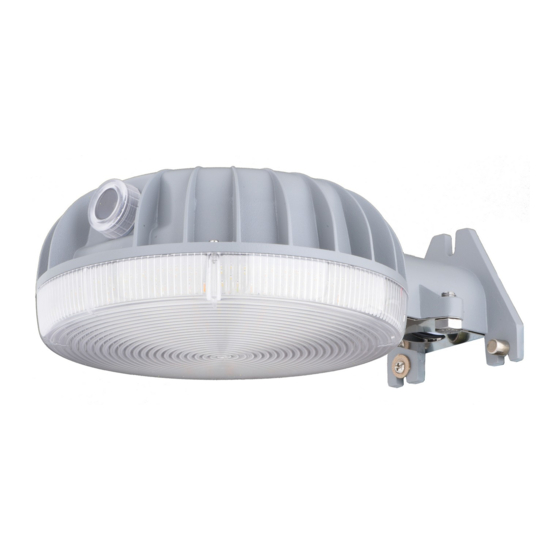
Note: Fixture can be wall mounted or mounting arm mounted.
Wall Mounted
1. Suitable for wet conditions and outdoors.
2. Do NOT touch the LEDs as they get hot while functioning.
3. Do NOT touch or install the fixture while in contact with water.
4. NOT suitable for ground-level installations. Mount between 8 ft. to 12 ft. off the ground.
5. Do NOT leave bare wires exposed outside of their electrical connections.
INSTRUCTIONS
TO AVOID RISK OF ELECTRICAL SHOCK, BE SURE TO SHUT OFF
POWER WHILE INSTALLING OR SERVICING THIS FIXTURE.
Large Screw (B)
40°F ~ 122°F
Page 1 / 4
Features:
1. Energy saving LED fixture.
2. Photocell keeps the light OFF during daylight hours.
3. 3 selectable color temperature (3000K/4000K/5000K)
Wire Connector (C)
Large Mounting Screw (B)
mounting arm mounted
Wire Connector (C)
Photocell / CCT Switch
Cover
Wire Compartment Cover Bolt
231127
Advertisement
Table of Contents

Related Manuals for Vaxcel T0727


Summary of Contents for Vaxcel T0727
- Page 1 ASSEMBLY AND INSTALLATION INSTRUCTIONS T0727 WARNING: TO AVOID RISK OF ELECTRICAL SHOCK, BE SURE TO SHUT OFF POWER WHILE INSTALLING OR SERVICING THIS FIXTURE. NOTE: 1. Before installing, consult local electrical codes for wiring and grounding requirements. 2. Read and save these instructions.
-
Page 2: Wall Mount Instructions
WALL MOUNT INSTRUCTIONS Before beginning, disconnect power to the junction box. If replacing an existing fixture with more than three wire leads, make note of where they were connected. 1. Unscrew both wire compartment cover bolts and remove the cover (Fig. 1) Fig. -
Page 3: Troubleshooting Guide
MOUNTING ARM INSTALLATION Before beginning, disconnect the power to the junction box. If replacing an existing fixture with more than two wire leads, make note of where they were connected. 1.Remove both wire compartment cover bolts, then remove the compartment cover (Fig.1). 2. -
Page 4: Spare Parts List
Vaxcel reserves the right to repair, replace or issue a credit for any properly installed product, provided it is returned per RMA instruction. This warranty is limited to the cost of the product only and does not extend to transportation, installation or replacement costs. - Page 5 INSTRUCCIONES DE ENSAMBLAJE E INSTALACIÓN T0727 ADVERTENCIA: PARA EVITAR EL RIESGO DE CHOQUE ELÉCTRICO, ASEGÚRESE DE APAGAR LA ENERGÍA MIENTRAS INSTALA O HACE EL MANTENIMIENTO DE ESTE ARTEFACTO. NOTA: 1. Antes de instalar, consulte los códigos de electricidad locales para ver los requisitos de cableado y conexión a tierra.
- Page 6 INSTRUCCIONES DE MONTAJE EN LA PARED Antes de comenzar, desconecte la corriente de la caja de conexiones. Si reemplazará un artefacto existente con más de tres cables conductores, preste atención al lugar donde van conectados. 1. Desenrosque los pernos de la cubierta del compartimento de cableado y extraiga la cubierta (Fig.
-
Page 7: Guía De Resolución De Problemas
INSTALACIÓN DEL BRAZO DE MONTAJE Antes de comenzar, desconecte la corriente de la caja de conexiones. Si reemplazará un artefacto existente con más de dos cables conductores, preste atención al lugar donde van conectados. 1. Extraiga los pernos de la cubierta del compartimento de cableado y la cubierta del compartimento (Fig. 1). 2. -
Page 8: Lista De Piezas De Repuesto
B: 7 pulgadas C: 3-1/2 pulgadas Garantía limitada de 5 años Vaxcel ofrece una garantía de un año en todos sus productos contra defectos de fabricación y acabado a partir de la fecha de envío. Además: ● Cualquier producto con un sensor de movimiento integrado o una fotocélula crepuscular está respaldado por una garantía de 5 años para la funcionalidad del producto. -
Page 9: Caractéristiques
INSTRUCTIONS DE MONTAGE ET D'INSTALLATION T0727 AVERTISSEMENT : POUR ÉVITER TOUT RISQUE D'ÉLECTROCUTION, VEILLEZ À COUPER L'ALIMENTATION ÉLECTRIQUE LORS DE L'INSTALLATION OU DE L'ENTRETIEN DE CE LUMINAIRE. REMARQUE : 1. Avant l'installation, consultez les codes électriques locaux pour connaître les exigences en matière de câblage et de mise à... - Page 10 INSTRUCTIONS POUR LE MONTAGE MURAL Avant de commencer, coupez l'alimentation de la boîte de connexion. Si vous remplacez un luminaire existant avec plus de trois fils, notez l'endroit où ils étaient connectés. 1. Dévissez les deux boulons du couvercle du compartiment des fils et retirez le couvercle (Fig.
-
Page 11: Guide De Résolution Des Problèmes
INSTALLATION DU BRAS DE MONTAGE Avant de commencer, coupez l'alimentation de la boîte de connexion. Si vous remplacez un luminaire existant avec plus de deux fils, notez l'endroit où ils étaient connectés. 1. Retirez les deux boulons du couvercle du compartiment à fils, puis retirez le couvercle du compartiment (Fig.1). 2. -
Page 12: Liste Des Pièces De Rechange
B : 17,78 cm (7 po) C : 8,89 cm (3-1/2 po) Garantie limitée de 5 ans Vaxcel garantit tous ses produits contre les défauts de fabrication et de finition pendant un an à compter de la date d'expédition. En outre : ●...
Need help?
Do you have a question about the T0727 and is the answer not in the manual?
Questions and answers