Table of Contents
Advertisement
Quick Links
Advertisement
Table of Contents

Related Manuals for Audiovox XR9


Summary of Contents for Audiovox XR9
- Page 1 XR9 Satellite Radio Receiver User Guide SATELLITE RADIO...
- Page 2 Over 60 channels of world-class sports, news, talk and information. Your Audiovox XR9 receiver must be used with an adapter kit, such as the Audiovox Home Kit, Boom Box or Vehicle Kit as required by your specific installation needs. These kits are available at retailers where Audiovox main units are sold.
-
Page 3: Table Of Contents
Contents Cautions and Warnings ... 4 XR9 System Components ... 4 Introduction ... 4 Enjoying Your XM -XR9 ... 5 XM XR9 Controls ... 6 Basic Operation ... 8 Tuning by Category ... 8 Channel Listing Options ... 8 Direct Tuning ... 9 Setting/Using Channel Preset Buttons ... -
Page 4: Cautions And Warnings
Cautions and Warnings 1. Do not install the XR9 in a position that hinders your view through the windshield, or obstructs view- ing of the dashboard indicators and displays. 2. Do not install the unit where it may obstruct the operation or deployment of safety devices, such as airbags, etc. -
Page 5: Enjoying Your Xm -Xr9
3. The XM logo ( ) appears on the display followed alternately by the XM preview channel. If this is the first time using the XR9, the screen will alternately display the Preview channel screen and a number of messages, including: “Activate Your XM 1-800-XM RADIO”. -
Page 6: Xm Xr9 Controls
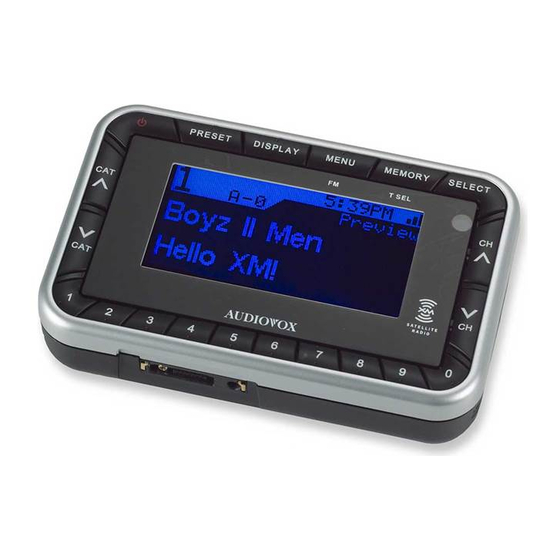
XMs friendly Customer Care representatives will take the necessary information and walk you through the activation process. XM XR9 Controls The Audiovox XM® XR9 Unit provides 10 control buttons and 10 number keys. Power Button: This button applies power to and removes power from the XM®... - Page 7 Title combinations. The XR9 also has the capability to search the current incoming XM signal, and thereby alert you if it matches the Artist/Song title stored in XR9 memory. Display Button: The DISPLAY button allows the user to choose one of several ways of presenting the Artist, Song Title and data service information on the LCD screen.
-
Page 8: Basic Operation
With the unit properly installed, activated and connected to your home or vehicle audio system, proceed as fol- lows: 1. Press the Power button; the XR9 turns on and the XM logo appears for 3 seconds followed by the default display for the channel and tuning mode in effect prior to turnoff. -
Page 9: Direct Tuning
the SELECT button will display all the available channel numbers and channel information. The first press will display the channel name. The second press of the DISPLAY button will display all currently available art- ists. The third press of the DISPLAY button will display song titles. -
Page 10: Display Button
Select the desired channel you wish to save into memory by using the CH Up/Down buttons, the direct tuning method or the category tuning method. With the desired channel playing, press and hold any of the numbered keypad but- tons (0-9). A confirmation tone is heard, and a confirming message (Channel Stored) is displayed. -
Page 11: Memory Button (T Sel Function)
The unit also has the capability to search the current incoming XM signal and alert the user when a saved song is being played. 1. While the XR9 is in any of the standard display modes, momentarily pressing and releas- ing the MEMORY button stores the current program data information within the unit’s memory. - Page 12 3. When the T SEL function is active, each time the XR9 is turned on, it automatically searches the incoming signal to determine if a match exists between the signal and the currently saved infor- mation stored in receiver memory.
-
Page 13: Memory Full
4. If the MEMORY button is pressed to save a cur- rently-playing selection, and all of the memory spaces are full, Memory Full will flash on the dis- play for 1 second. Country 12:34AM Memory Full To delete a selection from memory, press and hold the Memory button to display the list;... -
Page 14: Menu Display Operations
Menu Display Operations To enter the Menu Options page, press the MENU But- ton. The Main Menu list will appear on the LCD display. Using the CH Up/Down buttons, highlight the option you wish to adjust and then press the SELECT button. The following options are available: •... -
Page 15: Audio Options
NOTE: To prevent distortion caused by overdriving -15- Equalizer Control Bass Treble Equalizer Control Bass Treble Volume Control Equalizer Setting Volume Control the audio playback device input, it is recommended that you adjust the volume of the XR9 at mid-range. -
Page 16: Fm Options
FM Options The following adjustments are possible: NOTE: The internal wireless FM transmitter allows you to play the XR9 audio through any stan- dard FM receiver, eliminating the need to hardwire connections. FM On/ Off Frequency Setting FM On/Off: Upon entering this mode, press the CH Up/ Down buttons to toggle between the FM ON or FM OFF function/display selection. -
Page 17: Lock Option
Lock Option When this feature is selected, the following options appear on the display: Lock / Unlock Lock/UnLock Edit Code Edit Code Upon entering this mode, the user is prompted to enter a four digit numerical code that is used to lock/unlock channel access. -
Page 18: Antenna Aiming (Home Installation)
Lock Options Enter Code Lock Options New Code 6. Press the SELECT button. 7. Confirm the new code using buttons 0-9 and press the SELECT button. 8. The lock code is now changed. Antenna Aiming (Home Installation) Upon entering this mode, two 7-segment vertical bar graphs are displayed representing terrestrial (tower) and satellite transmitters. -
Page 19: Memory Options
Once a channel has been highlighted, pressing the SELECT Button displays a check mark ( ) next to the channel, and prevents the channel from being accessible during any of the tuning modes. Skipped channels can only be accessed ei- ther through direct channel number entry or by returning to this menu and going through the same process to return the skipped channel to the list. -
Page 20: Time Format
Activate this function if your area is subject to DST; press the Channel Up/Down buttons to toggle be- tween DST Observed (default) or DST Not Ob- served. Daylight Saving Time NOTE: When the XR9 has not been turned on -20- Clock Daylight Savings Time DST Observed... -
Page 21: Set Alarm
AM or PM thresh- old has been exceeded. When the desired time i s displayed, press the SELECT button to enter. NOTE: Loss of the satellite signal by the XR9 Sleep Mode In this mode, you have the capability of program ming the unit to shut off after a selected period of time. -
Page 22: Stock Options
Sleep Off (Factory Default) 60 minute 120 minutes 180 minutes Sleep Off is the factory default setting. Use the Channel Up/Down buttons to scroll through the desired sleep times. When the desired time is highlighted, press the SELECT button. The unit will now turn off after the selected time has ex- pired. -
Page 23: Stock Erase
Press CH to Change Char Searching ... You now have the option to either search this list for the desired symbol or further fine-tune your search by entering the next significant character. Use the Channel Up/Down buttons to search the list or, by pressing the Category Down button and then the Category Up button, highlight the next character. -
Page 24: Info Extras
Once highlighted, press the SELECT button to display the pop-up confirmation screen with the Yes/No options. Highlight the Yes selection to erase the current stock symbol. A pop-up screen appears to confirm Stock Erased. If Erase All is highlighted and selected, all of the currently stored stock symbols will be erased from memory if the Yes option is highlighted and selected. - Page 25 • Headlines • World • National • Sports • Entertainment NOTE: News and associated options are only available during XM Transmissions Use the Channel Up/Down buttons to highlight the de- sired news report, and press the SELECT button to en- ter.
-
Page 26: Info Display Options
Info Display Options When this option is highlighted, two choices are available: • Display Mode • Scroll Speed Press the Channel Up/Down buttons and then the SELECT button for the desired option. Display Mode when this option is highlighted and selected, addi- tional options, Scroll Mode and Page Mode, are displayed. -
Page 27: Remote Control Unit
Each button on the remote control func- tions in the same way as the button on the XR9 unit. For a full description of a keypad button or function refer to the preceding sections in this manual. - Page 28 Remote Control Unit AUDIO OX 1. POWER Turns the XR9 on and off. 2. Presets 0-9 These buttons are used to directly enter a desired channel number. They are also used when entering and recalling preset channel numbers into memory.
-
Page 29: Troubleshooting
6 Volt, Negative Ground, DC Input CAUTION: Use only the Audiovox- approved adapter specified in the Home (XH9) and Vehicle (XC9) kit for the XR9 Satellite Radio Receiver, or the XR9 could could be severely damaged. 110.0mm x 71.0mm x 26.0mm (4.30” x 2.8”... - Page 30 THIS PAGE LEFT BLANK INTENTIONALLY -30-...
-
Page 31: Warranty
AUDIOVOX CORPORATION (the Company) warrants to the original retail purchaser of this product that should this product or any part thereof, under normal use and conditions, be proven defective in material or workmanship within 12 months from the date of original purchase, such defect(s) will be repaired or replaced with new or reconditioned product (at the Company's option) without charge for parts and repair labor. - Page 32 © 2004 Audiovox Electronics Corporation 128-7220A...
Need help?
Do you have a question about the XR9 and is the answer not in the manual?
Questions and answers