Table of Contents
Advertisement
Advertisement
Table of Contents

Related Manuals for Audiovox Xpress XM


Summary of Contents for Audiovox Xpress XM
- Page 1 Released: 9-15-05...
-
Page 2: Congratulations
Your Audiovox Xpress XM receiver must be used with an accessory kit, such as the Audiovox Home Kit, Boom Box or Vehicle Kit as required by your specific installation needs. These kits are available at retailers where Audiovox main units are sold. -
Page 3: Cautions And Warnings
Cautions and Warnings This device complies with Part 15 of the FCC Rules. Operation is subject to the following two conditions: (1) this device may not cause harmful interference, and (2) this device must accept any interference received, including interference that may cause undesired operation. -
Page 4: Table Of Contents
TABLE OF CONTENTS Congratulations ... 2 Cautions and Warnings ... 3 TABLE OF CONTENTS ... 4 TABLE OF FIGURES ... 5 Xpress SYSTEM COMPONENTS ... 6 INTRODUCTION ... 7 OPTIONAL ACCESSORIES ... 7 GETTING STARTED ... 8 XM Activation ... 8 Controls ... -
Page 5: Table Of Figures
Figure 2. Xpress Receiver Unit ... 9 Figure 3. Xpress Receiver Unit Display Screen ... 11 Figure 4. XM and Audiovox Logos Power ON Screen ... 12 Figure 5. Active Channel Screen ... 12 Figure 6. Main Menu Screen ... 13 Figure 7. -
Page 6: Xpress System Components
Xpress SYSTEM COMPONENTS Receiver Model Xpress Part Number 136-4040 Remote Control Unit Part Number 136-4042 3 Vdc Battery for Remote, (1) CR2032... -
Page 7: Introduction
INTRODUCTION The Audiovox Xpress XM7 unit processes the XM satellite sig- nals received by the externally mounted antenna (purchased separately for Home or Boom Box Kits). The Xpress XM7 unit recognizes and decodes the incoming XM program information and provides an audio signal to your radio or other audio output equipment. -
Page 8: Getting Started
GETTING STARTED XM Activation Activating your XM7 radio service is easy. You have one of two choices to activate your service: Online or by Phone. Online Activation Process First, please make sure the Xpress XM7 unit is working prop- erly by tuning to the XM7 Preview channel (#1). If you can hear XM7 Preview, your equipment is ready. -
Page 9: Figure 2. Xpress Receiver Unit
ON for at least 1 hour. This will complete the activation process. When the Xpress XM7 unit is activated, you will be able to ac- cess over 150 digital radio channels. The Audiovox Xpress XM7 unit provides 7 control buttons, 1 Rotary/Select Knob and 10 number keys. SEARCH... -
Page 10: Controls
Controls Receiver Control Features Display Button - This button allows the user to choose one of four (4) different formats to present the Artist, Song Title and data service information on the LCD screen. Search Button - This button allows the user to search the next channel category as well as between preset channels or perform a continuous search. -
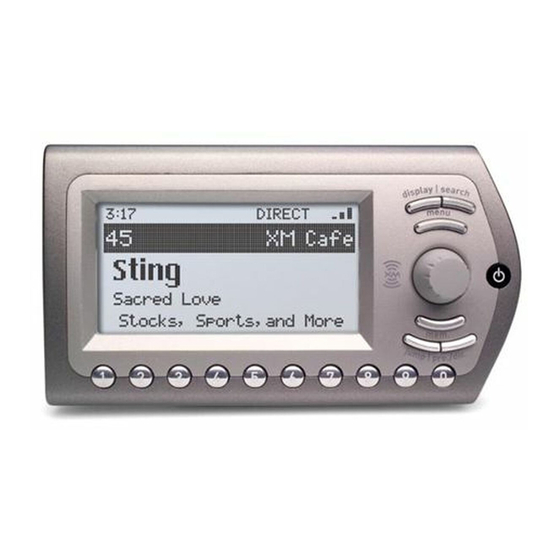
Page 11: Figure 3. Xpress Receiver Unit Display Screen
Jump Button – This button allows the user to jump to the Previous Channel (i.e., switch between the current and previ- ous channel. Signal Momentary Preset Indicator Strength Time (Stays on for 2-seconds) Preset/Direct Button (pre./dir.) - Each momentary press of the PRESET button allows the user to switch between (3) banks of Channel presets (10 presets each A, B, and C) plus Direct Channel... -
Page 12: Basic Operation
Turning Xpress ON and OFF Set up your Audiovox Xpress XM7 unit using the installation instructions included in this Kit (Home Kit, or Boom Box Kit), or with the help of a professional installer. -
Page 13: Menu Options
Menu Options To enter the Menu Options page, press the MENU Button on either the remote control or the main unit. The Main Menu list will appear on the screen (see Figure 6). Using the Rotary/Select Knob, highlight the option you wish to adjust turning (CW) scrolls DOWN and (CCW) will scroll UP through the various menus and lists. -
Page 14: Fm Frequency
FM Frequency The following Frequency Setting adjustments are possible: NOTE:The Xpress XM7 unit has an internal wireless FM trans- mitter, which allows you to play the audio through any standard FM receiver, eliminating the need for hardwire connections. In certain urban areas of the country where strong FM stations may overpower the Xpress XM7 unit FM transmitted signal, an FM direct adapter may be needed to achieve a clean audio signal (Part Number XMFM-1) -
Page 15: Brightness + Contrast
Brightness + Contrast This feature allows the user to adjust the brightness and con- trast of the unit’s display (see Figure Upon entering either the brightness or contrast adjustment mode, a horizontal bar graph is displayed with a minus (-) sign on the left and a plus (+) on the right. -
Page 16: Antenna Aiming (Home Installation)
NOTE: To prevent distortion caused by overdriving the audio playback device input, it is recommended that you adjust the audio level signal to mid-range. Screen displayed when the FM Frequency is set to OFF Screen displayed when a FM Transmitter is set to “ON”. -
Page 17: Direct Tune
Direct Tune Turn the Rotary/Select Knob CW or CCW to highlight choice (Di- rect Tune On or Direct Tune Off). When the desired setting is highlighted, press the Rotary/Select Knob or the (XM) Select Button on the remote control to confirm (see Figure 12). The direct tune function when enabled (ON), allows the user to manu- ally tune to a station using the Rotary/Select Knob or the remote control UP and DOWN buttons. -
Page 18: Channel Skip/Add
Channel Skip/Add The Channel Skip/Add function provides the ability to skip over certain channels when using the Rotary/Select Knob or the UP and DOWN buttons on the Remote Control. Upon entering this mode, a channel list is displayed with the current channel in play highlighted (see Figure 14). -
Page 19: Tune Select
Figure 16. Tune Select Screen TUNE SELECT This feature allows the user to store current program information (Artist and Song title) for future comparison against the incoming XM7 signal. The Xpress XM7 unit can hold up to 20 entries, after which any new information saved will replace the oldest entry in memory. -
Page 20: Select By-Song
Select By-Song This feature enables the Xpress XM7 unit to search incoming XM7 broadcast for stored content by song title. Use the Rotary/ Select Knob or the UP and DOWN buttons on the remote control and select the “Select by Song”. Press the Rotary/Select Knob or the (XM) Select Button on the remote to confirm the selection (see Figure 19). -
Page 21: Stock Ticker
Knob or the (XM) Select Button on the remote control to confirm each letter of the symbol. NOTE: The Xpress XM 7 unit will sometimes complete the entry. When the entry appears on the screen press the Rotary/Select Knob or the (XM) Select Button on the remote control to confirm symbol to exit this mode press the menu button twice. -
Page 22: Erase Stock
Erase Stock This feature allows the user to erase Stock Tickers individually or all together (see Figure 23). Use the Rotary/Select Knob or the UP or DOWN buttons on the remote control to highlight the desired action, and press the Rotary/Select Knob or (XM) Se- lect Button on the remote control to confirm the selection. -
Page 23: Erase Some Stock
Erase Some Stock This feature allows the user to erase Stock Tickers individually (see Figure 25). Use the Rotary Select Knob or the Up and Down buttons on the Remote Control to confirm the deletion. The stock will be immediately removed. To exit this function, press the Menu button to revert to previously active screen (Figure 5). -
Page 24: Display Screen Mode
Display Screen Mode This feature allows the user to personalize the display of the unit to individual preferences. Upon entering Display Screen mode (see Figure 27), the user can adjust the way information is viewed. Use the Rotary/Select Knob or the remote control UP and DOWN buttons to highlight the setting you wish to adjust then press the Rotary/Select Knob or the (XM) Select button on the remote control to confirm the selection. -
Page 25: Scrolling Display
Scrolling Display The Scrolling Display feature allows the user to program the Xpress XM7 unit to scroll stock tickers or Info Extra information across the bottom portion of the screen (continuous stream of information). The paging mode feature presents the data one page at a time and is useful when viewing the display at a distance. -
Page 26: Set Clock
Set Clock This feature allows the user to personalize the clock display. The clock data is provided via the XM7 signal, and is displayed according to the users settings. Use the Rotary/Select Knob or the UP and DOWN buttons on the remote control and highlight one of the three options on the Set Clock Screen (See figure 30). -
Page 27: Savings Selection
12/24 Hour This feature is used to set the time displayed to either a 12-hour (Default) or 24-hour format (see Figure 32). Use the Rotary/ Select Knob or the remote control UP and DOWN buttons to highlight either “12 hour Clock” or “24 Hour Clock” then press the Rotary/Select Knob or the Remote’s (XM) Select button to enter your selection. -
Page 28: Auto-On
Auto-On The Xpress XM7 unit is configured to shut down when the vehicle is shut OFF or power is disconnected. By default, when the power to the unit is reapplied the user must press the Power button to turn the unit back ON. This feature allows the user to program the Xpress XM7 unit to automatically turn ON when the power to the unit is reapplied (much like a car radio). -
Page 29: Set Factory Defaults
Figure 35. Auto-Off / Sleep Timer Screen Set Factory Defaults This feature allows the user to reset the Xpress XM7 unit back to the original factory settings. Upon entering the Factory De- fault mode, use the Rotary/Select Knob or the UP and DOWN buttons on the remote control to switch between the No or Yes function. -
Page 30: Exit Menu
Exit Menu- To exit the menu options rotate the Rotary/Select Knob CW or press the down arrow on the remote control to highlight ‘Exit Menu’. Press the Rotary/Select Knob or the (XM) Select button on the remote control to confirm the selection. Search Button The Search button provides the ability to search by category or to scan directly through each of the available channels or... -
Page 31: Memory
Memory This feature allows the user to program into memory favorite song titles, artist names and channel information. To make an entry, press the memory (mem.) button and a “Saved in Memory” confirmation screen will appear (see Figure 39). Up to 20 entries can be stored. -
Page 32: Pre./Dir
Pre./Dir The Pre./Dir button determines whether the numbered buttons 0 through 9 will operate as a keypad for entering station numbers directly, or as presets (A, B, C) used to select stations. The unit informs the operator by displaying the selected mode (DIRECT, PRESET A, PRESET B, PRESET C) on the top line of the display. -
Page 33: Turning The Xpress Unit Off
Turning The Xpress Unit OFF To turn the Xpress XM7 unit OFF, press the power button on the unit or on the remote control. The following screen will appear, the curved lines on either side of the XM7 logo gradually disap- pear and the unit will shut down. -
Page 34: Remote Control
REMOTE CONTROL Remote Control Features The wireless remote control supplied with the Xpress XM7 unit is capable of operating most of the features from a remote location. Each button on the remote control functions in the same way as the button on the Xpress XM7 unit. For a full (+) Button description of a keypad button and function refer to the preced- ing sections in this manual. - Page 35 Menu Button (menu) – The MENU button is used to access “Main Menu” options which allows the user to make feature function adjustments and set personal preferences. Upon en- tering the main menu mode, use the UP and DOWN buttons to highlight the desired function.
- Page 36 Search Button (search) – Depressing the Search button will cause the unit to initiate a search based on the search mode stored in the unit. Channel Up Button – This button is used to scroll through upper channels in the channel list as well as navigate to the next higher line in a list of menu options.
-
Page 37: Care And Cleaning Troubleshooting
CARE AND CLEANING TROUBLESHOOTING Keep the unit away from excessive moisture or where it may get wet. It is strongly recommended that the unit be installed and kept away from heat sources or direct sunlight. When cleaning, use only a soft, dry cloth. Never use any chemicals, abrasives, solvents, alcohol based cleaning solutions or ammonia. -
Page 38: Specifications
3.5mm Diameter Min-Stereo Jack 5 Volt, 2 Amp Maximum, Negative Ground, DC Input. CAUTION: Use only the Audiovox approved adapter specified in the kit for the Xpress XM 7 Satellite Radio Receiver, or the unit could be severely damaged. 1 RF SMB Connector H X W X D 2.44 Inches X 4.44 Inches X 1.22 Inches... -
Page 39: Warranty
12 MONTH LIMITED WARRANTY AUDIOVOX ELECTRONICS CORPORATION (the Company) warrants to the original retail purchaser of this product that should this product or any part thereof, under normal use and conditions, be proven defective in material or workmanship within 12 months from the date of original purchase, such defect(s) will be repaired or replaced with new or reconditioned product (at the Company's option) without charge for parts and repair labor. - Page 42 © 2005 Audiovox Electronics Corporation 128-7454...
Need help?
Do you have a question about the Xpress XM and is the answer not in the manual?
Questions and answers