Table of Contents
Advertisement
Available languages
Available languages
Quick Links
Advertisement
Table of Contents

Subscribe to Our Youtube Channel
Related Manuals for RealFlame 7100


Summary of Contents for RealFlame 7100
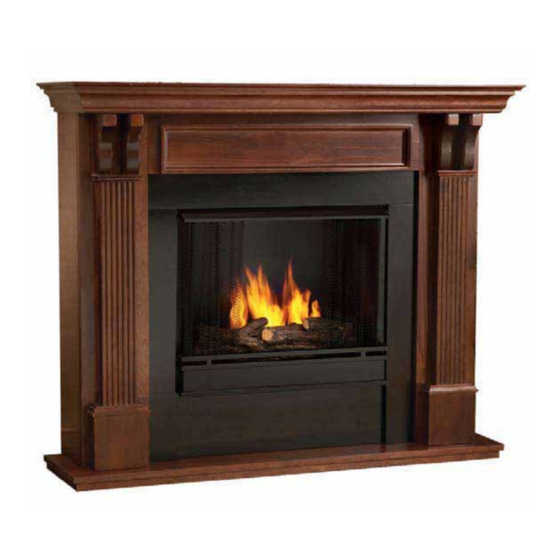
- Page 1 Model # 7100 Ashley Fireplace...
-
Page 2: Using Your Fireplace
Welcome to the Real Flame family of gel fuel products. If you have questions please call customer service at 1-800-654-1704 or log on to www.REALFLAME.com WARNINGS 1. Fireplace is designed to be used with Real Flame gel fuel only. Do not use with any other gel fuel or any other ®... -
Page 3: Parts List
PARTS LIST Number Description Part Number Quantity Base Panel 7101 Left Side Panel 7102 Right Side Panel 7103 Left Front Panel 7104 Right Front Panel 7105 Center Panel 7106 Top Panel 7107 Left Firebox Trim 7108 Right Firebox Trim 7109 Lower Firebox Trim 7110 Upper Firebox Trim... - Page 4 Step One -Join left side panel (2) with left front panel (4) by securing 6 short allen screws through 3 L-brackets. -Repeat with right side panel (3) and right front panel (5). Step Two -Set base panel (1) on a flat surface as shown. -Join panel (2) &...
- Page 5 Step Three -Attach left firebox trim (8) to left front panel (4) by securing 2 long allen screws through 2 washers. Fit on base panel (1) by securing 2 short allen screws through 1 L-bracket. -Repeat with right firebox trim (9). Step Four -Place lower firebox trim (10) on base panel (1).
- Page 6 Step Five -Attach center panel (6) to front panel (4) & (5) by securing 2 long allen screws through 2 washers. Fit on upper firebox trim (11) by securing1 long allen screw through 1 washer. Step Six -Attach 4pcs front panel decor (12) to front panel (4) & (5) by securing 8 long allen screws through 8 washers.
- Page 7 Step Seven -Locate top panel (7) to above finished parts. -Join center panel (6), side panel (2) & (3) by securing 5 long allen screws through 5 washers. Step Eight -Insert firebox support (13) to the hole on left side panel (2). Slide down the other side along the groove on right side panel (3).
-
Page 8: Care And Cleaning
Step Nine -Check and tighten all the screws with the allen wrench provided. Care and Cleaning Dust the mantel periodically. Using a soft cloth and a wood cleaner, wipe the mantel clean in the direction of the grain to minimize the appearance of scratches and scuffs in the finish. Do not use water to clean mantel. - Page 9 Modèle # 7100 Foyer Ashley...
- Page 10 Bienvenue dans la grande famille des produits de combus- tible au gel RealFlame. Pour toutes questions, contactez le service à la clientèle au 1-800-654-1704 ou allez au site www.REALFLAME.com Avertissements 1. Cet ensemble ne doit être utilisé qu’avec le gel combustible Real Flame. Ne jamais utiliser d’autres types de gel combustible ou d’autres matières inflammables.
-
Page 11: Liste Des Pièces
Liste des pièces Nº Description Nº de pièce Quantité Panneau de base 7101 Panneau latéral gauche 7102 Panneau latéral droit 7103 Panneau central gauche 7104 Panneau central droit 7105 Panneau central 7106 Panneau supérieur 7107 Moulure gauche 7108 Moulure droite 7109 Moulure inférieure 7110... - Page 12 Première étape - Unir le panneau latéral gauche (2) au panneau central gauche (4) et xer en utilisant 6 vis Allen courtes et 3 équerres. - Répéter la même opération avec le panneau latéral droit (3) et le panneau central droit (5) Deuxième étape - Mettre le panneau de base (1) sur une surface plane tel qu’illustré.
- Page 13 Troisième étape - Fixer la moulure gauche (8) au panneau central gauche (4) en utilisant 2 vis Allen longues et 2 rondelles. Placer sur le panneau de base (1) et xer en utilisant 2 vis Allen courtes et 1 équerre. - Répéter l’opération avec la moulure droite (9).
- Page 14 Cinquième étape - Fixer le panneau central (6) aux panneaux centraux (4) et (5) en utilisant 2 vis Allen longues et 2 rondelles. Placer sur la moulure supérieure (11) et xer en utilisant 1 vis Allen longue et 1 rondelle. Sixième étape - Fixer les 4 pièces centrales décoratives (12) aux panneaux (4) et (5) avec 8 vis Allen longues et 8 rondelles.
- Page 15 Septième étape - Mettre le panneau supérieur (7) sur les pièces déjà montées. - Unir le panneau central (6), les panneaux latéraux (2) et (3) et xer en utilisant 5 vis Allen longues et 5 rondelles. Huitième étape - Insérer le support du foyer (13) dans le trou sur le panneau latéral gauche(2). Glisser vers le bas le côté...
-
Page 16: Nettoyage Et Entretien
Neuvième étape - Examiner le tout et serrer toutes les vis en utilisant la clé Allen fourni avec les articles de quincaillerie. Nettoyage et entretien Épousseter régulièrement le manteau du foyer. Ne pas utiliser d’eau pour nettoyer le manteau du foyer. L’eau Utiliser des feutres protecteurs autant que possible.
Need help?
Do you have a question about the 7100 and is the answer not in the manual?
Questions and answers