Table of Contents
Advertisement
Advertisement
Table of Contents

Related Manuals for Audiovox Sirius SIR-PNP2


Summary of Contents for Audiovox Sirius SIR-PNP2
- Page 1 Shuttle User Guide SIR-PNP2 128-6901 1 of 28...
- Page 2 ESPN, ABC, CNBC, Bloomberg, Discovery and Radio Disney are developing news, sports and entertainment programming. Your Audiovox Shuttle receiver must be used with an adapter kit, such as the Audiovox Home kit or Vehicle Kit as required by your specific installation needs. These kits are available at retailers where Audiovox main units are sold.
- Page 3 THIS PAGE LEFT BLANK INTENTIONALLY 128-6901 3 of 28...
-
Page 4: Table Of Contents
Contents Cautions and Warnings ... 5 Shuttle System Components ... 5 Introduction ... 6 Enjoying Your Sirius Shuttle ... 6 Sirius Shuttle Controls ... 7 Basic Operation ... 9 Tuning by Category ... 9 Content Listing Options (Look Ahead) ... 9 Direct Tuning ... -
Page 5: Cautions And Warnings
Cautions and Warnings 1. Do not install the Shuttle in a position that hinders your view through the windshield, or obstructs view- ing of the dashboard indicators and displays. 2. Do not install the unit where it may obstruct the operation or deployment of safety devices, such as airbags, etc. -
Page 6: Introduction
You can begin to enjoy Sirius® Satellite Radio as soon as the Shuttle and Kit installation are complete: 1. Set up your Audiovox Shuttle using the installa- tion instructions included in your Home Kit or Vehicle Kit, or with the help of a professional installer. -
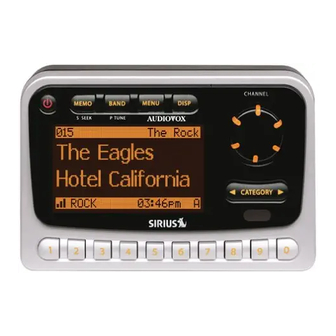
Page 7: Sirius Shuttle Controls
Sirius® Shuttle Controls The Audiovox Sirius® Shuttle Unit provides seven con- trol buttons, an Encoder knob and 10 number keys. Power Button: This button applies power to and removes power from the Sirius®... - Page 8 Encoder Knob and Select Button: The Encoder knob is the primary control for navigating through the various lists and option menus available on the unit. In the default mode, the Encoder knob provides sequential tuning through the available program streams. Clockwise (CW) rotation tunes up one stream-per-detent, while Counterclockwise (CCW) rotation tunes down one stream-per-detent.
-
Page 9: Basic Operation
display. Pre-set tuning continues until the user decides to terminate this function by pressing and holding the BAND Button for 2 seconds. Keypad Buttons 0-9: These buttons are used to directly enter a desired stream number. They are also used when entering and recalling preset stream numbers into memory. -
Page 10: Direct Tuning
While in the Category List menu, pressing the DISP button changes Stream List to Artist List. The available content listing now displays information by the Artist Name. Category Artist Name Display Category Song Title Display The DISP button is also used during category tuning. Consecutively pressing the DISP button while tuning by category will display the Stream Name, Artist Name or Song Title within the selected category. -
Page 11: Preset List Mode
Press and Hold BAND Button Press and Hold BAND Button Preset List Mode To search by list for a preset, press and hold the BAND button to enter Preset Tune mode. When in the Preset Tune Mode, press and hold the DISP button for 2 sec- onds;... -
Page 12: Memory (Memo) Button (S-Seek Function)
the DISPbutton will display program information by Artist Name, Song Title or stream name. Pressing and holding the DISP button will exit the Stream List mode and return to the previ- ously selected tuning/display mode. Memory Button (S-Seek Function): This feature allows the user to capture and store the current program data information (Artist &... - Page 13 Turning the Encoder knob highlights the options and pushing the knob selects the option. The delete option allows the user to delete the currently featured artist/ song title selection from S-Seek memory. The default setting is NO. If the YES option is chosen, the currently featured Artist/ Song Title is deleted from S-Seek memory.
- Page 14 No stored match alert is provided for the currently selected stream. To ensure that no duplicate en- tries are stored in memory, the receiver will check the stored input data to ensure the information about to be stored is not already in memory. a.
-
Page 15: Menu Display Options
Menu Display Operations To enter the Menu Options page, press the MENU Button. The Menu Options list will appear on the LCD display. Using the Encoder knob, highlight the option you wish to adjust and then press the Encoder knob. The following options are available: Sirius ID Audio Level Options... -
Page 16: Sirius Id
Sirius ID Displays your 12 digit Sirius ID number. No adjustments are allowed in this mode. To exit this option, press the Encoder knob or Menu Button. Sirius ID Display Settings The following adjustments are possible: Contrast Control Auto Dimmer Dimming Control Font Type To enter any of these modes, use the Encoder... -
Page 17: Fm Transmitter Options
Upon entering this mode, rotating the Rotary Encoder knob to toggle between the FM ON or FM OFF function/display selection. To select and/or exit this function, press the Encoder knob (No button activity for 10 seconds will also exit this function.) NOTE: It is recommended that you turn the FM Transmitter off if you are using the low level... -
Page 18: Lock/Unlock Default Code Function
1. Press the MENU button to access the User Menu. 2. Rotate the Encoder knob to select the “Lock Options”. 3. Press the Encoder knob. 4. Rotate the Encoder knob to highlight “Edit Code”. 5. Press the Encoder knob. 6. Enter the default code “0000”. 7. -
Page 19: Memory Options
Memory Options In this mode, the user can turn the Memory Search Function (S-Seek) ON or OFF. In addition, all 20 Memory Locations can be cleared. On the display, the top line displays the text,M e m o r y Options. - Page 20 Time Zone: The Time Zone option provides: (GMT-9:00) Alaska (GMT-8:00) Pacific (GMT-7:00) Mountain (GMT-6:00) Central (GMT-5:00) Eastern (GMT-4:00) Atlantic (GMT-3:30) Newfoundland (Abbreviated as GMT-3:30 Newfndlnd) Use the Encoder knob to highlight the desired time zone and press the Select Button. Daylight Savings Time (DST) Observance: Activate this function if your area is subject to DST;...
-
Page 21: Alarm Time
Alarm Time When this menu option is highlighted and selected the current alarm setting is displayed. The factorydefault is 12:00PM. By pressing the category buttons the hours can be increased or decreasedin one hour increments. AM or PM will switch automatically when the AM or PM threshold has been exceeded. -
Page 22: Stream
increase (CW) or decrease (CCW) to se lect the desired day from the default value (Monday). Stream: Rotate the Encoder knob to scroll through a listing of all the Sirius streams in a circular motion. The listing should encompass all 5 available lines. -
Page 23: Factory Default
Sleep Off is the factory default setting. Rotate the Encoder knob to toggle through the desired sleep times. When the desired time is highlighted, press the Encoder knob. The unit will now turn off after the selected time has expired Factory Default The Factory Default screen displays the text Restore Default Settings with the following adjustments:... - Page 24 Remote Control Unit 1. POWER - Turns the Shuttle on and off. 2. Presets 0-9- These buttons are used to directly enter a desired stream number. They are also used when entering and recalling preset stream numbers into memory. 3. DISPLAY- allows the user to choose one of three ways of presenting the Artist and Song title information on the LCD screen.
-
Page 25: Troubleshooting
Troubleshooting e l t y l r i l l y t l c i t c t i y t i i a t c i t . e l e l t i l e e l t t a l Specifications Audio Output... -
Page 26: Warranty
AUDIOVOX CORPORATION (the Company) warrants to the original retail purchaser of this product that should this product or any part thereof, under normal use and conditions, be proven defective in material or workmanship within 12 months from the date of original purchase, such defect(s) will be repaired or replaced with new or reconditioned product (at the Company's option) without charge for parts and repair labor. - Page 27 THIS PAGE LEFT BLANK INTENTIONALLY -27- 128-6901 27 of 28...
- Page 28 © 2003 Audiovox Electronics Corporation 128-6901 -28- 128-6901 28 of 28...
Need help?
Do you have a question about the Sirius SIR-PNP2 and is the answer not in the manual?
Questions and answers