Advertisement
Table of Contents
Advertisement
Table of Contents

Related Manuals for Kett PM-600


Summary of Contents for Kett PM-600
- Page 1 Seed & Grain Moisture Tester PM-600 Operating Manual...
-
Page 3: Table Of Contents
CONTENTS 1. Specifications ..................2. Names of Parts ................... 3. Keyboard ..................... 4. Display ....................5. Before Measurement................6. Measurement Methods ..............7. Displaying the Average Value ............13 8. Preforming Moisture Content Bias Adjustment ......14 9. Replacing the Batteries and Error Code Display ......16 10. -
Page 4: Specifications
1. Specifications Measuring principle : Dielectric constant (50MHz) Applications : Grain seeds and other agricultural products(See PM-600 PRODUCT LIST) Measuring range : 1.0∼40.0% (depends on products) Accuracy : S.E.C 0.2∼0.5% (for less than 20% moisture content) S.E.C : Standard Error of Calibration Capacity : Sample weight : 20∼200gr... -
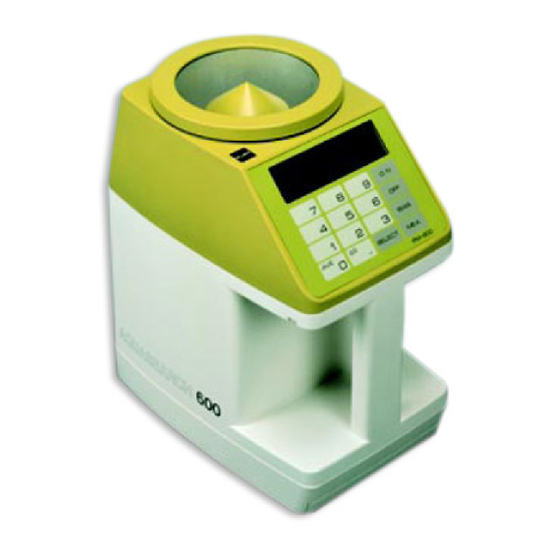
Page 5: Names Of Parts
2. Names of Parts ACCESSORIES MAIN BODY Measuring section Top ring Funnel Display Brush Keyboard Grip Operating manual Sample cup Battery cover PM-600PRODUCT LIST Product list Batteries... -
Page 6: Keyboard
3. Keyboard Power is turned on. Power is turned off. Bias adjustment can be entered. For measuring moisture. For selecting product number. (1) In MEA(measurement) mode, weight/litre is displayed. (2) In BIAS mode, "-" sigh can be entered. (1) In MEA mode, average value is displayed. -
Page 7: Display
Product Name and Type Number Weight/Litre Unit Moisture Unit Battery Indicator Number of Measurement Indicators of Function Indication of (1) Pour When the PM-600 becomes (1)Moisture ready for measurement, (2)Weight/Litre "Pour" blinks. (3)Bias adjustment value (2) Bias Bias adjustment (3) Ave Average... -
Page 8: Before Measurement
The unit is powered by four LR6 batteries. Place the batteries in the compartment correctly. (3) The PM-600 features an integrated balance. For best ac- curacy, place the unit on a horizontal surface, in a loca- tion that is not subject to wind or vibration. -
Page 9: Measurement Methods
6. Measurement Methods 6-1. Turn on the PM-600 (1) Press key. (Buzzer sounds for 2 seconds.) All indicators will be displayed (Figure1). Figure 1 (2) After 4 seconds, the product number (01~99) and the product name (4 characters), "T" and "%" indicators will be displayed (Figure2). - Page 10 Be sure that Product No. "41" is blinking (Figure 3). Figure 3 (2) Press key. "1" is blinking (Figure 4). Figure 4 (3) Press key (Figure 5). Note : The product number is retained in the non-volatile memory when the PM-600 power is off. Figure 5...
- Page 11 6-3. Pour the sample into the sample cup. (1) Place the funnel on top of the sample cup. Pour the sample to be tested into the cup until it overflows (Figure 6). Figure 6 (2) It shoud take about 4~5 seconds. (3) Remove the funnel and level the cup by pulling the funnel accross the top edge(Figure 7).
- Page 12 6-4. Pour the sample into the measuring section. (1) Press key. The decimal point blinks (Figure 9). The PM-600 is performing zero-adjustment of the built-in scale Figure 9 while the decimal point is blinking. Caution : Be sure not to touch the unit at this moment.
- Page 13 Note 2 : When "Corn Cane" or "Flattened Barley" or "Tapi- oca Flour" is measured, the sample is sometimes put on the top of testing chamber as per Figure A. In that case, drop the sample on the top into the testing chamber while a decimal point is blinking (Figure 12).
- Page 14 (3) After the "POUR" indicator goes out, the decimal point blinks 10 seconds. The moisture content and the number of measurement are displayed (Figure 14). Figure 14 The unit measures weight of the sample while the decimal point is blinking after the "POUR" indicator goes out. Caution : Do not pour more sample in during this period or the measurement precision will be greatly down- Figure 15...
-
Page 15: Displaying The Average Value
7. Displaying the Average Value Press key to display the average of the measured values. When the number of measurement is between 2 and 9, "AVE", Figure 17 the number of measurements and the average moisture are displayed (Figure 17). Next press key, the number of measurements and the Figure 18... -
Page 16: Preforming Moisture Content Bias Adjustment
8. Performing Moisture Content Bias Adjustment Moisture content bias adjustment can be made from -9.9~ +9.9% for each product. Input a bias value if the moisture content has any discrepancy against the official standard. The bias value is not cleared, when the power is off. Example : Product No. - Page 17 (3) Input the bias. Press key. The "BIAS" sign blinks. (Figure 22) Figure 22 Press key, key and key (Figure 23, Figure 24). The "BIAS" sign stops blinking (Figure 25). Figure 23 Figure 24 Figure 25...
-
Page 18: Replacing The Batteries And Error Code Display
9. Replacing the Batteries and Error Code Display (1) The battery indicator ( ) is displayed when the batteries are exhausted (Figure 26). Replace all four with new batteries. Figure 26 (2) When moisture underflows the lowest limit of the measuring A A A range, LCD displays "... - Page 20 0707 ・ MA ・ 0702 ・ 500...
Need help?
Do you have a question about the PM-600 and is the answer not in the manual?
Questions and answers