Table of Contents
Advertisement
Available languages
Available languages
: AVC-276PS - COLORADO
MODÈLE/
MODEL
INSTRUCTIONS D'INSTALLATION ET GUIDE DE L'USAGER
INSTALLATION GUIDE / USE AND CARE MANUAL
Hotte encastrable 28"
/ 28"
Built-in Hood
(27,6")
(27,6")
IMPORTANT
Lire et conserver ces instructions. Read and save these instructions.
:
NOTE : Installateur: Laissez ce manuel au propriétaire. Propriétaire: Conservez ce
guide pour référence ultérieure.
Installer: Leave this manual with the homeowner. Homeowner: Keep this guide for
future reference.
Advertisement
Chapters
Table of Contents

Related Manuals for AVG AVC-276PS-COLORADO


Summary of Contents for AVG AVC-276PS-COLORADO
- Page 1 : AVC-276PS - COLORADO MODÈLE/ MODEL INSTRUCTIONS D’INSTALLATION ET GUIDE DE L’USAGER INSTALLATION GUIDE / USE AND CARE MANUAL Hotte encastrable 28” / 28” Built-in Hood (27,6”) (27,6”) IMPORTANT Lire et conserver ces instructions. Read and save these instructions. NOTE : Installateur: Laissez ce manuel au propriétaire. Propriétaire: Conservez ce guide pour référence ultérieure.
-
Page 2: Table Of Contents
Dimensions du placard ……….…………….………………………….……..6 Spécifications électriques …............. 9 Instructions d’installation .............. 10 Instructions d’utilisation ..............13 Instructions d’entretien ..............14 Garantie AVG .................. 15 APPROUVÉ POUR LES APPAREILS À UTILISATION RÉSIDENTIELLE SEULEMENT. LISEZ CES INSTRUCTIONS ET CONSERVEZ-LES. VEUILLEZ LIRE... -
Page 3: Importantes Instructions De Sécurité
IMPORTANTES INSTRUCTIONS DE SÉCURITÉ AVERTISSEMENT : POUR RÉDUIRE LE RISQUE D’INCENDIE, CHOC ÉLECTRIQUE OU DOMMAGES CORPORELS, RESPECTEZ LES INSTRUCTIONS SUIVANTES: ɷ Utilisez cet appareil uniquement dans les applications envisagées par le fabricant. Pour toute question, contactez le fabricant. ɷ Avant d’entreprendre un travail d’entretien ou de nettoyage, interrompre l’alimentation de la hotte au niveau du tableau de disjoncteurs, et verrouiller le tableau de disjoncteurs pour empêcher tout rétablissement accidentel de l’alimentation du circuit. -
Page 4: Outils Et Pièces
Outils et pièces Rassemblez les outils et pièces nécessaires avant d’entreprendre l’installation. Lire et observer les instructions fournies avec chacun des outils de la liste ci-dessous. Outils nécessaires • Niveau • Perceuse • Foret de 1/8’’ (3 mm) • Crayon •... -
Page 5: Dimensions Du Produit
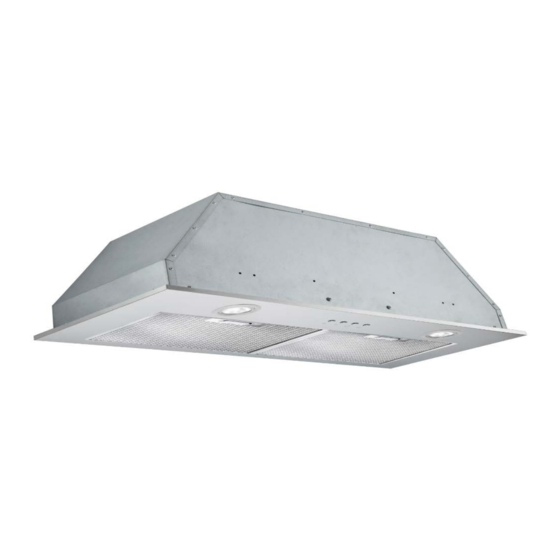
Dimensions Hotte encastrable 27,6 ‘’ (70,1 cm) Dimension DIM A 27 1/2’’ (68,6 cm) DIM B 26’’ (66 cm) DIM C 5/8’’ (1,6 cm) DIM D 10 1/4’’ (26 cm) DIM E 9 7/8’’ (25,1 cm) DIM F 5/8’’ (1,6 cm) DIM G 12 3/8’’... -
Page 6: Dimensions Du Placard
Dimensions du placard Hauteur minimum du placard: 12” (30,5 cm) Largeur de l’ouverture du placard : 30” (76,2 cm) Distance minimum suggérée: 26’’ (66,04 cm) minimum à partir du haut d’une surface de cuisson électrique et 30‘’ (76,2 cm) minimum à partir d’une surface de cuisson au gaz; Distance maximum suggérée: 30‘’... - Page 7 Exigences concernant l’évacuation • Le circuit d’évacuation doit décharger l’air vers l’extérieur. • Ne pas terminer le circuit d’évacuation dans un grenier ou dans un autre espace clos tel l’intérieur des murs. • Ne pas utiliser une bouche de décharge murale de 4’’ (10,2 cm) normalement utilisée pour un équipement de buanderie.
- Page 8 Calculer la longueur effective du circuit d’évacuation Pour la réalisation du circuit d’évacuation, nous recommandons un conduit de 6’’ (15,2 cm) de diamètre avec une longueur maximale de 35pi (10,7 m). Pour une performance optimale, ne pas utiliser plus de trois coudes à 90°. Pour calculer la longueur effective du circuit d’évacuation nécessaire, additionnez les longueurs équivalentes (en pieds / mètres) de toutes les composantes utilisées dans le circuit.
-
Page 9: Spécifications Électriques
Spécifications électriques AVERTISSEMENT Brancher sur une prise à 3 alvéoles reliée à la terre. Ne pas enlever la broche de liaison à la terre. Ne pas utiliser un adaptateur. Ne pas utiliser un câble de rallonge. Le non-respect de ces instructions peut causer un décès, un incendie ou un choc électrique. -
Page 10: Instructions D'installation
Instructions d’installation Préparation de l’emplacement • Il est recommandé que l’installation du circuit d’évacuation soit réalisée avant celle de la hotte. • Avant de procéder aux découpages, vérifiez que les distances de séparation pour les raccords dans les cavités du plafond ou du mur sont adéquates. •... - Page 11 Décharge vers l’extérieur, à travers le toit Relevez les mesures appropriées et tracez les lignes indiquées sur l’illustration. Utilisez une scie sauteuse ou une scie à guichet pour découper une ouverture à travers le sommet du placard et le toit pour l’évacuation A.
- Page 12 Raccordement du circuit d’évacuation Installation avec décharge vers l’extérieur Connectez le circuit d’évacuation sur l’ouverture de décharge de la hotte. Serrez le point de connexion avec des brides. Achever l’installation Réinstallez les filtres à graisse. Voir la section ‘’ Entretien de la hotte”. AVERTISSEMENT Risque de choc électrique Branchez sur une prise à...
-
Page 13: Instructions D'utilisation
Instructions d’utilisation La hotte de cuisinière est conçue pour extraire fumée, vapeurs et odeurs de cuisson de la zone de la table de cuisson. Pour obtenir les meilleurs résultats, mettre le ventilateur de la hotte en marche avant d’entreprendre une cuisson et la laisser fonctionner pendant plusieurs minutes après l’achèvement d’une cuisson pour pouvoir évacuer de la cuisine toute trace d’odeur de cuisson, de vapeur ou de fumée. -
Page 14: Instructions D'entretien
Instructions d’entretien Nettoyez fréquemment la hotte et les filtres à graisse en suivant les instructions ci-dessous. Réinstallez les IMPORTANT: filtres à graisse avant de faire fonctionner la hotte. Surfaces externes Afin d’éviter d’endommager la surface externe, ne pas utiliser de tampons en laine d’acier ou de tampons à récurer savonneux. -
Page 15: Garantie Avg
à condition d’une utilisation normale et adéquate du produit et d’un entretien adéquat, tel que décrit dans et conformément au manuel d’instructions fourni avec chaque unité AVG (*une preuve d’achat est requise). La responsabilité d’AVG dans le cadre de cette garantie se limite à une période de douze (12) mois à partir de la date de réception. - Page 16 Electrical specifications …............23 Installation Instructions............. 24 Use Instructions ................ 27 Maintenance Instructions ............28 AVG Warranty ................29 APPROVED FOR RESIDENTIAL TYPE DEVICES FOR RESIDENTIAL USE ONLY. READ AND SAVE THESE INSTRUCTIONS. PLEASE READ THE ENTIRE INSTRUCTIONS BEFORE YOU BEGIN.
-
Page 17: Important Security Instructions
IMPORTANTES SECURITY INSTRUCTIONS WARNING: TO REDUCE THE RISK OF FIRE, ELECTRIC CHOC OR BODILY HARM, RESPECT THE FOLLOWING INSTRUCTIONS: ɷ Use this unit only for the purpose that it is intended by the manufacturer. For questions, contact the manufacturer. ɷ Before undertaking maintenance or cleaning, interrupt the power supply to the hood at the breaker panel and lock the breaker panel to prevent accidental restoration of the power circuit. -
Page 18: Tools And Parts
Tools and Parts Gather the required tools and parts before starting installation. Read and follow the instructions provided with the tools listed below. Required tools • Level • Drill • Drill bit of 1/8’’ (3 mm) • Pencil • Pliers •... -
Page 19: Dimensions Of The Product
Dimensions of the product Built-In Hood 27.6 ‘’ (70.1 cm) Dimension DIM A 27 1/2’’ (68.6 cm) DIM B 26’’ (66 cm) DIM C 5/8’’ (1.6 cm) DIM D 10 1/4’’ (26 cm) DIM E 9 7/8’’ (25.1 cm) DIM F 5/8’’... -
Page 20: Dimensions Of The Cabinet
Dimensions of the cabinet Minimum height of the cabinet: 12” (30.5 cm) Width of the opening of the cabinet : 30” (76.2 cm) C. Minimum suggested distance: 26’’ (66.04 cm) minimum from the top of an electric cooktop and 30‘’ (76.2cm) minimum from the top of a gas cooktop. -
Page 21: Venting Requirements
Venting requirements • The discharge circuit must vent the air to the outside. • Do not terminate the venting system in an attic or other enclosed space such as inside walls. • Do not use a wall cap of 4'' (10.2 cm) normally used for laundry equipment. •... - Page 22 Calculating the effective length of the exhaust system For setting up the exhaust system, we recommend a pipe of 6 '' (15.2 cm) in diameter with a maximum length of 35 feet (10.7 m). For optimum performance, use no more than three 90° elbows. To calculate the length of the exhaust system required, add the equivalent length (feet/meters) of all the components used in the circuit.
-
Page 23: Electrical Specifications
Electrical specifications WARNING Plug into a 3-prong grounded outlet. Do not remove the ground connecting. Do not use an adapter. Do not use an extension cord. Failure to follow these instructions can result in death, a fire or electric shock. The hood must be properly grounded in accordance with local codes and ordinances or, in the absence of IMPORTANT: such codes, with the Canadian Electrical Code, CSA C22.1 No. -
Page 24: Installation Instructions
Installation Instructions Preparing the location • It is recommended that the installation of the exhaust system is carried out before the hood. • Before making cut-outs, make sure the separation distances for fittings in the cavities of the ceiling or wall are adequate. - Page 25 Discharge toward the exterior, through the roof Take appropriate measurements and draw the lines shown in the illustration. Use a jigsaw or reciprocator saw to cut an opening through the top of the cabinet and the roof for evacuation. A. Opening B.
-
Page 26: Completing The Installation
Connecting the exhaust system Venting installations to the exterior Connect the exhaust system to the discharge opening of the hood. Tighten the connection points with flanges. Completing the installation 1. Re-install the grease filters. See ''Range Hood Care”. WARNING Electrical Shock Hazard Plug into a 3-prong grounded outlet. -
Page 27: Use Instructions
Use Instructions The range hood is designed to remove smoke, cooking vapors and odors from the cooktop area. For best results, put the hood fan before starting cooking and let it run for several minutes after the completion of cooking to evacuate all traces of odor, steam or smoke. -
Page 28: Maintenance Instructions
Maintenance Instructions Frequently clean the hood and grease filters by following the instructions below. Reinstall the grease filters IMPORTANT: before operating the hood. External surfaces To avoid damaging the outer surface, do not use steel wool pads or scouring pads. Always wipe dry the surface to avoid leaving water marks. -
Page 29: Avg Warranty
The responsibility of AVG under this warranty is limited to twelve (12) months from the date of reception of the product. All parts covered by this warranty which, in the opinion of AVG, are defective and that, in the period covered by the warranty, are limited to repair or replacement, including labor costs, defective parts or assembly.
Need help?
Do you have a question about the AVC-276PS-COLORADO and is the answer not in the manual?
Questions and answers