Table of Contents
Advertisement
Available languages
Available languages
DEUTSCH
3
ENGLISH
14
FRANÇAIS
25
ITALIANO
36
Ab Serie-Nr. 41'000
From serie no 41'000
A partir du no de série 41'000
A partire dal no di serie 41'000
Vor dem Gebrauch des
Gerätes die Betriebs-
anleitung aufmerksam
lesen.
Before using the tool,
read the operating
instructions carefully.
Avant l'utilisation de
l'appareil, consultez
soigneusement le
mode d'emploi.
Prima d'utilizzare
l'apparecchio, leggere
attentamante le istru-
zioni per l'uso.
02.04/WE
BETRIEBSANLEITUNG UND SICHERHEITSVORSCHRIFTEN
BETRIEBSANLEITUNG UND SICHERHEITSVORSCHRIFTEN
BETRIEBSANLEITUNG UND SICHERHEITSVORSCHRIFTEN
BETRIEBSANLEITUNG UND SICHERHEITSVORSCHRIFTEN
BETRIEBSANLEITUNG UND SICHERHEITSVORSCHRIFTEN
OPERA
OPERA
OPERA
OPERATING
OPERA
TING
TING
TING AND SAFETY INSTR
TING
AND SAFETY INSTRUCTIONS
AND SAFETY INSTR
AND SAFETY INSTR
AND SAFETY INSTR
MODE D'EMPLOI ET DE SÉCURITÉ
MODE D'EMPLOI ET DE SÉCURITÉ
MODE D'EMPLOI ET DE SÉCURITÉ
MODE D'EMPLOI ET DE SÉCURITÉ
MODE D'EMPLOI ET DE SÉCURITÉ
ISTRUZIONI PER L'USO E DI SICUREZZA
ISTRUZIONI PER L'USO E DI SICUREZZA
ISTRUZIONI PER L'USO E DI SICUREZZA
ISTRUZIONI PER L'USO E DI SICUREZZA
ISTRUZIONI PER L'USO E DI SICUREZZA
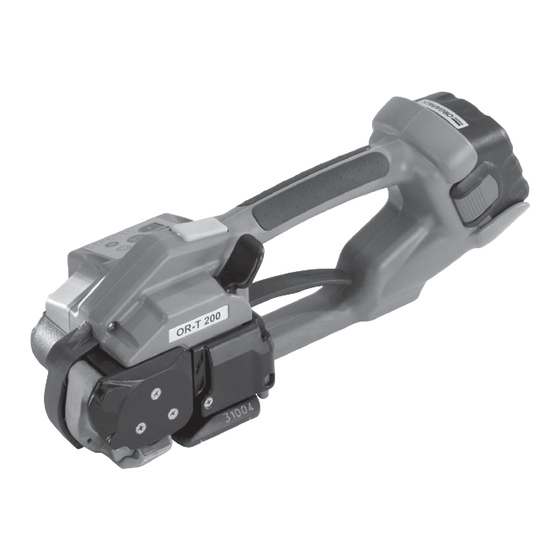
OR-T 200
Akku-Handgerät zum Umreifen mit Kunststoffband
Battery-hand tool for plastic strapping
Appareil sur accu pour le cerclage par bande plastique
Apparecchio da batteria per reggiare con reggetta di plastica
Sales and Service 877-862-6699
UCTIONS
UCTIONS
UCTIONS
UCTIONS
Advertisement
Chapters
Table of Contents

Related Manuals for Orgapack OR-T 200


Summary of Contents for Orgapack OR-T 200
- Page 1 ISTRUZIONI PER L‘USO E DI SICUREZZA ISTRUZIONI PER L‘USO E DI SICUREZZA ISTRUZIONI PER L‘USO E DI SICUREZZA ISTRUZIONI PER L‘USO E DI SICUREZZA ITALIANO OR-T 200 Akku-Handgerät zum Umreifen mit Kunststoffband Ab Serie-Nr. 41’000 Battery-hand tool for plastic strapping From serie no 41’000 Appareil sur accu pour le cerclage par bande plastique A partir du no de série 41’000...
- Page 2 KONFORMITÄTSERKLÄRUNG Standard-Umreifungstechnik (SST) Silbernstrasse 14 Wir erklären in alleiniger Verantwortung, dass CH-8953 Dietikon das Gerät OR-T 200, auf welches sich diese Erklä- Telefon +41 1 745 50 50 rung bezieht, mit den geltenden Bestimmungen des +41 1 745 52 64 STEG (Bundesgesetz über die Sicherheit von tech-...
-
Page 3: Table Of Contents
ORGAPACK OR-T 200 INHALTSVERZEICHNIS TECHNISCHE DATEN Seite Gewicht 3,9 kg (inkl. Akku) Technische Daten Allgemeines Abmessungen Länge 375 mm Hinweise zum Umweltschutz Breite 130 mm Sicherheitsvorschriften Höhe 140 mm Sicherheitsvorschriften für Ladegerät und Akku 5 Beschreibung Spannkraft 400–2000 N Aufbau... -
Page 4: Allgemeines
ORGAPACK OR-T 200 ALLGEMEINES Diese Betriebsanleitung soll das Kennenlernen des Gerätes und den bestimmungsgemässen Einsatz er- VORSICHT! leichtern. Die Betriebsanleitung enthält wichtige Hin- weise, wie das Gerät sicher, sachgerecht und wirt- Wird verwendet bei schaftlich einzusetzen ist. Das Einhalten der Hinweise Gefahren für Leben... -
Page 5: Sicherheitsvorschriften
ORGAPACK OR-T 200 SICHERHEITSVORSCHRIFTEN Informieren Sie sich! Verwenden Sie nur Original- Original Vor dem Gebrauch des Gerätes ORGAPACK-Ersatzteile! die Betriebsanleitung sorgfältig Die Verwendung von anderen als jklsfjklsdjš lksdfjkl lesen. ORGAPACK-Ersatzteilen jkljsdllkjjkljsd ORGAPACK fkljjklkjkljsdafj asdfjklkjjkljklj ksldafkjkljklš Das Gerät darf nur von ausgebil-... -
Page 6: Beschreibung
ORGAPACK OR-T 200 BESCHREIBUNG 4.1 AUFBAU 1 Bedienpanel 2 Drucktaste “Band spannen“ 3 Traggriff 4 Akku 5 Wippenhebel 6 Taste “Schweissen/Abschneiden“ 7 Schweissen/Abschneiden 8 Spannen 9 Akku Ladegerät Fig. 1 4.2 BEDIENPANEL 1 Drucktaste “Schweisszeit“ 2 Drucktaste “Spannkraft“ 3 Drucktaste “Akku“... -
Page 7: Ladegerät-Anzeigen
ORGAPACK OR-T 200 4.4 LADEGERÄT-ANZEIGEN Ladebereitschaft Grünes Dauerlicht Akku nicht gesteckt: Netzspannung liegt an. Schnelladung Grünes Blinklicht Schnelladung läuft, bis Akku mit fehlender Kapazität nach- geladen ist. Danach schaltet das Ladegerät automatisch auf Erhaltungsladung um. Erhaltungsladung Grünes Dauerlicht Akku eingesteckt: Ladegerät liefert zur Zeit nur... -
Page 8: Inbetriebnahme
ORGAPACK OR-T 200 INBETRIEBNAHME 5.1 AKKU-LADEGERÄT Input 230 V 50/60 Hz / 44 W Die Netzspannung muss mit den Angaben auf dem Output 7.2-14.4 V 1.9 A Typenschild (Fig. 5) übereinstimmen. Das Ladegerät ist nur geeignet zum Laden von Bosch- Akkus (NiCd/NiMH) mit Spannungen zwischen 7,2 V Fig. -
Page 9: Bedienung
ORGAPACK OR-T 200 BEDIENUNG 6.1 BEDIENUNG DES GERÄTES – Geladenen Akku (7/1) in Gerät einsetzen. – Das Band um das Packgut legen, so dass die Bänder auf der Oberseite übereinander liegen. Der Bandanfang liegt unten. Bänder mit der linken Hand so fassen, dass der Bandanfang ca. -
Page 10: Verschlusskontrolle
ORGAPACK OR-T 200 – Taste (10/1) bis zum Anschlag nach unten drücken. Die Bänder werden miteinander verschweisst, und das obere Band wird abgeschnitten. – Die LED-Anzeige (10/2) zeigt die Abkühlzeit des Verschlusses an: LED blinkt: Nach einem ausgeführten Reib- schweissverschluss blinkt die grüne LED für ca. -
Page 11: Bedienpanel
ORGAPACK OR-T 200 6.3 BEDIENPANEL a) Standard-Anzeige max. min. a) Standard-Anzeige (grün) Mit eingesetztem und geladenen Akku wird die aktuell eingestellte Spannkraft angezeigt. grün 1 = minimale Spannkraft (ca. 400 N) 7 = maximale Spannkraft (ca. 1200/2000 N*) b) Anzeige “Akku leer“... -
Page 12: Bandspannungsbereich Einstellen
ORGAPACK OR-T 200 6.3.4 BANDSPANNUNGSBEREICH EINSTELLEN Am Gerät können folgende zwei Bandspan- nungsbereiche eingestellt werden: A = 400–2000 N (Standard) B = 400–1200 N (z.B. für 13 mm Bänder) Bandspannungsbereich abfragen: – Drucktaste “–“ (17/2) betätigen und festhalten, zu- sätzlich Drucktaste “Spannkraft“ (17/1) für eine Sekunde betätigen. -
Page 13: Wartung Und Instandsetzung
ORGAPACK OR-T 200 WARTUNG UND INSTANDSETZUNG Sämtliche Wartungsarbeiten können mit einem Kreuzschraubenzieher (Phillips) aus- geführt werden! 7.1 SPANNRAD REINIGEN/ERSETZEN Ausbau – Akku aus Gerät ziehen. – Drei Senkschrauben (20/3) lösen und Deckel (20/2) zusammen mit Rillenkugellager entfernen. – Spannrad (20/1) vorsichtig herausziehen. -
Page 14: 82 Db (A)
DECLARATION OF AGREEMENT We take sole responsibility for declaring that the EN 50081-2, EN 50082-2, EN 55022, EN 50081-1 tool OR-T 200, to which this declaration refers, is in full compliance with the current requirements of the CH-8953 Dietikon, December 2003 guidelines laid down by the council on 22th June 1998 (98/37/EEC), “Machine Guidelines“. -
Page 15: General Information
ORGAPACK OR-T 200 GENERAL INFORMATION These operating instructions are intended to simplify familiarisation with the strapping tool and its proper CAUTION! use for the intended purpose. The operating instruc- tions contain important information concerning the Used where there is safe, proper and efficient use of the strapping tool. -
Page 16: Safety Instructions
ORGAPACK OR-T 200 SAFETY INSTRUCTIONS Inform yourself! Original ORGAPACK spare Original Read the operating instructions parts must be used exclu- carefully. sively! jklsfjklsdjš lksdfjkl Preventive and corrective main- Not using original spare parts jkljsdllkjjkljsd ORGAPACK fkljjklkjkljsdafj asdfjklkjjkljklj ksldafkjkljklš tenance on the tool may only be... -
Page 17: Description
ORGAPACK OR-T 200 DESCRIPTION 4.1 CONSTRUCTION 1 Operating panel 2 Strap tensioning push button 3 Handle 4 Battery 5 Rocker lever 6 Welding/cutting button 7 Welding/Cutting 8 Tensioning 9 Battery charger Fig. 1 4.2 OPERATING PANEL 1 Welding time push button... -
Page 18: Battery Charger Indicators
ORGAPACK OR-T 200 4.4 BATTERY CHARGER INDICATORS Continuous Ready for charging green light Battery not inserted, mains supply is connected. Rapid charging Flashing green light Rapid charging operates until the battery is fully recharged. The battery charger then switches automatically to trickle charging. -
Page 19: Initial Operation
ORGAPACK OR-T 200 INITIAL OPERATION 5.1 BATTERY CHARGER Input 230 V 50/60 Hz / 44 W The mains supply must comply with the specifications Output 7.2-14.4 V 1.9 A on the rating plate (Fig. 5). The battery charger is suitable only for charging batteries from the Bosch range of tools (NiCd/NiMH) Fig. -
Page 20: Operating Instructions
ORGAPACK OR-T 200 OPERATING INSTRUCTIONS 6.1 OPERATING THE TOOL – Insert charged battery (7/1) into strapping tool. – Place strap round goods to be packaged, so that the straps lie one above the other on top of package. The beginning of the strap is underneath. Hold the straps with the left hand so that the strap beginning of the straps is approximately 20 cm (8") ahead of... -
Page 21: Checking The Seal
ORGAPACK OR-T 200 – Depress button (10/1) completely to the stop. The straps are welded together and the upper strap is cut off. The LED indicator (10/2) indicates the cooling time of the sealing: LED flashing: after finishing the friction welding, the green LED flashes for approx. -
Page 22: Operating Panel
ORGAPACK OR-T 200 6.3 OPERATING PANEL a) Standard indication max. min. a) Standard indication (green) The current strap tension setting is monitored with inserted and charged battery. green 1 = minimum strap tension (approx. 400 N) 7 = maximum strap tension (approx. 1200/2000 N*) -
Page 23: Setting Strap Tension Range
ORGAPACK OR-T 200 6.3.4 SETTING STRAP TENSION RANGE The following two strap tension ranges can be set on the tool: A = 400–2000 N (standard) B = 400–1200 N (eg for 13 mm straps) Check strap tension range: – Depress and hold down “–“ push button (17/2), and depress strap tension push button (17/1) for one second. -
Page 24: Preventive And Corrective Maintenance
ORGAPACK OR-T 200 PREVENTIVE AND CORRECTIVE MAINTENANCE All preventive maintenance tasks can be performed with a Phillips screw driver! 7.1 CLEANING/REPLACING TENSION WHEEL Removal – Remove battery from tool. – Release three sunk screws (20/3) and remove cover (20/2) with ball bearing. -
Page 25: Recommended Spare Parts
ORGAPACK OR-T 200 Empfohlene Ersatzteile Recommended spare parts Pièces de rechange recommandées Parti di ricambio consigliate Bei Bestellungen immer Artikel-Nr. angeben When ordering please indicate part number Lors d'une commande, veuillez indiquer Nelle ordinazione indicare sempre il numero le numéro d'article dell'articolo Pos. - Page 26 ORGAPACK OR-T 200 Pos. Artikel-Nr. Benennung Part name Article Articolo Stück Part no Quantity No d'article Pièce Art. nr. 1933.710.150 Nadelhülse, Ø10/14 x 15 Needle bushing Douille d'aiguille Bussola ad aghi 1917.401.125 Distanzscheibe, Ø12/24 x 0.5 Spacer disk Disque d'écartement Rondella distanziatrice 1832.039.177...
- Page 27 ORGAPACK OR-T 200 Pos. Artikel-Nr. Benennung Part name Article Articolo Stück Part no Quantity No d'article Pièce Art. nr. 1832.022.086 Lagerbüchse komplett, inkl. Pos. 77 Bushing complete, incl. pos. 77 Plaier complète, incl. pos. 77 Bronzina completo, incl. pos. 77 1922.103.083...
- Page 28 ORGAPACK OR-T 200 Pos. Artikel-Nr. Benennung Part name Article Articolo Stück Part no Quantity No d'article Pièce Art. nr. 1832.011.115 Deckel Spannen Cover tensioning Couvercle tension Coperchio tensione 1832.042.021 Bandführung, 13 mm Strap guide, 13 mm Guide de la bande, 13 mm Guida reggia, 13 mm 1911.804.166...
- Page 29 ORGAPACK OR-T 200 Pos. Artikel-Nr. Benennung Part name Article Articolo Stück Part no Quantity No d'article Pièce Art. nr. 1832.022.092 Rolle Roller Rouleau Rullo 1832.022.093 Achse Shaft Asse 1832.022.094 Druckbolzen Pressure bolt Goujon à pression Albero di pressione 1821.010.056 Schraubenfeder...
- Page 30 ORGAPACK OR-T 200 Pos. Artikel-Nr. Benennung Part name Article Articolo Stück Part no Quantity No d'article Pièce Art. nr. 1914.630.100 PT-Schraube, KA 30x10 PT-Screw Vis PT Vite PT 1821.153.003 Overlayplatte digital Overlaycover digital Plaque numérique Placca digitale 2179.150 Akku 12V 2,4 Ah...
- Page 31 196* a) 134 103* a) 131 a) 153 a) 125 a) 34 a) 47 a) 47 a) 47 a) 103 193* a) 103 a) 194* OR-T 200 1832.002.017/1.0 Loctite 222 Loctite 243 *Optionen/Options 06.02.04 Ba/hp 02.04/WE Sales and Service 877-862-6699...