
Related Manuals for Yardworks 060-3864-2


Summary of Contents for Yardworks 060-3864-2
- Page 1 Dethatcher model number 060-3864-2 | contact us: 1.866.523.5218 IMPORTANT: Operator’s Read and follow all safety rules and operating Manual instructions before using this product.
- Page 2 060-3864-2 | contact us: 1.866.523.5218 SPeCifiCAtionS KnoW YoUR DetHAtCHeR SYMbolS SAfetY infoRMAtion eleCtRiCAl infoRMAtion exPloDeD VieW PARtS liSt ASSeMblY oPeRAtion MAintenAnCe tRoUbleSHooting WARRAntY Motor: 120 V AC, 60 Hz, 10 A Speed: 3,500 RPM Dethatching path: 14” (36 cm) Weight: 23 lb 12 oz (10.8 kg)
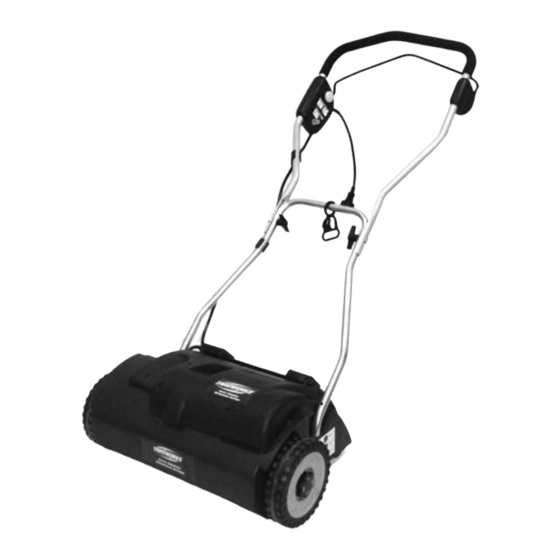
- Page 3 060-3864-2 | contact us: 1.866.523.5218 1. Safety lock-out button 2. electrical cord 3. Cable clip 4. Upper handle 5. Knob 6. lower handle 7. Wheel 8. Cord retainer 9. Handle bar 10. bale lever (Accessories: REPLACEMENT TINES 060-6115-8) KNOW YOUR DETHATCHER This product requires assembly.
- Page 4 060-3864-2 | contact us: 1.866.523.5218 Some of the following symbols may be used on this product. Please study them and learn their meaning. Proper interpretation of these symbols will allow you to operate the product better and safer.
- Page 5 060-3864-2 | contact us: 1.866.523.5218 GENERAL SAFETY RULES WARNING: When using electric gardening appliances, basic safety precautions should always be followed to reduce the risk of fire, electric shock, and personal injury, including the following: SAVE THESE SAFETY INSTRUCTIONS Safety is a combination of common sense, staying alert, and knowing how to use your dethatcher.
- Page 6 060-3864-2 | contact us: 1.866.523.5218 • KeeP CleAn AnD fRee of oil oR gReASe. Always use only a clean cloth when cleaning. Do not use solvents, brake fluids, gasoline, or other petroleum products to clean the tool, as they may damage plastic parts.
- Page 7 060-3864-2 | contact us: 1.866.523.5218 SPECIFIC SAFETY RULES FOR DETHATCHER • Do not use the dethatcher in the rain or in moist, wet conditions. • Do not work close to the edge of swimming pools or garden ponds.
- Page 8 060-3864-2 | contact us: 1.866.523.5218 DOUBLE INSULATED this dethatcher has a plug that looks like the one shown below. the dethatcher is double insulated to provide a dual thickness of insulation between you and the tool’s electrical system. All exposed metal parts are insulated from the internal motor components using protective insulation.
- Page 9 060-3864-2 | contact us: 1.866.523.5218 GUIDELINES FOR USING EXTENSION CORDS USe tHe PRoPeR extenSion CoRD. Make sure your extension cord is in good condition. When using an extension cord, be sure to use one of heavy enough gauge to carry the current your product will draw.
- Page 10 060-3864-2 | contact us: 1.866.523.5218...
- Page 11 060-3864-2 | contact us: 1.866.523.5218 Item Description Housing Cover for motor Motor assembly gear case assembly tines assy. Steel shaft bracket Steel shaft block Steel shaft axle Steel shaft talon bolt, nut and washer bracket for tines assy...
- Page 12 060-3864-2 | contact us: 1.866.523.5218 Item Description Small switch box assembly bale lever Cord retainer...
- Page 13 060-3864-2 | contact us: 1.866.523.5218 ASSEMBLING HANDLES INSTALLING THE LOWER HANDLE: • insert the lower handle (2) into the housing hole. • Using the supplied screws (3), fasten the lower handle to the housing using a star-head screwdriver (not supplied).
- Page 14 060-3864-2 | contact us: 1.866.523.5218 STARTING AND STOPPING THE DETHATCHER STARTING THE DETHATCHER: • Plug the dethatcher into an approved outdoor extension cord. • Press and hold the safety lock-out button (1) . this makes the bale switch operational •...
- Page 15 060-3864-2 | contact us: 1.866.523.5218 USING THE CORD RETAINER • this dethatcher is equipped with a cord retainer (1) in order to prevent the extension cord (2) from disconnecting from the power cord while the dethatcher is in use. the cord retainer hangs from the cord guide bar.
- Page 16 060-3864-2 | contact us: 1.866.523.5218 the dethatcher cylinder can cause injuries! Prior to making adjustments, unplug the unit and wait until the dethatcher cylinder has stopped. Wear heavy-duty work gloves when making adjustments. if the dethatcher cylinder is not yet worn but individual springs have broken, these must be replaced.
- Page 17 060-3864-2 | contact us: 1.866.523.5218 REPLACING THE TINES • Remove the tine cartridge as demonstrated on page 16. • Secure tine cartridge on a workbench. • Push out the pin using a screwdriver (not supplied). You may use a rubber mallet if more strength is required.
- Page 18 060-3864-2 | contact us: 1.866.523.5218 Prior to maintenance, unplug from the power source and wait until the dethatcher cylinder has stopped. Wear heavy-duty gloves for performing maintenance. the lawn dethatcher should be cleaned after each use. Risk of injury and physical damage! Do not clean the lawn dethatcher under running water (particularly under high pressure).
- Page 19 Contact an authorized service Dethatching belt faulty. centre. results are not satisfactory. Mow the lawn before using the lawn has grown too tall. dethatcher. if you have any problem with this Yardworks tool, please contact our toll-free helpline at 1.866.523.5218.
- Page 20 060-3864-2 | contact us: 1.866.523.5218 2-YEAR LIMITED WARRANTY the toll-free helpline, at 1.866.523.5218. YARDWoRKS CAnADA will not accept for tWo YeARS from the date of purchase the return of a complete unit unless prior within Canada, YARDWoRKS CAnADA will, written permission has been extended by at its option, repair or replace for the original YARDWoRKS CAnADA.
Need help?
Do you have a question about the 060-3864-2 and is the answer not in the manual?
Questions and answers
The dethatcher. just stopped. It will not start. Is there and overload reset?
Yes, the Yardworks dethatcher model 060-3864-2 has an overload reset feature in the form of a circuit breaker. If the circuit breaker switch pops out, it can be reset by allowing the dethatcher to cool down and then pressing the switch back in.
This answer is automatically generated
@Mr. Anderson
and where is this reset button?
The tine cartridge on my 060-3864-2 dethatcher does not have the screws on each tine to enable changing tines. How can I change the tines?
To change the tines on a Yardworks 060-3864-2 dethatcher:
1. Disconnect the dethatcher from power and wait for all moving parts to stop.
2. Turn the dethatcher over.
3. Remove two star-shaped screws, flat washers (2), and lock washers (3) securing the tine casing.
4. Remove the two nuts on the opposite side using a star-head screwdriver.
5. Press the locker (4) on the shaft edge with a slotted screwdriver to separate the tine casing from the shaft.
6. Replace the worn or broken tines with new Yardworks Replacement Tines 060-6115-8.
7. Reassemble the tine casing in the original order and placement, ensuring all screws use flat and lock washers.
This answer is automatically generated
The replacement tine has a loop, or tab. Where does this tab go? Does in go in the slot on the cartridge, or outside the slot? The manual is not clear on this.
How do I lower the tines
I am looking for the rubber shield for a yardworks 060-3864-2 dethatcher. But I can’t find it.
Pièces pour déchaumeuse Yardwork 06038642 Numéro de la pièce: 5.1 5.2 5.3 5.5
The replacement parts for the Yardworks dethatcher model 060-3864-2 are:
- 5.1: Base for tine (Qty: 18)
- 5.2: Tine cartridge (Qty: 18)
- 5.3: Pin (Qty: 18)
- 5.5: Bolt, nut and washer (Qty: 18)
This answer is automatically generated
I’m trying to replace dethatcher tines there is no screws to remove the old ones
To replace the dethatcher tines on a Yardworks model 060-3864-2 without screws:
1. Unplug the dethatcher from the power source and wait for the dethatching cylinder to stop.
2. Wear heavy-duty gloves for safety.
3. Remove and discard the worn or broken tines.
4. Insert the replacement tine into position.
5. Slide the pin back into place by pressing it against a solid surface to secure it.
No screws are required for this process.
This answer is automatically generated