
Related Manuals for Yardworks 060-3877-2


Summary of Contents for Yardworks 060-3877-2
- Page 1 ELECTRIC LAWN VAC 060-3877-2 Owner's Manual TOLL-FREE HELPLINE: 1-866-523-5218 WARNING WARNING Read all safety rules and instructions carefully before operating this tool.
-
Page 2: Table Of Contents
CONTENTS SPECIFICATIONS.........................2 SAFETY INFORMATION......................3-9 ELECTRICAL ........................10-11 KNOW YOUR LAWN VAC ....................12-13 ASSEMBLY INSTRUCTIONS....................1 4-18 OPERATING INSTRUCTIONS....................1 9-21 MAINTENANCE AND REPAIR INSTRUCTIONS..............22-23 TROUBLESHOOTING ........................24 WARRANTY..........................25 EXPLODED VIEW........................26 PARTS LIST ........................... 2 7-28 PRODUCT SPECIFICATIONS ELECTRIC LAWN VAC Motor......................120 V AC, 60 Hz, 14 A Vacuuming path......................16”... -
Page 3: Safety Information
SAFETY INFORMATION Please read and understand this entire manual before attempting to assemble, operate or install the product. These safety instructions are not meant to cover every possible condition that could occur. If you have any questions regarding the product, please call the Toll-free Helpline at 1-866-523-5218, 9:00 a.m.-5:00 p.m., EST, Monday-Friday. -
Page 4: Assembly Instructions
SAFETY INFORMATION IMPORTANT SAFETY INSTRUCTIONS READ AND UNDERSTAND ALL INSTRUCTIONS. Failure to follow all instructions listed below may result in electric shock, fire, and/or serious personal injury. READ THESE INSTRUCTIONS BEFORE USING THE LAWN VAC. GENERAL OPERATION 1. Carefully read all instructions on the LAWN VAC. and in the manual before attempting to assemble and operate the LAWN VAC. - Page 5 SAFETY INFORMATION 14. As an added safety measure, Ground Fault Circuit Interrupter (GFCI) protection should be provided on the circuit(s) or outlet(s) that will be used to power the Lawn Vac. 15. In order to prevent electric shock, use this mower only with a CSA/CUL listed extension cord that is approved for outdoor use, such as Type SW–A, SOW–A, STW–A, STOW–A, SJW–A, SJOW–A, SJTW–A, or SJTOW–A.
- Page 6 SAFETY INFORMATION 22. Never pull the Lawn Vac back toward you while you are walking. If you must back the Lawn Vac away from a wall or an obstruction, first look down and behind in order to avoid tripping, and then follow these steps: •...
-
Page 7: Slope Operation
SAFETY INFORMATION SLOPE OPERATION Slopes are a major factor related to slip-and-fall accidents, which can result in severe injury. All slopes require caution. If you feel uneasy on a slope, do not vacuum it. Always take the following precautions when using this machine on slopes: ALWAYS: •... -
Page 8: Maintenance And Storage
SAFETY INFORMATION MAINTENANCE AND STORAGE 1. When servicing the Lawn Vac, use only replacement parts that are listed in this manual. The use of parts that do not meet the original equipment specifications may lead to improper performance, and may compromise safety. 2. -
Page 9: Operating Instructions
SAFETY INFORMATION DOUBLE INSULATED Double insulation eliminates the need for the usual three-wire grounded power cord and grounded power supply system. Wherever there is electric current in the Lawn Vac, there are two complete sets of insulation to protect the user. All exposed metal parts are isolated from the internal metal motor components by protecting insulation. -
Page 10: Electrical
ELECTRICAL DOUBLE INSULATION Double insulation is a concept in safety in electric power tools that eliminates the need for the usual three-wire grounded power cord. All exposed metal parts are isolated from the internal metal motor components with protecting insulation. Double insulated tools do not need to be grounded. -
Page 11: Electrical
ELECTRICAL **Amperage rating (on product data plate) 0-2.0 2.1-3.4 3.5-5.0 5.1-7.0 7.1-12.0 12.1-16.0 Cord Length Wire Size (AWG) 25' (7.6 m) 50' (15 m) 100' (30 m) **Used on 12 gauge - 20 A circuit. NOTE: AWG = American Wire Gauge WARNING: Keep the extension cord clear of the working area. -
Page 12: Know Your Lawn Vac
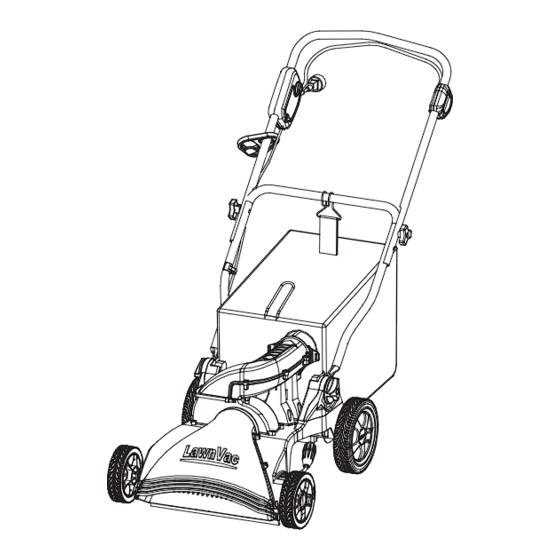
KNOW YOUR LAWN VAC Handle bar Trigger switch Power button Plug Circuit breaker connector Cord lock Upper handle Lower handle Blower chute Nozzle cover Rear wheel Nozzle height adjustment lever Front wheel Fig. 2... -
Page 13: Know Your Lawn Vac
KNOW YOUR LAWN VAC The safe use of this product requires an understanding of the information on the product and in this Owner's Manual, as well as a knowledge of the project you are attempting. Before using this product, familiarize yourself with all operating features and safety rules. - Page 14 ASSEMBLY UNPACKING This product requires assembly. • Carefully remove the product and any accessories from the box. Make sure all items listed on the packing list are included. • Inspect the product carefully to make sure no breakage or damage occurred during shipping.
- Page 15 ASSEMBLY ATTACHING THE HANDLE (See Figure 3.) 1. Remove any packing material that may have been inserted between the upper and lower handles for shipping purposes. 2. Align the holes (2) on the upper handle (1). Insert carriage screw (3) through the holes in upper handle from the inside, and secure with handle knob (4).
- Page 16 ASSEMBLY ATTACHING THE BAG (See Figure 4.) • Grasp bag handle (1) with one hand, and press the bag tube (2) with another hand. • Hitch the hooks (3) on the bag to the mounting bracket of the unit. • Slide the bag tube over the discharge opening on the unit. •...
- Page 17 ASSEMBLY NOZZLE HEIGHT ADJUSTMENT (See Figure 5.) The nozzle can be adjusted to any of six positions, ranging from 1/2 to 2 3/4" (1.3 to 7 cm) ground clearance. The nozzle height has to be adjusted according to yard conditions. The lever is located beside the left front wheel. WARNING: Before performing any maintenance or adjustments, always release the switch to turn the LAWN VAC off, and wait for blade to come to a complete stop.
- Page 18 ASSEMBLY WALL BRACKET INSTALLATION (See Figure 6-7.) 1. Find a proper mounting location on the studs, not lower than 5’ from the floor. 2. Mark a level line on the wall. 3. Mark the position of the holes on the studs, using the bracket as a template (Fig. 6). 4.
- Page 19 OPERATION STARTING AND STOPPING THE LAWN VAC (See Figure 9.) Starting the LAWN VAC: • Plug the LAWN VAC into an approved outdoor extension cord. • Press and hold the Power button (1). This makes the trigger switch operational. • Pull the trigger switch (2) upward to the handlebar to operate.
- Page 20 OPERATION TO EMPTY BAG (See Figure 10.) There is a transparent placket on the upper part of the bag. It’s easy to see whether the bag is full. When the bag is full, empty the bag: • Lift the bag by its handle and lift to remove from the LAWN VAC. •...
- Page 21 OPERATION CLEARING A BLOCKED NOZZLE/IMPELLER (See Figure 11.) • Disconnected the power supply, and wait until the LAWN VAC comes to a complete stop. • Remove the 6 screws that are holding the nozzle cover onto the deck. • Romove the nozzle cover from the deck. •...
-
Page 22: Maintenance And Repair Instructions
MAINTENANCE WARNING: Before performing any maintenance or adjustments, always release the switch to turn the LAWN VAC off, and wait for impeller to come to a complete stop. Always wear safety glasses during operation or while performing any adjustments or repairs. GENERAL RECOMMENDATIONS •... - Page 23 MAINTENANCE STORING THE LAWN VAC • Disconnect the LAWN VAC from the power supply. • Turn the LAWN VAC on its side, and clean leaf clippings that have accumulated on the underside of the LAWN VAC deck. • Wipe the LAWN VAC clean with a dry cloth. •...
-
Page 24: Troubleshooting
TROUBLESHOOTING Problem Possible Cause Solution The Lawn Vac will • The bag is full. • Empty the bag. not vacuum. • The nozzle is blocked. • Clear the blockage. • The impeller is blocked. • Clear the blockage • The impeller is damaged. •... -
Page 25: Warranty
WARRANTY For TWO YEARS from the date of purchase within Canada, YARDWORKS ® CANADA will, at its option, repair or replace for the original purchaser, free or charge, any part or parts that are found to be defective in material or workmanship. -
Page 26: Exploded View
EXPLODED VIEW... -
Page 27: Parts List
PARTS LIST ITEM # PART NO. DESCRIPTION 31103143 Venting assy. 34105143 Upper venting cover 34106143 Lower venting cover Micro switch(125VAC) 36301143 34116143 Switch cover 34104143 Motor cover 32201162 Screw M4×23 34103143 Cover 31104143 Handle right fixing bracket assy. 34120143 8“ wheel 3331638 Washer 33316143... - Page 28 PARTS LIST ITEM # PART NO. DESCRIPTION 3410835-4 Knob 3220436 Handle bolt 33315143 Lower handle 31107143 Upper handle assy. 31108143 Switch assy. Switch left box 34208281 37-1 33903281 Switch spring 37-2 33903281 Switch spring 37-3 36501227 Over-current protecter 37-4 34206281 Switch knob 37-5 33902281...
Need help?
Do you have a question about the 060-3877-2 and is the answer not in the manual?
Questions and answers