
Related Manuals for KUBE SYSTEMS KS Clock


Summary of Contents for KUBE SYSTEMS KS Clock
-
Page 1: Alarm Clock
Model KS Clock Charging Station with Bluetooth Audio and Alarm Clock User Guide Please read these instructions completely before operating this product. Version 1.1... -
Page 3: Table Of Contents
Connecting Via AUX Input ....................14 CHARGING ........................15 Charging Via Qi Wireless Charging (Optional) ..............15 Charging Via Wired Chargers ...................16 Charging Via USB Ports ....................16 SPECIFICATIONS ......................17 TROUBLESHOOTING ...................... 17 KUBE SYSTEMS PRODUCTS LIMITED WARRANTY ............ 20 — 1 —... -
Page 4: Important Safety Instructions
IMPORTANT SAFETY INSTRUCTIONS PRODUCT SAFETY: When used in the directed manner, this unit has been designed and manufactured to ensure your personal safety. Improper use of this product can result in potential electrical shock or fire hazards. Please read all safety and operating instructions carefully before installation and use, and keep these instructions handy for future reference. - Page 5 IMPORTANT SAFETY INSTRUCTIONS IMPORTANT SERVICE SAFETY INSTRUCTIONS Damages caused by non-compliance with this operating manual will void the warranty! 1. Read and Follow Instructions - All the safety and operating instructions should be read before the product is operated. Follow all operating instructions. 2.
-
Page 6: Introduction
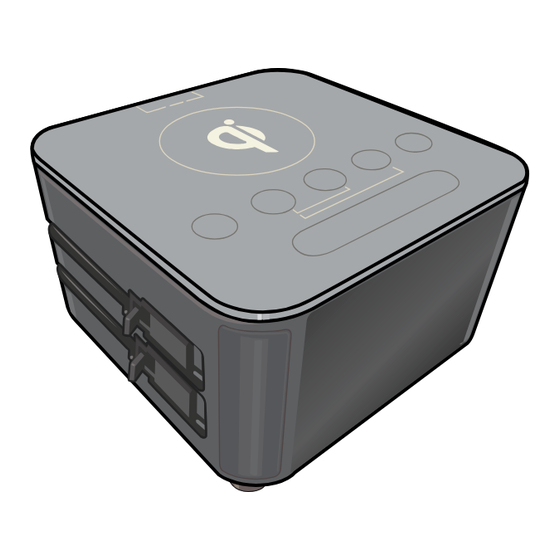
INTRODUCTION Getting to Know Your Alarm Clock FRONT/LEFT SIDE HR (Hour) Button Bluetooth PAIR Button MIN (Minute Button) Volume Up Button SNOOZE Button Volume Down Button Alarm SET Button Alarm ON/OFF Button Clock Display Apple ® Lightning Connector Micro USB Connector REAR/RIGHT SIDE Qi Wireless Charging Pad (Optional) - Page 7 INTRODUCTION Getting to Know Your Alarm Clock BOTTOM Threaded Security Bolt Socket Used to connect a security lanyard or retractor. TIME HOUR DST –1 Button DST +1 Button MIN Button HOUR Button TIME SET Button Speaker — 5 —...
-
Page 8: Ac Connection
INTRODUCTION AC Connection Insert the power supply plug into the Insert the AC cord into the power DC In jack on the rear of the unit. supply. Insert AC plug into an AC outlet having 100-240v (50-60hz); the clock display will show a time. Auto-Dimming Display The ambient light sensor on the right side of the unit will dim the clock display... -
Page 9: Operation
OPERATION Kensington Lock Installation - Example 1 ® If desired, tether to a wall or piece of furniture by attaching a Kensington security cable to the ® Kensington Lock Attachment Point. Note that there are many types of Kensington security ®... -
Page 10: Kensington® Lock Installation - Example 2
OPERATION Kensington Lock Installation - Example 2 ® NOTE: ecurity cable/bolt/hardware not included. TO ATTACH TO A PIECE OF FURNITURE OR WALL: Insert the Kensington Combo Lock into ® the Kensington Lock Attachment Point. ® Scramble Combo Lock combination to lock. -
Page 11: Threaded Security Bolt Installation - Example 1
OPERATION Threaded Security Bolt Installation - Example 1 If desired, tether to a wall or piece of furniture by attaching a security cable to the Threaded Security Bolt Socket on the bottom of the unit. Note that there are many types of installations, the next two pages just show a couple of examples. -
Page 12: Threaded Security Bolt Installation - Example 2
OPERATION Threaded Security Bolt Installation - Example 2 NOTE: ecurity cable/bolt/hardware not included. TO ATTACH USING RETRACTOR WITH EYELET: Bolt the eyelet side of the cable into the bottom of the unit using a Drilled Spanner Screwdriver (shown below). Secure using the hardware included with the Kit (not included). -
Page 13: Setting The Time
OPERATION Setting the Time To set the time, turn the unit upside Within 3 seconds, press the HOUR down. Press and release the TIME SET button to set the hour, making sure to button on the bottom of the unit; the set the correct AM/PM. -
Page 14: Dst (Daylight Saving Time)
OPERATION DST (Daylight Saving Time) To enable daylight saving time, press To cancel daylight saving time, press the DST +1 button; the time will the DST –1 button; the time will increase by one hour. decrease by one hour. TIME TIME HOUR HOUR... -
Page 15: Turning Off The Alarm
OPERATION Turning Off the Alarm When the alarm is sounding, press IMPORTANT ALARM NOTE: the Alarm ON/OFF button to turn it off. It will NOT be set for the next day. • The Alarm will only go off once (single day If desired, reset alarm following the alarm) and will not repeat daily. -
Page 16: Pairing Via Bluetooth
OPERATION Pairing Via Bluetooth Press and release the Bluetooth button On the Bluetooth device, enable on the top of the unit; the button will Bluetooth and select “KS-CLOCK” flash blue and white. from the Device List. It may take a few seconds for it to appear. -
Page 17: Connecting Via Aux Input
CHARGING Connecting Via AUX Input Insert one end of the audio cable (included) into the LINE OUT jack on your external audio unit and the other end into the AUX IN jack on the rear of this unit. The external device will automatically be selected when the audio cable is connected. -
Page 18: Charging Via Wired Chargers
CHARGING Charging Via Wired Chargers Charge up to three devices using the built-in Charging Cables. Simply pull out the desired connector and insert it into your device. Apple Lightning Connector Used for ® charging newer Apple devices with the Lightning jack. Apple 30-Pin Connector: Used for ®... -
Page 19: Specifications
The Alarm worked fine this morning but when attempting to activate it for tomorrow morning, the unit beeps twice and indicates “Set Alarm”. SOLUTION(s): The alarm of KS Clock is a one-day alarm. This means a user will always have to manually set the alarm time for each use. SYMPTOM: KS Clock will not pair with a Bluetooth device. - Page 20 The clock display is too dim. SOLUTION(s): Ensure that the right side of KS Clock has at least 1 inch of free area. There is a small port hole on the right side where KS Clock has an ambient light sensor.
- Page 21 TROUBLESHOOTING SYMPTOM: After connecting a device to one of the charger cables of KS Clock, the Apple device indicates “Not Charging” or “Incompatible Device”. SOLUTION(s): Unplug the Apple device from the KS Clock and then plug it back in. Occasionally a loose connection in the plug may cause this. Lightly clean the connector free of any foreign matter.
-
Page 22: Kube Systems Products Limited Warranty
Limited Warranty Period. This Limited Warranty only applies to new products which were not sold “as-is,” purchased and serviced either directly from Kube Systems or an authorized distributor or dealer who was authorized by Kube Systems to sell such products at the time of the original purchase. - Page 23 (xv) acts of God or force majeure; (b) loss of, damage to or corruption of stored data; (c) repair of products damaged by any modification or adaptation to enable a Kube Systems product to operate in any particular country; (d) damage to, or deterioration of, any accessory or decorative surface;...
- Page 24 http://www.kubesystems.com...
Need help?
Do you have a question about the KS Clock and is the answer not in the manual?
Questions and answers