
Related Manuals for KUBE SYSTEMS Kube Essentials


Summary of Contents for KUBE SYSTEMS Kube Essentials
-
Page 1: Alarm Clock
Kube Essentials Charging Station with Alarm Clock User Guide Please read these instructions completely before operating this product. Version 1.1... -
Page 3: Table Of Contents
TABLE OF CONTENTS IMPORTANT SAFETY INSTRUCTIONS ................2 INTRODUCTION ........................4 Getting to Know Your Kube Essentials ................4 AC Connection ........................5 Dimmer ..........................5 OPERATION ........................6 Setting the Time ....................... 6 Setting the Alarm Time .......................8 Turning Off the Alarm ......................9 Snooze ..........................9 AC Outlet Reset .........................9... -
Page 4: Important Safety Instructions
IMPORTANT SAFETY INSTRUCTIONS PRODUCT SAFETY: When used in the directed manner, this unit has been designed and manufactured to ensure your personal safety. Improper use of this product can result in potential electrical shock or fire hazards. Please read all safety and operating instructions carefully before installation and use, and keep these instructions handy for future reference. - Page 5 IMPORTANT SAFETY INSTRUCTIONS IMPORTANT SERVICE SAFETY INSTRUCTIONS Damages caused by non-compliance with this operating manual will void the warranty! 1. Read and Follow Instructions - All the safety and operating instructions should be read before the product is operated. Follow all operating instructions. 2.
-
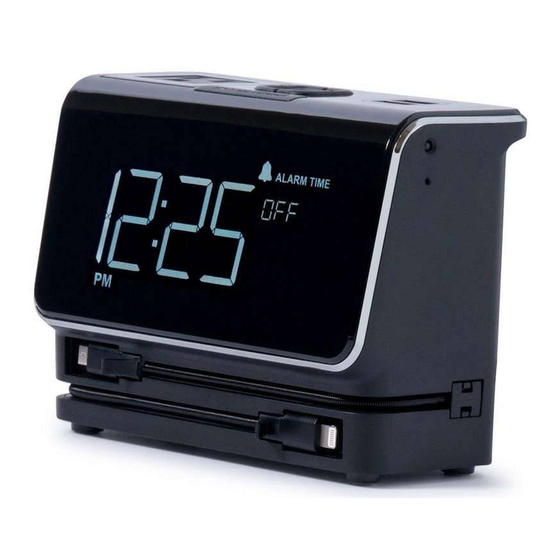
Page 6: Introduction
INTRODUCTION Getting to Know Your Kube Essentials FRONT/LEFT SIDE Set + Button iPad USB Charge Port iPod/iPhone USB Charge Port ALARM SET/OFF Button SNOOZE/DIMMER Button Set – Button AC Outlet (100-240VAC/5A) Clock Display Lightning Charge Cable Micro USB Charge Cable... -
Page 7: Ac Connection
INTRODUCTION AC Connection Connect the AC Power plug to the AC Grounding Instructions jack on the rear of the unit, then plug into properly installed and grounded THIS APPLIANCE MUST BE three prong outlet. See safety GROUNDED. precautions in the next column. In the event of an electrical short circuit, grounding reduces the risk of electric shock by providing an escape wire for... -
Page 8: Operation
OPERATION Setting the Time To set the time, simultaneously Within 2 seconds, press the Set + press and hold the ALARM SET/OFF and – buttons to set the year. Press and SNOOZE/DIMMER buttons for the ALARM SET/OFF button and the approximately 6 seconds;... - Page 9 OPERATION Setting the Time (Continued) Within 2 seconds, press the Set + and Within 2 seconds, press the Set + and – buttons to set the hour. Make sure – buttons to set the minutes. Press the correct AM/PM setting is also set. the ALARM SET/OFF button and the Press the ALARM SET/OFF button and country will blink.
-
Page 10: Setting The Alarm Time
OPERATION Setting the Alarm Time Press the ALARM SET/OFF button; the Within 2 seconds, press the Set + and alarm time will blink. – buttons to set the alarm time making sure to set the correct AM/PM. Press the ALARM SET/OFF button and the alarm will be set and activated to turn on when the time reaches the set alarm time. -
Page 11: Turning Off The Alarm
OPERATION Turning Off the Alarm When the alarm is sounding, press the To set it to turn on the following day, ALARM SET/OFF button to turn it off. press the ALARM SET/OFF button It will NOT be set for the next day and again and the ALARM TIME will blink OFF will appear in the display. -
Page 12: Threaded Security Bolt Installation - Example 1
OPERATION Threaded Security Bolt Installation - Example 1 If desired, tether to a wall or piece of furniture by attaching a security cable to the Threaded Security Bolt Socket on the bottom of the unit. Note that there are many types of installations, the next two pages just show a couple of examples. -
Page 13: Threaded Security Bolt Installation - Example 2
OPERATION Threaded Security Bolt Installation - Example 2 NOTE: ecurity cable/bolt/hardware not included. TO ATTACH USING RETRACTOR WITH EYELET: Bolt the eyelet side of the cable into the bottom of the unit using a TORX Screwdriver. Secure using the hardware included with the Kit (not included). -
Page 14: Charging
Follow the instructions below to learn how to use your Qi Wireless Charging Pad for Kube Essentials. Make sure your device is Qi compatible or utilizes a Qi case or other Qi charging option (both available separately), then place the unit on top of the Qi Wireless Charging Pad. -
Page 15: Charging Via Built-In Connectors
CHARGING Charging Via Built-in Connectors Charge up to two devices using the built-in Charging Cables. Simply pull out the desired connector and insert it into your device. Apple Lightning Connector (2.1 ® Amp): Used for charging newer Apple devices with the Lightning jack. Micro USB Connector (1.5 Amp): Used for charging devices that utilize the Micro USB jack. -
Page 16: Specifications
SPECIFICATIONS Specifications AC Input ......................100 - 240 VAC AC Output ....................100 - 240VAC; max 5A USB-A Output 1 ....................... 5V ~ 2.1A USB-A Output 2 ......................5V ~ 1A microUSB Cable Output ................... 5V ~ 1.5A Lightning Cable Output ..................... 5V ~ 2.1A Wireless Charge Pad Output .................... -
Page 17: Kube Systems Products Limited Warranty
Limited Warranty Period. This Limited Warranty only applies to new products which were not sold “as-is,” purchased and serviced either directly from Kube Systems or an authorized distributor or dealer who was authorized by Kube Systems to sell such products at the time of the original purchase. - Page 18 Kube Systems product to operate in any particular country; (d) damage to, or deterioration of, any accessory or decorative surface; (e) any Kube Systems product on which the serial number has been effaced, modified or removed; or (f) Kube Systems products purchased from unauthorized distributors or dealers.
- Page 19 http://www.kubesystems.com...
Need help?
Do you have a question about the Kube Essentials and is the answer not in the manual?
Questions and answers