
Related Manuals for KUBE SYSTEMS Audio Clock II


Summary of Contents for KUBE SYSTEMS Audio Clock II
-
Page 1: User Guide
Kube Audio Clock II Charging Station with Bluetooth Audio and Alarm Clock User Guide Please read these instructions completely before operating this product. -
Page 3: Getting To Know Your Alarm Clock
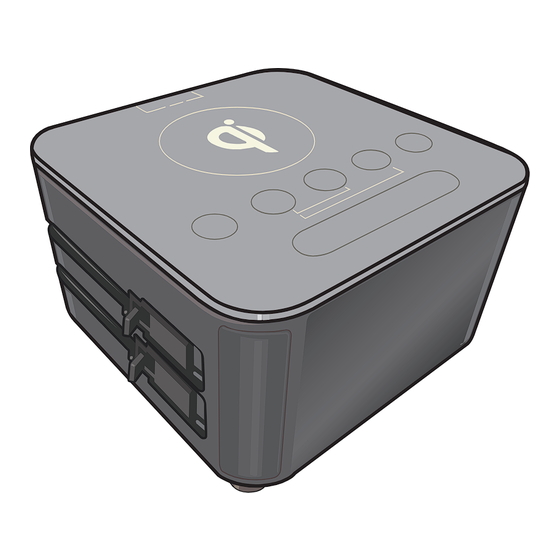
INTRODUCTION Getting to Know Your Alarm Clock FRONT/LEFT SIDE HR (Hour) Button Bluetooth PAIR Button MIN (Minute Button) SNOOZE/DIMMER Alarm SET Button Alarm ON/OFF Button Clock Display Apple Lightning Connector ® Micro USB Connector... - Page 4 INTRODUCTION Getting to Know Your Alarm Clock REAR/RIGHT SIDE Qi Wireless Charging Pad (Optional) Ambient Sensor iPad USB Jack iPod/iPhone USB Jack USB-C Connector DC IN Jack Kensington Lock ® Attachment Point...
- Page 5 INTRODUCTION Getting to Know Your Alarm Clock BOTTOM Threaded Security Bolt Socket Used to connect a security lanyard or retractable cable. TIME (SEL) HOUR DST –1 Button DST +1 Button MIN Button HOUR Button TIME SET Button Speaker...
-
Page 6: Operation
OPERATION AC Connection Insert the 12VDC/4A plug Plug AC adapter into 100-240v into the DC In jack on the rear (50-60hz) wall outlet. The clock of the unit. will display the time. Auto-Dimming Display The ambient light sensor on the right side of the unit will dim the clock display when it detects the ambient light is low if the unit is clear of obstructions. -
Page 7: Setting The Time
OPERATION Setting the Time To set the time, turn the unit Within 3 seconds, press the upside down. Press and release HOUR button to set the hour, the TIME SET button on the making sure to set the correct bottom of the unit; the time will AM/PM. - Page 8 OPERATION DST (Daylight Saving Time) To change the time for Daylight Savings Time, press the DST+ or DST- buttons to adjust the time by 1 hour. TIME TIME (SEL) (SEL) HOUR HOUR Manual Setting Mode Hold SET + HR for 5 seconds to enter setting mode.
- Page 9 OPERATION Setting the Alarm Time Press the Alarm ON/OFF button. The current alarm time will be displayed. To change the alarm time, press the SET and HR buttons together to set the hours. The Alarm icon will flash in the display. Press the SET and MIN To activate the alarm, press the button together to set the...
- Page 10 OPERATION Turning Off the Alarm When the alarm is sounding, press the Alarm ON/OFF button to turn it off. It will NOT be set for the next day. If desired, reset alarm following the instructions above. IMPORTANT ALARM NOTE: By default (1-day alarm option), the alarm will only be activated for one day, then the alarm icon will go off.
-
Page 11: Pairing Via Bluetooth
OPERATION Pairing Via Bluetooth Press and release the Bluetooth On the Bluetooth device, button on the top of the unit; enable Bluetooth and select the button will flash blue and from the Kube Audio Clock white. Device List. It may take a few seconds to appear. - Page 12 CHARGING Charging Via Qi Wireless Charging (Optional model) Designed with inductive charging capabilities, this unit allows you to place your Qi compatible device on top of the unit for wireless charging. It’s that simple! Make sure your device is Qi compatible or utilizes a Qi case or other Qi charging option (both available separately), then place the unit on the Qi Wireless Charging logo...
- Page 13 CHARGING Charging Via Built-in Cables Charge up to three devices using the built-in Charging Cables. Simply pull out the desired connector and insert it into your device. Apple Lightning Connector ® Used for charging Apple devices that feature a Lightning jack. Micro USB Connector: Used for charging devices that utilize the Micro USB jack.
-
Page 14: Charging Cables
CHARGING Charging Via USB Ports Charge up to two additional devices using the two USB ports on the rear of the unit. Each outlet has its own intelligent auto-configuring USB circuit that allows any device to charge properly. These ports are labeled, “iPod/iPhone” (1A) and “iPad”... - Page 16 www.kubesystems.com...
Need help?
Do you have a question about the Audio Clock II and is the answer not in the manual?
Questions and answers