
Related Manuals for STEINWAY LYNGDORF P200


Summary of Contents for STEINWAY LYNGDORF P200
-
Page 1: Installation Manual
MODEL P200 SURROUND SOUND PROCESSOR INSTALLATION MANUAL July 5, 2016 [Skriv tekst]... -
Page 2: Table Of Contents
Compliance ......................4 Pre-Installation ....................5 Home Automation System Integration ..............7 Preparing the Model P200 for Mounting in a Rack ..........8 Rear Panel ......................9 Remote ......................10 How to Pair Remote ..................11 Switching Remote to RF and IR Mode ............11 Setup Procedure .................... - Page 3 Troubleshooting ....................29 RoomPerfect™....................29 Network Setup ....................31 Connecting to Model P200 with a Network Cable ......... 31 Set Up a Fixed IP Address in Windows XP or Windows 7 ......32 Trademarks ...................... 34 Service Information ................... 35...
-
Page 4: Compliance
Steinway Lyngdorf products and accessories comply with parts 15 and 68 of the FCC rules. Operation is subject to the following two conditions: (1) this device may not cause harmful interference;... -
Page 5: Pre-Installation
Link cable • Remote LED Signaling Red: Standby / On Orange: Switching on Blinking: Updating software Operating Voltage Steinway Lyngdorf products must be connected to the mains power system only. The Model P200 will automatically detect the voltage between 110-230v. -
Page 6: Ventilation Requirements
Ventilation Requirements The Model P200 does not have a built-in fan, nor does it require special measures to ensure proper heat dissipation. However, it should be placed according to the guidelines below: • It should always have at least one inch of free space on all sides. -
Page 7: Home Automation System Integration
Model P200 Serial Control Manual). Use Telnet, Putty, or similar programs to open the TCP connection. If you do not know the IP address of the Model P200 on your local network, the Model P200 supports Apple´s Bonjour Discovery service, which must be on the computer you want to set up the Model P200 with. -
Page 8: Preparing The Model P200 For Mounting In A Rack
1. Turn the Model P200 upside down and place it on a stable, even surface. 2. The screws used to fasten the rack brackets to the bottom of the Model P200 are in the holes designated for the brackets when the product leaves the factory. -
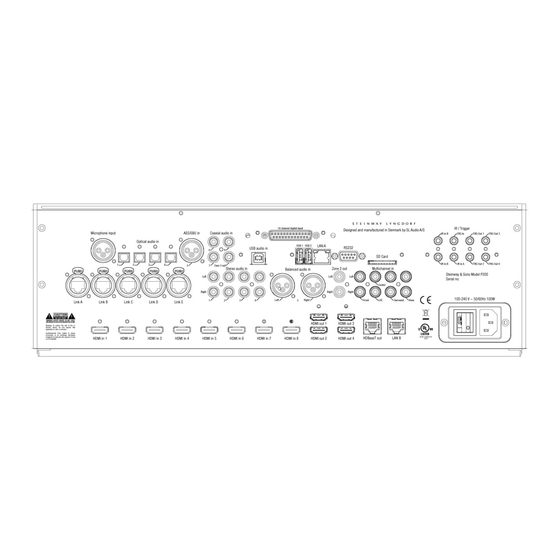
Page 9: Rear Panel
Rear Panel On the back of the Model P200, you will find a range of inputs and outputs: • Various optical, coaxial, and analog stereo audio inputs. • 8 HDMI inputs and 4 HDMI outputs, all 4K compatible. • 1 HDBaseT output. -
Page 10: Remote
Remote The Model P200 comes with a dedicated RF and IR remote control for installations and everyday use. Setup Access the installation menu. Standby Turn the Model P200 on and into standby. Audio Access the post-processing menu. “Picture-in-picture” and other multi-view formats. -
Page 11: How To Pair Remote
How to Pair Remote The remote control is paired to the Model P200 at the factory, and you only need to pair it again if you have a new Model P200 or remote. To pair the RF remote control to a Model P200: 1. -
Page 12: Setup Procedure
5. Connect all external equipment, such as a Blu-ray player or home automation system, to the Model P200, including inputs, outputs, and mains. 6. Connect power to the Model P200, the amplifiers, and all connected audio and video sources. 7. Switch on the Model P200. -
Page 13: Installation Via Osd
If you do not know the IP address of the Model P200 on your local network, the Model P200 supports Apple´s Bonjour Discovery service, which must be on the computer you want to set up the Model P200 with. -
Page 14: Source
Source In the Source menu, you can register the individual sources connected to the Model P200 by the audio and/or video input sockets they use. Create Source name Input the name for the source. Lipsync offset Set delay time in milliseconds to ensure that the video and audio signals are played back simultaneously. -
Page 15: Edit
Only available if control of speaker setups in the System Configuration menu has been set to Yes. Trigger out Choose which trigger output to activate when using this source. Audio input Select the audio input. This procedure must be followed for all connected sources. Edit Edit all enabled sources. -
Page 16: Speaker And Room
Speaker and Room The Speaker and Room menu provides information about the current speaker configuration, allowing you to select a configuration that is stored on the Model P200, on a laptop, or on a connected memory stick. Speaker Configuration Manage Add or delete speaker config files. - Page 17 If the woofers are lower than the listening position, measure the distance from the listening position to the top dust cap of the top woofer. If in doubt, contact your Steinway Lyngdorf representative for guidance. Do not measure distances at floor level, as these measurements will not give...
-
Page 18: How To Set Up Roomperfect
If the microphone has been dropped on the floor, it may be damaged. If this is the case, obtain a new microphone from your Steinway Lyngdorf representative before performing the system calibration. Volume Setting The system guides you through the selection of a proper calibration volume level. -
Page 19: Measuring The Focus Position
Measuring the Focus Position When the calibration volume has been set, RoomPerfect™ will send a range of tones to measure the focus position. If there is noise in the room, the measurement may take longer. This will not affect the quality of the end result. See RoomPerfect™... -
Page 20: Room Measurements Above 90% Roomknowledge
• the microphone should not be closer than 0.5m/1.5ft from the floor, ceiling, and walls. • the microphone should be at least 1m/3ft from the front of the loudspeakers. • there should be at least 50cm/1.5ft between each measurement. • do not take symmetrical measurements in the room. - Page 21 To fully optimize RoomPerfect™’s understanding of the room’s acoustical properties, we recommend you keep doing measurements until the RoomKnowledge is above 95%. The higher the RoomKnowledge, the more accurate the room correction filters will be. Calculation of Focus and Global Filters When room measurements are complete, the system will calculate the focus and global filters automatically.
-
Page 22: Video Setup
One - the Model P200 advertise support for the given resolution, if one of the TVs on the outputs support the resolution. • All - the Model P200 advertise support for the given resolution, if all of the TVs on the outputs support the resolution. HDCP compatibility Generally, this should only be changed if there are problems. -
Page 23: Audio Setup
Audio Setup Audio Processing This menu allows you to manage the audio processing presets for DTS, NeoX, AURO, and Dolby. Voicing Setup A voicing is an equalizer filter that can be activated to amplify or attenuate certain frequencies according to your personal preferences, or to compensate for the recording quality. -
Page 24: Zone B
Zone B Setup Here you can adjust the Zone B volume and default settings. -
Page 25: System Configuration
Set a max volume for the device (dB). This setting is a safety precaution. • Set startup volume Use last volume – Sets the volume to be the same as when the Model P200 was turned off. Use fixed volume – Sets the default volume at startup. HDMI CEC settings Set enable CEC and use ARC channel as audio input to Off or On. -
Page 26: Trigger In Setup
RoomPerfect™ calibration of the system. Enable front IR sensor Turn the Model P200´s IR sensor Off or On. This function is useful if you are using a home automation system and other remotes are using the same IR codes as the Model P200 remote. -
Page 27: Manage Software
Please don’t unzip or change the name of the file. Simply save it and upload it to the Model P200. If you are using a Mac, please right-click and “save as,” rather than downloading the file, to avoid automatic unzipping. - Page 28 3. Select the file in the menu and click OK on the remote control. Note: System settings and RoomPerfect™ data remain intact during software updates. Update from Remote Files When connected to the internet, the Model P200 can automatically download and update the software.
-
Page 29: Troubleshooting
Troubleshooting RoomPerfect™ The calibration microphone is very sensitive and may pick up unwanted noise, including subsonic signals and background noise, which disturbs the measurements. If the signal is disturbed, it will take longer for the system to make a correct measurement. A measurement that has been disturbed by noise but completed will always be correct;... - Page 30 Remote Control Doesn´t Work The remote control is paired to the Model P200 at the factory; you only need to pair it again if you have a new Model P200 or remote. To pair the RF remote control to a Model P200: 1.
-
Page 31: Network Setup
Connecting to Model P200 with a Network Cable It is possible to get access to the Model P200´s web interface via a direct cable connection between the Model P200 and a computer, or a connection via a hub or switch. -
Page 32: Set Up A Fixed Ip Address In Windows Xp Or Windows 7
Obtain DNS server address automatically selected by default. Click Use the following IP address and enter the following: IP address: 192.168.1.2 Subnet mask: 255.255.255.0 Default gateway: 192.168.1.1 Click OK to close the configuration windows, and you should now be able to access the Model P200 via your Internet browser. - Page 33 Click Use the Following IP address and enter the following: IP address: 192.168.1.2 Subnet mask: 255.255.255.0 Default gateway: 192.168.1.1 Click OK to close the configuration windows, and you should now be able to access the Model P200 via your Internet browser.
-
Page 34: Trademarks
Trademarks DTS is a registered trademark & the DTS logos and Symbol are trademarks of DTS, Inc. Manufactured under license under U.S. Patent #’s: 5,451,942; 5,956,674; 5,974,380; 5,978,762; 6,226,616; 6,487,535 & other U.S. and worldwide patents issued & pending. DTS is a registered trademark and the DTS logos, Symbol, DTS-HD Master Audio are trademarks of DTS, Inc. -
Page 35: Service Information
Service Information In order to obtain warranty service, you must contact your original dealer or the Steinway Lyngdorf distributor of the region or country where you are located. If you have trouble locating an authorized representative, please contact service@steinwaylyngdorf.com. Steinway Lyngdorf...
Need help?
Do you have a question about the P200 and is the answer not in the manual?
Questions and answers