Table of Contents
Advertisement
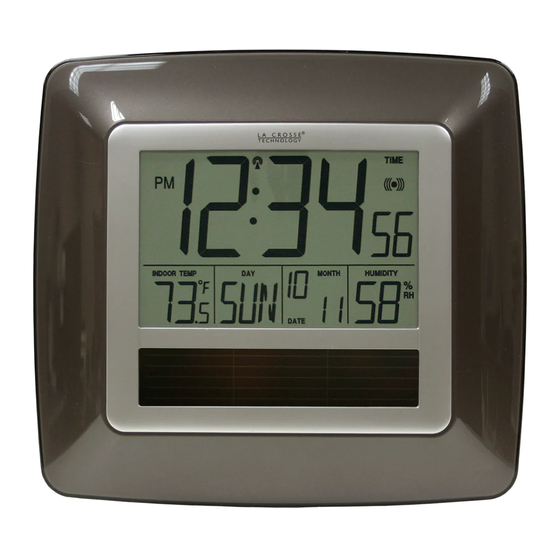
SOLAR WALL CLOCK
INSTRUCTION MANUAL
FEATURES:
SOLAR WALL CLOCK:
LCD1
display
LCD2
display
Solar
panel
•
DCF-77 Radio controlled time with manual time setting
•
Time display: hour, minute, second
•
12/24h time format display
•
Alarm setting with snooze function
•
Calendar display
•
Weekday display (4 languages to choose from: English,
Spanish, French, German)
•
Time zone setting
•
Solar mode setting
•
Indoor temperature display in ºC/ ºF selectable
•
Indoor humidity display in RH%
•
Primary Alkaline battery or rechargeable Alkaline battery
selection
16
Wall Mount
Location
Function keys
Battery
cover
Foldable
stands
Advertisement
Table of Contents

Subscribe to Our Youtube Channel
Related Manuals for La Crosse Technology WT-8112-U


Summary of Contents for La Crosse Technology WT-8112-U
- Page 1 SOLAR WALL CLOCK INSTRUCTION MANUAL FEATURES: SOLAR WALL CLOCK: LCD1 display LCD2 display Solar panel Wall Mount Location Function keys Battery cover Foldable stands • DCF-77 Radio controlled time with manual time setting • Time display: hour, minute, second • 12/24h time format display •...
-
Page 2: Initial Setup
• Low battery indicator • Wall mount or freestanding TO INSTALL / REPLACE BATTERY The solar wall clock can use either the included 1 x AA Alkaline rechargeable battery (charged by solar panel) or 1 x AA Alkaline battery (non-rechargeable; not included). Important: the battery type selection (rechargeable or non-rechargeable) must be made BEFORE inserting the battery into the compartment otherwise it may... - Page 3 To use a non-rechargeable alkaline battery: Remove the included rechargeable AA battery from the compartment. Use the switch to select the alkaline battery (see below). Insert 1 x AA, IEC LCR6, 1.5V Alkaline battery into the compartment, observing the correct polarity (see marking inside battery compartment.
-
Page 4: Radio Controlled Time
SETUP AFTER CHANGING/REPLACING THE BATTERY After powering up the solar clock, all LCD segments will light up briefly and it will show the time (00:00), indoor temperature, date, and indoor humidity. Next, the DCF time code reception will automatically start. This takes typically between 3 - 5 minutes in good conditions. -
Page 5: Function Keys
time code is received, the DCF tower becomes permanently lit and the time will be displayed. Daily DCF reception is done at 03:00. If the reception is not successful at 03:00, then the other reception occurs at 05:00. If the reception at 05:00 is still not successful, then the next try will take place the next day. -
Page 6: Lcd Screen Descriptions
LCD SCREEN DESCRIPTIONS The radio-controlled clock's LCD is divided into 2 sections and once the batteries are inserted, all the segments will light up briefly before displaying the information for time, date, indoor temperature and indoor humidity. Radio reception icon Alarm icon Low battery time... -
Page 7: Time Zone Setting
TIME ZONE SETTING The time zone can be set between the 0 to -12 hour and then runs from 12 back to 0 in consecutive 1-hour interval. To do this: After pressing the SET-Button the current time zone value starts flashing. Use the + key to set the time zone. -
Page 8: Month Setting
The year digits will start flashing (only last 2 digits) on LCD2. Select the desired year by use of the + key. Press and release the SET key to switch to the “Month Setting”. MONTH SETTING The month digit on LCD2 will start flashing (Default setting 1). -
Page 9: Solar Mode
The characters “°C” or “°F” will start flashing on LCD1. By use of the + key select “°F” for temperature display in degrees Fahrenheit or “°C” for degrees Celsius. Press and release the SET key to enter the mode “Solar Mode Setting”. -
Page 10: Exit The Manual Setting Modes
If the solar mode setting is OFF: • LCD will remain ON constantly. EXIT THE MANUAL SETTING MODES • To return to the normal display mode from anywhere in manual setting mode simply press the SNZ key anytime. • If no keys are pressed for at least 15 seconds in setting mode, the radio-controlled solar clock will automatically switch back to normal display mode. -
Page 11: Snooze Setting
ALM key in normal mode display. The alarm icon will disappear, the alarm is now off. SNOOZE SETTING The snooze can only be activated during alarm time for a snooze duration of 10 minutes by pressing the SNZ key on the back of the clock. -
Page 12: Care And Maintenance
CARE AND MAINTENANCE: • Avoid placing the unit in areas prone to vibration and shock as these may cause damage. • Avoid areas where the unit can be exposed to sudden changes in temperature, i.e. direct sunlight, extreme cold and wet/moist conditions as these will lead to rapid changes which reduce the accuracy of readings. -
Page 13: Liability Disclaimer
Dimensions (L x W x H) Solar clock 233.4 x 28.4 x 216.5mm LIABILITY DISCLAIMER • The electrical and electronic wastes contain hazardous substances. Disposal of electronic waste in wild country and/or in unauthorized grounds strongly damages the environment • Please contact your local or/and regional authorities to retrieve the addresses of legal dumping grounds with selective collection...
Need help?
Do you have a question about the WT-8112-U and is the answer not in the manual?
Questions and answers