
Related Manuals for Technical Pro h12x500ubt


Summary of Contents for Technical Pro h12x500ubt
- Page 1 Technical Pro Professional Hybrid Amplifier with USB & SD Card Inputs with 12 Speaker Outputs ® Bluetooth Compatibility User Manual for: H12X500UBT...
- Page 2 If you've spent any time at all in professional audio, you know the name Technical Pro and what it stands for — incredible performance &...
-
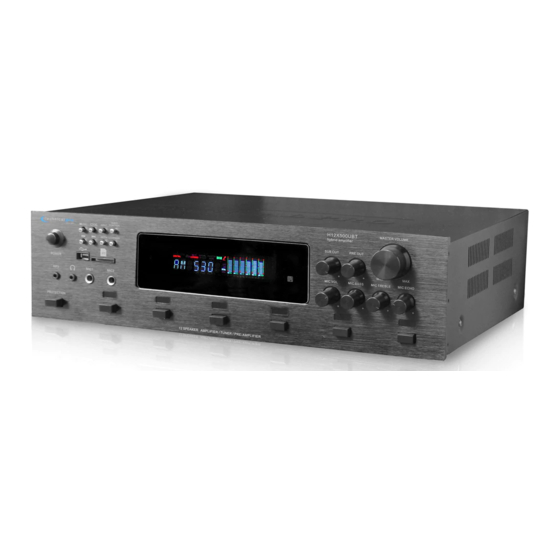
Page 3: Front Panel
H12X500UBT H12X500UBT Front Panel 4 5 6 17 18 19 20 1.Power:Press this button to power the unit on and off. 2.MP3(1/8”) Input: Connect your MP3 player or computer here.Make sure to press the input selector button (5) until “MP3” appears on the display screen to play the signal from the MP3 player or computer. - Page 4 H12X500UBT entering the numbers, press the “RPT/RDM” button or “RPT” key again to save. And the unit will exit the scan and play the station stored. 5.Input Selector: Use this button to switch between all the inputs. 6.Audio Function: Use this to switch among treble, bass, balance & master volume control mode, then use the master volume knob to adjust the corresponding sound effect.
- Page 5 H12X500UBT H12X500UBT Rear Panel 1.Power Supply: Only use the power cord provided with the unit to power the unit. When connecting and disconnecting the power cord, be sure the power of the unit is off. Connect the cord to the rear of the unit and then connect it to the outlet.
- Page 6 H12X500UBT H12X500UBT Remote 1.Play/Pause:Press this button to pause the signal from the USB flash drive,SD Card or iPod™(Classic and Nano) or bluetooth signals,press again to play. This button will only function for the USB flash drive,SD Card, iPod™ (Classic and Nano) or bluetooth signals.
- Page 7 11.Bass Control: Press either of these buttons to increase or decrease the bass effects on the main output. 12.EQ Mode Selector: The H12X500UBT has five built-in pre-set equalization modes. Press this button to switch among the pre-set equalization modes. 13.P.Call: Press this button to switch entry functions in tuner mode. Press this button the first time, and then press the number keys to enter the frequency.
-
Page 8: Remote Control Operation
H12X500UBT “REC” and the elapsed time displayed on the screen will start flashing. Press again to continue the recording. Press and hold this button for several seconds to save the file and end the recording and exit. If both USB flash drive and SD card are connected, the unit will begin recording onto the USB flash drive. - Page 9 In the typical setup, a user should wire from the output of the signal source directly to one of the RCA inputs on the rear of the H12X500UBT.Once the input signal source is connected to the H12X500UBT, connect the speakers to the H12X500UBT’s speaker outputs. Pictured above is an iPhone™ and CD player connected to the H12X500UBT inputs.To play tracks from the iPhone™...
- Page 10 SOURCE SHOULD ALL BE IN THE OFF POSITION WITH THE VOLUME LEVELS TURNED DOWN Protection & Speaker Selector Buttons: For any audio to be played by the H12X500UBT the protection button must be pushed IN. When the Protections button is pushed OUT, there will be NO audio output.
- Page 11 MP3 Player There are also SD Card and USB flash drive inputs on the front panel of the H12X500UBT which is compatible with iPod™ (Classic and Nano) via the USB input. The maximum size of the SD Card or USB flash drive is 32GB. If your memory card exceeds 32GB, the unit will not be able to read the files from the memory cards.
-
Page 12: Ac Power Cord Connection
(other sound sources) to the unit, make sure that the CD player has a RCA cord coming from its output and that this cord is plugging into the RCA Input on the rear of the H12X500UBT. Ensure that the polarity of your signals always maintained by using color coordinated RCA cables. -
Page 13: Screen Display
This will display when the input selected is bluetooth. The Bluetooth word mark and logos are registered trademarks owned by SIG, Inc. and any use of such marks by Technical Pro is under license. Other trademarks and trade name are those of their respective owners.
Need help?
Do you have a question about the h12x500ubt and is the answer not in the manual?
Questions and answers
My input selection will not stop on tuner. What can I do to fix this?