Table of Contents
Advertisement
Available languages
Available languages
Quick Links
Installation and Operation Guide
Plug-In Wireless Doorbell
Preparation
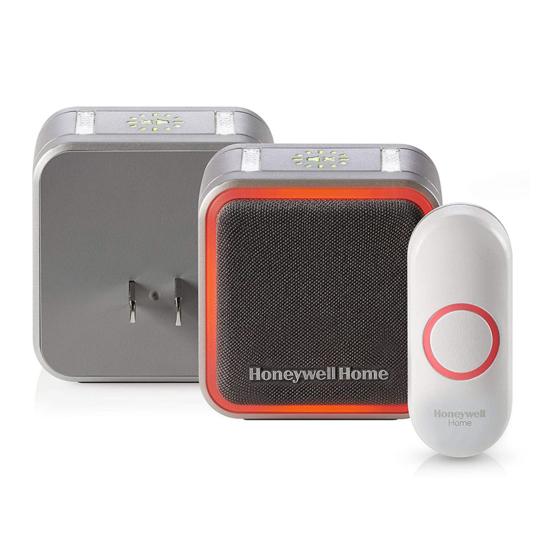
In the box you will find
Doorbell
Push
Push Button Mounting
Button
Bracket
and Adhesive Pad
The push button supplied with this kit is pre-programmed to operate with the doorbell.
If it is not, see "Connect a Push Button" on page 5.
Home
CR2032
Battery
Flat Head
Screws
RDWL515P2000
To install you will need
Phillips Screwdriver
Standard Screwdriver
Advertisement
Table of Contents

Related Manuals for Honeywell RDWL515P2000


Summary of Contents for Honeywell RDWL515P2000
- Page 1 Home Installation and Operation Guide Plug-In Wireless Doorbell RDWL515P2000 Preparation In the box you will find To install you will need Phillips Screwdriver Standard Screwdriver Doorbell CR2032 Battery Push Push Button Mounting Flat Head Button Bracket Screws and Adhesive Pad The push button supplied with this kit is pre-programmed to operate with the doorbell.
-
Page 2: Setup And Operation
Overview Just follow these simple steps: 1. Install the push button battery and plug in the doorbell. 2. Set up the doorbell and your preferences. 3. Install the push button. Indoor use only. Do not expose to liquid, vapor, or rain. Power-up 1. -
Page 3: Adjust The Volume
Change the Tune Press the Music button to change the Ding Dong doorbell tune. Westminster Piano Every time you press the Music button, Fantasy the tune will change. Stop pressing the Soft Alert Music button when you hear the tune Smart Sax you want: Change the Halo Light Color... - Page 4 Install Push Button 1. Mount the push button bracket in the desired location Use the screws –OR– Use the adhesive backing. If –OR– using the adhesive backing, clean the surface first. 2. Snap the push button onto the mounting bracket. Note: If you need to remove the push button, use a small screwdriver to release the tab.
-
Page 5: Night Light
Connect a Push Button Follow these steps to change the ring and halo light color for an existing doorbell, too. 1. Press and hold the Setting button on the doorbell for three seconds. The halo light will circle. 2. Press the push button. 3. -
Page 6: Maintenance
3. The halo light will circle, and the doorbell is returned to its factory default settings. Specifications Doorbell Push Button Operating Temperature 23°F to 104°F (-5ºC to 40ºC) -4°F to 122°F (-20ºC to 50ºC) Honeywell ActivLink™ 916.8 MHz 916.8 MHz Range (open field) 350 ft. (106 m) 350 ft. (106 m) Sound Level (typical) -
Page 7: Troubleshooting
This warranty does not cover removal or reinstallation costs. This warranty shall not apply if it is shown by Honeywell that the defect was caused by damage which occurred while the product was in the possession of a consumer. -
Page 8: Fcc Regulations
FCC Regulations This device complies with part 15 of the FCC Rules. Operation is subject to the following two conditions: (1) This device may not cause harmful interference, and (2) this device must accept any interference received, including interference that may cause undesired operation. The grantee is not responsible for any changes or modifications not expressly approved by the party responsible for compliance. - Page 9 Résidentiel Guide d’installation et d’utilisation Sonnette sans fil enfichable RDWL515P2000 Préparation Vous trouverez dans la boîte Matériel requis pour l’installation Sonnette Tournevis cruciforme Tournevis normal Pile CR2032 Bouton- Support de montage de Vis à tête poussoir bouton-poussoir avec plate tampon adhésif Le bouton-poussoir fourni avec ce nécessaire est préprogrammé...
-
Page 10: Mise Sous Tension
Aperçu Suivez simplement ces quelques étapes simples : 1. Installez la pile du bouton-poussoir et branchez la sonnette. 2. Configurez la sonnette et vos préférences. 3. Installez le bouton-poussoir. Indoor use only. Do not expose to liquid, vapor, or rain. Mise sous tension 1. -
Page 11: Réglage Du Volume
Modification de la mélodie Appuyez sur le bouton Musique pour modifier Ding Dong la mélodie de la sonnette. Westminster À chaque fois que vous appuyez sur le Piano bouton Musique, la mélodie change. Arrêtez Fantaisie d’appuyer sur le bouton Musique lorsque Alerte douce vous entendez la mélodie souhaitée. - Page 12 Installation du bouton-poussoir 1. Montez le support du bouton-poussoir à l’emplacement souhaité. Utilisez les vis –OU– utilisez le support adhésif. –OU– Si vous utilisez le support adhésif, nettoyez d’abord la surface. 2. Enclenchez le bouton- poussoir sur le support de montage.
- Page 13 Connexion d’un bouton-poussoir Suivez ces étapes pour modifier la mélodie ou la couleur du halo d’une sonnette existante. 1. Appuyez sans relâcher le bouton de réglage de la sonnette pendant trois secondes. Le halo se mettra à circuler. 2. Appuyez sur le bouton-poussoir. 3.
-
Page 14: Entretien
Caractéristiques techniques Sonnette Bouton-poussoir Température de fonctionnement -5 °C à 40 °C (23 °F à 104 °F) -20 °C à 50 °C (-4 °F à 122 °F) ActivLink™ Honeywell 916,8 MHz 916,8 MHz Portée (champ ouvert) 106 m (350 pi) 106 m (350 pi) -
Page 15: Dépannage
La présente garantie ne couvre pas les frais de retrait ou de réinstallation. La présente garantie ne s’appliquera pas s’il est démontré par Honeywell que la défaillance est due à un endommagement du produit qui s’est produit lorsque le consommateur l’avait en sa possession. - Page 16 Règlement de la FCC Cet appareil est conforme à la partie 15 du règlement de la FCC. Son fonctionnement est soumis aux deux conditions suivantes : (1) Ce dispositif ne doit pas causer d’interférences nuisibles et (2) ce dispositif doit accepter toutes les interférences reçues, y compris celles pouvant causer un fonctionnement non souhaité.
- Page 17 Hogar Instalación y guía del usuario Timbre inalámbrico enchufable RDWL515P2000 Preparación En la caja, encontrará lo siguiente: Para instalar necesitará Destornillador de estrella Destornillador estándar Timbre Batería CR2032 Pulsador Soporte de montaje del Tornillos pulsador y almohadilla de cabeza adhesiva plana El pulsador que se suministra con este kit está...
-
Page 18: Información General
Información general Siga estos pasos sencillos: 1. Coloque la batería del pulsador y enchufe el timbre. 2. Configure el timbre y sus preferencias. 3. Instale el pulsador. Indoor use only. Do not expose to liquid, vapor, or rain. Accionamiento 1. Elija un lugar en exteriores que no esté cerca de una fuente de calor, donde se pueda ver y escuchar fácilmente el timbre y enchúfelo. -
Page 19: Regulación Del Volumen
Cambio de la melodía Presione el botón de Música para Ding Dong cambiar la melodía del timbre. Westminster Piano Cada vez que presiona el botón de Fantasía Música, la melodía cambiará. Deje de Alerta suave presionar el botón de Música cuando Saxofón inteligente escuche la melodía que desea. - Page 20 Instale el pulsador 1. Monte el soporte del pulsador en la ubicación deseada. Utilice los tornillos –O– Utilice el respaldo adhesivo. –O– Si usa el respaldo adhesivo, limpie la superficie primero. 2. Coloque a presión el pulsador en el soporte de montaje.
-
Page 21: Luz Nocturna
Conexión a un pulsador Siga estos pasos para cambiar el timbre y el color de la luz tipo halo para un timbre existente también. 1. Presione y sostenga el botón de configuración en el timbre durante tres segundos. La luz tipo halo hará un círculo. -
Page 22: Mantenimiento
Especificaciones Timbre Pulsador Temperatura de funcionamiento 23 °F a 104 °F (-5 °C a 40 °C) -4 °F a 122°F (-20 °C a 50 °C) ActivLink™ de Honeywell 916.8 MHz 916.8 MHz Alcance (campo abierto) 350 ft. (106 m) 350 ft. (106 m) -
Page 23: Localización Y Solución De Problemas
Si el producto está defectuoso (i) devuélvalo, con una factura de venta o cualquier otro comprobante de compra con fecha, al lugar donde lo compró; o (ii) llame al Servicio de atención al cliente de Honeywell al 1 (800) 468 1502. - Page 24 Honeywell International Inc. 1985 Douglas Drive North Golden Valley, MN 55422 yourhome.honeywell.com ® U.S. Registered Trademark. ® Marque de commerce déposée aux É.-U. ® Marca registrada en EE. UU. © 2016 Honeywell International Inc. 33-00186EFS—01 M.S. 05-16 33-00186EFS-01 Printed in U.S.A.
Need help?
Do you have a question about the RDWL515P2000 and is the answer not in the manual?
Questions and answers