NETGEAR C7100V User Manual
Ac1900 cable modem voice router
Hide thumbs
Also See for C7100V:
- Quick start manual (18 pages) ,
- Troubleshooting steps (2 pages) ,
- Quick start (2 pages)

Subscribe to Our Youtube Channel
Related Manuals for NETGEAR C7100V


Summary of Contents for NETGEAR C7100V
- Page 1 AC1900 Cable Modem Voice Router Mode l C7100V Us e r Manual February 2017 202-11722-01 350 East Plumeria Drive San Jose, CA 95134...
- Page 2 Thank you for purchasing this NETGEAR product. You can visit to register your product, get help, access the latest downloads and user manuals, and join our community. We recommend that you use only official NETGEAR support resources. Conformity http://kb.netgear.com/app/answers/detail/a_id/11621.
-
Page 3: Table Of Contents
Log In to the Modem Router ......... . 20 Access the Modem Router With the NETGEAR genie App ....21 Chapter 3 Specify Your Internet Settings Specify the Cable Connection Starting Frequency . - Page 4 Use the Scan Feature of a Multifunction USB Printer ..... 61 Change NETGEAR USB Control Center Settings ......62 Chapter 7 Voice Telephone Lines Connect a Telephone Line .
- Page 5 AC1900 Cable Modem Voice Router Change the WiFi Security Option ........81 Set Up a Guest Network .
- Page 6 AC1900 Cable Modem Voice Router Internet LED Is Off ..........116 Troubleshoot the Cable Internet Connection .
-
Page 7: Chapter 1 Hardware Overview
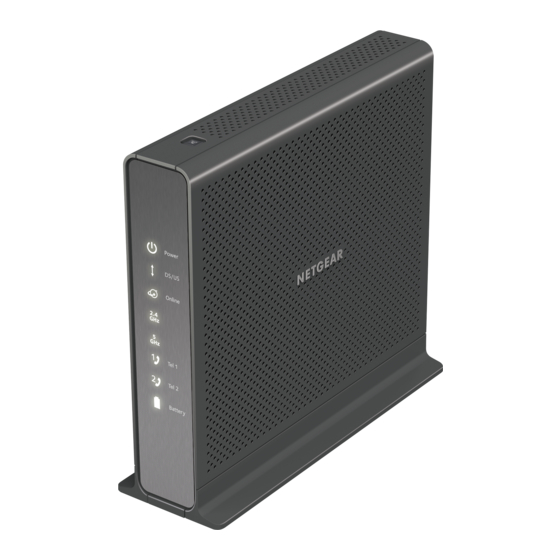
Hardware Overview The modem router provides you with an easy and secure way to set up a WiFi home network with fast Internet access through a coaxial cable and two VoIP telephone lines. The modem router battery (sold separately) provides up to five hours of talk time and eight hours or idle time for voice service during a power outage. -
Page 8: Package Contents
AC1900 Cable Modem Voice Router Package Contents Your package includes the following items. Power cord Phone cable Ethernet cable Quick start gude Modem router Figure 1. Package contents Front Panel The front panel contains status LEDs. Use the LEDs to verify status and connections. Power LED DS/US LED (downstream and upstream) Online LED... - Page 9 AC1900 Cable Modem Voice Router You can use the LEDs to verify status and connections. The following table lists and describes each LED and the WPS button on the front panel. Table 1. Front panel LEDs and button of the modem router Icon Description Power...
-
Page 10: Top Panel Wps Button
AC1900 Cable Modem Voice Router Top Panel WPS Button The WPS button is on the top panel. WPS button Press the WPS button to connect to the WiFi network without typing the WiFi password. For more information about using WPS, see WiFi Connection on page 18. -
Page 11: Product Label
AC1900 Cable Modem Voice Router • USB ports. The USB ports lets you connect a USB hard drive, flash drive, or printer to the modem router. • Tel (voice) ports. Connect Voice over IP (VoIP) telephone lines. • Four Ethernet LAN ports. These ports support 1000 Mpbs, 100 Mpbs, and 10 Mpbs connections. -
Page 12: Install An Optional Battery
AC1900 Cable Modem Voice Router Install an Optional Battery A battery is not included with the modem router, but you can purchase a NETGEAR modem router battery (sold separately) and install it. The battery can give you five hours of additional talk time and eight hours of idle time for voice service during a power outage. -
Page 13: Position Your Modem Router
AC1900 Cable Modem Voice Router Position Your Modem Router The modem router lets you access your network from anywhere within the operating range of your WiFi network. However, the operating distance or range of your WiFi connection can vary significantly depending on the physical placement of your modem router. For example, the thickness and number of walls the WiFi signal passes through can limit the range. -
Page 14: Install And Activate Your Modem Router
AC1900 Cable Modem Voice Router Install and Activate Your Modem Router The modem router provides a connection between your cable Internet provider’s network and your computer, router, or WiFi router. Connect Your Modem Router to a Computer During the installation and activation, you must connect the modem router directly to a computer. -
Page 15: Call Comcast Xfinity To Activate Internet Service And Register The Voice Telephone Lines
AC1900 Cable Modem Voice Router Connect the power cord provided in the package to the modem router and plug the power cord into an electrical outlet. When the startup procedure is completed, the Power LED lights white. Wait for the modem router to come online. It takes at least 10 minutes for the modem router to come online on the network. -
Page 16: Perform A Speed Test
AC1900 Cable Modem Voice Router The Tel (Voice) LED blinks while the phone is being registered and then lights solid white once it is registered. After the voice line is registered, you can hear a dial tone when the phone is off-hook. For information about voice telephone lines, see Chapter 7, Voice Telephone Lines. -
Page 17: Chapter 2 Connect To The Network And Access The Modem Router
Connect to the Network and Access the Modem Router This chapter contains the following sections: • Connect to the Network • Types of Logins • Log In to the Modem Router • Access the Modem Router With the NETGEAR genie App... -
Page 18: Connect To The Network
AC1900 Cable Modem Voice Router Connect to the Network You can connect to the modem router’s network through a wired or WiFi connection. If you set up your computer to use a static IP address, change the settings so that it uses Dynamic Host Configuration Protocol (DHCP). -
Page 19: Types Of Logins
AC1900 Cable Modem Voice Router The WiFi network name is on the modem router label. Join the WiFi network and enter the WiFi password. The password is on the modem router label. Your computer or mobile device connects to the WiFi network. Types of Logins Separate types of logins serve different purposes. -
Page 20: Log In To The Modem Router
AC1900 Cable Modem Voice Router Log In to the Modem Router When you connect to the network (either with WiFi or with an Ethernet cable), you can use a web browser to access the modem router to view or change its settings. The first time you access the modem router, the modem router automatically checks to see if it can connect to your Internet service. -
Page 21: Access The Modem Router With The Netgear Genie App
The modem router connects to the Internet. The BASIC Home page displays the status of the Internet connection. Access the Modem Router With the NETGEAR genie App The genie app is the easy dashboard for managing, monitoring, and repairing your home network. -
Page 22: Chapter 3 Specify Your Internet Settings
Specify Your Internet Settings Usually, the quickest way to set up the modem router to use your Internet connection is to allow the modem router to detect the Internet connection when you first access the modem router with a web browser. You can also customize or specify your Internet settings. This chapter contains the following sections: •... -
Page 23: Specify The Cable Connection Starting Frequency
AC1900 Cable Modem Voice Router Specify the Cable Connection Starting Frequency The starting frequency is automatically generated. For most Internet connections, you do not need to specify this information. If you must enter a starting frequency, contact your Internet provider. To change the starting frequency: ... -
Page 24: View Modem Router Initialization
AC1900 Cable Modem Voice Router View Modem Router Initialization You can track the initialization procedure of the modem router and get details about the downstream and upstream cable channel. The time is displayed after the modem router is initialized. The modem router automatically goes through the following steps in the provisioning process: Scans and locks the downstream frequency and then ranges the upstream channels. -
Page 25: Manually Set Up The Internet Connection
AC1900 Cable Modem Voice Router Manually Set Up the Internet Connection In most situations, you do not need to change these settings. We recommend that you use the default settings for DHCP because most cable Internet services provide the IP address through DHCP. -
Page 26: Specify An Ipv6 Internet Connection
Use This MAC Address. Enter the MAC address that you want to use. Click the Apply button. Your settings are saved. If the NETGEAR website does not display within one minute, see Chapter 11, Troubleshooting. Specify an IPv6 Internet Connection To specify an IPv6 Internet connection: ... -
Page 27: Change The Mtu Size
“fragmented” to accommodate the device with the smallest MTU. The best MTU setting for NETGEAR equipment is often the default value. In some situations, changing the value fixes one problem but causes another. Leave the MTU unchanged unless... - Page 28 • You experience problems connecting to your ISP or other Internet service, and the technical support of either the ISP or NETGEAR recommends changing the MTU setting. These web-based applications might require an MTU change: A secure website that does not open, or displays only part of a web page...
- Page 29 Table 2. Common MTU sizes Application 1500 The largest Ethernet packet size. This setting is typical for connections that do not use PPPoE or VPN, and is the default value for NETGEAR routers, adapters, and switches. 1492 Used in PPPoE environments. 1472 Maximum size to use for pinging.
-
Page 30: Chapter 4 Control Access To The Internet
Control Access to the Internet The modem router comes with a built-in firewall that helps protect your home network from unwanted intrusions from the Internet. This chapter includes the following sections: • Set Up Parental Controls • Block Access to Your Network •... -
Page 31: Set Up Parental Controls
AC1900 Cable Modem Voice Router Set Up Parental Controls The first time that you select Parental Controls from the BASIC Home page, your browser goes to the Parental Controls website, where you can learn more about parental controls. To set up parental controls, you must download the genie app. To set up parental controls: ... -
Page 32: Block Access To Your Network
AC1900 Cable Modem Voice Router b. Click the Next button. After you log on or create your account, the filtering level page displays. Select a radio button for a filtering level and click the Next button. The Setup is complete page displays. Click the Take me to the status page button. -
Page 33: Use Keywords To Block Internet Sites
AC1900 Cable Modem Voice Router To allow the computer or device you’re currently using to continue to access the network, select the check box next to your computer or device, and click the Allow button. Click the Apply button. Your settings are saved. Use Keywords to Block Internet Sites You can use keywords to block certain Internet sites from your network. -
Page 34: Delete A Keyword
AC1900 Cable Modem Voice Router For example: • Specify XXX to block http://www.badstuff.com/xxx.html. • Specify .com if you want to allow only sites with domain suffixes such as .edu or .gov. • Enter a period (.) to block all Internet browsing access. Click the Add Keyword button. -
Page 35: Block Services From The Internet
AC1900 Cable Modem Voice Router Block Services From the Internet You can block Internet services on your network based on the type of service. You can block the services all the time or based on a schedule. To block services: ... -
Page 36: Schedule When To Block Internet Sites And Services
AC1900 Cable Modem Voice Router Click the Add button. To add a service that is in the Service Type menu, select the application or service. The settings for this service automatically display in the fields. To add a service or application that is not in the menu, select User Defined, and do the following: a. -
Page 37: Avoid Blocking On A Trusted Computer
AC1900 Cable Modem Voice Router To schedule blocking: Launch an Internet browser from a computer or mobile device that is connected to the network. Type http://www.routerlogin.net or http://www.routerlogin.com. A login window opens. Enter the user name and password. The user name is admin. The default password is password. The user name and password are case-sensitive. -
Page 38: Set Up Security Event Email Notifications
AC1900 Cable Modem Voice Router Select ADVANCED > Security > Block Sites. The Block Sites page displays. Scroll down and select the Allow trusted IP address to visit blocked sites check box. In the Trusted IP Address field, enter the IP address of the trusted computer. Click the Apply button. -
Page 39: Manage Services
AC1900 Cable Modem Voice Router You might be able to find this information in the configuration page of your email program. If you leave this field blank, log and alert messages are not sent. Enter the email address to which logs and alerts are sent in the Send to This E-mail Address field. - Page 40 AC1900 Cable Modem Voice Router Select ADVANCED > Security > Services. Select or clear check boxes to enable or disable services. • When firewall features are enabled, the modem router performs stateful packet inspection (SPI) and protects against denial of service (DoS) attacks. •...
-
Page 41: Enable Or Disable Nat
AC1900 Cable Modem Voice Router Enable or Disable NAT Network address translation (NAT) is a method of remapping one IP address space into another by modifying network address information in Internet Protocol (IP) datagram packet headers while they are in transit across a traffic routing device. To enable or disable NAT: ... -
Page 42: Chapter 5 Share Usb Devices Attached To The Modem Router
Add a Network Folder on a USB Storage Device • Edit a Network Folder on a USB Storage Device • Approve USB Devices • Access the USB Storage Device Through the Internet • Safely Remove a USB Storage Device For more information about ReadySHARE features, visit netgear.com/readyshare. -
Page 43: Usb Storage Device Requirements
The modem router works with most USB-compliant external flash and hard drives. For the most up-to-date list of USB storage devices that the modem router supports, visit kbserver.netgear.com/readyshare. Some USB external hard drives and flash drives require you to load the drivers onto the computer before the computer can access the USB device. -
Page 44: Access A Usb Drive Connected To The Modem Router From
AC1900 Cable Modem Voice Router If your USB storage device uses a power supply, connect it. You must use the power supply when you connect the USB storage device to the router. When you connect the USB drive to the modem router USB port, it might take up to two minutes before it is ready for sharing. -
Page 45: Access A Usb Storage Device That Is Connected To The Modem Router From A Mac
AC1900 Cable Modem Voice Router Click the Finish button. The USB storage device is mapped to the drive letter that you specified. To connect to the USB storage device as a different user, select the Connect using different credentials check box, click the Finish button, and do the following: a. - Page 46 AC1900 Cable Modem Voice Router Enter the user name and password. The user name is admin. The default password is password. The user name and password are case-sensitive. The BASIC Home page displays. Select ADVANCED > USB Storage > Advanced Settings. Specify access to the USB storage device: •...
-
Page 47: Use Ftp Within The Network
AC1900 Cable Modem Voice Router Use FTP Within the Network File Transfer Protocol (FTP) lets you send and receive large files faster. To set up FTP access: Launch an Internet browser from a computer or mobile device that is connected to the network. -
Page 48: View Network Folders On A Usb Storage Device
AC1900 Cable Modem Voice Router View Network Folders on a USB Storage Device You can view or change the network folders on the USB storage device. To view network folders: Launch an Internet browser from a computer or mobile device that is connected to the network. -
Page 49: Add A Network Folder On A Usb Storage Device
AC1900 Cable Modem Voice Router • Folder Name. Full path of the network folder. • Volume Name. Volume name from the storage device (either USB storage device or HDD). • Total Space and Free Space. Show the current utilization of the storage device. Add a Network Folder on a USB Storage Device You can add network folders on the USB storage device. -
Page 50: Edit A Network Folder On A Usb Storage Device
AC1900 Cable Modem Voice Router The user name (account name) for All–no password is guest. The password for admin is the same one that is used to log in to the modem router. By default, it is password. Click the Apply button. The folder is added on the USB device. - Page 51 AC1900 Cable Modem Voice Router Enter the user name and password. The user name is admin. The default password is password. The user name and password are case-sensitive. The BASIC Home page displays. Select ADVANCED > Advanced Setup > USB Settings. By default the Enable any USB Device connection to the USB port radio button is selected.
-
Page 52: Access The Usb Storage Device Through The Internet
AC1900 Cable Modem Voice Router Access the USB Storage Device Through the Internet You can access the USB storage device through the Internet when you’re not home. To access the USB storage device from a remote computer: Launch a web browser on a computer that is not on your home network. Connect to your modem router: •... - Page 53 AC1900 Cable Modem Voice Router Select ADVANCED > USB Storage > Advanced Settings. Select the FTP (via Internet) check box. Click the Apply button. Your settings are saved. To limit access to the admin user, click the Edit button. In the Read Access menu, select admin. In the Write Access menu, select admin.
-
Page 54: Access The Usb Storage Device Through The Internet With Ftp
AC1900 Cable Modem Voice Router Access the USB Storage Device Through the Internet With FTP You must first set up FTP via Internet access. For information about setting up FTP via Internet access, see Set Up FTP Access Through the Internet on page 52. - Page 55 AC1900 Cable Modem Voice Router The USB Storage page displays. Click the Safely Remove USB Device button. This takes the drive offline. Physically disconnect the USB storage device. Share USB Devices Attached to the Modem Router...
-
Page 56: Chapter 6 Share A Usb Printer
Download the ReadySHARE Printer Utility • Install the ReadySHARE Printer Utility • Use the Shared Printer • View or Change the Status of a Printer • Use the Scan Feature of a Multifunction USB Printer • Change NETGEAR USB Control Center Settings... -
Page 57: Install The Printer Driver And Cable The Printer
The utility works on Windows and Mac computers. To download the utility: Visit netgear.com/readyshare. Scroll down to the Print From the Comfort of Your Home Network section at the bottom of the page. Click one of the following links: •... -
Page 58: Install The Readyshare Printer Utility
Install the ReadySHARE Printer Utility You must install the ReadySHARE Printer utility on each computer that will share the printer. After you install it, the utility displays as NETGEAR USB Control Center on your computer. To install the utility: ... -
Page 59: Use The Shared Printer
AC1900 Cable Modem Voice Router Select a language from the menu and click the OK button. Some firewall software, such as Comodo, blocks NETGEAR USB Control Center from accessing the USB printer. If you do not see the USB printer displayed, you can disable the firewall temporarily to allow the utility to work. -
Page 60: View Or Change The Status Of A Printer
If another computer is already connected to the printer, your print job goes into a queue to wait to be printed. If your document does not print, use the NETGEAR USB Control Center to check the status. View or Change the Status of a Printer To view or change the status: ... -
Page 61: Use The Scan Feature Of A Multifunction Usb Printer
To use the scan feature of a multifunction USB printer: Launch the NETGEAR USB Control Center. Make sure that the printer status shows as Available. Click the Network Scanner button. The scanner page displays so that you can use the USB printer for scanning. -
Page 62: Change Netgear Usb Control Center Settings
AC1900 Cable Modem Voice Router Change NETGEAR USB Control Center Settings You can stop the NETGEAR USB Control Center from starting automatically when you log in to Windows. You can also change the language and specify the time-out to release the printer connection. - Page 63 AC1900 Cable Modem Voice Router To specify the time-out: Click the NETGEAR USB Control Center icon The NETGEAR USB Control Center page displays. Select Tools > Configuration. The Control Center Configuration page displays. In the Timeout field, type the number of minutes.
-
Page 64: Chapter 7 Voice Telephone Lines
Voice Telephone Lines This chapter contains the following sections: • Connect a Telephone Line • View the Voice Status • View the MTA Call List • View the EMTA Event Log... -
Page 65: Connect A Telephone Line
AC1900 Cable Modem Voice Router Connect a Telephone Line To connect a telephone line: Connect one end of the phone cable to the Tel (Voice) port on the rear panel of the modem router. Phone cable Connect the other end of the phone cable to the telephone. Call Comcast XFINITY customer service at 1-800-XFINITY (1-800-934-6489) and ask them to register the phone lines. -
Page 66: View The Mta Call List
AC1900 Cable Modem Voice Router Select Voice > Voice Status. The following information displays: • MTA Provision Status. This is the current MTA provision state. • MTA MAC Address. This is the MAC address of the MTA interface. • MTA Telephony Line 1 and Line 2 Status. These are the hook states of line 1 and line 2. -
Page 67: View The Emta Event Log
AC1900 Cable Modem Voice Router Select Voice > MTA Call List. To see the most recent entries, click the Refresh button. View the EMTA Event Log To view the EMTA event log: Launch a web browser from a computer or mobile device that is connected to the network. -
Page 68: Chapter 8 Specify Network Settings
Specify Network Settings This chapter includes the following sections: • View or Change WAN Settings • Set Up a Default DMZ Server • Manually Configure LAN Switch Ports • Change the Modem Router’s Device Name • Change the LAN TCP/IP Settings •... -
Page 69: View Or Change Wan Settings
AC1900 Cable Modem Voice Router View or Change WAN Settings You can view or configure wide area network (WAN) settings for the Internet port. You can set up a DMZ (demilitarized zone) server, change the maximum transmit unit (MTU) size, and enable the modem router to respond to a ping to its WAN (Internet) port. -
Page 70: Set Up A Default Dmz Server
AC1900 Cable Modem Voice Router MTU only if you are sure that it is necessary for your ISP connection. See Change the MTU Size on page 27. • Disable SIP ALG. Some VoIP applications do not work well with the SIP ALG. Selecting this check box to turn off the SIP ALG might help your VoIP devices to create or accept a call through the modem router. -
Page 71: Manually Configure Lan Switch Ports
AC1900 Cable Modem Voice Router The user name is admin. The default password is password. The user name and password are case-sensitive. The BASIC Home page displays. Select ADVANCED > Setup > WAN Setup. Select the Default DMZ Server check box. Type the IP address. -
Page 72: Change The Modem Router's Device Name
AC1900 Cable Modem Voice Router Change the Modem Router’s Device Name The modem router’s device name is C7100V. This device name displays in file manager when you browse your network. To change the modem router’s device name: Launch an Internet browser from a computer or mobile device that is connected to the network. -
Page 73: Specify The Ip Addresses That The Modem Router Assigns
AC1900 Cable Modem Voice Router Enter the user name and password. The user name is admin. The default password is password. The user name and password are case-sensitive. The BASIC Home page displays. Select ADVANCED > Setup > LAN Setup. In the IP Address fields, type the IP address. - Page 74 AC1900 Cable Modem Voice Router To specify the pool of IP addresses that the modem router assigns: Launch an Internet browser from a computer or mobile device that is connected to the network. Type http://www.routerlogin.net or http://www.routerlogin.com. A login window opens. Enter the user name and password.
-
Page 75: Disable The Dhcp Server Feature In The Modem Router
AC1900 Cable Modem Voice Router Disable the DHCP Server Feature in the Modem Router By default, the modem router acts as a DHCP server. The modem router assigns IP, DNS server, and default gateway addresses to all computers connected to the LAN. The assigned default gateway address is the LAN address of the modem router. -
Page 76: Edit A Reserved Ip Address Entry
AC1900 Cable Modem Voice Router The user name is admin. The default password is password. The user name and password are case-sensitive. The BASIC Home page displays. Select ADVANCED > Setup > LAN Setup. The LAN Setup page displays. In the Address Reservation section, click the Add button. In the IP Address field, type the IP address to assign to the computer or server. -
Page 77: Delete A Reserved Ip Address Entry
AC1900 Cable Modem Voice Router Delete a Reserved IP Address Entry To delete a reserved address entry: Launch an Internet browser from a computer or mobile device that is connected to the network. Type http://www.routerlogin.net or http://www.routerlogin.com. A login window opens. Enter the user name and password. -
Page 78: Use The Wps Wizard For Wifi Connections
AC1900 Cable Modem Voice Router The UPnP page displays. Select the Turn UPnP On check box. By default, this check box is selected. UPnP for automatic device configuration can be enabled or disabled. If the Turn UPnP On check box is cleared, the modem router does not allow any device to automatically control modem router resources such as port forwarding. -
Page 79: Specify Basic Wifi Settings
AC1900 Cable Modem Voice Router Select ADVANCED > WPS Wizard. A page displays that explains WPS. Click the Next button. The WPS page displays. Select the radio button for the setup method that you want to use: • Push button. Click the WPS button on this page. •... - Page 80 AC1900 Cable Modem Voice Router Select Wireless. In the Region menu, select your region. In some locations, you cannot change this setting. To control the SSID broadcast, select or clear the Enable SSID Broadcast check box. When this check box is selected, the modem router broadcasts its network name (SSID) so that it displays when you scan for local WiFi networks on your computer or mobile device.
-
Page 81: Change The Wifi Security Option
AC1900 Cable Modem Voice Router For 5 GHz, Up to 1300 Mbps is the default setting, which allows 802.11ac and 802.11a WiFi devices to join the network. The other settings are Up to 600 Mbps and Up to 289 Mbps. Click the Apply button. -
Page 82: Set Up A Guest Network
AC1900 Cable Modem Voice Router In the Passphrase field, enter the network key (password) that you want to use. It is a text string from 8 to 63 characters. Write down the new password and keep it in a secure place for future reference. Click the Apply button. -
Page 83: Control The Wifi Radios
AC1900 Cable Modem Voice Router Select any of the following settings: • Enable Guest Network. When this check box is selected, the guest network is enabled, and guests can connect to your network using the SSID of this profile. • Enable SSID Broadcast. -
Page 84: Enable Or Disable The Wifi Radios
AC1900 Cable Modem Voice Router Enable or Disable the WiFi Radios If you used the WiFi On/Off button to turn off the WiFi radios, you can’t log in to the modem router to turn them back on. You must press the WiFi On/Off button again for two seconds to turn the WiFi radios back on. -
Page 85: Set Up A Wifi Schedule
AC1900 Cable Modem Voice Router Set Up a WiFi Schedule You can use this feature to turn off the WiFi signal from your modem router at times when you do not need a WiFi connection. For example, you might turn it off for the weekend if you leave town. -
Page 86: Specify Wps Settings
AC1900 Cable Modem Voice Router Specify WPS Settings Wi-Fi Protected Setup (WPS) lets you join the WiFi network without typing the WiFi password. To specify WPS settings: Launch an Internet browser from a computer or mobile device that is connected to the network. -
Page 87: Chapter 9 Manage Your Network
Manage Your Network This chapter describes the modem router settings for administering and maintaining your modem router and home network. The chapter includes the following sections: • Change the admin Password • View Modem Router Status • View the Battery Status •... -
Page 88: Change The Admin Password
AC1900 Cable Modem Voice Router Change the admin Password This feature let you change the default password that is used to log in to the modem router with the user name admin. This password is not the one that you use for WiFi access. The modem router label shows your unique WiFi network name (SSID) and password for WiFi access. -
Page 89: View Modem Router Status
AC1900 Cable Modem Voice Router View Modem Router Status To view modem router status and usage information: Launch an Internet browser from a computer or mobile device that is connected to the network. Type http://www.routerlogin.net or http://www.routerlogin.com. A login window opens. Enter the user name and password. - Page 90 AC1900 Cable Modem Voice Router Enter the user name and password. The user name is admin. The default password is password. The user name and password are case-sensitive. The BASIC Home page displays. Click the ADVANCED tab. The ADVANCED Home page displays. In the Internet Port pane, click the Show Statistics button.
-
Page 91: Check The Internet Connection Status
AC1900 Cable Modem Voice Router Check the Internet Connection Status To check the Internet connection status: Launch an Internet browser from a computer or mobile device that is connected to the network. Type http://www.routerlogin.net or http://www.routerlogin.com. A login window opens. Enter the user name and password. -
Page 92: View The Battery Status
AC1900 Cable Modem Voice Router To exit, click the Close Window button. View the Battery Status To check the battery status: Launch an Internet browser from a computer or mobile device that is connected to the network. Type http://www.routerlogin.net or http://www.routerlogin.com. A login window opens. - Page 93 AC1900 Cable Modem Voice Router A login window opens. Enter the user name and password. The user name is admin. The default password is password. The user name and password are case-sensitive. The BASIC Home page displays. Select ADVANCED > Administration > Logs. The Logs page shows the following information: •...
-
Page 94: View Event Logs
AC1900 Cable Modem Voice Router View Event Logs Event logs capture important modem router events. To view the event logs: Launch a web browser from a computer or mobile device that is connected to the network. Type http://routerlogin.net or http://192.168.0.1. A login window opens. -
Page 95: Run The Ping Utility
AC1900 Cable Modem Voice Router Run the Ping Utility Ping is an administration utility that tests whether a computer on the network is reachable and measures the time it takes messages sent from the originating device to reach a destination computer and return. To run a ping test: ... -
Page 96: Run The Traceroute Utility
AC1900 Cable Modem Voice Router To stop a ping test, click the Abort Test button. To clear the results from the display, click the Clear Results button. Run the Traceroute Utility To display the route and measure transit delays of packets across an IP, run the traceroute utility. -
Page 97: Monitor Internet Traffic
AC1900 Cable Modem Voice Router • Resolve Host. Select On to resolve the host name to the IP address. Click the Start Test button. The traceroute results display. To clear the results from the display, click the Clear Results button. Monitor Internet Traffic Traffic metering allows you to monitor the volume of Internet traffic that passes through the modem router Internet port. -
Page 98: View Devices Currently On The Network
AC1900 Cable Modem Voice Router • Select the Traffic volume control by radio button and then select one of the following options: No Limit. No restriction is applied when the traffic limit is reached. Download only. The restriction is applied to incoming traffic only. Both Directions. -
Page 99: Manage The Modem Router Configuration File
AC1900 Cable Modem Voice Router Select Attached Devices. The Wired Devices section lists devices that are connected to the modem router with Ethernet cables. The Wireless Devices section lists devices that are connected to the WiFi network. The following information is displayed: •... -
Page 100: Restore Configuration Settings
AC1900 Cable Modem Voice Router The BASIC Home page displays. Select ADVANCED > Administration > Backup Settings. Click the Back Up button. Specify a location on your network. A confirmation message displays. Click the OK button. A copy of the current settings is saved in the location you specified. Restore Configuration Settings To restore configuration settings that you backed up: ... -
Page 101: Erase The Current Configuration Settings
AC1900 Cable Modem Voice Router Erase the Current Configuration Settings You can erase the current configuration and restore the factory default settings. You might want to do this if you move the modem router to a different network. (See Factory Settings page 123). -
Page 102: View Or Change The Modem Router Wireless Channel
AC1900 Cable Modem Voice Router Select ADVANCED > Administration > Wireless AP. The page displays the WiFi access points in use in your area. View or Change the Modem Router Wireless Channel In many countries and geographic locations, laws or guidelines specify which channels can be used. -
Page 103: Dynamic Dns
AC1900 Cable Modem Voice Router Select ADVANCED > Administration > Wireless Channel. The page displays WiFi channels in use in the 2.4 GHz WiFi band. Your network is shown in blue. Yellow shows other networks in your area. To view WiFi channels in use in the 5 GHz WiFi band, select the 5 GHz a/n radio button. To change the WiFi channel, click the Change Channel button. -
Page 104: Specify A Dns Account
AC1900 Cable Modem Voice Router Specify a DNS Account To set up Dynamic DNS in the modem router: Launch an Internet browser from a computer or mobile device that is connected to the network. Type http://www.routerlogin.net or http://www.routerlogin.com. A login window opens. Enter the user name and password. -
Page 105: Remote Management
AC1900 Cable Modem Voice Router Type http://www.routerlogin.net or http://www.routerlogin.com. A login window opens. Enter the user name and password. The user name is admin. The default password is password. The user name and password are case-sensitive. The BASIC Home page displays. Select ADVANCED >... - Page 106 AC1900 Cable Modem Voice Router Select ADVANCED > Advanced Setup > Remote Management. Select the Turn Remote Management On check box. In the Allow Remote Access By section, specify the external IP addresses to be allowed to access the modem router’s remote management:. Note: For enhanced security, restrict access to as few external IP addresses as practical.
-
Page 107: Chapter 10 Specify Internet Port Settings
Specify Internet Port Settings You can use port forwarding and port triggering to set up rules for Internet traffic. You need networking knowledge to set up these features. This chapter includes the following sections: • Set Up Port Forwarding to a Local Server •... -
Page 108: Set Up Port Forwarding To A Local Server
AC1900 Cable Modem Voice Router Set Up Port Forwarding to a Local Server If your home network includes a server, you can allow certain types of incoming traffic to reach the server. For example, you might want to make a local web server, FTP server, or game server visible and available to the Internet. -
Page 109: Add A Custom Port Forwarding Service
AC1900 Cable Modem Voice Router If the service that you want to add is not in the menu, create a custom service. See Add a Custom Port Forwarding Service on page 109. In the Server IP Address field, enter the IP address of the computer that will provide the service. -
Page 110: Edit A Port Forwarding Service
AC1900 Cable Modem Voice Router If you are unsure, select TCP/UDP. In the External Starting Port field, enter the beginning port number. If the application uses a single port, enter the same port number in the Ending Port field. If the application uses a range of ports, enter the ending port number of the range in the External Ending Port field. -
Page 111: Delete A Port Forwarding Entry
AC1900 Cable Modem Voice Router • For the internal ports, leave the Use the same port range for Internal port check box selected. • Internal IP address. Type the IP address in the Internal IP address field, or select the radio button for an attached device listed in the table. Click the Apply button. -
Page 112: How The Modem Router Implements The Port Forwarding Rule
AC1900 Cable Modem Voice Router (Optional) Register a host name with a Dynamic DNS service, and specify that name in the Dynamic DNS page. Dynamic DNS makes it much easier to access a server from the Internet because you can type the name in the Internet browser. Otherwise, you must know the IP address that the ISP assigned, which typically changes. -
Page 113: Add A Port Triggering Service
AC1900 Cable Modem Voice Router Note: If you use applications such as multiplayer gaming, peer-to-peer connections, real-time communications such as instant messaging, or remote assistance (a feature in Windows XP), enable Universal Plug-N-Play (UPnP). Add a Port Triggering Service To add a port triggering service: ... -
Page 114: Application Example: Port Triggering For Internet Relay Chat
AC1900 Cable Modem Voice Router In the Service Type fields, enter the starting and ending ports. Enter the inbound connection port information in the Starting Port and Ending Port fields. Click the Apply button. The service is now in the Portmap table. You must enable port triggering before the modem router uses port triggering for the service that you added. -
Page 115: Chapter 11 Troubleshooting
Troubleshooting This chapter provides information to help you diagnose and solve problems you might experience with your modem router. If you do not find the solution here, check the NETGEAR support site at http://support.netgear.com for product and contact information. This chapter contains the following sections: •... -
Page 116: Troubleshoot With The Leds
Make sure that the power cord is securely connected to your modem router and securely connected to a working power outlet. • Check that you are using the power cord that NETGEAR supplied for this product. • If the problem persists, contact technical support for help at www.netgear.com/support. -
Page 117: Cannot Log In To The Modem Router
AC1900 Cable Modem Voice Router Cannot Log In to the Modem Router If you are unable to log in to the modem router from a computer or mobile device on your local network, check the following: Make sure that you are connected to the modem router’s wired or WiFi network. •... -
Page 118: Changes Not Saved
AC1900 Cable Modem Voice Router Changes Not Saved If the modem router does not save the changes you make in the modem router interface, check the following: • When entering configuration settings, always click the Apply button before moving to another page or tab, or your changes are lost. -
Page 119: Phone Does Not Get A Dial Tone
AC1900 Cable Modem Voice Router Check to see if the WiFi signal strength is weak in your location. Is your modem router too far from your computer, or too close? Place your computer near the modem router, but at least 6 feet (1.8 meters) away, and see if the signal strength improves. -
Page 120: Test The Path From Your Computer To A Remote Device
AC1900 Cable Modem Voice Router ping www.routerlogin.net Click the OK button. You should see a message like this one: Pinging <IP address > with 32 bytes of data If the path is working, you see this message: Reply from < IP address >: bytes=32 time=NN ms TTL=xxx If the path is not working, you see this message: Request timed out If the path is not functioning correctly, you might be experiencing one of the following... - Page 121 AC1900 Cable Modem Voice Router • Check to see that the network address of your computer (the portion of the IP address specified by the subnet mask) is different from the network address of the remote device. • Check to see that your cable or DSL modem is connected and functioning. •...
-
Page 122: Appendix A Supplemental Information
Supplemental Information This appendix covers the following topics: • Factory Settings • Technical Specifications... -
Page 123: Factory Settings
AC1900 Cable Modem Voice Router Factory Settings You can return the modem router to its factory settings. Use the end of a paper clip or a similar object to press and hold the Reset button on the back of the modem router for at least seven seconds. -
Page 124: Technical Specifications
AC1900 Cable Modem Voice Router Table 3. Factory default settings (continued) Feature Default setting WiFi (continued) RF channel (5 GHz) CH 153 (or manually select channels I and 4) Operating mode Up to 600 Mbps at 2.4 GHz, 1300 Mbps at 5 GHz 1.
Need help?
Do you have a question about the C7100V and is the answer not in the manual?
Questions and answers