
Related Manuals for Monoprice 18800


Summary of Contents for Monoprice 18800
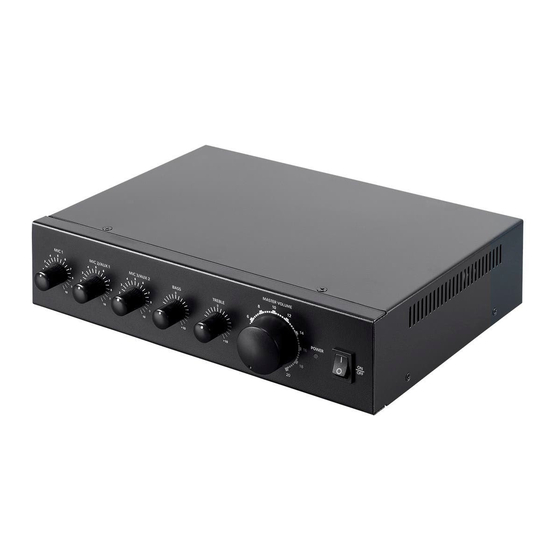
- Page 1 Commercial Audio 60-Watt 2-Channel 70V/100V Mixer Amplifier 18800 User’s Manual...
-
Page 2: Table Of Contents
CONTENTS SAFETY WARNINGS AND GUIDELINES ..........................3 INTRODUCTION ......................................5 FEATURES ........................................5 CUSTOMER SERVICE .................................... 5 PACKAGE CONTENTS ..................................6 PRODUCT OVERVIEW ..................................6 Front Panel ......................................6 Rear Panel ....................................... 7 CONSTANT VOLTAGE VS 8-OHM SPEAKER SYSTEMS ..................7 SAMPLE CONNECTION DIAGRAM ............................ -
Page 3: Safety Warnings And Guidelines
SAFETY WARNINGS AND GUIDELINES Please read this entire manual before using this device, paying extra attention to these safety warnings and guidelines. Please keep this manual in a safe place for future reference. This device is intended for indoor use only. ... - Page 4 Take care to prevent damage to the power cord. Do not allow it to become crimped, pinched, walked on, or become tangled with other cords. Ensure that the power cord does not present a tripping hazard. Never unplug the unit by pulling on the power cord. Always grasp the connector head.
-
Page 5: Introduction
If you have any problem with your order, please give us an opportunity to make it right. You can contact a Monoprice Customer Service representative through the Live Chat link on our website www.monoprice.com during normal business hours (Mon-Fri: 5am-7pm PT, Sat-... -
Page 6: Package Contents
PACKAGE CONTENTS Please take an inventory of the package contents to ensure you have all the items listed below. If anything is missing or damaged, please contact Monoprice Customer Service for a replacement. 1x Commercial Audio 60-Watt 2-Channel 70V/100V Mixer Amplifier... -
Page 7: Rear Panel
Rear Panel 9. AC Power Cord 10. Speaker Terminals 11. AUX 2 Unbalanced RCA Input 12. AUX 2/MIC 3 Selector Switch 13. MIC 3 Unbalanced 1/4" Input 14. AUX 1 Unbalanced 1/4" Input 15. AUX 1/MIC 2 Selector Switch 16. MIC 2 Unbalanced 1/4" Input 17. - Page 8 For example, if you want to connect two speakers per channel in a traditional 8-ohm speaker system, you must either connect them in series, which results in an overall 16- ohm impedance, or in parallel, which results in an overall 4-ohm impedance. In the first case, the 16-ohms impedance effectively halves the output power of your amplifier, resulting in lower overall volume levels.
-
Page 9: Sample Connection Diagram
SAMPLE CONNECTION DIAGRAM CONSTANT RESISTANCE INSTALLATION Perform the following steps to install this amplifier in a 4-ohm or 8-ohm speaker system. 1. Ensure that all equipment to be connected is powered off and unplugged from its power source before making any electric/audio connections. 2. - Page 10 a 16-ohm array, then connect a second 16-ohm array in parallel to the first to create an overall 8-ohm speaker load. Speaker load calculators are available on the internet to help with the math. 4. Connect the negative lead of the speaker wire to the COM terminal on the amplifier, then connect the positive lead to either the 4-ohm or 8-ohm terminal, depending on the overall impedance of your speaker array.
-
Page 11: Constant Voltage Installation
CONSTANT VOLTAGE INSTALLATION Perform the following steps to install this amplifier with a 70-volt or 100-volt constant voltage speaker array. 1. Ensure that all equipment to be connected is powered off and unplugged from its power source before making any electric/audio connections. 2. - Page 12 7. (Optional) Either plug a dynamic microphone into the MIC 2 Input (16) or plug a line-level device, such as the headphone output of an mp3 player or smartphone, into the AUX 1 Input (14). If using the MIC 2 Input, set the AUX 1/MIC 2 Switch (15) to the MIC 2 position, otherwise if using the AUX 1 Input, set it to the AUX 1 position.
-
Page 13: Block Diagram
BLOCK DIAGRAM... -
Page 14: Specifications
SPECIFICATIONS Model 18800 Rated Power Output 60 watts Speaker Outputs 4-ohm, 8-ohm, 70-volt, and 100-volt 3x 1/4" unbalanced microphone Inputs 1x 1/4" unbalanced auxiliary 1x RCA unbalanced auxiliary Microphone Input Sensitivity Auxiliary Input Sensitivity 350mV Frequency Response 80 Hz ~ 16 kHz (-3dB) Signal-to-Noise Ratio ≥... -
Page 15: Technical Support
TECHNICAL SUPPORT Monoprice is pleased to provide free, live, online technical support to assist you with any questions you may have about installation, setup, troubleshooting, or product recommendations. If you ever need assistance with your new product, please come online to talk to one of our friendly and knowledgeable Tech Support Associates. -
Page 16: Notice For Industry Canada
Reorient or relocate the receiving antenna. Increase the separation between the equipment and receiver. Connect the equipment into an outlet on a circuit different from that to which the receiver is connected. Consult the dealer or an experienced radio/TV technician for help. Notice for Industry Canada This Class B digital apparatus complies with Canadian ICES-003.
Need help?
Do you have a question about the 18800 and is the answer not in the manual?
Questions and answers