Milwaukee M18 Operator's Manual
Cordless 1/2" drill/driver and hammer drill/driver
Hide thumbs
Also See for M18:
- User manual ,
- Original instructions manual (161 pages) ,
- Instructions manual (51 pages)
Table of Contents
Advertisement
Available languages
Available languages
Cat. No. / No de cat.
2606-20, 2607-20
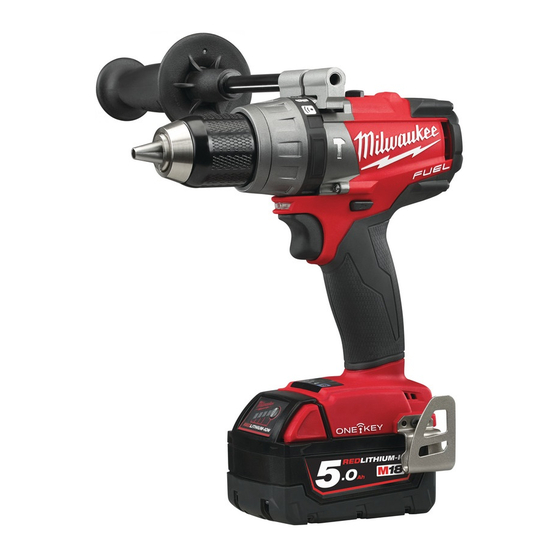
M18™ CORDLESS 1/2" DRILL/DRIVER AND HAMMER
DRILL/DRIVER
PERCEUSE-VISSEUSE ET PERCEUSE À PERCUSSION
DE M18™ 13 mm (1/2")
TALADRO DESTORNILLADOR Y TALADRO DE PERCUSIÓN
DE 13 mm (1/2") M18™
WARNING
AVERTISSEMENT
comprendre le manuel.
ADVERTENCIA
To reduce the risk of injury, user must read and understand operator's manual.
Afin de réduire le risque de blessures, l'utilisateur doit lire et bien
Para reducir el riesgo de lesiones, el usuario debe leer y entender el manual.
OPERATOR'S MANUAL
MANUEL de L'UTILISATEUR
MANUAL del OPERADOR
Advertisement
Table of Contents

Related Manuals for Milwaukee M18


Summary of Contents for Milwaukee M18
- Page 1 OPERATOR'S MANUAL MANUEL de L'UTILISATEUR MANUAL del OPERADOR Cat. No. / No de cat. 2606-20, 2607-20 M18™ CORDLESS 1/2" DRILL/DRIVER AND HAMMER DRILL/DRIVER PERCEUSE-VISSEUSE ET PERCEUSE À PERCUSSION DE M18™ 13 mm (1/2") TALADRO DESTORNILLADOR Y TALADRO DE PERCUSIÓN DE 13 mm (1/2") M18™...
-
Page 2: General Power Tool Safety Warnings
GENERAL POWER TOOL attached to a rotating part of the power tool may result in personal injury. SAFETY WARNINGS • Do not overreach. Keep proper footing and Read all safety warnings, instruc- WARNING balance at all times. This enables better control tions, illustrations and specifica- of the power tool in unexpected situations. -
Page 3: Specifications
“live” and could give the operator an electric shock. • Maintain labels and nameplates. These carry important information. If unreadable or missing, contact a MILWAUKEE service facility for a free replacement. • Some dust created by power sanding,... -
Page 4: Operation
ASSEMBLY Selecting Drill or Drive Action (Cat. No. 2606-20) Recharge only with the charger WARNING 1. To use the drilling mode, rotate the specified for the battery. For spe- torque selector collar until the drill cific charging instructions, read the operator’s symbol appears in line with the manual supplied with your charger and battery. - Page 5 Drilling Cat. No. 2607-20 Place the bit on the work surface and apply firm pres- Clutch Applications sure before starting. Too much pressure will slow the Setting in. lbs bit and reduce drilling efficiency. Too little pressure 28-30 Small screws in softwood. will cause the bit to slide over the work area and dull 31-33 the point of the bit.
-
Page 6: Maintenance
Subject to certain exceptions, misalignment or binding of moving parts, breakage of MILWAUKEE will repair or replace any part on an electric power tool parts, or any other condition that may affect the tool which, after examination, is determined by MILWAUKEE to be defec- tive in material or workmanship for a period of five (5) years* after the operation. -
Page 7: Règles De Sécurité Générales Relatives Aux Outils Électriques
LIMITED WARRANTY - MEXICO, RÈGLES DE SÉCURITÉ GÉNÉRALES CENTRAL AMERICA & CARIBBEAN RELATIVES AUX OUTILS ÉLECTRIQUES TECHTRONIC INDUSTRIES' warranty is for 5 year since the original Lire toutes les consignes AVERTISSEMENT purchase date. de sécurité, consignes, This warranty card covers any defect in material and workmanship on this Power Tool. -
Page 8: Utilisation Et Entretien De L'outil Électrique
conditions, porter aussi un masque antipoussières, tâche à effectuer. L'usage d'un outil électrique pour des bottes de sécurité antidérapantes, un casque des applications pour lesquelles il n'est pas conçu protecteur ou une protection auditive afin de réduire peut être dangereux. les blessures. -
Page 9: Description Fonctionnelle
• Maintenir en l’état les étiquettes et les plaques DESCRIPTION FONCTIONNELLE d’identification.Des informations importantes y fig- urent. Si elles sont illisibles ou manquantes, contacter un centre de services et d’entretien MILWAUKEE pour un remplacement gratuit. • Certaines poussières gé- AVERTISSEMENT nérées par les activités de... -
Page 10: Montage De L'outil
MONTAGE DE L'OUTIL MANIEMENT Ne recharger la batterie Il faut toujours retirer la AVERTISSEMENT AVERTISSEMENT qu’avec le chargeur spéci- batterie et verrouiller la fié. Pour les instructions de charge spécifiques, détente de l’outil avant de changer ou d’enlever lire le manuel d’utilisation fourni avec le chargeur les accessoires. - Page 11 Sélection du mode percussion, perçage N.B. : Utiliser un déchet de matériau pour tester les ou vissage (No de Cat. 2607-20) différentes positions d’embrayage avant de visser dans la pièce de travail. 1. Pour utiliser le mode martelage-perforage, faire tourner le collier de sélection jusqu’à ce que le Sélection de la vitesse symbole marteau apparaisse...
- Page 12 électriques ou les tuyaux avant d’entreprendre travaux d’entretien. Ne démontez jamais l’outil, le forage. la batterie ou le chargeur. Pour toute réparation, consultez un centre de service MILWAUKEE ac- Perçage du bois, des matériaux crédité. synthétiques et du plastique Entretien de l’outil Lorsque vous percez du bois, des matériaux syn-...
-
Page 13: Service - Canada
électrique qui, après examen par bon de commande estampillé du sceau du distributeur ou du magasin MILWAUKEE, s’est avérée être affectée d’un vice de matériau ou de où le produit a été acheté. Toute pièce défectueuse ou tout composant fabrication pendant une période de cinq (5) ans* après la date d’achat,... -
Page 14: Advertencias De Seguridad Generales Para La Herramienta Eléctrica
ADVERTENCIAS DE SEGURIDAD ción, tal como una máscara contra polvo, calzado GENERALES PARA LA antideslizante, casco o protección auditiva, utilizado para condiciones adecuadas disminuirá las lesiones HERRAMIENTA ELÉCTRICA personales. Lea todas las advertencias de ADVERTENCIA • Evite el arranque accidental. Asegúrese de que el seguridad, instrucciones, ilus- interruptor esté... -
Page 15: Mantenimiento
• Utilice las herramientas eléctricas únicamente de servicio MILWAUKEE para obtener un reemplazo con baterías específicamente diseñadas. El uso gratuito. de cualquier otra batería puede producir un riesgo •... -
Page 16: Especificaciones
ESPECIFICACIONES ENSAMBLAJE Volts.............. 18 CD Recargue la batería sólo con ADVERTENCIA Tipo de batería ..........M18™ el cargador especificado Tipo de cargador ..........M18™ para ella. Para instrucciones específicas sobre Cat. No............2606-20 cómo cargar, lea el manual del operador sumin- RPM ............Baja 0 - 450... - Page 17 1. Para abrir las mordazas del portabrocas, gire el 3. Para usar el modo de atornillado, anillo en dirección antihoraria. Si se usan brocas gire el collarín selector de apli- para taladrar, deje que la broca toque el fondo cación hasta que el símbolo de del portabrocas.
- Page 18 APPLICACIONES Utilización del interruptor de control El interruptor de control se puede colocar en tres Para reducir el riesgo de ADVERTENCIA posiciones diferentes: avance, retroceso y bajo se- electrocución, antes de tal- guro. Debido a un mecanismo de traba, el interruptor adrar o colocar tornillos verifique que en el área de control se puede cambiar de posición únicamente de trabajo no hayan tuberías o cables ocultos.
- Page 19 MILWAUKEE. *El período de garantía de las radios para obras, del puerto de alimen- tación M12™, Fuente de poder M18™, Ventilador para obra y de las Para reducir el riesgo de le- ADVERTENCIA carretillas de trabajo industrial Trade Titan™...
- Page 20 TECHTRONIC INDUSTRIES MEXICO, .S.A. DE C.V. Av Presidente Mazarik 29 Piso 7, 11570 Chapultepec Morales Miguel Hidalgo, Distrito Federal, Mexico Modelo: Fecha de Compra: Sello del Distribuidor: MILWAUKEE TOOL 13135 West Lisbon Road Brookfield, WI 53005 USA 58142609d5 961011802-01(A) 01/16...
Need help?
Do you have a question about the M18 and is the answer not in the manual?
Questions and answers