MSA galaxy GX2 Quick Start Manual
Automated test system
Hide thumbs
Also See for galaxy GX2:
- Operating manual (72 pages) ,
- Quick start manual (56 pages) ,
- Quick start manual-description and setup (46 pages)
Advertisement
Quick Links
Download this manual
See also:
Operating Manual
GALAXY® GX2 Automated Test System Quick Start Guide -
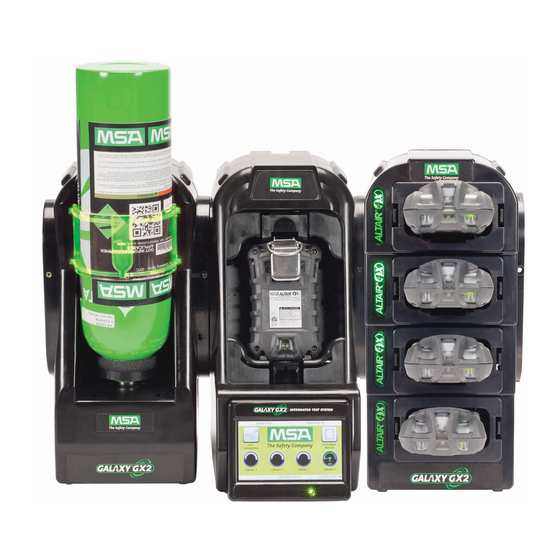
1 System Components
Touch screen display
Status LED
Test stand to test stand connector
Test stand Ethernet jacks
2 Unit Connection
On test stand left side, ensure that all 5 barb fittings are in
place & straight before connecting cylinder holder or
another test stand.
Press 2 units together until barb fittings are fully inserted &
flange screw holes align.
*If using ammonia or chlorine test gas, read restriction found under instruction manual chapter 2.8 "Special Conditions for Use with
Reactive Gases" .
Description and Setup
SD card port
USB port
Gas plugs
Insert 3 screws: to connect multiple test stands, remove
white gas plugs from all units except farthest right test stand.
Continue adding test stands to right, cylinder holders to left.*
If using MSA cylinder holders, left-most cylinder holder should
have fresh air filter attached to top port.
GB/EN
Advertisement

Related Manuals for MSA galaxy GX2


Summary of Contents for MSA galaxy GX2
- Page 1 Press 2 units together until barb fittings are fully inserted & flange screw holes align. If using MSA cylinder holders, left-most cylinder holder should have fresh air filter attached to top port. *If using ammonia or chlorine test gas, read restriction found under instruction manual chapter 2.8 “Special Conditions for Use with...
- Page 2 3 Initial Startup Power on system by plugging into A/C outlet. MSA logo screen will briefly display. Next, language setup screen automatically displays; select your language from list. Language selection determines date format, either MM/DD/YYYY or DD/MM/YYYY. Select Save, then select Home.
- Page 3 GB/EN GALAXY® GX2 Automated Test System Quick Start Guide - Test Stand Default Parameters Screen Name Parameter Default Setting Date Setup Date Current date set during assembly Time Zone Setup Time zone Eastern Time (US & Canada) Time Setup Time Current time set during assembly 24 hour time Test Setup...
- Page 4 Weeks to expiration 4 weeks LEL Setup % volume setting All combustible gas 100% LEL volumes set to ANSI standards View complete product literature on the enclosed CD or visit MSAsafety.com ID 0818-25-MC / 2012 © MSA 2012 Printed in U.S.A.
- Page 5 RFID tag Internal pressure regulator & sensor See Galaxy GX2 Automated Test System Quick Start Guide 1 for directions regarding test stand/cylinder holder setup. Multi-color light band indicates gas cylinder functionality: Green indicates functional cylinder; gas parameters are within pressure &...
- Page 6 Red light indicates charging. Each multi-unit charger requires an individual power source. Unit can be used as a stand-alone device or mechanically attached to a GALAXY GX2 System. View complete product literature on the enclosed CD or visit MSAsafety.com ID 0818-25-MC / 2012 ©...
- Page 7 GB/EN GALAXY® GX2 Automated Test System Quick Start Guide - How to Test ALTAIR® Single-Gas Detectors Testing ALTAIR & ALTAIR Pro Single-Gas Detectors Before inserting ALTAIR or ALTAIR Pro Detector into test stand, press & hold instrument test button for one second. Gas detector screen should display GAS? prior to inserting into test stand.
- Page 8 How to Test ALTAIR® Gas Detectors To perform instrument tests after setup & configuration of GALAXY GX2 System: 1 Plug-in Galaxy GX2 test stand to power on. 2 GALAXY GX2 System includes 1 of 3 instrument cradles to accommodate ALTAIR Gas Detectors. Please follow the instructions listed for your instrument.
- Page 9 Gas Detector Charging status (only displays for changing GX2) Administrator screen provides configuration options for the test stand, instrument & test gas cylinders: GALAXY GX2 System test stand configuration Instrument configuration Test gas cylinder configuration GALAXY GX2 System status selection...
-
Page 10: Test Sequence
• If instrument passes test, remove it or select Home. • If instrument fails the test, select Calibration Details or Bump Details for sensor failure information. View complete product literature on the enclosed CD or visit MSAsafety.com ID 0818-25-MC / t 2012 © MSA 2012 Printed in U.S.A.
Need help?
Do you have a question about the galaxy GX2 and is the answer not in the manual?
Questions and answers