
Related Manuals for Conbrov DV12


Summary of Contents for Conbrov DV12
-
Page 1: User Manual
MINI SECURITY CAMERA MODEL NO: DV12 USER MANUAL - Please ensure that you read the complete user manual carefully before using any part of the product. - Keep this copy safe for future reference in case of operational questions or difficulties. -
Page 2: Safety Instructions
Safety Instructions Please read the following safety instructions before using the camera: - Ensure that the camera is tested before using it for the first time and confirm that it suits your intended purpose. - We are not responsible for any missing video information due to incorrect or inappropriate operation, Micro-SD malfunctioning or camera angle limits etc. -
Page 3: Product Accessories
Rotating bracket USB cable Manual Neck lanyard Card reader It is important to note that: Please review the product accessories listed above to make sure you received everything. If items is missing, contact us as soon as possible at: support@conbrov.com... -
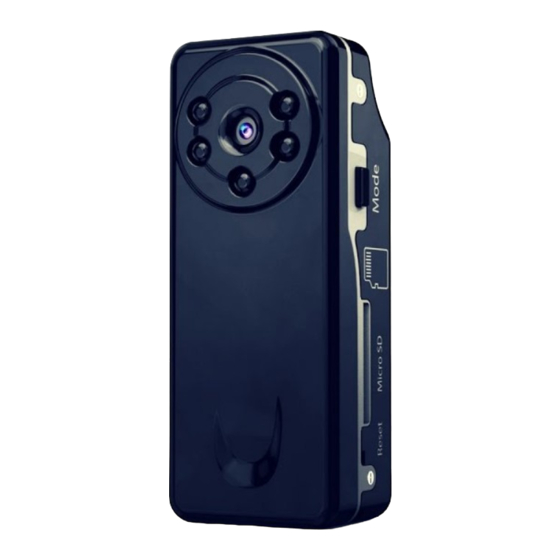
Page 4: Product Design
Product design Lens Power on button USB Port Mode(sound control and motion detection) Micro-SD slot 5 invisible Led light source Reset Micro phone Status indicator Record/Pause Button... - Page 5 How to install or remove the Micro-SD card Loop recording defaulted: automatically overwrites oldest video file with newest Install Micro-SD card Remove Micro-SD card Important notice: - The camera has the ability to record video only when Micro-SD is inserted. - Do not remove Micro-SD when the camera is either powered ON or connected to the computer.
-
Page 6: Charge The Camera
Operation Guide 1.Charge the camera Please charge the camera before using the camera for the first time. Recommended charging time is 1-2 hours for a full charge. A)You can charge the camera by connecting it with a PC usb port or a USB 5v1A charge adaptor. Please make sure the camera is powered off for charging. - Page 7 Operation Guide B)When you power on the camera and connect it to your PC USB port,this means that your camera is in Mass storage mode and PC camera mode. Indicator Status:Yellow and blue indicator are always on and red indicator flash slowly. Yellow&blue indicator stay on and the red indicator flashes C)When you connect the camera to your USB charge adaptor and power it on, this means that your camera...
-
Page 8: Manually Recording
Operation Guide Important Notes: 1.During all the above three modes, the camera is in charging. 2.When camera can not be powered on, please charge the camera. 3.If your camera can not be recognized as a mass storage,pls use the provided card reader to read/copy the recorded files to your computer for playback. - Page 9 Operation Guide Indicator Status: The blue indicator flash 3 times and goes off.Then the camera start to record manually. indicator (No light up when camera is in recording) Saving videos: Briefly press the top record button again to save the video.
- Page 10 Operation Guide 3.Sound activated recording 1)Switching to sound activated recording mode: When the camera is in standby status (blue indicator is on). Briefly press the mode button,the camera will go into the sound activated recording mode. 2)Start recording: When the environmental sound volume is over 60 decibels (dB) which is normal speaking volume, the camera will automatically start to record;...
-
Page 11: Motion Detection Recording
Operation Guide 3)Exit from sound activated recording mode: Briefly press the top record button or mode button while it is in recording.The camera will save the video and go back to the standby status.(Blue indicator is on) Blue indicator 4.Motion detection recording 1)Switching to motion detection recording mode: When the camera is in standby status (blue indicator is on).Briefly press mode button for 2 seconds,the... - Page 12 Operation Guide 2)Start recording: When an object is moving in front of the camera lens, it will detect and start to record automatically. If there's no more motion in 2 minutes, the video will be saved and the camera will turn itself into the next motion detection standby status.
- Page 13 Operation Guide 5.Time modification The camera’s software will automatically create a time file named as SETTIME when the camera is switched on with Micro-SD card installed.The time will be amended to the current time when you open the document and save it. Exit the portable disk and restart the camera and record, new videos recordings will automatically synchronize with the current time.
- Page 14 Operation Guide Important Note: 1.If you didn't find the SETTIMETXT file when you open the Micro-SD card from your computer, Please record a video clip using the camera to activate the card and then try to set the date and time again. 2.The amended date and time will not change unless the battery is drained for long time.
-
Page 15: Detailed Parameters
Detailed parameters Item Parameter Video Format Video compression M-JPEG Playback software on PC Windows media player or others windows xp/Vistar/7; Mac os OS supported 10.4 or above Color-pinhole Camera Lens Focal distance 2.8mm Memory extension supported Up to 32G USB port USB2.0 940nm, 5 pcs only LED TYPE... - Page 16 Indicator Status and their meanings Starting up with SD card Blue light always on Blue light flashes 10 seconds Starting up without SD card and shut down Light off Record mode Red light always on Sound control stand-by Light off Sound control recording Red and blue indicator is on Motion detection stand-by...
Need help?
Do you have a question about the DV12 and is the answer not in the manual?
Questions and answers