Table of Contents
Advertisement
Advertisement
Table of Contents

Related Manuals for Sachs Bikes SAXY 25


Summary of Contents for Sachs Bikes SAXY 25
- Page 1 Your Sachs dealer SACHS uses Sachs Fahrzeug- und Motorentechnik GmbH and recommends Ernst-Sachs-Straße 6 • D-90441 Nürnberg Phone: +49 (0)911 4231 400 • Fax +49 (0)911 4231 332 e-Mail: info@sachs-bikes.de • www.sachs-bikes.de Nr. P00 638 008 00 02 000 2006 05 005...
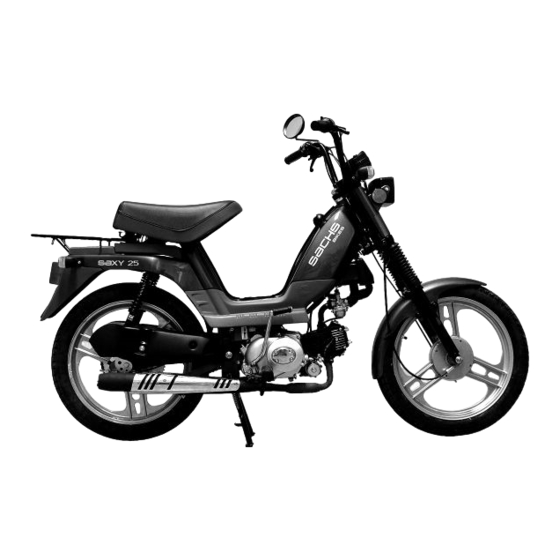
- Page 2 SAXY 25/45 owners manual...
- Page 3 PREFACE Yo u h a v e p u r c h a s e d a S a x y, congratulations and thank you for putting your trust in us. Reprinting, reproduction and translation, This operating manual includes important The Saxy is a sturdy motorcycle in modern even of excerpts, without our express instructions for handling your light motor-...
-
Page 4: Table Of Contents
CONTENTS RIDING INSTRUCTIONS OVERVIEW AND OPERATION Ride safely ................19 Safety symbols ................3 Ride economically and be aware of the environment ..20-21 Side views ................4-5 Running-in instructions ............22 Engine ..................6 Side stand ................23 Handlebar fi ttings ............... 7 Ignition lock ................ - Page 5 CONTENTS NOTES ON MAINTENANCE TECHNICAL DATA Checking steering bearing ............36 Engine ..................48 Checking the telescopic fork and shock absorber ....36 Power transmission ..............49 Removing the front wheel ............37 Chassis ..................50 Installing the front wheel ............37 Lubricants and operating fl...
-
Page 6: Overview And Operation
OVERVIEW AND OPERATION Safety symbols and notes Observe the following: CAUTION NOTE Important instructions and pre cau tion ary Special instructions for better handling WARNING rules to be followed in order to pre vent during operation and inspection and when Precautionary measures against the risk of the motorbike from being dam aged. -
Page 7: Side Views
OVERVIEW AND OPERATION 1 Chassis number and rating plate 2 Fork column lock 3 Kick starter 4 Footrest 5 Battery and fuse... - Page 8 OVERVIEW AND OPERATION Left-hand side view 6 Cockpit 7 Handlebar fi ttings 8 Tank cap 9 Fuel tap 10 Shock absorber 11 Side stand 12 Footrest 13 Main stand 14 Air fi lter housing...
-
Page 9: Engine
OVERVIEW AND OPERATION Engine right-hand side view Engine left-hand side view 5 Spark plug connector 1 Carburetor 6 Electric starter 2 Oil drain plug 7 Footrest right 3 Engine number 8 Oil fi ller cap 4 Footrest left 9 Kick starter 10 Oil level sight glass... -
Page 10: Handlebar Fi Ttings
OVERVIEW AND OPERATION Left-handle handlebar fi ttings Right-handle handlebar fi ttings 1 Handbrake lever rear brake 5 Handbrake lever front brake 6 Throttle 2 Choke lever ( 7 Direction-indicator switch 3 Emergency off switch Switch to the left: Push-button: horn Left indicator on Switch to the right: Right indicator on... -
Page 11: Ignition Lock
OVERVIEW AND OPERATION Ignition-lock Key positions NOTE Activate the parking light only for a lim it ed Ignition off period. Take into account the charge of the battery. Operating position: ignition and all The key can be removed in positions circuits activated Ignition and lights on WARNING... -
Page 12: Cockpit
OVERVIEW AND OPERATION Cockpit Speedometer 1 KM/H -odometer 2 DST - total distance (km) Instrument lights 3 left and right direction indicator green... -
Page 13: Safety Test
SAFETY TEST Checklist Before each ride, carry out a safety – Lights Important notes for the operation with a catalyst. check using the checklist. – Clutch operation The catalyst. is designed for a optimal Take the safety check seriously. Carry out –... -
Page 14: Fuel, Fuel Tank
SAFETY TEST Fuel, fuel tank NOTE The tank cap as well as the steering lock are operated with the same key. Tank cap (1) The fuel-tank cap (1) is designed to allow for ventilation. Do not make any changes to the cap. Opening: - Insert the key, turn to the right and pull out the tank cap. -
Page 15: Fuel Tap
SAFETY TEST Fuel tap CAUTION When you stop the engine, always set the fuel tap to position CLOSE. Oth- er wise, fuel could enter the engine and this could make starting diffi cult or lead to se ri ous engine damage. We cannot be held liable under the guarantee for damage caused by non- observance of this caution. -
Page 16: Engine Oil
SAFETY TEST Engine oil Recommended grade: - 20° -10° 0° 10° 20° 30°40° C CAUTION Per API: SG or higher or also with ad di tion al Do not use additives. Since the oil release status: ACEA A3/96 (CCMC G5). also serves to lubricate the clutch, SAE 10W/30 do not use car engine oils sup ple -... -
Page 17: Checking The Oil Level
SAFETY TEST Checking the oil level - Stop the warmed-up engine, wait for ap- prox. 5 minutes and hold the motorcycle upright. NOTE Make sure that the motorcycle during oil- level checks stands level in all respects. Even the slightest inclination towards the side will produce measurement errors. -
Page 18: Brakes
SAFETY TEST Braking WARNING If the motorcycle is not used for a while, a rust fi lm may form on the brakes and thus increase the braking effect. A thick rust fi lm can cause the brakes to lock When setting out on a ride after a long lay-up period, carefully operate the brakes several times until they work normally. -
Page 19: Drive Chain
SAFETY TEST Drive chain Check the chain tension - Prop the motorbike up on the side stand. - Let the motorbike rear end drop to the limit imposed by the suspension. - Push in the drive chain from the top half way between the sprocket and pinion. -
Page 20: Tyre Profi Le, Tyre Pressure And Size
SAFETY TEST Tyre profi le Tyre pressure Tyre size Checking the tyre pressure The standard motorbike is provided with the following tyre sizes: WARNING Front 2.75-17 Rear 2.75-17 Adjust the tyre pressure according to the total weight load. Never exceed the rated total weight or the bearing capacity WARNING of the tyres. -
Page 21: Load / Lights
SAFETY TEST Load / lights Correctly loaded Checking the lights WARNING - Make sure that the left-right weight dis- For the sake of your safety, use only WARNING tribution is balanced. original Sachs accessories or prod ucts Before any ride, check the operation of - Check that fastenings are correct and released by Sachs. -
Page 22: Riding Instructions
RIDING INSTRUCTIONS Ride safely Your reactions can be adversely af fect ed On smooth, slippery roads take into ac count CAUTION not only by alcohol, but also by drugs and that your riding stability and brak ing power medicines. are limited by the grip of the tyres on the Riding safety is largely also de ter mined road top. -
Page 23: Ride Economically And Be Aware Of The Environment
RIDING INSTRUCTIONS Ride economically and be aware of the environment Turn the engine off when waiting in Fuel consumption, environmental pol lu tion traf fi c. and wear of engine, brakes and tyres de- Different riding conditions affect fuel con- pend on various factors. - Page 24 RIDING INSTRUCTIONS Ride economically and be aware of the environment Fuel consumption is also affected by Observe the following aspects for eco- Low tyre pressure increases rolling re sis - conditions that are out of your control, for nom i cal fuel consumption: tance.
-
Page 25: Running-In Instructions
RIDING INSTRUCTIONS Running-in instructions running-in instructions for engine and Maximum top speed in the individual gears Running-in new tyres during the running-in period: gearbox WARNING CAUTION New tyres have a smooth surface. They Running-in instructions must therefore be roughened by care- Exceeding the running-in speeds incre- 0-500 km Open the throttle control... -
Page 26: Side Stand
RIDING INSTRUCTIONS Side stand Propping up the motorbike on the side stand. WARNING Always make sure that the stand is resting on fi rm ground. On sloping roads, always park the motorbike facing uphill. When you kick the stand in, do not stand within the pivoting arc of the stand. -
Page 27: Starting
RIDING INSTRUCTIONS Starting Before starting - Turn the ignition key (2) to operating position NOTE - Pull and hold one of the handbrake le- Pull and hold one of the handbrake levers vers. to start the engine. - Operate the start button - Put the motorcycle it in a vertical position and let the side stand fould up. -
Page 28: Starting With Kick Starter
RIDING INSTRUCTIONS Starting with kick starter CAUTION CAUTION WARNING Avoid high engine speeds after a cold Do not let the kick starter hit back Never run the engine in closed rooms. start. against the stop. Exhaust gases are highly toxic - danger Fold the kick starter pedal back in after to life! - Shift the cold start lever (CHOKE 1) in... -
Page 29: Starting With Electric Starter
RIDING INSTRUCTIONS Starting with electric starter - When the operating temperature is in- creasing, turn back the CHOKE (1) all the way in the opposite direction to the arrow "A". WARNING Never allow the engine to run in an en- closed space. -
Page 30: Braking
RIDING INSTRUCTIONS Braking Wet brakes Oil and grease WARNING Washing the motorcycle or riding through WARNING Operate the brakes to grind off the salt water or rain can delay the brak ing effect deposited on the brake discs. The brake drums and linings must be due to wet or (in winter) ice-covered brake free of oil and grease! discs and linings. -
Page 31: Braking
RIDING INSTRUCTIONS Braking Brake with care. Locked wheels do not have much braking effect and can lead to skid- ding / crashing. In prin ci ple, do not brake on a curve, but before the curve. Braking on a curve increases the dan ger of sliding. -
Page 32: Stopping The Engine
RIDING INSTRUCTIONS Stopping the engine Steering lock Stopping the engine Safeguard the steering against unautho- CAUTION rized use. - Turn the ignition key to the po si tion Lock: Turn the fuel tap (2) to the OFF po si tion. (1). -
Page 33: Service Instructions
SERVICE INSTRUCTIONS Servicing the motorbike / cleaning agents NOTE WARNING Regular, expert service will help main tain Always carry out a brake test after clean- the value of your motorcycle and is a condi- ing and before starting a ride! tion for guarantee claims for cor ro sion and CAUTION other such damage. - Page 34 SERVICE INSTRUCTIONS Servicing the motorbike / cleaning agents CAUTION Never use paint-polishing agents on plastic parts. - After a longish ride, thoroughly clean the chassis and the aluminium parts and pre- serve them with a com mer cial ly available anti-cor ro sion agent.
-
Page 35: Operation In Winter And Anti-Corrosion Protection
SERVICE INSTRUCTIONS Operation in winter and anti-corrosion protection NOTE Protect the environment by using only en- vironmentally friendly preservation agents, and use them frugally. Use of the motorcycle in the winter can cause considerable damage due to the presence of salt on the roads. CAUTION Do not use hot water, which would in- crease the effect of the salt. -
Page 36: Repairing Paint Damage / Servicing The Tyres
SERVICE INSTRUCTIONS Repairing paint damage Servicing tyres Minor paint damage should be im me di ate ly If the motorcycle is not used for a long er repaired. period, it is recommended to support the motorcycle so that its weight is not on the tyres. -
Page 37: Lay-Up / Commission
SERVICE INSTRUCTIONS Lay-up / commission Lay-up Commission NOTE - Clean the motorcycle. - Remove the preservation agents from the Before laying up the motorcycle, have a outside. - Remove the battery. Sachs dealer change the engine oil. Observe the maintenance in struc tions. - Clean the motorcycle. -
Page 38: Technical Changes, Accessories And Spare Parts
SERVICE INSTRUCTIONS Technical changes, accessories and spare parts For approved Sachs accessories and origi- WARNING CAUTION nal Sachs spare parts, see a specialised Sachs dealer. Technical changes to the mo tor cy cle We recommend using only ap proved He will also ensure that they are pro fes - can lead to cancellation of the EC op er - Sachs accessories and original Sachs at ing license. -
Page 39: Notes On Maintenance
NOTES ON MAINTENANCE Checking the steering bearings Checking the telescopic fork - Pull the hand brake to block the front NOTE wheel brake. The telescopic fork should not jam up when turned and it should swing back lightly to - Now pump the fork girders several times up and down using the handlebar. -
Page 40: Removing The Front Wheel
NOTES ON MAINTENANCE Removing and installing the front wheel - Attach the axle nut (3) and screw tight. Torque Axle nut (3): 35-45 Nm - Install speedometer shaft (1). - Hook up control cable and readjust brake (refer to adjusting the front wheel brake). -
Page 41: Removing The Rear Wheel
NOTES ON MAINTENANCE Removing and installing the rear wheel Installing - Clean and grease the full fl oating axle (2). - Introduce full fl oating axle (2), chain adjuster (4), brake support (7) with brake caliper into rear suspension. - Install the drive chain (6). - Install rear wheel with spacer bushes (8 and 9) and full fl... -
Page 42: Adjusting The Front And Rear Brake
NOTES ON MAINTENANCE Adjusting the front and rear brakes Adjustment: - Slacken the lock nut (2) on the handle- bar. - Turn setscrew (3) accordingly. - Tighten lock nut (2). - Check the play. - After this measurement is attained, the brake shoes should be heard brushing against the brake drum. -
Page 43: Checking, Adjusting The Drive Chain
NOTES ON MAINTENANCE Checking and adjusting the drive chain 30 - 35 mm SFM 649 033.1 Let the rear end of the motorbike drop Adjusting the chain Checking the chain for wear to the suspension limit. CAUTION CAUTION Push in the drive chain up half way It is essential to have the tightening The adjustment of the chain infl... -
Page 44: Cleaning The Air Fi Lter
Clean Drench in air fi lter oil... -
Page 45: Cleaning The Fuel Fi Lter
NOTES ON MAINTENANCE Spark plug Cleaning the fuel fi lter 0,7 - 0,8 mm Check and change - Insert new spark plug NGK CR7 HSA NOTE and tighten up. We recommend to have the fuel fi lter (1) CAUTION cleaned by a Sachs-dealer. Torque 20 Nm. -
Page 47: Battery
NOTES ON MAINTENANCE Battery Charging the battery WARNING FIRST AID After a long lay-up (3-4 months), charge the Always wear safety glasses. If acid comes into contact with an eye, im- battery. The charging current (in amperes) Keep children away from acids and mediately fl... -
Page 48: Battery
NOTES ON MAINTENANCE Battery - Open the seat (3). - Disconnect the rubber band (4) on the barttery case. - Remove the battery. Installation takes place in reverse order to disassembly. Removing and installing the battery CAUTION The battery may only be connected or disconnected while the ignition is inactive. -
Page 49: Changing The Bulbs
NOTES ON MAINTENANCE Headlight Tail / brake light Changing the bulbs NOTE Use only tested, incandescent bulbs with the ‘E’ designation. Use of non-approved bulbs will void the operating license. Do not touch the bulbs with bare fi ngers. Hold bulbs with a clean, dry cloth when installing or re mov ing them. -
Page 50: Adjusting The Headlight
NOTES ON MAINTENANCE Adjusting the headlight - Activate the dipped beam. - Use the adjusting screws (1) on both sides to adjust the angle of the asymmetrically illuminated surface area of the road top. - Release srews (1) adjust and tighten NOTE If you have problems adjusting the head- lamps, see a specialised Sachs dealer. -
Page 51: Technical Data Engine
TECHNICAL DATA Engine Engine type: FY139FMB-B Design: Single cylinder 4-stroke petrol engine Valve control: 1 overhead cam with rocker arms Valves: 2 valves Valve clearance, cold: Intake + exhaust 0.05 mm - 0.08 mm Displacement: 49.5 cm Bore: ø 39 mm Stroke: 41.4 mm Compression ratio:... -
Page 52: Power Transmission
TECHNICAL DATA Power transmission Clutch: Multi-disk automatic splashing oilclutch Gear shifting: 2- gear transmission with permanent engagement Gear ratios: 1. Gear = 36/11 (3,273) 2. Gear = 31/16 (1,938) Primary: 4,059 Drive pinion: 11 teeth Sprocket: 45 Version: 48 teeth / 25 Version: 60 teeth Drive chain:... -
Page 53: Chassis
TECHNICAL DATA Chassis Motorbike version: Type 638 Frame: Steel- tankframe Front suspension: Telescopic fork ø 37 mm, spring travel 110 mm Rear suspension: Shock absorbers, spring travel 48 mm Wheels: Light metal (Alu) Front rim size: = 1,50 x 17“ Rear rim size: = 1,50 x 17“... -
Page 54: Lubricants And Operating Fl Uids
TECHNICAL DATA Lubricants and operating fl uids Fuel tank capacity: 6.5 litres, incl. 1.0 litres reserve Fuel: Unleaded fuel min. 91 octane Engine oil: SAE 15 W 40 mineral oil API (SG or higher) Filling quantity: 0.7 litres... -
Page 55: Electrical Equipment
TECHNICAL DATA Electrical equipment Generator: 12 V 60 W Battery: 12 V 3 Ah MF Fuse: 15 A Lights: - Headlight: Low beam 12V 15W - Instrument lights: Direction-indicator 12V 3W Cockpit 12 V 3W - Brake/tail light: 12 V 21/5W - Turn signal light: 12V 10W... -
Page 56: Dimensions And Weights
TECHNICAL DATA Dimensions and weights Overall length: 1795 mm Width across handlebars: 630 mm without rear view mirror Maximum height: 1125 mm without rear view mirror Wheel base: 1190 mm Seat height: 845 mm Weight empty: 79 kg Weight in running order: 83,5 kg Max. -
Page 57: Warranty Conditions
WARRANTY Warranty conditions In case of an occurring fault the company then entitled to legal claims. Replaced tomer must present the correctly fi lled in Sachs Fahrzeug- und Motorentechnik parts pass over into the possession of service book to the seller. GmbH will provide the customer with the Sachs Fahrzeug- und Motorentechnik 6. -
Page 58: List Of Wear Parts
WARRANTY List of wear parts Wear parts Wear limits Tires, hoses, rims depending on riding style, load and tire pressure the wear limit may already be reached after only 1000 km or even earlier. Wheels, hubs depending on riding style, load and tire pressure the wear limit may already be reached after only 2500 km or even earlier. - Page 59 WARRANTY List of wear parts Wear parts Wear limits Cleaning and lubrication of drive chain according of use and of every washing. Drive chain, pinion, sprocket wheels, depending on road conditions / ground and care, a wear is possible after 1500 km. chain guidance, chain pulley Do not wash with high pressure cleaner! Control during every maintenance.
-
Page 60: Inspection Plan
INSPECTION PLAN Please observe the following: WARNING CAUTION - During and after the warranty period all For safety reasons, do not carry out any inspections should solely be performed In case of non-compliance the warranty repair or adjustment activities to the by a specialised dealer approved by us. - Page 61 INSPECTION PLAN Component Servicing Tasks Before 1st service Every Every Assembly (*Only by an authorised Sachs dealer) each after 4.000 km / 8.000 km / trip 1000 km 4 months 8 months Valves Check and adjust valves if necessary (cold)* Spark plug Check condition and accordingly clean or replace Replace...
-
Page 62: Inspection Plan
INSPECTION PLAN Component Servicing Tasks Before 1st service Every Every Assembly (*Only by an authorised Sachs dealer) each after 4.000 km / 8.000 km / trip 1000 km 4 months 8 months Rear suspension Check, retighten, replace if necessary or lubricate* Every 24.000km / 2 Years Tyres Check gereral condition and profi... -
Page 63: Maintenance Confi Rmation
MAINTENANCE CONFIRMATION Workshop activities carried out Workshop activities carried out Activities carried out date Activities carried out date... - Page 64 MAINTENANCE CONFIRMATION Workshop activities carried out Workshop activities carried out Activities carried out date Activities carried out date...
- Page 65 MAINTENANCE CONFIRMATION 1.000 km/1 months 4.000 km/4 months After 8.000 km/8 months After 12.000 km/12 months service dealer stamp: dealer stamp: dealer stamp: dealer stamp: km ........km ........km ........km ........date......... date......... date......... date......... After 16.000 km/16 months After 20.000 km/20 months After 24.000 km/24 months After 28.000 km/28 months...
- Page 66 MAINTENANCE CONFIRMATION After 32.000 km/32 months After 36.000 km/36 months After 40.000 km/40 months After 44.000 km/44 months dealer stamp dealer stamp dealer stamp dealer stamp km ........km ........km ........km ........date......... date......... date......... date......... After 48.000 km/48 months After 52.000 km/52 months After56.000 km/56 months After 60.000 km/60 months...
-
Page 68: Motorbike Data / Rating Plate
Rating plate (Sample): Motorbike data (Fill in on purchase) Model designation: ............Sachs Fahrzeug-und Motorentechnik GmbH Vehicle identity No: ............(Chassis No.) e1-0265*00 WSF 638A1050000101 Key No.: ......................4250 min — d B ( A ) EC-approval: ............Owner: ............
Need help?
Do you have a question about the SAXY 25 and is the answer not in the manual?
Questions and answers