Table of Contents
Advertisement
Quick Links
Advertisement
Table of Contents

Subscribe to Our Youtube Channel
Related Manuals for Sigma x-treme PQ24


Summary of Contents for Sigma x-treme PQ24
- Page 1 X-treme PQ24 Smartphone User manual...
-
Page 2: Table Of Contents
Dear Client! Thank you for purchasing Sigma mobile product! Please read this manual before using the device to ensure safe and proper use and prevent it from damages. Software, design features and content of manual may be changed to improve the product without a prior notice. - Page 3 1.3 Remove and install the battery ............... 12 2. Basic Operation ....................13 2.1 Power On/Off the Phone ................13 2.2 Screen locking and unlocking ..............13 2.3 Touch methods ..................14 2.4 Query of IMEI number ................15 2.5 Main Keys ....................15 2.6 Screen sleep and wake-up ...............
- Page 4 4.1 New contact ....................20 4.2 Backup Contacts ..................21 4.3 Edit or delete contact ................21 4.4 Add contact into list of favorites ............. 21 4.5 Delete favorite contact ................21 4.6 Use contact group function ..............21 5. Message ......................22 5.1 SMS ......................
- Page 5 13.2 Device ...................... 43 13.3 Personal ....................44 13.4 System ..................... 45 14. System update ....................47 15. Play Store....................... 47 Common Problems & Solutions ................. 50 Package Contents: Smartphone Sigma mobile X-treme PQ24 Network charger USB-cable Headset...
-
Page 6: Specifications
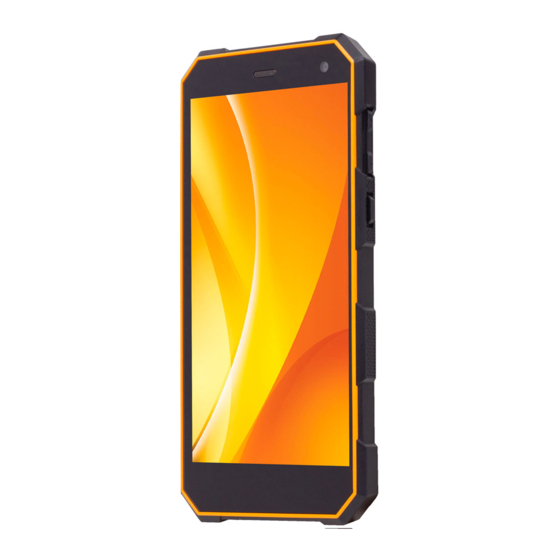
Manual Warranty Card Size: 147*76*14 mm, weigh: 217g The manufacturer reserves the right to change complement, specifications and appearance. Specifications OC ANDROID 5.1 Popular operating system for smartphones, the ability to install applications. Screen 5” resolution 1280*720. МТК6580, 4 cores to 1.3 GHz*. Camera 8 Megapixel on the back and 2 Megapixel on the front side of device to take photos and record video. -
Page 7: Safety Information
Safety Information Safety Specifications and Instructions for Battery of Mobile Phone Recommended Use Considerations ·Before the use of battery, please carefully read this operation instruction and the battery surface mark. · During use, the battery shall be away from the heat source and the high pressure, and the children shall be prevented from playing batteries. - Page 8 Forbid to penetrate into the battery with the metal, beat or knock the battery or damage the battery by other means, otherwise it will may cause battery heating, smoking, distortion or burning, even result in danger. ·Do not use the battery for other devices The improper service conditions will damage the battery performance and reduce the service life, even cause battery heating, smoking, distortion or burning.
-
Page 9: Important Instructions
·Place the mobile phone and all parts at the place that the children cannot touch. ·Do not store the mobile phone at the high temperature place. High temperature may shorten the service life of the electric device, damage the battery, distort or melt some plastic parts. - Page 10 time as far as possible. Pay attention to radiated interference When using the mobile phone, keep the mobile phone away from the article or instrument susceptible to interference as far as possible. We suggest that you should be 2.5 CM away from the antenna when using the mobile phone. Pay attention to the interference with the medical facilities Some medical instruments may be interfered when the mobile phone is used.
-
Page 11: Introduction
Introduction 1.1 Insertion and removal of SIM Card Turn off the phone, open the left upper cover. With a thimble inserted the card slot inside the round hole. Remove the card seat. Fit SIM card to the SIM seat, with the metal surface downward and the edge and corner of the card fitting with the card slot. -
Page 12: Insertion And Removal Of Memory Card
Tips: SIM does not support hot plug. Do not remove SIM in standby mode for fear of damaging SIM card. 1.2 Insertion and removal of Memory Card Turn off the phone, open the left upper cover. With a thimble inserted the card slot inside the round hole. -
Page 13: Basic Operation
and the computer connection. If the battery power of your mobile phone has been fully used up, it may be impossible to charge the mobile phone through USB data connecting line. At this time, you should use the charger to charge the mobile phone. Basic Operation 2.1 Power On/Off the Phone Long press the power key to turn on/off the mobile phone. -
Page 14: Touch Methods
towards the upside to enter the unlocking pattern when being turned on each time. If you want not to enter the unlocking pattern, please change the screen locking in “Set→security”, enter the unlocking pattern, and then click None. Set screen locking→password. 1. -
Page 15: Query Of Imei Number
zoom in or out. 2.3.6 Quick slide When you select the contact in the list through the scroll bar, the quick slide of the touch screen can be rapidly realized. When you quickly slide a long column of contacts, click the screen to stop sliding. -
Page 16: Main Screen
mode, enter Set→Display→Sleep. 2.7 Main screen The main screen can be scrolled on the left and right, the applications such as shortcut and widget can be customized and added. 2.7.1 Add items to main screen Customize the main screen by adding applications, widgets, folders and shortcut keys for applications or items. -
Page 17: Phone Operating Status
2.9 Phone Operating Status network signal Down Load strength GSM network using Full battery power Battery charging Mute Mode WLAN signal strength Open portable WLAN Headset is plugged in Off-line mode New Message Alarm clock is set Calling Missed Call 2.10 Management notice The top status column of the home screen shows new messages, emails, calendar... -
Page 18: Dial
events, alarm clock, and the on-going activity (e.g. calling). 3. Dial 3.1 Dial pad: Main menu→Dial or click dial key 3.1.1 Click and press the keys on the dial pad to enter the phone number. If you enter the wrong number, click to clear the figures one by one;... -
Page 19: Refuse Via Message
Slide the icon leftward on the incoming call interface to to refuse the call. 3.4 Refuse via message Slide the icon downward on the incoming call interface to , to refuse the call and send a message of refusal reason. 3.5 Hold a call Click the wait icon during the call. -
Page 20: Call Records
3.9 Call records The call records include your all dialed calls, received calls or missed calls. Main menu→Dial→Call records 1. Press the right item, and click the “Call Back” at the bottom to call back. 2. Press the right item, and click the “Details” at the bottom to see the details of the number and do other work. -
Page 21: Backup Contacts
4.2 Backup Contacts Main menu→Contacts→Press the option menu on the right upper corner→Import/Export→Pop up import/export contact box, select to be exported to SD/SIM card, and determine to export. Note: Backing up contacts requires memory card in the phone. 4.3 Edit or delete contact Main menu→Contacts Click the required contact, press edit key to modify the contact, and then click OK on the upper left corner. -
Page 22: Message
to view or manage your groups. 4.6.2 Add group 1. Open the contact group interface. 2. Click the group icon in the upper right corner-Add Group to add group. 3. Name the group and click OK. 4.6.3 Add members to a group 1. -
Page 23: Mms
5.1.1 Send SMS 1. Open the Message and view the message list. 2. Click the Create Message icon at the lower right corner of the screen to write a new message. 3. Enter the phone number of the receiver into the receiver box,or select receiver from the contacts list by clicking the icon on the right. -
Page 24: Transfer Message
5.4 Transfer Message 1. Open the Message and view the message list. 2. Directly click the message to be transferred to open it. 3. Press and hold the message to be transferred, and click Menu→Message Details from the popping Message Options bar. 5.5 Delete Message 5.5.1 Delete all messages from and to a contact 1. -
Page 25: Read Email
Click Email on the main menu interface to open it and set your 6.1.2 email account. Enter your email address and password, and click Next button. 6.1.3 Then the system will connect with the server and inspect the server settings automatically, or you can manually set the server. Set email check frequency, default account, email notify, etc., and 6.1.4 click Next button. -
Page 26: Add Email Account
6.4.5 Click the upper left icon->Set. 6.4.6 Click the email account you have set. 6.4.7 Click Signature. 6.4.8 Enter your desired signature and click OK. 6.5 Add email account 6.5.1 Click Email on the main menu, to enter the Inbox. 6.5.2 Click the upper left icon->Set->Add account. - Page 27 1. When you enter the Chrome browser for the first time, enter the “Welcome to use Chrome” interface. Once the application is used, it means that you agree to and have the right to use the “service terms” and the “privacy statements” of Chrome. As required, check “Send usage statistics and crash reports to Google so as to help us to perfect Chrome”.
- Page 28 3. Display the collected bookmarks on the home page, click to view the saved bookmarks and the mobile device bookmarks; click to view tab histroies opened and closed recently as well as infromation related to other equiopment. Note, please log in Chrome for the other equiopment.
-
Page 29: Music
8. Music You can enjoy music saved in your phone or SD card via the music player. 8.1 Copy audio document to your phone 1. Connect your phone with computer via USB cable. 2. When USB setting interface pops on your phone, select mount SD card. 3. - Page 30 1. Open the music application and view audio document list. 2. Select the music documents to be added to the playlist, press and hold it until a shortcut menu pops up. 3. Click Add to Playlist. 4. Click Create Playlist. 5.
- Page 31 Fast forward/Rewind Press and hold View playlist Click and Press Shuffle Click and Press Repeat Click and Press Sound effect Click and Press Volume Press volume upward or downward 8.7 Hide, activate and turn off the music player Press the home button can hide the music player, and using other application can continue you music playing.
-
Page 32: Video
9. Video You can open video documents to enjoy wonderful videos if any in your phone. 9.1 View video Click Video button in the main menu interface to open the video library. The Video application can show any video in SD card or your phone, including those shot by your camera or downloaded from internet or other devices. - Page 33 camera mode at the top of the icon, at the bottom right corner, you can choose the flashlight mode, and switch camera mode. Touch the preview area can be adjusted to focus. As shown in figure:...
- Page 34 2. Camera mode is default. You can select from the bottom of the screen to switch to shooting mode. 3. Aim the camera at the target location/object. 4. Click to take a picture. Thumbnail of the latest photo you take is shown at the lower right of the screen. Press the thumbnail to view the photos.
- Page 35 ·Select Share, to share the video via message, Bluetooth, email, etc. ·Press the Menu button, select Delete, to delete the video. ·Press the Menu button, select Prune, to cut the video. ·Press the Menu button, select Mute, then the video will be saved into the camera and will be mute when being played.
- Page 36 10.4 Set Camera Shooting Mode Click to enter the camera setting mode, you can according to your needs for camera exposure, effects, shooting and other settings. As shown:...
-
Page 37: Picture Library
11. Picture Library You can open the picture library to view your pictures album. 11.1 View picture album Click Picture Album from the main menu and view the picture album. The picture album can show pictures in SD card or the phone, including the pictures you take by the camera and download from internet or other devices. - Page 38 11.2.1 View and browse pictures 1. Click the picture library to open it and view picture album. 2. Click an album in the list to open it, and then the pictures in the album will be shown in the thumbnail format. 3.
-
Page 39: Other Applications
others via message, Bluetooth, email and other third party. Other Applications 12.1 Clock 1. Enter the Clock from the main menu, and click the clock icon, to enter the clock setting interface. 2. Select the existing clock in the list to enter the editing interface, or click Add Clock at the bottom of the screen to enter the editing interface. -
Page 40: Stop Watch
folders to share, copy, delete, cut, rename and other operations. You can also reordered folder by name, size or date. 12.5 Stop watch 1. Click Clock in the standby interface and select stop watch. 2. Click the start icon for timing. 3. -
Page 41: Radio
12.8 Radio Enter Radio from the main menu(it is necessary to fit in the earphone as antenna for operating the radio). 1. Click to turn off or turn on the radio. 2. Click to turn on or turn off the loudspeaker. 3. -
Page 42: Settings
13. Settings You can use Set Application Configuration to set parameters of the phone. Click Set from the main menu. 13.1 WLAN and internet WLAN a. Click WLAN to enter WLAN interface, and then slide Switch On/Off WLAN b. After switch on WLAN, you can view WLAN connections nearby, and after you log in a WLAN account, you can connect you phone to internet via the WLAN. -
Page 43: Device
Switch on/off the flight mode by sliding left/right the Switch. B. Default short message application The default short message application is message. C. Network sharing and portable hotspots After entering the Network Sharing and Portable Hotspots interface, you can use the phone as a portable WLAN hotspot, to share your data connection with several devices simultaneously. -
Page 44: Personal
changes after the Screen Luminance is switched on.. Hibernate: delay before auto screen lock. Interactive screensaver: set screensaver. Font size: set font size. Auto-rotate Screen: rotate screen contents to keep current direction. 2. Warning tone and notice In this interface, you can set sound of the device. 3. -
Page 45: System
C. SIM card lock mode Set SIM card lock: switch on or off SIM card lock, and change SIM card and PIN code. D. Password Display password: select to display or hide the password. E. Device management Set Manager: add or delete device manager. Unknown source: allow applications not from the non-market to be installed. - Page 46 Set date and time. a. Automatically confirm date and time: automatically confirm date and time based on internet data, and can be switched on/off. b. Automatically determine the time zone: use the time zone provided in the network (supported in the network) to support opening/closing. c.
-
Page 47: System Update
Kernel version: version of the kernel of the phone. Version number: the software version number of the phone. Custom version: display the custom version. 14. System update You can update your phone version via this function Note: using this function requires internet connection. 15. - Page 48 Click to install the selected software, application permissions in the popup choose to accept, the phone automatically starts to download the software, if you want to cancel the download, click next to the download progress bar. After the download is complete, click Open, you can start to apply your newly downloaded this software:...
-
Page 50: Common Problems & Solutions
In the Play Store homepage, click the menu key to bring up the following menu: Select "My apps", you can view your "Installed application" and "All apps", you can also reset accounts, notifications, auto-updating applications, password, etc. Other Google services, such as: Gmail, Google set, Google Talk, will need to apply for Google account, after landing Google services in order to properly use Google related services. - Page 51 Using the mobile phone in the call dense period, such Try to avoid as commute time, line congestion caused by the inability of the calls. Can ask Internet service Associated with the launch providers provides service of the base station network area map built near and far Due to poor network trunk,...
- Page 52 network service area. supplier the service area. Please move to the strong The signal is weak signal place to retry set up the call barring cancel the call barring function function Calls unable to call fixed dial cancel fixed dial function function.
Need help?
Do you have a question about the x-treme PQ24 and is the answer not in the manual?
Questions and answers