Table of Contents
Advertisement
Hamax ID: 10244 Rev 010 14052013
User manual Caress
Hamax AS
Visiting address:
Vålerveien 159
N-1599 Moss
Norway
Tel.: +47 69 23 38 38
email: customerservice@hamax.no
www.hamax.com
User
Manual
Caress
EN
Important!
FR
Important!
PL
Ważne!
DE
Wichtig!
PT
IMPORTANTE!
NO
Viktig!
RO
Importantă!
CZ
Důležité!
RU
важно!
DA
SE
Vigtigt!
VIKTIGT!
ES
¡Importante!
SK
Dôležité!
FI
TÄRKEÄÄ!
BG
Важно!
HU
FONTOS!
TR
Önemli!
IT
IMPORTANTE!
UA
Важливо!
NL
BELANGRIJK!
BIKE FRAME TUBE
OK!
NOT OK!
Ø = 28 - 40mm
NOT OK!
NOT
OK
OK
EN
User Manual
Congratulations on purchasing the Hamax bicycle child seat. You now have
a comfortable and safe child seat that can be adjusted to fit your child as
she/he grows.
Please read the instructions carefully before assembling or using the child
seat.
Keep these instructions in a safe place as they will be useful if you later
buy extra equipment for your child seat.
INSTAllATION
•Check there are no sharp objects, such as split
• Can be mounted on bicycles with frame tube
wires, on the bicycle that can harm the child.
diameters from 28-40 mm.
• Ensure that the restraint system is not loose or
• Cannot be mounted on bicycles with oval or
able to become trapped in any moving parts
square down tubes.
particularly the wheels, including when the
• Cannot be mounted where the luggage carrier
cycle is ridden without a child in the seat.
is wider than 160 mm.
• Always use the safety belt/restraint system,
(Note that the luggage carrier can be removed
ensuring the child is restrained in the seat.
before fitting the child seat.)
• A child sitting in a child seat should be dressed
• Cannot be mounted on cycles fitted with shock
more warmly than the rider.
absorbers.
• The child should be protected against rain with
• Can be fitted to bikes with and without a
suitable waterproof garments.
luggage carrier. If you are in any doubt that the
• Remember to put the child's helmet on
seat will fit, we recommend you seek
before starting your bicycle trip.
information from the bicycle's supplier.
• Remember that the child seat can get very hot
• The seat must only be mounted on a bicycle
standing out in the sunshine, so check the child
which is suitable for this kind of load. Please
seat before placing your child in it.
ask your bicycle supplier for detailed advice.
• When transporting the bicycle by car (outside
• Make sure the bracket screws are well
the car) remove the seat. Air turbulence might
tightened and check them at regular intervals.
damage the seat or loosen its fastenings to the
• The child seat is fitted on the frame tube of the
cycle, which could result in an accident.
bike with the bracket (7). See picture E. The
screws must be tightened hard enough to fix
WArNINgS
the seat securely and prevent it from sliding.
• Warning: Do not attach extra luggage or
Make it a rule to check this before starting a
equipment to the child seat, as this could lead
trip with the bike.
to the total load exceeding 22 kg. We
• For optimal comfort and safety of the child,
recommend that extra luggage is attached at
ensure that the seat does not slope forwards,
the front of the bicycle
so that the child does not tend to slide out of it.
• Warning: Do not modify the child seat. This will
Hamax recommend that the backrest should
automatically invalidate the guarantee and the
slope backwards slightly.
manufacturer's product liability will lapse.
• Check all parts of the bike that they function
• Warning: Be aware that the load of a child in
correctly with the bicycle seat mounted.
the child seat may alter the bicycle's stability
and handling characteristics, particularly when
USE
steering and braking.
• To take a child on a bicycle, the rider must
• Warning: Never leave the bicycle parked with a
normally be over 16 years. Check your national
child in the seat unattended.
laws and regulations.
• Warning: Do not use the seat if any parts are
• The child seat is approved for children from
broken.
about 9 months to 6 years or maximum 22 kg
• Cover any exposed rear saddle spring.
weight. Ensure that you re-check from time to
MAINTENANcE
time that the child's weight and size do not
exceed the maximum capacity of the seat.
• When cleaning the seat, use only lukewarm
• Do not carrying a child that is too young to sit
soapy water.
safely in the seat as regarding minimum age of
• If the child seat is involved in an accident or
the child. Carry only child that are able to sit
are damaged, contact your dealer to check that
unaided for a longer period of time, at least as
it can still be used. Damaged parts must
long as the intended bicycle journey.
always be replaced. Contact your dealer if you
• Ensure that it is not possible for any part of
are not sure how to fit the new parts.
the child's body or clothing to come into
contact with any moving part of the seat or
Tip! With an extra bracket you can easily move
cycle and to re-check as the child grows, due to
one seat between two bicycles.
the danger of entrapment of feet in the wheel
and of the finders in brake mechanisms and
We wish you and your child many enjoyable
sprung saddles. The child seat gives good side
bicycle trips with your Hamax child seat!
and feet protection. However, you are
recommended to buy and fit a closed wheel
Best regards from us at Hamax.
guard/chain guard. You can buy this at your
bicycle dealer.
Advertisement
Table of Contents

Subscribe to Our Youtube Channel
Related Manuals for Hamax Caress


Summary of Contents for Hamax Caress
- Page 1 User Important! User Manual Important! Ważne! Congratulations on purchasing the Hamax bicycle child seat. You now have Manual Wichtig! IMPORTANTE! a comfortable and safe child seat that can be adjusted to fit your child as she/he grows. Viktig! Importantă! Důležité! важно!
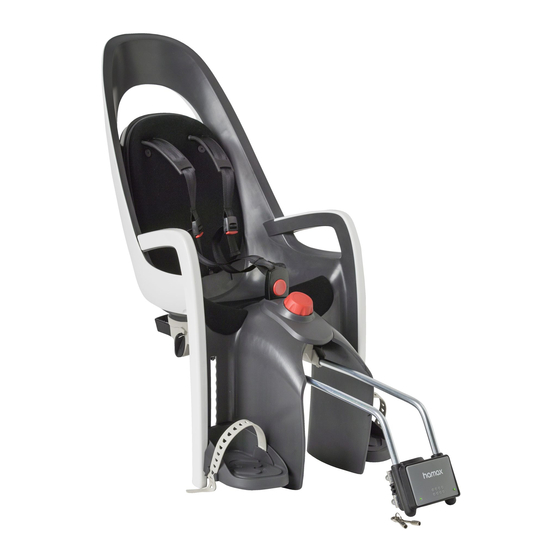
- Page 2 CARESS 1. Siège principal 1. Sæde 2. Système de harnais 2. Fastspændingssystem 3. Dossier coulissant 3. Forskydeligt ryglæn 4. Fermeture de ceinture 4. Bæltelås 5. Supports de pieds 5. Fodstøtter 1. Main seat 6. Arc porteur 6. Bærebue 7. Étrier de fixation complet 7. Komplet monteringsbeslag 2. Restraint system a) Étrier a) Beslag 3. Sliding backrest b) Sangles métalliques b) Metalbånd c) Vis de fixation c) Fastgørelsesskruer 4. Belt lock d) Indicateur de sécurité...
- Page 3 1. Seggiolino principale 1. Scaun principal 2. Cinture di sicurezza 2. Sistem de fixare 3. Schienale scorrevole 3. Spătar glisant 4. Fibbia 4. Dispozitiv de blocare centură 5. Poggiapiedi 5. Suport pentru picioare 6. Staffa di sostegno 6. Bară de sprijin 7.
-
Page 4: Fr Manuel De L'utilisateur
- Avertissement : N’attachez pas de baga- et qu’il ne puisse glisser hors du siège. ges ou d’équipements supplémentaires au Hamax recommande que le dossier soit siège pour enfants, puisque cela pourrait légèrement incliné vers l’arrière. faire augmenter le poids au-delà des 22 - Vérifiez que tous les composants de la bi-... -
Page 5: Maintenance
Gratulerer med kjøpet av barnesetet fra Hamax anbefaler at ryggstøtten bør Nehmen Sie nur ein Kind mit dem Hamax til sykkelen din. Du har nå helle litt bakover. INSTALLATION Fahrradkindersitz mit, dass darin längere et komfortabelt og sikkert barnesete •... -
Page 6: Cz Návod K Použití
- Upozornění: Nepřipojujte další cyklosedačky Hamax. Pořídili jste si utaženy dostatečně silně, aby držely zavazadla nebo zařízení do dětské Srdečně vás zdravíme my v Hamax. pohodlnou a bezpečnou dětskou sedačku bezpečně a zabránily jí ve sedačku, kterou lze upravovat podle sklouznutí. -
Page 7: Es Manual Del Usuario
Si tiene dudas sobre si el asiento va a correctamente asegurado en el asiento. adicional, le resultará muy fácil infantil Hamax para bicicleta. Se trata encajar bien, le aconsejamos que se - El niño que vaya sentado en el asiento desmontar el asiento y montarlo en de un cómodo y seguro asiento infantil... - Page 8 Kuljeta istuimessa mikään sen osa on rikkoutunut. gyermek kicsúszik az ülésből. kerékpár elejéhez rögzítse. A Hamax azt ajánlja, hogy a háttámla - Vigyázat: Ne változtassa meg a vain lasta, joka kykenee istumaan Peitä kaikki näkyvissä olevat legyen kissé hátrafelé megdöntve.
-
Page 9: Installazione
- Het kinderzitje wordt met de beugel (7) op - Gebruik altijd de veiligheidsriemen of het Hamax consiglia di fare in modo che lo het kader van de fiets gemonteerd. Zie fi- harnassysteem om u ervant te verzekeren schienalesia leggermente reclinato. -
Page 10: Pt Instruções De Utilização
- Uwaga: Nie dołączać do fotelika rowerowych z fotelikiem Hamax! przydatna w razie nabycia Hamax zaleca, aby oparcie było lekko dodatkowego bagażu lub wyposażenia, dodatkowego wyposażenia fotelika. przechylone do tyłu. gdyż może to spowodować... - Page 11 şi că nu poate fi blocat în A Hamax recomenda que a cadeira se adequado. - Nu poate fi montat pe biciclete componentele mobile, în special ale incline ligeiramente para trás.
- Page 12 Grattis till ditt köp av en cykelbarnsits fungerar som de ska när barnsitsen är тормозной механизм или в гнездо - Не может устанавливаться на från Hamax. Nu har du en bekväm och monterad. пружины. Кресло обеспечивает велосипеды с овальной или квадратной...
-
Page 13: Bg Ръководство За Потребителя
- Varning: Lämna aldrig cykeln parkerad celkového zaťaženia 22 kg. dvoma bicyklami. med ett barn i barnsitsen utan uppsikt. Vänliga hälsningar från oss på Hamax. Odporúčame batožinu pripojiť k prednej Želáme vám a vášmu dieťaťu - Varning: Använd inte barnsitsen om starne bicykla någon av delarna är trasig. -
Page 14: Tr Kullanım Kılavuzu
дитячого велосипедного крісла - Не можна встановлювати на - Завжди використовуйте ремінь додаткову кріпильну скобу. Hamax. Тепер у Вас є зручне й велосипеди з амортизаторами. безпеки / систему фіксації, що безпечне дитяче крісло, що може - Можна встановлювати на велосипеди... - Page 15 Çocuk koltuğu, çocuğun yan kısmının ve ayaklarının korunmasını Hamax çocuk koltuğu ile size ve sağlar. Ancak yine de, kapalı çamurluk / çocuğunuza keyifli yolculuklar zincir kapağı satın alarak takmanız diliyoruz.
- Page 16 Remove the transportation lock CARESS Press the front of the mounting bracket (7) to release the bracket from the transportation pins (13). Remove the transportation pins. The transportation pins (13) are recyclable. PRESS Appuyez sur la partie frontale de Presione en la parte delantera del Nacisnąć...
- Page 17 Remove shop display strap & protective foamblock CARESS Remove the shop display strap (11) by pulling up the edge over the top of the strap, as shown in pic. 1. Remove protection foam block (12) (pic. 3) from the back. Both the shop display strap and protection foam block are recyclable.
- Page 18 Remove locking pin & seperate extra footguard CARESS Turn the seat (1) upside down. Turn the eccentric shaft (8) clockwise before you pull the eccentric shaft completely out. The footguards (10) will be used later. zoom Retournez le siège (1). Tournez la Käännä...
- Page 19 Mount the carrier bar to the seat CARESS Insert the carrier bow (6) through the holes as shown below. Insérez l’arc porteur (6) dans les Voer de draagboog (6) door de trous comme illustré ci-dessous. gaten zoals hieronder weergegeven. Stecken Sie den Trägerbogen (6) Przesunąć...
- Page 20 Insert locking pin CARESS D1) Locked D2) Unlocked Insert the eccentric shaft (8) through the holes under the seat base, keeping it in unlocked position to allow final adjustment later on. zoom Insérez la goupille de verrouillage Pase el pasador de cierre (8) por Wkładamy bolec blokujący (8) w...
- Page 21 Fastening bracket Aseta kiinnityspidike (7a) pyörän Puneţi suportul de fixare (7a) pe runkoputken päälle. Ruuvaa pidike ţeava cadrului bicicletei. Montaţi suportul CARESS paikalleen metalliliuskoilla ja cu benzile metalice/şuruburile de fixare kiinnitysruuveilla (7b+c). Älä kiristä (7b + c). Nu strângeţi complet astfel kokonaan niin, että...
- Page 22 Gør det til en regel at tjekke og, hvis nødvendigt, efterspænde folgenden Anordnung festziehen (leicht anziehen und anschließend festziehen): beslaget før hver cykeltur. CARESS Das empfohlene Anzugsmoment beträgt Introduzca los extremos de la 10 Nm. Es handelt sich dabei jedoch barra portadora (6) por el soporte (7a) Guide the carrier bow ends (6) lediglich um eine Empfehlung.
- Page 23 magasságra úgy, hogy kb. 10-12 cm Het aangeraden aanspankoppel is 10 folosirii, continuaţi să strângeţi până Zaveďte konce oblúka nosiča (6) legyen a hátsó kerék/sárhányó/ Nm. Dit is echter slechts een richtlijn. este bine fixat. dole do konzoly (7a), až kým csomagtartó...
- Page 24 згідно прикладу (затягніть, а потім Вставте кінці дуги багажника (6) Étrier Hamax de fixation: Uchwyt mocujący Hamax: підтягніть): у скобу (7a), поки не почуєте Assurez-vous que l’arc porteur est Należy upewnić się, czy pałąk mocujący клацання, що відповідатиме correctement attaché à l’étrier en jest prawidłowo umieszczony w klamrze...
- Page 25 Lockable bracket: By pressing down the locking pin (7e), the carrier bow is locked to the bracket. To unlock: Insert key (7f) and turn clockwise. For safekeeping, Hamax recommends that you remove the keys before the bicycle trip. Locking pin Étrier verrouillable:...
-
Page 26: Adjusting The Seat
Adjusting the seat CARESS Make sure the eccentric shaft (8) is in the unlocked position before adjusting the seat to the correct lengthways position = max. 10 cm between the centre mark (14) on the seat and the rear hub. -
Page 27: Foot Rest Adjustment
Foot rest adjustment CARESS How to release the foot rest (5): Release the footrest handle on the back by flipping it upwards. Move the foot rest (5) to the preferred height and fasten the foot rest by pressing the foot rest handle down. -
Page 28: Foot Strap Adjustment
Foot strap adjustment CARESS How to fasten/release the foot strap (a): To fasten the foot strap put the strap into the track and pull down to preferred length. The strap will automatically lock. It’s only possible to tighten the strap when it is in the track. To loosen the foot strap, just pull it out of the track. - Page 29 Extra footguard CARESS To mount the extra foot guard (10): Press the foot guard into the fitting grooves until it clicks. CLICK! Opposite view zoom Pour monter la protection de pieds Lisäpinnasuojan kiinnitys Paina Pentru a monta protecţia Ekstra ayak korumasını (10) supplémentaire (10) : Poussez la...
-
Page 30: Restraint System
Restraint system Pic. 1 CARESS The restraint system (2) can be attached and detached by pressing in or out the belt lock (4) shown in pic. 1. It is important to press at the middle of the belt lock button (pic. 2 & 3) when detaching the restraint system. - Page 31 Chest buckle adjustment CARESS Pic. 1 The restraint system length can be adjusted by adjusting buckle a Pic. 2 and b. To adjust buckles (a+b) hold the buckle as shown in pic. 1. By pressing the red button, the belt loosens by pulling the buckle upwards.
- Page 32 Lungimea sistemului de fixare Çocuk emniyet kemeri sistemi poate fi ajustată cu ajutorul cataramei uzunluğu a ve b tokalarıyla ayarlanabilir. de reglare a şi b. Pentru a regla Tokaları (a+b) ayarlamak için tokayı cataramele (a+b) ţineţi catarama aşa resim 1’de gösterildiği gibi tutun. cum este prezentat în figura 1.
- Page 33 SLIDING BACKREST CARESS The sliding backrest (3) height can be adjusted, so the backrest and restraint system is in the correct height to the child’s shoulders. Move backrest to preferred height, and fasten by pressing the lever down (pic. 1).
- Page 34 Reclinable function CARESS To recline the seat twist the reclining knob (9) to the position required. Pour incliner le siège en arrière, Aby ustawić fotelik w pozycji tournez la molette de réglage (9) leżącej należy przekręcić pokrętło jusqu’à atteindre la position désirée.
- Page 35 How to remove the seat CARESS The seat (1) is easy to PRESS remove from the bicycle when not in use. Press the cover of the bracket and pull the seat bar free from the bracket (7). In case you have a lockable bracket, check if the bracket is locked first.
- Page 36 È facile rimuovere il seggiolino (1) Du tar enkelt av sitsen (1) från dalla bicicletta quando non è in uso. cykeln när den inte ska användas. Premere il pulsante dell’attacco ed Tryck på fästet och dra loss sitsbygeln estrarre la staffa di supporto från fästet (7).
- Page 37 Before embarking on a bicycle trip CARESS • Adjust the restraint system (2) • Adjust the foot rests (5) and fasten foot straps • Check the safety indicators (7d) of the bracket • Always wear helmets; both child and adult NB! Never leave your child alone in the bicycle child seat.
- Page 38 • Regolare la cintura di sicurezza (2) • Reglaţi centura de siguranţă (2) • Настройте предпазния колан (2) • Regolare i poggiapiedi e fissare le • Reglaţi suportul pentru picioare şi • Настройте стъпенките и затегнете cinghiette per i piedi (8) strângeţi benzile pentru picioare (8) коланите...
- Page 39 Extra fastening bracket CARESS With an extra bracket (7) you can easily move one seat between two bicycles. Hamax fastening bracket (7) is available in two version; standard and lockable Art. nr.: 604001 STANDARD BRACKET Art. nr.: 604002 LOCKABLE BRACKET Si vous disposez d’un étrier...
-
Page 40: Problem Solving
Contact your cycle dealer. Problem 1: Solution 1: Extra bar for small frames 603083 Caress Problem 2: Solution 2: Extra bar to lower seat 603086 Caress Problem 3:... - Page 41 Problem solving CARESS Problem 4: Solution 4: Extra bar to increase incline 603085 Caress Si vous éprouvez l’un des Existen cuatro tipos diferentes de W rozwiązaniu problemów Ak by ste sa mali stretnut s problèmes illustrés ci-dessus, il y a soportes para solucionar cualquiera de przedstawionych na powyższych...
Need help?
Do you have a question about the Caress and is the answer not in the manual?
Questions and answers