Table of Contents
Advertisement
Available languages
Available languages
Quick Links
Advertisement
Table of Contents

Related Manuals for H.Koenig TCP85


Summary of Contents for H.Koenig TCP85
- Page 1 Instruction manual Manuel d'instructions Bedienungsanleitung Gebruiksaanwijzing Manual de instrucciones Manuale d’uso TCP85 HAND VACUUM CLEANER ASPIRATEUR A MAINS HAND STAUBSAUGER HANDSTOFZUIGER ASPIRADOR DE MANO ASPIRAPOLVERE A MANO...
-
Page 2: Important Safeguards
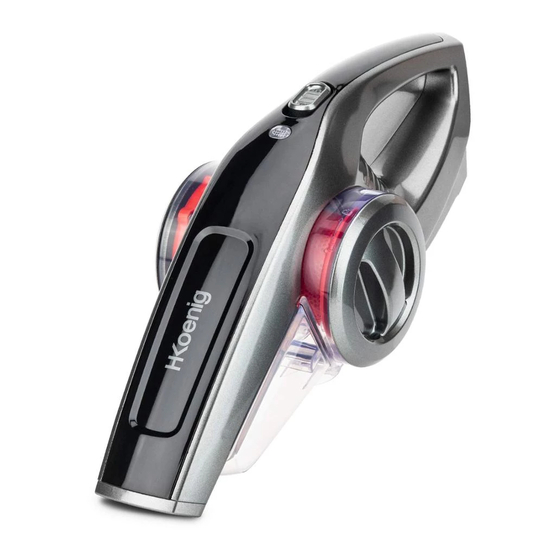
ENGLISH 1. Switch 2. Charging Light 3. Cyclone Bin 4. Dust Cup 5. Crevice tool 6. Small Brush 7. Charging base 8. Charging adapter PHOTO 1 IMPORTANT SAFEGUARDS When using an electrical appliance, basic safety precautions should always be observed, including the following: READ ALL INSTRUCTIONS BEFORE USING YOUR VACUUM.WARNING: To reduce the risk of fire, electrical shock, or injury:... - Page 3 6.Do not abuse the charger cord. Never carry the charger or base by the cord or yank to disconnect from an outlet; instead grasp the plug and pull to disconnect. 7.Keep charger cord away from heated surfaces. 8.This product includes rechargeable nickel cadmium batteries. Batteries must be recycled or disposed of properly.
-
Page 4: Installation Instructions
INSTALLATION INSTRUCTIONS There two options Option A : 1. Fix the charging base on the wall ( see Photo 2) , using 2 pcs M4X16 screws supplied plug 2. Mount in upright (handle up) position (see Photo 3) 3. Plug charging adapter, charging indication will light to indicate the unit is under charging PHOTO 2 PHOTO 3 Option B... -
Page 5: Operation
on charge indefinitely without damage or danger. It is not possible to “overcharge” the battery cells with the charger provided. THIS PRODUCT IS FOR DRY PICK-UP ONLY. OPERATION Ensure that the product is fully engaged on the charging base and the charge indicator light is on. - Page 6 PHOTO 8 PHOTO 9 PHOTO 10 -To remove the filter twist in anticlockwise direction and pull out the filter shield. PHOTO 10 PHOTO 11&12 - Pull out filter, pat the filter first then using warm, soapy water to wash the filter and ensure it is completely dry before using it again.
- Page 7 that the cyclone bin is full and requires emptying. Never immerse the product in water. A damp cloth and soapy water should be used to clean the exterior of the motor section. Always ensure the product is completely dry before re-use or storing. ACCESSORIES.
-
Page 8: Troubleshooting
TROUBLE SHOOTING Problem Possible cause Possible answer Battery energy ran out Recharging That the switch is in the “OFF” position Slide the switch ‘ON’ Unit don't work Contacts between Adapter and battery dirty. Clean the battery contacts. Dead Battery (won’t hold a Bring it to the service charge) center... -
Page 9: Importantes Mesures De Securite
FRANCAIS 1. Bouton de mise en marche 2. Lumière de chargement 3. Bac cyclonique 4. Bac à poussière 5. Tuyau de succion 6. Petite brosse 7. Base de chargement 8. Adaptateur de chargeur PHOTO 1 IMPORTANTES MESURES DE SECURITE Lorsque l’on utilise un appareil électrique, il faut toujours respecter certaines règles fondamentales de sécurité, telles que celles-ci : Lire toutes les instructions avant d’utiliser votre aspirateur. - Page 10 6. Ne pas abusez du cordon du chargeur. Ne jamais transporter le chargeur ou la base par le cordon ou tirer sur le cordon pour le débrancher d’une prise; on veillera plutôt à saisir le chargeur et à tirer sur la fiche pour le débrancher. 7.
- Page 11 CONSERVER CES INSTRUCTIONS Pour usage domestique seulement. COMMENT UTILISER VOTRE ASPIRATEUR A MAIN INSTRUCTIONS D’INSTALLATION Il y a deux options : Option A : 1. Fixez la base du chargeur sur le mur (voir Photo 2), en utilisant des vis 2 pcs M4X16 \ 2.
- Page 12 peut rester en chargement indéfiniment sans dommage ni danger. Ce n’est pas possible de ‘’surcharger’’ la batterie avec le chargeur. CET APPAREIL DOIT ETRE UTILISÉ SEULEMENT POUR DES SURFACES SECHES. UTILISATION Assurez-vous que l’appareil est complètement accroché á la base de chargement et que la lumière de l’indicateur de chargement soit allumée.
- Page 13 PHOTO 8 PHOTO 9 PHOTO 10 – Pour enlever le filtre, tournez dans le sens inverse des aiguilles d’une montre et retirer le protège-filtre. PHOTO 10 PHOTO 11&12 – Retirer le filtre. Tapoter d’abord le filtre et ensuite lavez-le avec de l’eau chaude et un peu de savon et assurez-vous qu’il soit complètement sec avant de le réutiliser.
- Page 14 hors tension, cela signifie que le bac cyclonique est plein et qu’il faut le vider. Ne plongez jamais l’appareil dans l’eau. Utilisez un torchon humide avec un peu d’eau et de savon pour nettoyer l’extérieur de la partie du moteur. Assurez-vous toujours que le produit soit complètement sec avant de le réutiliser ou de le ranger.
-
Page 15: Dépannage
DÉPANNAGE Problème Cause Possible Solution Possible Batterie non chargée Rechargez la batterie bouton mise Faire glisser le bouton sur marche est sur ‘’OFF’’ ‘’ON’’ L’appareil refuse de Mauvais contact entre Vérifier le contact avec la démarrer l’adaptateur et la batterie. batterie. -
Page 16: Wichtige Sicherheitshinweise
DEUTSCH EIN/AUS Knopf 1. Lade Licht 2. Zyklonischerbehaelter 3. Staubdeckel 4. Fugenduese 5. Kleine Buerste 6. Ladestation 7. Ladeadapter FOTO 1 WICHTIGE SICHERHEITSHINWEISE Wenn Sie ein elektrisches Geraet benutzen muessen Sie immer auf folgende Sicherheitsmassnahmen achten: LESEN SIE BITTE ALLE SICHERHEITSHINWEISE BEVOR SIE DEN STAUBSAUGER BENUTZEN: Um Elektroschock-, Brand- und Verletzunggefahr zu vermeiden: 1.Benutzen Sie das Geraet nicht im Freien. - Page 17 7.Halten Sie das Kabel immer von Hitzequellen entfernt. 8.Dieses geraet enthaelt wiederaufladbare nickel Kadmium Batterien die speziell entsorgt werden muessen. Verbrennen Sie die Batterien nicht und tun sie die auch nicht in heisse Temperaturen, da die explodieren koennten. 9.Betaetigen sie das Geraet nicht mit nassen Haenden. 10.Tun sie keine Objetkte in die oeffnungen des Staubsaugers.
- Page 18 FOTO 2 FOTO 3 Option B Setzen Sie die Station uaf eine Horizontale Oberflaeche (siehe Foto 4.) FOTO 4 WIEDERAUFLADEN Das Ladegeraet das mit den Staubsauger mitgeliefert wird muss vertikal oder horizontal eingesteckt werden. Neue Batterien bruachen eine Ladezeit von 21 Stunden. Fuer spaetere Ladungen werden zwischen 10-12 Studen Ladezeit reichen.
- Page 19 betaetigen Sie wieder den selben Knopf. Tun sie den Staubsauger immer uf die Ladestation so wird die Batterie immer geladen. Verischern sie sich immer das das Geraet gut auf der Ladestation ist. PHOTO 5 ACHTUNG: Benutzen Sie das Geraet niemals ohne Filter. HINWEIS: Der Filter ist wiederverwendbar, verwechseln sie den Filter nicht mit wegwerfbaren Staubsaecken und werfen Sie Ihn nicht weg wenn er gebraucht ist.
- Page 20 FOTO 10 – Um den Filter zu entfernen drehen Sie Ihn im Gegenuhrzeigersinn un ziehen Sie Ihn raus. FOTO 10 FOTO 11&12 – Nehmen sie den Filter raus und waschen Sie Ihn mit warmen Seifenwasser. Bevor Sie ihn wieder installieren vergewissern Sie sich das er komplett trocken ist. Es ist sehr wichtig das der Filter so sauber wie moeglich ist un das er korrekt installiert ist.
- Page 21 WICHTIG: Die maximale Saugkraft wir nur erreicht wenn der Behaelter so leer wie moeglich ist und der Filter sauber sind. Falls der Staubraus faellt wenn der Staubsauger aus ist zeigt es an das der Behaelter voll ist und er geleert werden muss. Setzen Sie das geraet niemals ins Wasser.
-
Page 22: Problembehebung
PROBLEMBEHEBUNG Problem Moegliche Ursache Moegliche Antwort Batterie hat keine Ladung mehr. Aufladen. Der Knopf ist auf OFF. Den Knopf auf ON stellen. Die Verbindungen zwischen Geraet geht nicht der Batterie un der Reinigen Ladestation sind schmutzig. Verbindungen. Die Batterie haelt die Ladung Bringen Sie das Geraet in nicht. -
Page 23: Belangrijke Veiligheidsmaatregelen
NEDERLANDS Schakelaar 1. Licht van oplading 2. Cyclone Bak 3. Stof cup 4. Spleetmondstuk 5. Kleine borstel 6. Oplaadstation 7. Oplader PHOTO 1 BELANGRIJKE VEILIGHEIDSMAATREGELEN Bij het gebruik van een elektrisch apparaat dienen bepaalde voorzorgsmaatregelen in acht genomen te worden, waaronder de volgende: LEES ALLA INSTRUCTIES VOORDAT U UW STOFZUIGER GAAT GEBRUIKEN. - Page 24 verwijder deze. 7.Houd de oplader uit de buurt van warmtebronnen. 8.Dit product bevat oplaadbare nickel-cadmium-batterijen. Batterijen moeten worden gerecycled of weggegooid. Verbrand batterijen niet en stel ze niet bloot aan hoge temperature, aangezien ze kunnen exploderen. 9.Gebruik de stekker en het toestel nooit met natte handen. 10.Plaats geen voorwerpen in de openingen.
- Page 25 2. Monteer rechtop (handvat omhoog) positie (zie Foto 3) 3. Plug oplader, batterij indicator licht op om aan te geven dat het apparaat aan het opladen is FOTO 2 FOTO 3 Optie B Zet laadstation op de tafel, installer deze in horizontale positie (zie Foto 4) FOTO 4 OPLADEN De lader voor dit product moet in correcte verticale of horizontale posite aangesloten worden.
- Page 26 FOTO 5 WAARSCHUWING: Gebruik dit apparaat nooit zonder filter. Let Op: Het filter is herbruikbaar, niet te verwarren met wegwerp stofzakken, gooi het niet we gals het product wordt geleegd. Wij raden u aan de filters om de 6-9 maanden te vervangen, afhankelijk van de frequentie van het gebruik.
- Page 27 FOTO 11&12 – Trek het filter eruit, en reinig met warm water en zeep en wacht tot het volledig is gedroogd voordat u het opnieuw gebruikt. Hou schooner de filter, hoe beter werkt het product. Het is zeer belangrijk dat de filter goed is geplaatst voordat u het opnieuw gebruikt. WAARSCHUWING: De filter moet volledig droog zijn voordat u het opnieuw plaatst.
- Page 28 en voltage. Gegevens belangrijke kenmerken: Ca. 15 minuten continu gebruik 12 Volts, 85 watts Approx.0.8-liter volume Geluidsniveau <70 dBA Vacuum: Approx.3.0Kpa Batterij is op Opladen Schakelaar “OFF” positie Schakelaar op “AAN” Apparaat werkt niet Contact tussen adapter en batterij is vuil.
-
Page 29: Precauciones Importantes
ESPANOL 1. Botón de encendido 2. Luz de carga 3. Recipiente ciclónico 4. Recipiente para polvo 5. Accesorio para hendiduras 6. Cepillo pequeño 7. Base de carga 8. Adaptador de carga FOTO 1 PRECAUCIONES IMPORTANTES Al usar un dispositivo eléctrico, unas precauciones básicas de seguridad deben ser tomadas en cuenta, entre ellas las siguientes: LEA TODAS LAS INSTRUCCIONES ANTES DE USAR SU ASPIRADOR. - Page 30 3. No permita que el dispositivo se utilice como juguete. Preste especial atención cuando se utilice por o cerca de niños. 4. Utilice el dispositivo sólo como se describe en este manual y use los accesorios recomendados por el fabricante. 5.
- Page 31 26. La batería debe reciclarse o eliminarse de manera segura. 27. El dispositivo debe estar desconectado de la fuente cuando extraiga la batería. 28. Apague todos los controles antes de desenchufar el dispositivo. 29. Este dispositivo no está destinado a ser utilizado por personas con capacidad reducida en lo físico, mental o sensorial, o falta de experiencia y conocimiento (incluidos los niños), a menos que los tiene fue el encargado de supervisar o si han tenido instrucciones sobre el uso del aparato por una persona responsable de su...
- Page 32 FOTO 4 RECARGA El cargador suministrado con este producto está diseñado para ser conectado de modo que sea correctamente orientado en una posición vertical u horizontal. En la primera carga, las baterías recargables necesitan un tiempo de carga mínimo de 21 horas para garantizar la máxima potencia.
- Page 33 FOTO 5 ADVERTENCIA: Nunca utilice el dispositivo sin el filtro. NOTA: El filtro es reutilizable, no lo confunda con bolsas para polvo descartables, ni lo deseche cuando el dispositivo sea vaciado. Le recomendamos que cambie los filtros cada 6-9 meses dependiendo de la frecuencia de uso. FOTO 6 y 7 - presione el botón de liberación del recipiente para polvo para vaciar los restos de polvo.
- Page 34 FOTO 10 - Para quitar el filtro gírelo hacia la izquierda y tire del mismo. FOTO 10 FOTO 11 y 12 - Saque el filtro y use agua tibia y jabón para lavarlo y asegúrese de que esté completamente seco antes de volver a utilizarlo. Mientras más limpio esté el filtro, el aspirador trabajará...
-
Page 35: Solución De Problemas
ACCESORIOS FOTO 13, 14, 15 y 16 - Saque el accesorio para hendiduras y el cepillo pequeño de la base de carga. Ambos pueden ser insertados directamente en el orificio de aspiración. Después de usarlos guárdelos en el mismo lugar. FOTO 13 FOTO 14 FOTO 15... -
Page 36: Mantenimiento
El interruptor está en Ponga el interruptor en posición On posición OFF Batería débil Recárguela El recipiente para polvo y el Límpielos recipiente ciclónico están Bajo poder de succión llenos Filtro obstruido Limpie el filtro Orificio de succión obstruido Limpie el filtro de succión MANTENIMIENTO Utilice únicamente jabón suave y un paño húmedo para limpiar el aspirador. -
Page 37: Importanti Misure Di Sicurezza
ITALIANO 1. Interruttore 2. Spia di ricarica 3. Contenitore ciclonico per la polvere 4. Tappo di protezione del filtro 5. Beccuccio per fessure 6. Spazzola piccola 7. Base per la ricarica 8. Adattatore per la ricarica Figura 1 IMPORTANTI MISURE DI SICUREZZA Quando si utilizza un apparecchio elettrico, alcune precauzioni di sicurezza devono essere sempre rispettate, tra le quali: LEGGERE ATTENTAMENTE TUTTE LE ISTRUZIONI RIPORTATE PRIMA DI UTILIZZARE... - Page 38 l’aspirapolvere se il caricatore o l’apparecchio stesso presentano danni in seguito a una caduta, quando sono danneggiati, se lasciati in ambienti esterni o quando sono caduti accidentalmente in acqua. 6. Maneggiare il cavo di alimentazione del caricatore con cura. Quando si strasporta l’aspirapolvere o la base, mai afferrarli per il cavo.
- Page 39 CONSERVARE QUESTO MANUALE PER USO ESCLUSIVAMENTE DOMESTICO COME UTILIZZARE L’APPARECCHIO ISTRUZIONI PER L’INSTALLAZIONE È possibile installare l’apparecchio in due modi: Opzione A: 1. Fissare la base per la ricarica sul muro (vedi figura 2) usando le 2 viti M4X16 in dotazione. 2.
-
Page 40: Funzionamento
posizione. Durante la ricarica, l’apparecchio potrebbe surriscaldarsi, ma questo è perfettamente normale e sicuro. L’apparecchio può rimanere in ricarica a tempo indeterminato senza danni e in tutta sicurezza; infatti, grazie a questo adattatore,non è possibile "sovraccaricare" le batterie. QUESTO APPARECCHIO È STATO PROGETTATO ESCLUSIVAMENTE PER ASPIRARE MATERIALI SECCHI. - Page 41 Figura 8 Figura 9 Figura 10 - Per rimuovere il filtro ruotare in senso antiorario e tirare la protezione del filtro. Figura 10 Figure 11 e 12 – Per prima cosa, dare un colpetto per estrarre il filtro e lavarlo con acqua calda e sapone.
- Page 42 svuotarlo. Non immergere mai l’apparecchio in acqua. Per pulire la parte esterna del motore si dovrebbe utilizzare solo un panno umido, acqua e sapone. Assicurarsi sempre che l’apparecchio sia completamente asciutto prima di utilizzarlo nuovamente o prima di conservarlo. ACCESSORI. Figure 13, 14, 15 e 16 –...
-
Page 43: Risoluzione Dei Problemi
RISOLUZIONE DEI PROBLEMI Problema Possibile causa Possibile soluzione La batteria è scarica Ricaricare L’interruttore è posizionato Posizionare su ‘ON’ su ‘OFF’ L’apparecchio non I contatti tra l’adattatore e la funziona Pulire i contatti batteria sono sporchi. Batteria esaurita (non si Portarla in un centro di ricarica più) assistenza...
Need help?
Do you have a question about the TCP85 and is the answer not in the manual?
Questions and answers