Table of Contents
Advertisement
Advertisement
Table of Contents

Related Manuals for Eaton PXG 900


Summary of Contents for Eaton PXG 900
- Page 1 Power Xpert Gateway 900 PXG 900 User’s Guide...
- Page 2 THIS DOCUMENT SHALL NOT BECOME PART OF OR MODIFY ANY CONTRACT BETWEEN THE PARTIES. In no event will Eaton be responsible to the purchaser or user in contract, in tort (including negligence), strict liability or other-wise for any special, indirect, incidental or consequential damage or loss whatsoever, including but not limited to...
-
Page 3: Table Of Contents
1. PXG Users Guide ................... 2 1.1 Connecting the PXG to a PC . -
Page 4: Pxg Users Guide
The Power Xpert Gateway 900 (PXG) is a powerful tool for monitoring electrical systems. It can also serve as a data aggregation point if used with Eaton's Power Xpert Insight or third party software. This guide will show you how to configure the PXG from its web interface and how to work with the Network, One-lines, and Alarms tabs.You can... -
Page 5: Connecting The Pxg To A Pc
You can initially connect the PXG to a PC via the USB A to USB mini-B cable shipped with the gateway. Before your PC can connect to the gateway, you may first need to install the USB driver from Eaton. You'll need administrative privilege on the PC in order to install the driver. - Page 6 PXG 900 User's Guide - Firmware Version 4.3 - 1/9/2017 Right-click and select Update Driver Software. Update Driver Software Select Browse my computer for driver software.
- Page 7 PXG 900 User's Guide - Firmware Version 4.3 - 1/9/2017 Browse for Driver Choose Browse. The Locate File window opens. .Locate and select the folder containing the powerxpert.inf file. Choose Open. The folder displays in the Search for driver software in this location box.
- Page 8 PXG 900 User's Guide - Firmware Version 4.3 - 1/9/2017 Verifying the IP Address Connecting via an Ethernet Cable If you can't connect via a USB cable, you can use this method. It requires the following: A PC that is completely disconnected from all networks, including wireless. To ensure this, you may wish to turn off your wireless network adapter.
-
Page 9: Configuring The Pxg
If you choose this approach note the IP address on the label, publish it to the users, and make certain it's reserved in your network. DHCP, where the gateway is automatically assigned an IP address by the DHCP server or router. Eaton recommends that you don't use this approach. Software-controlled bridging is used to allow other Ethernet devices to access the gateway's LAN connection when the devices are plugged into Network 2. - Page 10 PXG 900 User's Guide - Firmware Version 4.3 - 1/9/2017 Gateway Configuration Sidebar Click Edit again to exit edit mode. After you've completed configuring an IP address (either through DHCP Reservations or as a static IP), write this on the label under the connectors.
- Page 11 PXG 900 User's Guide - Firmware Version 4.3 - 1/9/2017 Setting Port Visibility The Network tab displays devices attached to the various ports; however, you can use the Port Visibility check boxes to limit what's shown on the tab to only the ports that you select. This only applies to the Network tab and all devices will still be visible on the other tabs.
-
Page 12: Configuring Device Communications
PXG 900 User's Guide - Firmware Version 4.3 - 1/9/2017 Configuring Device Communications You can configure the PXG's Modbus serial ports, Modbus TPC/IP port, and INCOM port on the Network tab. Choose edit to change any of the port configurations. You can access the port settings by choosing the appropriate gear icon. - Page 13 PXG 900 User's Guide - Firmware Version 4.3 - 1/9/2017 Initial Setup The PXG helps you when adding devices, guiding you through the initial setup steps:To add either a Modbus RTU or INCOM device: Choose Edit. Choose Add Device under the appropriate port.
- Page 14 PXG 900 User's Guide - Firmware Version 4.3 - 1/9/2017 Adding an IQ 250...
- Page 15 PXG 900 User's Guide - Firmware Version 4.3 - 1/9/2017 Example 2: Adding a Digitrip 1150 Breaker Choose the Network tab. Choose Edit. Choose Add Device under INCOM. Select Protection under Family. Select Digitrip Breaker under Model Series Select Digitrip 1150 under Model.
- Page 16 PXG 900 User's Guide - Firmware Version 4.3 - 1/9/2017 Adding a Digitrip 1150...
- Page 17 PXG 900 User's Guide - Firmware Version 4.3 - 1/9/2017 Example 3: Adding a BIM II Display Device Choose the Network tab. Choose Edit. Choose Add Device under INCOM. Select Accessories under Family. Select Local Display under Model Series Select BIM II under Model.
- Page 18 PXG 900 User's Guide - Firmware Version 4.3 - 1/9/2017 Adding a BIM II...
- Page 19 PXG 900 User's Guide - Firmware Version 4.3 - 1/9/2017 Special Considerations for the AEM II The gateway supports the AEM II with firmware at level 6 or greater. If your AEM II has a sub-network with devices attached, you can add these devices after you've added the AEM II to the gateway.
-
Page 20: Setting Preferences
PXG 900 User's Guide - Firmware Version 4.3 - 1/9/2017 Setting Preferences Under Settings, you can configure: Date and Time Localization Settings is in the upper right of the screen. Click Settings Time If time stamp accuracy on data is important to you, NTP syncronization is the best option. However, you'll either need access to the Internet or you'll need to install an NTP server on your network. - Page 21 PXG 900 User's Guide - Firmware Version 4.3 - 1/9/2017 Locale Settings...
-
Page 22: Network Access Settings
PXG 900 User's Guide - Firmware Version 4.3 - 1/9/2017 Network Access Settings Access Control Ethernet communications defaults to the usual ports for HTTP, HTTPS, and Modbus TCP: 80, 443, and 502 respectively. You can disable, enable, or change these ports. You can also set each port so that it can only be used to access the PXG through trusted host names or IP addresses. -
Page 23: Modbus Tcp Server
PXG 900 User's Guide - Firmware Version 4.3 - 1/9/2017 Modbus TCP Server Modbus TCP Server Enabled The PXG can also function as a Modbus TCP server, providing channel data as Modbus registers from both Modbus and INCOM devices. The device addresses and Modbus maps for these devices can be downloaded directly from the PXG. - Page 24 PXG 900 User's Guide - Firmware Version 4.3 - 1/9/2017 Modbus TCP Server Setup Viewing and Modifying the Modbus Map Under Modbus TCP Server Configuration, the View Map button produces a window that lists the various devices attached to the PXG with their Modbus TCP ID. You can sort this list by device name, the native serial address set on the device, or the TCP ID.
- Page 25 PXG 900 User's Guide - Firmware Version 4.3 - 1/9/2017 Selecting the Modbus map type The download link beside each device provides the Modbus register map for channels in the device configuration file. Before downloading the map, decide if you want a zero based register map and then select the check box.
- Page 26 EMINT (INCOM only) In some cases, you may need to use Eaton's legacy software to configure set points on INCOM devices. The PXG makes this easier by providing a way to connect legacy software directly to the gateway via a UDP connection, allowing that software to then connect to all of the "downstream"...
-
Page 27: Bacnet Ip Server
PXG 900 User's Guide - Firmware Version 4.3 - 1/9/2017 BACnet IP Server Setting up a BACnet/IP Server Note: Edit must be active to make these changes. The Base ID setting won't be reflected in the Device Mapping until you save and exit edit mode. - Page 28 PXG 900 User's Guide - Firmware Version 4.3 - 1/9/2017 BACnet/IP Settings Mapping You can view and download the mapping information for your virtual network and virtual devices by clicking View Map (the download arrow is available only in non-edit mode). If you are manually setting IDs, you can do that in the Device Mapping dialog box.
-
Page 29: Notifications
PXG 900 User's Guide - Firmware Version 4.3 - 1/9/2017 Notifications Notifications provide email alerts for alarms and related activities, such as acknowledging an alarm, or when an alarm is cleared. Emails can include attached event, trend, and/or data logs. - Page 30 PXG 900 User's Guide - Firmware Version 4.3 - 1/9/2017 Adding a New Email Recipient In Edit mode, choose Add New Recipient. In the sidebar enter the recipient's email address. HTML provides nicely formatted emails, but only works if your email system allows it (most do). Plain text provides emails in ASCII text.
- Page 31 PXG 900 User's Guide - Firmware Version 4.3 - 1/9/2017 Note: to send recipients email notifications when waveforms become available, select the Waveform Available channel (in the Operations category) for the device providing the waveform, as shown in the following figure.
-
Page 32: Users And Access Control
PXG 900 User's Guide - Firmware Version 4.3 - 1/9/2017 Users and Access Control Note: For information about the Session Timeout on the Security tab see Cybersecurity Hardening the PXG . Controlling access to the PXG is vital component in any effort to secure it. Many regulatory agencies and standards organizations now recommend/require Role-Based Access Control (RBAC) as part of any access control effort. - Page 33 Troubleshoot Remotely reboot the PXG. A role with this permission may be required by Eaton personnel to service/troubleshoot the gateway. Minimal Issue device commands that don't have control capabilities. The following figure shows the set of...
- Page 34 PXG 900 User's Guide - Firmware Version 4.3 - 1/9/2017 View users View users and their assigned roles. This includes anything that lists users, such as the Audit logs. Also, view the individual permissions assigned to a role. Manage Create or delete users, as well as assign a role to each user. Also, create and delete roles and users assign permissions to roles.
- Page 35 PXG 900 User's Guide - Firmware Version 4.3 - 1/9/2017 Command View users Update View users, Install. Troubleshoot, Configuration file save/restore Roles and Permissions Cookbook The following are examples of how to combine permissions to create roles that make sense in your organization.
- Page 36 Troubleshoot (remote rebooting) and Configuration file save/restore missions. Eaton field service and customer support personnel may require a user with this role to help troubleshoot a PXG. Password Policy The security provided by restricting access to authorized users is only as strong as uniqueness of the user passwords.
- Page 37 PXG 900 User's Guide - Firmware Version 4.3 - 1/9/2017 User Password Management The security administrator may use the User Password Management settings to view and modify password expirations and lockouts for each user individually. The per user management provides a way to extend the global Password Policy choices;...
-
Page 38: Advanced Administration
PXG 900 User's Guide - Firmware Version 4.3 - 1/9/2017 Advanced Administration Several advanced administration actions are available on the Network Tab. You can access these actions by clicking the row with your gateway's name (or additionally, by clicking the gear icon for the gateway while in Edit mode). - Page 39 PXG 900 User's Guide - Firmware Version 4.3 - 1/9/2017 Ping Test: Use this to verify that there is an Ethernet connection between the PXG and another device, NTP server, SMTP server, or Power Xpert Insight software. Audit Logs: The following section lists the various available logs.
- Page 40 PXG 900 User's Guide - Firmware Version 4.3 - 1/9/2017 Audit Logs...
-
Page 41: Setting Alarms
PXG 900 User's Guide - Firmware Version 4.3 - 1/9/2017 Setting Alarms You can set custom alarms for any channel on any connected device directly in the PXG. Each alarm configuration references values on a single channel and specifies either: A High or Low alarm value for analog channels. - Page 42 PXG 900 User's Guide - Firmware Version 4.3 - 1/9/2017 Creating an alarm configuration Alarm Levels Every channel can have multiple alarm triggers (not just High and Low). Each time you define an additional High or Low alarm trigger point for a particular analog channel, it automatically becomes a new alarm level. The alarm level is assigned based on the comparative values of the trigger settings.
- Page 43 PXG 900 User's Guide - Firmware Version 4.3 - 1/9/2017 Type Value Level High 144 VAC High 132 VAC 108 VAC 96 VAC The following figures show the alarm logic and how this is affected by alarm levels. Examples for both latching and non-latching alarms are given.
- Page 44 PXG 900 User's Guide - Firmware Version 4.3 - 1/9/2017 Non-Latching Alarm Example Setting Alarm Level for Multi-State Channels Multi-state channels, such as Status, can't be automatically assigned a level. Instead, you must assign the levels yourself when configuring alarms for such channels. When configuring multi-state channels, the dialog box includes an Alarm level field for this purpose.
- Page 45 PXG 900 User's Guide - Firmware Version 4.3 - 1/9/2017 Alarm level field for multi-state channels...
-
Page 46: One-Lines
PXG 900 User's Guide - Firmware Version 4.3 - 1/9/2017 One-lines One-lines are the way to group electrical devices and creating One-lines is the first step to creating a graphical representation of your system on the One-lines tab. Creating One-Lines Click Edit on the One-lines tab in Device Tree view. - Page 47 PXG 900 User's Guide - Firmware Version 4.3 - 1/9/2017 Location only one-line Electrical One-lines, which you can draw quickly using the PXG's Auto-draw technology. Auto-draw is assisted drawing, where the PXG does much of the work in creating a One-line for you yet still provides you...
- Page 48 PXG 900 User's Guide - Firmware Version 4.3 - 1/9/2017 Electrical One-line The PXG helps you create diagrams on a One-line through a feature called "Auto-draw." Auto-draw dramatically reduces the time it takes to create an electrical One-line diagram. It not only sets up the starting point for your One-line diagram, it helps you connect devices in the diagram as you edit.
- Page 49 PXG 900 User's Guide - Firmware Version 4.3 - 1/9/2017 Using Auto-Draw When you enable Auto-Draw for one or two sources, Auto-Draw automatically connects all devices on their closest source symbol. As you drag a device across the center of the screen, its connection line automatically snaps to the other side.
-
Page 50: Connecting To The Web Interface
IP address of the PXG. You can also use HTTP to connect, if that's enabled, although Eaton recommends that you only connect via HTTPS. For information about enabling HTTPs, see "Cybersecurity Hardening the PXG". -
Page 51: Network Tab
PXG 900 User's Guide - Firmware Version 4.3 - 1/9/2017 Network Tab The Network tab shows all of the devices attached to the gateway. These are grouped under their communication port. Devices are color coded based on status: Red shows that there are alarms from one or more channels for that device. - Page 52 PXG 900 User's Guide - Firmware Version 4.3 - 1/9/2017 Choose an Action The Choose an Action list can provide some of the following functions (what shows depends on the device). Device Details (pop-out) Trend Viewer (pop-out) Trend Export Device Alarms (navigate to Alarms tab)
- Page 53 PXG 900 User's Guide - Firmware Version 4.3 - 1/9/2017 Device Details...
-
Page 54: Alarms Tab
PXG 900 User's Guide - Firmware Version 4.3 - 1/9/2017 Alarms Tab The PXG shows alarms when devices indicate something is wrong. Devices with alarms are shown as red in the Network Tab. If there are any open alarms on the PXG, there will be an alarm callout at the top of the page indicating the number of open alarms (shown above). -
Page 55: Trend Viewer
PXG 900 User's Guide - Firmware Version 4.3 - 1/9/2017 Trend Viewer You can launch the Trend Viewer from the Choose an Action menu in the sidebar. Choose Add Device to include any installed device that has trend data. Choose Add Channel to select a channel from the device. Channels are arranged in categories. -
Page 56: Waveforms
Waveforms The PXG can download waveforms: From any attached INCOM device that's capable of capturing waveforms. The following Eaton devices are supported: FP-5000, FP-6000, IQ Analyzer Logger 6400/6600, MPCV Relay, Digitrip 1150. If Enable Waveforms in the device configuration for that device is selected. - Page 57 PXG 900 User's Guide - Firmware Version 4.3 - 1/9/2017 Waveform Files The Waveform files themselves are packaged in a .tgz compressed tar archive file. Unpacking this in Windows requires special software such as 7-Zip. When you unpack the file, you may need to first decompress it and then unpack the resulting .tar file.
- Page 58 PXG 900 User's Guide - Firmware Version 4.3 - 1/9/2017 Adding a New Email Recipient In Edit mode, choose Add New Recipient. In the sidebar enter the recipient's email address. HTML provides nicely formatted emails, but only works if your email system allows it (most do). Plain text provides emails in ASCII text.
- Page 59 PXG 900 User's Guide - Firmware Version 4.3 - 1/9/2017 Note: to send recipients email notifications when waveforms become available, select the Waveform Available channel (in the Operations category) for the device providing the waveform, as shown in the following figure.
- Page 60 PXG 900 User's Guide - Firmware Version 4.3 - 1/9/2017 After authenticating you'll see something like the following page, which you can use to download available waveform files.The Home page button will take you to the gateway interface. List of Available Waveforms...
-
Page 61: One-Lines Tab
PXG 900 User's Guide - Firmware Version 4.3 - 1/9/2017 One-lines Tab The One-lines tab shows all of the devices in your facility, organized as either a Device Tree or in Graphic View. Device Tree Device Tree view is similar to viewing devices in the Network tab. The main difference is that in the Device Tree, devices are grouped and ordered the way you wish instead of by connection. - Page 62 PXG 900 User's Guide - Firmware Version 4.3 - 1/9/2017 Every device has the following commands: Device Details : This produces a pop-out window that shows all of the channels available for that device, organized by channel type. It also includes navigational controls and (for convenience) the same set of controls in the device sidebar.
- Page 63 PXG 900 User's Guide - Firmware Version 4.3 - 1/9/2017 Channel Management Trend Viewer and Trend Export: This launches the Trend Viewer pop-out, preloading the selected device. For more information on the Trend Viewer, see "Trend Viewer". You can also export the trend information as a CSV file.
-
Page 64: Cybersecurity Hardening The Pxg
PXG 900 User's Guide - Firmware Version 4.3 - 1/9/2017 Cybersecurity Hardening the PXG For added security, you should always disable HTTP access and enable HTTPS access for the gateway. To use HTTPS to connect to the PXG, you'll need to: Set either the local machine policy to allow users to manage certificates or, if multiple people in your organization will access the PXG, set a group policy. - Page 65 PXG 900 User's Guide - Firmware Version 4.3 - 1/9/2017 Downloading the Certificate File from the Gateway Point either Google Chrome or Microsoft Internet Explorer to the IP address of the gateway followed by /ca.html. For example: http://192.168.1.1/ca.html. Click the Root CA Certificate link. The browser will download the certificate.
- Page 66 PXG 900 User's Guide - Firmware Version 4.3 - 1/9/2017 Installing the Certificate Double-click the certificate file. This will launch the certificate installation wizard. Click Install certificate. On the Welcome dialog box, click Next. Select Place all certificates in the following store and then click Browse.
- Page 67 PXG 900 User's Guide - Firmware Version 4.3 - 1/9/2017 Select Trusted Root Certification Authorities from the list, then click OK. On the Completing the Certificate Import Wizard dialog box, click Finish.
- Page 68 PXG 900 User's Guide - Firmware Version 4.3 - 1/9/2017 7. You should see an alert box stating that the import was successful. Click OK. You can now access the gateway using the HTTPS protocol (for example, https://192.168.1.1/ Ports in Use For web-based communications with the gateway, TCP Ports 80 (HTTP) and 443 (HTTPS) are enabled by default.
- Page 69 PXG 900 User's Guide - Firmware Version 4.3 - 1/9/2017 47808 BACnet/IP SNMP SNMP The following ports are open and necessary for proper PXG operation: Port Number Protocol/Use TCP/UDP 7011 Eaton's Mercury Websockets 7012 Eaton's Mercury Websockets – Secure via TLS...
- Page 70 Advanced Administration Eaton recommends that all products should be installed on a secure network. For more information on how to secure this product in your environment please refer to the whitepaper "Cybersecurity considerations for electrical distribution systems"...
- Page 71 PXG 900 User's Guide - Firmware Version 4.3 - 1/9/2017 Failed Login Attempt Warning Last Login History can be viewed at any time by clicking on the Welcome text found next to the displayed Date and Time. Login Menu Doing so, produces the following menu.
- Page 72 PXG 900 User's Guide - Firmware Version 4.3 - 1/9/2017 Browser Session Time-Out You can use the Session Timeout (on the Security tab under General Settings) to impose a time-out to automatically log out a browser session. This time-out applies to all user accounts. The Session Timeout value is the number of minutes during which no browser activity is detected.
- Page 73 PXG 900 User's Guide - Firmware Version 4.3 - 1/9/2017 In this example, setting Max Concurrent Logins to 2 limits the number of users logging in using a shared account to just 2. Good security practice suggests setting this to the lowest practical non-zero number for your specific installation.
-
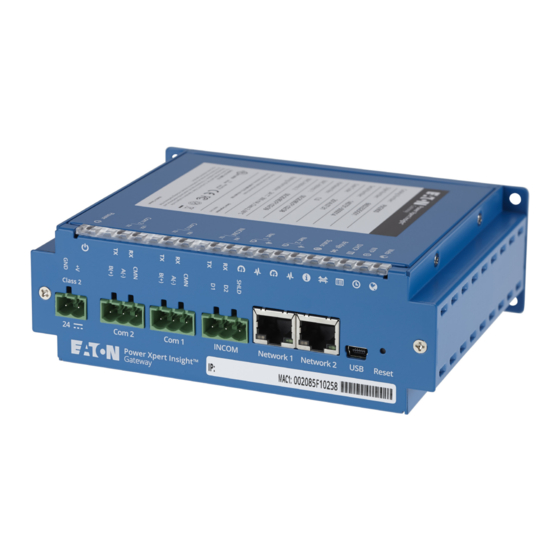
Page 74: Reset Button
PXG 900 User's Guide - Firmware Version 4.3 - 1/9/2017 Reset Button The recessed push-button switch located on the front of the PXG provides three functions: A momentary button press (< 5 Seconds) will restart the gateway. Pressing and holding the button for more than 5 seconds, but less than 15 seconds, will reset the stored username and password settings to their defaults. - Page 75 Eaton 1000 Eaton Boulevard Cleveland, OH 44122 United States Eaton.com © 2017 Eaton All Rights Reserved Eaton is a registered trademark. Printed in USA Publication No. MN152006EN All trademarks are property February 2017 of their respective owners.
Need help?
Do you have a question about the PXG 900 and is the answer not in the manual?
Questions and answers