Table of Contents
Advertisement
Advertisement
Table of Contents

Related Manuals for Velocitek Prostart


Summary of Contents for Velocitek Prostart
- Page 1 Firmware Version v1.6 Revision Date March 23, 2016...
-
Page 2: Table Of Contents
Contents INTRODUCTION EATURES INSTALLATION BATTERIES ECHARGEABLE ATTERIES HEN TO ECHARGE OR EPLACE ATTERIES BUTTONS MODES TART IMER ISTANCE LINE ISTANCE LINE RAPH PEED EADING EADER RAPH CONFIGURATION OMPASS ECLINATION GPS DATA STORAGE... - Page 3 UNDERSTANDING DISTANCE TO START LINE ETTING NIMATED EMONSTRATION OPERATION GPS S CQUIRE A IGNAL AXIMUM PEEDS AND ON THE ILLER ET THE TART SE THE IMER OW TO OMPASS ECLINATION AND FFSET FIRMWARE UPDATE SOFTWARE ELOCITEK ONTROL ENTER ELOCITOOL MAINTENANCE CONTACT COMPLIANCE FCC C...
-
Page 4: Introduction
When we started brainstorming about the ProStart, we asked sailors which functions they actually use on the SC1, the predecessor to the ProStart. What was surprising to us was that no one used VMG function and everybody used the distance-to-line function. -
Page 5: Features
Introduction Features Only essential features actually used by professional sailors are included in the product. Speed, compass, and distance to line updated twice a second Count down start timer Header/Lift indicator updated twice a second Maximum and best 10 second average speed recall ... -
Page 6: Installation
The ProStart can be installed anywhere on the boat with a view of the sky. The ProStart comes with a cradle that interlocks with it. Install the cradle permanently on your boat. Press the tab on the cradle to unlock the ProStart from it. -
Page 7: Batteries
Batteries Batteries The ProStart requires 3 AA batteries to operate. The battery compartment can be reached by opening the back of the case. The batteries are not included with the ProStart. Use Rechargeable Batteries We recommend using rechargeable NiMH AA batteries over standard alkaline disposable AA batteries. -
Page 8: Buttons
Timer Start/Sync There are a total of 8 buttons on the ProStart as illustrated above. The buttons will be referred to in capitalized blue text throughout this document as follows, PWR, MODE, MAX, RESET, +1, PIN, GUN. -
Page 9: Modes
Start Mode: timer & distance Race Mode: speed & heading The ProStart function is separated into two modes each providing you with the essential information at different stages of the race, before and after the gun. The mode indicator can be found at the upper left hand corner of the LCD screen. -
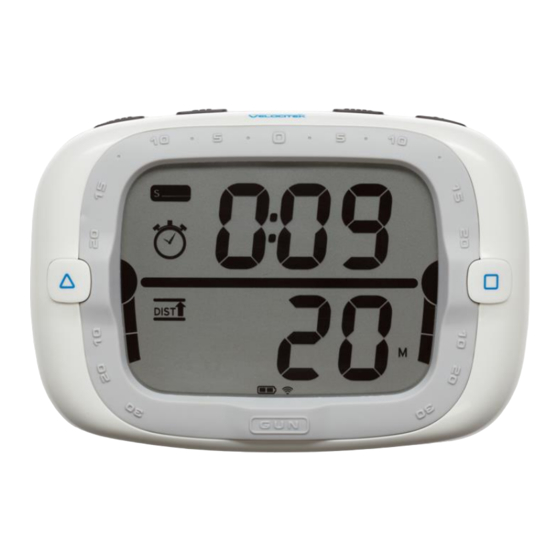
Page 10: Start Mode
Modes Start Mode Timer Start Mode Indicator Timer Distance Display Indicator Distance-to -line Bar Distance- Graph to-line Display Indicator The start mode combines a timer and distance to line display to provide the information necessary for a perfect start at the gun. The semi-circles next to the buttons indicate if the respective ends are set. -
Page 11: Race Mode
To display magnetic heading the local magnetic declination must be defined in device settings. The ProStart displays heading only when your speed is greater than 1 knot, otherwise it will show a heading of 0 degrees regardless of which direction you are actually moving. -
Page 12: Lift/Header Bar Graph
Lift/Header Bar Graph The ProStart automatically detects when a sailor is trimmed to a heading then provides the header/lift wind shift relative to the trim angle. Once a tack or a jibe is detected the indicator resets and nothing is indicated until another trim angle is set. -
Page 13: Configuration
This feature has been removed. GPS Data Storage The ProStart records GPS data whenever the device is on and GPS signal is detected. The device records data every 2 seconds. The ProStart can store up to 30 hours of data. - Page 14 Understanding Distance to Start Line Understanding Distance to Start Line ProStart The above illustration provides a graphical definition of distance to start line and how you can set it. Setting Ends The start line ends can be set anywhere along the start line. We recommend sighting both the pin and the race committee ends from outside the line.
- Page 15 The operation of the ProStart relies on low-power radio signals from GPS satellites that orbit the earth at an altitude of approximately 20,000 km. As a result, the ProStart must be outdoors with a clear view of the sky to function properly. Stay away from tall buildings and forests when acquiring a signal off the water since these obstacles block or reflect the signals making it difficult to obtain signal.
- Page 16 Operation Show Off Your Maximum Speeds Hold to display max speeds Press RESET while max speeds are displayed to reset the max speeds Maximum 10 second Average Speed Maximum Instantaneous Speed Display both your instantaneous and 10 second average maximum speed by holding MAX. To reset the maximum speeds, press RESET while holding MAX.
- Page 17 Operation Set the Start Line No Ends Set Set the start line pin and race committee ends by pressing respectively. The semi-circles next to indicate if the respective ends are set. The semi-circles flash when the end is not set and go solid when set. The ends can be set in either order.
- Page 18 Operation Use the Timer +1 min Timer Reset Change the reset time by pressing to scroll through the minutes. The timer can be set to 1:00 ~ 15:00. Start the timer by pressing GUN. Start Timer Reset Timer +1 min Timer Counting Down Add one minute to the timer without stopping the timer by pressing +1.
- Page 19 Operation How to Set Compass Declination Compass declination is set by pressing and holding RESET for 3 seconds. Press to confirm the setting and exit setup menu as illustrated below. Hold to Enter Declination Menu Press to Exit Declination Menu Enter the declination menu by holding RESET...
- Page 20 Software Firmware Update Firmware is the software that runs on the ProStart. Periodically firmware updates will be available with bug fixes and enhanced features. To update the firmware you must download either Velocitek Control Center (for Windows) or Velocitool (for Mac) and connect your device to a computer.
- Page 21 Maintenance Maintenance To ensure your ProStart's enclosure remains watertight and the electronics are not destroyed by corrosion, please take the following precautions: Dry case with a towel before opening. Wipe away sand or debris on the gasket before closing the back case.
- Page 22 Contact Contact Mail: Velocitek, LLC 271 B Kahiko St. Paia, HI 96779 Fax: +1-650-618-2679 Phone: Calls will be answered 9AM ~ 6PM, Hawaiian Standard Time (GMT-10) US and Canada: +1-866-498-6737 International: +1-650-592-4519 Email: support@velocitek.com Website: http://www.velocitek.com Forum: http://www.velocitek.com/forums/ Support: http://www.velocitek.com/support...
- Page 23 Compliance Compliance FCC Compliance Statement This device complies with Part 15 of the FCC Rules. Operation is subject to the following two conditions: (1) This device may not cause harmful interference, and (2) this device must accept any interference received, including interference that may cause undesired operation. NOTE: This equipment has been tested and found to comply with the limits for a Class B digital device, pursuant to Part 15 of the FCC Rules.
- Page 24 Index Index Acquire a GPS Signal, 14 Lift/Header Bar Graph Indicator, 11 Animated Demonstration, 13 Maintenance, 20 Batteries, 6 Modes, 8 Bow Offset, 12 Bow Offset Calculation, 13 Buttons, 7 Operation, 14 Compass Declination, 12 Race Mode, 10 Compliance, 22 Configuration, 12 Contact, 21 Control Center, 19...
Need help?
Do you have a question about the Prostart and is the answer not in the manual?
Questions and answers