Table of Contents
Advertisement
Quick Links
WEATHER FORECAST CENTER
Instruction manual
INTRODUCTION
The Meteotronic Weather Forecast Center provides a professional weather forecast for the current day
and the day to come. The weather forecasts are made by professional meteorologists and are sent out
with the radio-time signal generator DCF77 in Germany and HBG in Switzerland and can be received in
almost all of Europe. The reception area for the radio-time signal generator is divided into a total of 90
meteorological regions with 2 day forecast. The desired region for the local or holiday location is simply
selected and the respectively current weather forecast is shown on the display. This gives you a quick
overview of the weather situation for the following days at any time. Updating the weather data is done
every day.
You will also be able to consult the local outside temperature, thanks to the transmitter which you will
install in a place of your choice.
Please read the operating instructions carefully and completely before using for the first time, to
prevent function errors and incorrect operation. Keep the instructions handy for consulting.
WEATHER FORECAST CENTER
7
Advertisement
Table of Contents

Related Manuals for Techno Line Meteotronic WM 5412


Summary of Contents for Techno Line Meteotronic WM 5412
- Page 1 WEATHER FORECAST CENTER Instruction manual INTRODUCTION The Meteotronic Weather Forecast Center provides a professional weather forecast for the current day and the day to come. The weather forecasts are made by professional meteorologists and are sent out with the radio-time signal generator DCF77 in Germany and HBG in Switzerland and can be received in almost all of Europe.
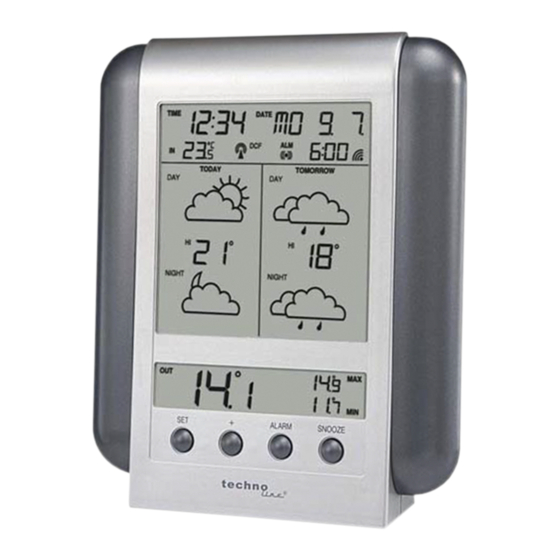
- Page 2 DISPLAY Time reception signal Alarm ON icon Calendar Time Indoor Alarm time temperature Reception indicator for weather data Weather forecast icon (day) MAX temperature Weather forecast icon (night) Tomorrow (Day 1) Today Outdoor temperature MIN/MAX outdoor temperature Outdoor signal reception icon Reception indicator for weather data •...
- Page 3 • Switch on all potential sources of interference (e.g. television) in the area that you want to install the station during the test! • Position the device in the location, oriented as you prefer, but at least one meter from the possible source of interference.
- Page 4 Calling up/exiting the configuration menu Calling up the configuration menu • Press the <SET> button for at least three seconds. The first point in the configuration menu (weather region) is called up. Exiting the configuration menu • Press the <SET> button as often as required to reach the normal display again. Setting the weather region •...
- Page 5 setting is activated. The minute display flashes. Use the <+> button for the minutes setting. Press the <ALARM> button again to end the setting mode for the alarm time. • Use the <ALARM> button to activate or deactivate the alarm. When the alarm is active, the alarm symbol "((( ))) “...
- Page 6 INTENDED USAGE, EXCLUSION OF WARRANTY, AND SAFETY INFORMATION • This weather station is intended for private usage as an indicator for future weather. The forecasts of this device are to be used as orientation values and do not represent absolute, precise forecasts. •...
- Page 7 Dimensions (L x W x H) : Station : ..........141 x 29 x 167 mm Transmitter : ........32 x 14 x 86 mm...
Need help?
Do you have a question about the Meteotronic WM 5412 and is the answer not in the manual?
Questions and answers