
Subscribe to Our Youtube Channel
Related Manuals for Sprint PPC 6600


Summary of Contents for Sprint PPC 6600
- Page 1 One Sprint. Many Solutions. Sprint PCS Vision User's Guide Smart Device PPC6600...
-
Page 2: Welcome To Sprint
Welcome to Sprint Sprint has the most complete, all-digital wireless network in the nation. Depend on it. We are committed to bringing you the best wireless technology available. With Sprint, you get the most complete, all-digital wireless network in the nation so all your services work the same wherever you go on the network.We built our network right from the start, so no matter where you are on the enhanced Sprint... -
Page 3: Table Of Contents
Table of Contents Section 1: Getting Started...1 1.1 Setting Up Service... 2 1.2 Your Sprint PCS Vision Smart Device... 6 1.3 Battery... 9 1.4 Accessories ... 12 Section 2: Getting to Know Your PPC6600...14 2.1 Initiating Your Sprint PCS Vision Smart Device... - Page 4 Section 5: Synchronizing Information ..55 5.1 Using ActiveSync 5.2 Synchronizing Information..58 5.3 Synchronizing Using an Infrared Connection ... 60 5.4 ActiveSync Section 6: Personalizing Your PPC6600...62 6.1 Device Settings... 63 6.2 Phone Settings... 71 Section 7: Using Microsoft Outlook 7.1 Calendar ...
- Page 5 Section 10: Using Companion 10.1 Pocket Word ... 121 10.2 Pocket Excel ... 124 10.4 Pictures ... 126 10.3 Windows Media Player ... 126 Section 11: Using Camera and 11.1 Camera ... 131 11.2 Album ... 143 11.3 Managing Sprint PCS Picture Mail Section 12: Maintenance, Safety, and 12.1 Adding or Removing Programs ...
-
Page 6: Section 1: Getting Started
Section 1 Getting Started In This Section 1.1 Setting Up Services 1.2 Your Sprint PCS Vision Smart Device 1.3 Battery 1.4 Accessories... -
Page 7: Setting Up Service
1.1 Setting Up Service Setting up service on your new Sprint PCS Vision Smart Device is quick and easy. This section walks you through the necessary steps to set up your device's phone, set up your voicemail, establish passwords, and contact Sprint for assistance with your Sprint PCS Service. -
Page 8: Sprint Pcs Account Passwords
Sprint PCS Account Passwords As a Sprint PCS customer, you enjoy unlimited access to your personal account information, your voicemail account, and your Sprint PCS Vision account. To ensure that no one else has access to your information, you will need to create passwords to protect your privacy. -
Page 9: Getting Help
Getting Help Visit Our Website You can get up-to-date information on Sprint PCS Services and Options by signing onto our Website at www.sprintpcs.com When you visit us online, you can Review coverage maps Learn how to use voicemail Access your account information Purchase accessories Discover additional service plan options Check out frequently asked questions... - Page 10 Sprint PCS Directory Assistance You have access to a variety of services and information through Sprint PCS Directory Assistance, including residential, business, and government listings; assistance with local or long-distance calls; movie listings; and hotel, restaurant, shopping, and major local event information.There is a per-call charge and you will be billed for airtime.
-
Page 11: Your Sprint Pcs Vision Smart Device
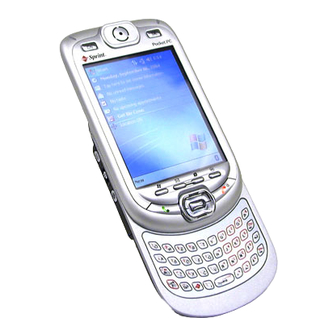
1.2 Your Sprint PCS Vision Smart Device Top, Front, and Bottom Components 1. MMC/SD cards or SDIO accessories slot 4. Contact 5. Messaging 6. Start 7. Send 16. Microphone 17. Soft Reset 15. QWERTY Keyboard Section 1: Getting Started 2. Power Button/ Backlight 3.Earphone Plug 8. - Page 12 Back, Left and Right Side Components 19. Stylus and Stylus Slot 20. Notification LED 21. Record 22. Volume 23. Camera 24. Infrared Port 25. Built in Flash Preview Mirror 30. Car Antenna Connector 27. Camera Lens 28. Battery 29. Fixing Lock Section 1: Getting Started...
- Page 13 PPC6600 Features 1. MMC/SD cards or SDIO accessories slot Insert either MMC/SD cards or SDIO accessories in this slot. 2. Power Button/Backlight Press to turn your PPC6600 or backlight on or off. 3. Earphone Plug Allows you to listen to audio media or use the phone's hands-free kit.
-
Page 14: Battery
22. Volume Press up/down to adjust the volume of your device. 23. Camera Press to activate the built-in camera. 24. Infrared Port Enables you to exchange files or data with other devices infrared. 25. Built in Flash It improves picture quality in low-light condition. 26. -
Page 15: Data Retention
Data Retention It is vital to keep your battery charged. Because your PPC6600 does not have a hard drive,all data and any new programs you install are stored in RAM. If the battery completely drains, any data or new programs you installed will be erased. Only the default programs on the device when you bought it will remain. - Page 16 - or - Plug the AC Adapter into the optional USB cable head and then connect your PPC6600 directly to an external power source. - or - Plug the AC Adapter into the optional AC Adapter Converter and then connect the sync connector of your PPC6600 directly to an external power source without using the cradle.
-
Page 17: Usb Cradle
When Your Battery is Low When the low battery warning message appears, immediately save any data you are working on, perform a synchronization with your PC (see page 55), then turn off your PPC6600. If your device does shut down, the backup portion of your main battery will protect data for up to 72 hours. -
Page 18: Stereo Headset
USB Sync Cable optional USB Sync Cable (not included) allows you to synchronize with your desktop PC without the cradle. The AC converter in the head also allows you to insert the AC Adapter to recharge your device. Stereo Headset The included stereo headset has a volume control jog dial and a button to press to pick up a phone call. -
Page 19: Section 2: Getting To Know Your Ppc6600
Section 2 Getting to Know Your PPC6600 In This Section 2.1 Initiating Your Sprint PCS Vision Smart Device 2.2 Entering Information 2.3 Writing on the Screen 2.4 Drawing on the Screen 2.5 Recording a Message 2.6 Finding and Organizing Information... -
Page 20: Initiating Your Sprint Pcs Vision
2.1 Initiating Your Sprint PCS Vision Smart Device Turning Your PPC6600 On and Off To turn your device on: Press the Power Button on the top of the device. (The PPC6600 will power up and, if this is the first time it has powered up, will automatically begin the initiation/calibration process. -
Page 21: Screen Orientation
Screen Orientation To switch the orientation of your LCD screen between Portrait and Landscape mode if needed, you can select the > Settings > System tab > Orientation options by tapping Screen.This helps to get a better view or a better operation interface when running certain programs on your PPC6600. -
Page 22: Today Screen
Today Screen The Today screen displays important information, such as today’s appointments, and status icons for your device. Tap the information listed on the Today screen to open the associated program. 1. Tap to go to a program. 2. Tap to view notification information. 3. - Page 23 Indicators Following are some of the status icons you may see. Indicators Sounds are off / sounds are on. Main battery with full strength / no battery. Main battery low / very low. Backup battery is very low. Indicates that the Caller ID monitor program is not yet ready to receive calls.
-
Page 24: Command Bar
Title Bar The title bar, located at the top of the screen, displays the current time and certain status icons.Tap the leftmost icon to open the Start Menu. shown below. In Portrait mode 1. Tap to switch to a program. 2. -
Page 25: Pop-Up Menus
Pop-Up Menus Use pop-up menus to quickly perform an action on an item. To access a pop-up menu, tap and hold the item that you want to perform the action on. When the menu appears, tap the action you want to perform, or tap anywhere outside the menu to close it without performing an action. - Page 26 Icon Program Phone Tasks Windows Media Pocket Excel Pocket Word MSN Messenger Pictures Calculator Games File Explorer Camera Album xBackup Bluetooth Manager Section 2: Getting to know Your PPC6600 Description Makes and receives calls, switches between calls, and sets up conference calling.
-
Page 27: Entering Information
2.2 Entering Information You can enter information on your device in several ways, depending on the type of program you are using. Synchronizing - Using ActiveSync, exchange information between your PC and device. (For more information on ActiveSync, see Section 5.) Typing - Using the Input Panel or the QWERTY keyboard ... -
Page 28: Typing With The Soft Keyboard
Typing on the QWERTY Keyboard 1. Slide the main screen upward to reveal the QWERTY keyboard. 2. To type lowercase letters, press the keys with your fingers. 3. To type a single uppercase letter, press the the desired letter key. 4. - Page 29 5. To backup one character, tap the backspace key. (You can also tap and hold any key and then drag the stylus to the left across at least two others to back up one space.) 6. To insert a carriage return, tap and hold the stylus anywhere on the keyboard and drag down.
-
Page 30: Using Letter Recognizer
Using Letter Recognizer With Letter Recognizer you can write letters using the stylus just as you would on paper. 1. Tap the arrow next to the Input Panel button Letter Recognizer. 2. Write a letter in the box. When you write a letter, it is converted to typed text that appears on the screen. -
Page 31: To Punctuate In Transcriber
Using Transcriber With Transcriber you can write anywhere on the screen using the stylus just as you would on paper. Unlike Letter Recognizer and Block Recognizer, you can write a sentence or more of information. Then, pause and let Transcriber change the written characters to typed characters. -
Page 32: Editing/Selecting Text
Using Profiles The Letter Shapes selector supports two profiles by tapping File > Master or Guest: Master: Typically used by the PPC6600's primary user. This profile is unaffected by any Guest user settings. Guest: For temporary device usage by another person. ... -
Page 33: Writing On The Screen
2.3 Writing on the Screen In any program that accepts writing, such as the Notes program, and in the Notes tab in Calendar, Contacts, and Tasks, you can use your stylus to write directly on the screen.Write the way you do on paper.You can edit and format what you have written and convert the information to text at a later time. -
Page 34: Converting Writing To Text
Converting Writing to Text 1. On the note, tap Tools and Recognize from the menu bar. 2. If you want to convert only certain words, select them before tapping Recognize on the Tools menu (or tap and hold the selected words and then tap Recognize on the pop up menu). -
Page 35: Drawing On The Screen
If you edit or add to a word after attempting to recognize it, the new writing will not be included if you attempt to recognize it again. 2.4 Drawing on the Screen You can draw on the screen in the same way that you write on the screen. -
Page 36: Recording A Message
To change the zoom level so it is easier to work or view your drawing, Tip: tap Tools and then select a zoom level. 2.5 Recording a Message In any program where you can write or draw on the screen, you can also quickly capture thoughts,reminders,and phone numbers by recording a message. -
Page 37: Finding Information
To change recording formats In the note list, tap Tools > Options > Global Input Options link. 2. Tap the Options tab and select a voice recording format from the drop-down list. Pulse Code Modulation (PCM) provides slightly better sound quality. However, PCM recordings may take up to 50 times more storage space than Mobile Voice recordings. -
Page 38: Section 3: Sprint Pcs Service Features
Section Sprint PCS Service Features In this Section ..3.1 About Your Phone 3.2 Making a Call 3.3 Receiving a Call 3.4 In-call Options 3.5 Contacts Information 3.6 Additional Dialing Information 3.7 Securing Your Phone... -
Page 39: About Your Phone
3.1 About Your Phone Like a standard mobile phone you can use your PPC6600 to keep track of calls and send SMS messages.You can also take notes while talking and dial directly from About The Dialer Screen To access the Dialer Screen, tap your device.From this screen, you can access Call History,Speed Dial and Phone Setting. - Page 40 Indicators Below are some of the status icons you may see phone operation.. Indicator Phone off or out of network service. turn on the phone. In network service, tap this icon to turn off the phone. Call Missed. Tap this icon to view the call(s) you missed.
-
Page 41: The Navigation Pad And Dialing
The Navigation Pad and Dialing 1. Take Call - Press to answer an incoming call. Dialer Screen - Press to activate the dialer screen. Speakerphone - During a call, press and hold to turn Dial - Press to dial a number. ... -
Page 42: Turning Phone On And Off
In many countries you are required by law to turn off your phone Important when flying. Turning off your device doesn’t turn off your phone; Note: you must follow the instructions below to turn your device’s phone off when flying. Turning Phone On and Off You can turn your phone on and off while keeping your device turned 1. -
Page 43: Adjusting Phone Volume
Adjusting Phone Volume 1. During a call, tap your device. 2. You can select to adjust the phone volume device volume menu. 3. If you select Vibrate mode, at the top of the phone display. 4. Turn off the volume by choosing the Off option. To adjust the conversation phone volume, you must do it during a call. -
Page 44: Making A Call
3.2 Making a Call With your PPC6600 Phone, you can make a call from the Dialer, Contacts, Speed Dial, and Call History. To make a call from the Dialer: The most direct method is by using the phone keypad. 1. Press 2. -
Page 45: To Make A Call From Speed Dial
Tap the Letter here to display all the phone numbers and e-mail for this contact Using Speed Dial: Create speed dials to call frequently-used numbers with a single tap.Before you can create a speed dial entry for a phone number, that number must already exist in Contacts. - Page 46 By default the Location function will give you the next available position in the Speed Dial list. If you want to assign a number to a Note: position that is already occupied, the new number will replace the existing number. Tips for Speed Dial Setting To create a speed dial entry from Contacts, tap and hold ...
-
Page 47: Receiving A Call
3.3 Receiving a Call To answer an incoming call: Tap Answer, or press press Note: If you reject a call, the busy tone will be sent out. To end a call: When on a call, press 3.4 In-Call Options Your device notifies you when you have another incoming call and gives you the choice of rejecting or accepting the call. -
Page 48: Taking Notes During A Call
4. Once you’re connected to the second party, press or tap Three-Way Calls can only be established from outgoing calls; Note: incoming calls cannot be conferenced. Taking Notes During a Call Regardless of whether you call from the Dialer, Contacts, Call History, or Speed Dial, you can take notes during a call. -
Page 49: Enabling Speakerphone Mode
Enabling Speakerphone Mode Your device has a speakerphone allowing you to talk hands-free and/or let other people listen to the caller. 1. Wait until the phone is ringing. 2. Press and hold speakerphone comes on and the icon appears in the top toolbar. 3. -
Page 50: Contacts Information
3.5 Using Call History Managing Your Call History Call History details all incoming,outgoing,and missed calls, and also provides a summary of total calls. Call History can also tell you when a call was initiated, how long it lasted, and provides easy access to any notes taken during the call. - Page 51 To manage how long your Call History details are saved: 1. Tap > Tools > Call Timers. 2. Tap the drop-down list under Delete call history items older than:, select a time period, and tap OK. Saving Contacts From Call History You can use your Call History listings to save entries to your device’s Contacts list.
-
Page 52: Additional Dialing Information
3.6 Additional Dialing Information To make an emergency call: Enter the emergency number 911 then tap press the 3.7 Securing Your Phone You can customize the level of security you want to have on your PPC6600 by locking the keypad or the entire device. Locking the keypad The keypad lock turns off the keypad functionality. -
Page 53: Locking Your Phone
Locking Your Phone Locking your PPC6600 prevents access to personal data.When you enable this feature, your PPC6600 will automatically lock after a specified time of inactivity. A screen will be displayed requiring your PPC6600 lock password before access is granted. 1. -
Page 54: Section 4: Sprint Pcs Vision
Section Sprint PCS Vision In This Section 4.1 Sprint PCS Business Connection 4.2 Messaging 4.3 Web 4.4 Sprint PCS Picture Mail... -
Page 55: Sprint Pcs Business Connection
Sprint PCS Business Connection Personal Edition Sprint PCS Business Connection Personal Edition is designed to offer secure wireless access to both Microsoft Outlook and Lotus Notes. Sprint PCS Business Connection Personal Edition delivers the following features: Business e-mail access: Read, reply to, forward, delete and ... -
Page 56: Messaging
Messaging Now you can send and receive e-mail and text messages from your Sprint PCS Smart Device. Messaging allows you to stay connected to friends, family, and co-workers 24 hours a day with always-on text capabilities anywhere on the enhanced Sprint Nationwide PCS Network. -
Page 57: Web
With Web on your Sprint PCS Vision Smart Device, you can browse full-color graphic versions – not just text versions – of your favorite Websites, making it easier than ever to stay informed while on the go. Check sports scores, trade stocks, and shop on your PPC6600 anywhere within the enhanced Sprint Nationwide PCS Network. -
Page 58: Creating Your Sprint Pcs Picture Mail Password
My Account: Check minutes and Sprint PCS Vision usage, view your current invoice, or make a payment. Google Search: Launch a Google search. Navigating the Web from your phone using the Sprint PCS Vision home page is easy once you get the hang of it. For details on how to connect to and navigate the Web, see "8.2 Connecting to the Internet"... -
Page 59: Sprint Pcs Vision Faqs
Sprint PCS Vision FAQs How do I know when my device is connected to Sprint PCS Vision Services? Your device automatically connects when Sprint PCS Vision Service is used or an incoming message arrives. (Connecting takes about 10-12 seconds.) Can I make calls and use Sprint PCS Vision Services at the same time? You cannot use voice and data services simultaneously. -
Page 60: Synchronizing Information
Section Synchronizing Information In This Section 5.1 Using ActiveSync 5.2 Synchronizing Information 5.3 Synchronizing by Using an Infrared Connection 5.4 ActiveSync ® ® Errors... -
Page 61: Using Activesync
5.1 Using ActiveSync With ActiveSync®,you can synchronize the information on your PC with the information on your PPC6600. Synchronization compares the data on your device with your PC and updates both with the most recent information.With ActiveSync®, you can: Keep Pocket ... -
Page 62: Connecting Your Device To Your Pc
Connecting Your Device to Your PC 1. Insert the USB connector attached to the USB cradle into an available USB port on your PC. 2. Insert the AC adapter into the adapter port on the cradle and plug the other end into a standard power outlet. 3. -
Page 63: Section 5: Synchronizing Information
5.2 Synchronizing Information This section provides an overview of the types of Outlook information you can synchronize.By default, ActiveSync does not automatically synchronize all types of Outlook information. ActiveSync® for specific information types. Synchronizing Inbox When you select Inbox for synchronization in ActiveSync®, e-mail messages are synchronized as part of the general synchronization process. -
Page 64: Synchronizing Calendar
Synchronizing Calendar Calendar items stored on your PPC6600 can be synchronized with calendar items stored on your PC and/or on a Microsoft® calendar items from the last two weeks will be synchronized. Calendar items created on your PPC6600 are copied to ... -
Page 65: Synchronizing Using An Infrared Connection
5.3 Synchronizing Using an Infrared Connection You can use an infrared connection to create a direct connection between your PPC6600 and another mobile device or computer quickly. This method is ideal for quickly switching between multiple devices since there are no cables or adapters to change. -
Page 66: Activesync Errors
5.4 ActiveSync WheneverActiveSync® cannot successfully synchronize your information, it displays an error on your phone. To view ActiveSync Press the Action button when the error text is displayed. ActiveSync® will then display more information about the error that occurred. Some types of errors can interfere with automatic synchronization. -
Page 67: Section 6: Personalizing Your Ppc6600
Section Personalizing Your PPC6600 In This Section 6.1 Device Settings 6.2 Phone Settings... -
Page 68: Device Settings
6.1 Device Settings You can adjust device settings to suit the way you work. To see available options, tap tab located at the bottom of the screen. Personal Tab Icon Buttons Assigns an application program to a hardware button. Input Sets up the input portion of your device. - Page 69 Icon Backlight Customizes the for power saving purposes. Button Lock Enables you to lock the buttons on your device except Power button when device is off. Certificates Displays the name of the certificate issuer and the expiration date. Clock & Alarms Changes the time Device Information Displays information about version, hardware,...
- Page 70 Buttons To customize the program hardware buttons to open your most used programs: 1. Tap > Settings > Personal tab > Buttons > Program Buttons tab 2. Under Select a button, tap the button you want to assign a program, and then select a program from Assign a program.
-
Page 71: Owner Information
You can also change input options by tapping the Note: the Options. Menus To add the programs you use most often to the Start Menu. 1. Tap > Settings > Personal tab > Menus. 2. Select the programs you want, then tap OK. Note: Only 7 programs are allowed in the Start Menu. -
Page 72: Sounds And Notifications
Password 1. Tap > Settings > Personal tab > Password. 2. To enable this function, tap Prompt if unused for, then select a time period from the pull-down menu. 3. Select the type of password you would like to use: Simple 4 digit or Strong alphanumeric. -
Page 73: To Change The Background
Turning off sounds and the notification light helps conserve battery power. Use Phone settings to change the ring type and volume for your phone. Today You can customize the Today screen the following ways: To change the background: 1. -
Page 74: Clock & Alarms
Backlight 1. Tap > Settings > System tab > Backlight. 2. Tap the Battery Power tab to turn on/off the backlight when using battery power. 3. Tap the External Power tab to turn on/off the backlight when using external power. 4. -
Page 75: Permanent Save
The Storage Card tab displays how much memory is available on the storage card that is inserted into your device. If you have more than one card inserted, tap the list box and then the name of the storage card whose information you want to view. -
Page 76: Phone Settings
Keyboard Your PPC6600 comes with a QWERTY keyboard.You can access it by sliding down the bottom end of the device. > Settings > System tab> Keyboard to open the Keyboard setting program which allows you to switch on the keyboard backlight, set a time limit for the keyboard backlight to switch off when it is not being used;... -
Page 77: Add Ring Tone
Add Ring Tone Add RingTone allows you to quickly find and display all the ring tones stored on your device, gives you the option to listen, and then add or remove them from the Phone Settings list mentioned above. 1. To display all ring tones on your device, you can >... -
Page 78: Automatic Answer
Services Services settings on the Settings > Personal > Phone > Services tab are primarily used to set options such as Voice Privacy, Network System, and Location Setting. Feature Location Setting Enables you to allow your network to lock onto your position or not. SMS Setting By default, your device will automatically detect and set your voicemail and SMS... -
Page 79: Using Microsoft Outlook
Section 7 Using Microsoft Outlook ® In This Section 7.1 Calendar 7.2 Contacts 7.3 Tasks 7.4 Notes Pocket ®... -
Page 80: Calendar
7.1 Calendar: Scheduling Appointments and Meetings Use Calendar to schedule appointments, including meetings and other events.You can check your appointments in any of several views (Day,Week,Month,andAgenda) and set Calendar to remind you of appointments with a sound or other method. Appointments for the day can be displayed on the Today screen. - Page 81 Creating or Changing an Appointment To create an appointment, tap New.To select a new date from a pop-up calendar, tap the displayed date. To enter or select a new time, tap the displayed time. Enter the appointment details, and when finished, tap OK to return to the calendar.
-
Page 82: Sending A Meeting Request
Sending a Meeting Request You can use Calendar to set up meetings with users of Outlook or Pocket Outlook®.The meeting request will be created automatically and sent either when you synchronize Inbox or when you connect to your e-mail server. 1. - Page 83 Setting a Reminder for an Appointment 1. In Calendar, tap the appointment, and then tap Edit on the tool bar. 2. Tap Reminder and select Remind me. 3. To change how many minutes before the appointment you are reminded, tap the minutes displayed. To set a reminder for all new appointments, in Calendar, tap Tip: Tools >...
-
Page 84: Contact
7.2 Contacts: Tracking Friends and Colleagues Contacts maintains a list of your friends and colleagues so that you can easily find the information you’re looking for, whether you’re at home or on the road.You can enter both personal and business information. If you use Outlook on your PC, you can synchronize contacts between your PPC6600 and PC. -
Page 85: Finding A Contact
Creating or Changing a Contact: To add a new contact: 1. Tap > Programs > Contacts > New. 2. Use the input panel to enter a name and other contact information. (You will need to scroll down to see all available fields.) 3. -
Page 86: Beaming A Contact
In the contact list, tap the category list (labeled All Contacts by default) and tap the category to which you’ve assigned a contact.To show all contacts again, select All Contacts.To view a contact not assigned to a category, select No Categories. To view the names of companies your contacts work ... -
Page 87: Tasks
Using the Summary Screen When you tap a contact in the contact list, a summary screen is displayed.To change the contact information, tap Edit. 7.3 Tasks: Keeping a To Do List Use Tasks to keep track of things you need to do. A variety of task information can be displayed on the Today screen. -
Page 88: Beaming A Task
To quickly create a task, enter text in the Tap here to add a new Note: task box at the top of the screen. If you don't see this box, tap Tools > Entry Bar. Setting a Reminder for a Task 1. -
Page 89: Notes
7.4 Notes: Capturing Thoughts and Ideas Notes helps you quickly capture your ideas, notes, and thoughts.You can create a note using written and typed text, drawings, and recordings.You can also share your notes with others through e-mail, infrared, or synchronizing with your PC. - Page 90 Beaming a Note To beam a note, in the note list, tap and hold the note. On the pop-up menu, tap Beam File. Changing Options In the note list, tap Tools, and then Options. 1. From the Default template list, you can select a pre-designed template to use with all new notes.
-
Page 91: Section 8: Getting Connected
Section 8 Getting Connected In This Section 8.1 About Connections 8.2 Connecting to the Internet 8.3 Terminal Client Service 8.4 Bluetooth... -
Page 92: About Connections
8.1 About Connections You can set up connections to the Internet and corporate network at work in order to do activities such as browsing the Internet or intranet, sending and receiving e-mail and instant messages, and synchronizing information. Connections can be made using a modem, wireless network, or network (Ethernet) card. -
Page 93: Setting Up A Wap Gateway
4. Wireless connections can be made via a mobile phone network or CDMA. If you are using a mobile phone network to connect, in the Select a modem list, tap Cellular Line. 5. To view additional information for any screen, tap 6. -
Page 94: Pocket Internet Explorer
8. In the WAP box, enter the WAP gateway server name. Under Port, enter the port number.The most common WAP port number is 9201. 9. Create a modem connection. Also, if necessary, set dialing rules. Pocket Internet Explorer Once connected, you can use Pocket Internet Explorer to view Web HTML, cHTML, xHTML and WAP pages on your PPC6600 in two ways: by downloading pages through synchronization or by connecting to the Internet.While browsing, you can also... -
Page 95: Terminal Services Client
Press here for quick access to http://pda.sprintpcs.com 8.3 Terminal Services Client Using the Terminal Services Client, you can log onto a PC running Terminal Services or Remote Desktop and use all of the programs available on that PC from your mobile device. For example, instead of running can run the PC version of the .doc files on that PC from your PPC6600. -
Page 96: Navigating Within Terminal Services Client
Navigating Within Terminal Services Client Once connected to the server, the PC’s screen may more than fill your mobile device’s screen. If scroll bars are displayed on the server’s screen, you will see more than one set of scroll bars on your PPC6600: one to scroll information on the PC, and one to scroll the PC display through the Terminal Services window in Terminal Services Client. -
Page 97: Tips And Tricks
Tips and Tricks Improving display performance Display performance is improved by decreasing the time it takes for the screen to be refreshed on the computer. 1. On your computer, select Start, then Settings, and then select Control Panel. 2. Click Display. 3. -
Page 98: Turning Bluetooth On And Off
Using Bluetooth Turning Bluetooth On and Off To turn Bluetooth on: icon in the lower-right corner and tap Turn Tap the Bluetooth ON. (You can also tap Settings, and tap Turn on.) When Bluetooth is powered on, the LED indicator for Bluetooth, located Note: on the left upper corner of your PPC6600, will blink blue every 6 seconds to indicate Bluetooth is on. - Page 99 To access Bluetooth Settings: 1. Turn Bluetooth on. 2. Tap > Bluetooth Settings. Using Profiles Setting the profiles allows: Different users to quickly re-configure the PPC6600 to their personal preferences. For example, if Joe and Mary both use the same device, but each uses it for a different purpose, selecting a preconfigured profile will alter the settings to those of the appropriate user.
- Page 100 4. Select an existing profile on which to base the new profile. 5. Tap OK. The new profile does NOT automatically become the active profile; to Note: activate the new profile, select it from the Current Profile field on the General tab.
-
Page 101: Setting Accessibility Properties
Setting Accessibility Properties You can enter or change the accessibility properties to define how your PPC6600 interacts with other Bluetooth devices. To access Accessibility properties: > Bluetooth Settings > Accessibility tab. 1. Enter the Bluetooth name of your PPC6600. (This name is displayed to remote devices when you’re using the current profile, if the Use PocketPC device name for Bluetooth is unchecked.) -
Page 102: Enabling Bluetooth Services
4. Other devices can discover me - When this option is enabled, other Bluetooth devices can see and report your PPC6600. This allows any device, even those unknown to yours, to connect to your PPC6600. The ability of remote devices to connect is also subject to the security Note: restrictions, and whether Bluetooth is enabled on your PPC6600. - Page 103 To access Bluetooth Services for configuration: > Bluetooth Settings > Services tab. 1. In the Services field, select the service to be configured. 2. In the Service settings area, enable the selected service by checking the Enable service box. 3.
-
Page 104: Pairing Devices
Using Bluetooth Manager The Bluetooth Manager provides a friendly user interface for establishing connections based on the connection preferences and profiles that you have set in the Bluetooth Settings. With Bluetooth Manager, you can: Pair devices to allow for information exchange. ... - Page 105 Exchanging Business Cards You can use Bluetooth Manager to launch Business Card Exchange, which allows you to exchange your electronic business card information with other Bluetooth devices. To use Business Card Exchange: 1. From the Bluetooth Manager, tap Tools > Business Card Exchange. 2.
- Page 106 Using the Bluetooth Connection Wizard The Bluetooth Connection Wizard allows you to configure your PPC6600 to use Bluetooth for a variety of external data connections. To run the Bluetooth Connection Wizard: 1. From the Bluetooth Manager, tap New to launch the Bluetooth Connection Wizard.
- Page 107 Locate a remote device that can provide access to the Internet. Examples include a Bluetooth cell phone, a Bluetooth modem, or possibly a Local Area Network. Once the connection shortcut is created, open the connection and then open a browser such as Internet Explorer.
- Page 108 To establish a serial connection: 1. Tap > Bluetooth Manager. 2. Tap New > Explore a Bluetooth device > Next. 3. Follow the connection wizard instructions. Setting up a Bluetooth Hands-free/Headset Connection 1. Tap > Bluetooth Manager. 2. Tap New > Hands-free/Headset setup > Next. Be sure that the Hands-free device you are trying to connect to is ready Note: to receive incoming connection requests.
- Page 109 Dial-Up Networking: Connecting to a Remote PC Dial-up Networking (DUN) allows you to connect to a remote computer via a phone line. Once connected, you can browse the Internet, check your e-mail, etc. The remote Bluetooth device that will provide the Dial-up Networking service must have access to a telephone system (either a hard-wired or cellular connection).
- Page 110 To make this connection the default dial-up connection for Pocket Internet Explorer when using Bluetooth modem, you need to complete the following steps: 1. From the Today screen, tap 2. Tap the Connections icon, then tap Advanced, and select Networks. 3.
- Page 111 To host a Personal Area Network: 1. From Bluetooth Manager > tap New > Connect > Join a personal network > tap Next. 2. On the next wizard screen select Host a personal network, and then tap Next. 3. Add remote devices to the Bluetooth Personal Area Network, if desired: Tap the Add button and select the device to be added.
-
Page 112: Active Connections
The double-tap is context sensitive: If the connection is not open — double-tap its icon to establish a connection. If the connection is open — double-tap its icon to display the connection’s status. Connections can also be opened/closed, and other options accessed, using the tap-and-hold technique. -
Page 113: In This Section
Section Exploring Messaging In this Section 9.1 E-Mail Messages 9.2 SMS Text Messaging 9.3 Sprint PCS Picture Mail Messaging 9.4 MSN Messenger 9.5 Managing Messages and Folders... -
Page 114: E-Mail Messages
9.1 E-mail Messages: Using Messaging You can set up a connection to an e-mail server so that you can send and receive e-mail messages by using a modem or network connection and Inbox on your device. The ISP or network must use a POP3 or IMAP4 e-mail server and an Note: SMTP gateway. -
Page 115: Sending And Receiving E-Mail
Sending and Receiving E-mail You can use Inbox to send and receive e-mail messages in either of these ways: Synchronize e-mail messages with Outlook® on your PC. Connect directly to an e-mail server through an Internet service provider (ISP) or a network. You also can use Messaging to send and receive Text Messages;... -
Page 116: Using The Message List
When working offline, once you have downloaded new message headers or partial messages, you can disconnect from the e-mail server and then decide which messages to download completely. The next time you connect, Inbox downloads the complete messages you have marked for retrieval and sends the messages you have composed. -
Page 117: Sms Text Messaging
Phone messages can be sent by entering the phone numbers in Tip: the To field. 3. Compose your message. (To enter preset or frequently used messages, tap My Text and select a message.) 4. Tap the (If you are working offline, the message is moved to the Outbox folder and will be sent the next time you connect.) 9.2 SMS Text Messaging Your PPC6600 and Sprint PCS Account let you quickly and... -
Page 118: Sprint Pcs Picture Mail
9.3 Sprint PCS Picture Mail Using Media Picker to Send Sprint PCS Picture/Video Mail: Media Picker is used when you wish to send Sprint PCS Picture/Video Mail. It is a program very similar to Album, but can only be invoked when Messaging is selected from the Start Menu or when you select Picture Mail from the Today screen. -
Page 119: Viewing Incoming Picture/Video Mail Messages
6. Enter the text message in the Message box. 7. If you wish to record and include a Voice Memo with the picture you are sending, tap on the microphone icon and then tap Record. A pop-up menu will appear. Tap start recording and tap OK. - Page 120 4. Tap on a picture/video mail, then a messaging screen will appear. 5. In the message, tap on the link to open the picture/video mail. This will automatically connect the Sprint PCS Picture Mail Website. Managing Your Sprint PCS Picture/Video Mail: After you have opened a picture/video mail, there are three options available: Reply to the sender.
-
Page 121: Msn Messenger
9.4 MSN Messenger: Instant Messaging MSN Messenger on your mobile device is an instant messaging program that lets you: See who is online. Send and receive instant messages. Have instant message conversations with groups of contacts. Notify contacts of your on-line status. ... -
Page 122: Working With Contacts
Setting Up and Signing In 1. Connect to the Internet using any methods outlined in Section 8 Getting Connected. 2. Tap anywhere on the MSN Messenger screen, enter your sign-in name and password, then tap Sign in. Or tap Tools, then Options, and then select Accounts to set up your sign-in name and password by selecting Enable MSN Messenger Service. -
Page 123: Managing Messages And Folders
9.5 Managing Messages and Folders By default, messages are displayed in one of five folders for each service you have created: Inbox, Deleted Items, Drafts, Outbox, and Sent Items.The Deleted Items folder contains messages that have been deleted on the device. The behavior of the Deleted and Sent Items folders depends on the options you have chosen. - Page 124 If you use POP3 and you move e-mail messages to a folder you created, the link is broken between the messages on the device and their copies on the mail server. The next time you connect, the mail server will see that the messages are missing from the device Inbox and delete them from the server.
-
Page 125: Section 10: Using Companion Programs
Section Using Companion Programs In This Section 10.1 Pocket Word 10.2 Pocket Excel 10.3 Windows Media Player 10.4 Pictures... -
Page 126: Pocket Word
10.1 Pocket Word Pocket Word works with you easy access to copies of your documents. You can create new documents on your device, or you can copy documents from your PC to your device. Synchronize documents between your PC and your device so that you have the most up-to-date content in both locations. -
Page 127: Entering Information In A New File
1. Select a specific folder if you only want to list the Word files in that folder. 2. Tap to change the sort order of the list. 3. Tap to open a document. 4. Tap and hold an item to see a pop-up menu of actions. 5. -
Page 128: Drawing Mode
a. Typing Mode Using the input panel, enter typed text into the document. For more information on entering typed text, see Section 2, page To format or edit existing text,first select it by using your stylus to drag through the text.You can search a document for text by tapping Edit, then Find/Replace. -
Page 129: Pocket Excel
10.2 Pocket Excel Pocket Excel works with provide easy access to copies of your workbooks.You can create new workbooks on your device, or you can copy workbooks from your PC to your device. Synchronize workbooks between your PC and your device so that you have the most up-to-date content in both locations. -
Page 130: Tips For Working In Pocket Excel
Tips for Working in Pocket Excel Note the following when working in large worksheets in Pocket Excel: View in full screen mode to see as much of your worksheet as possible. Tap View > Full Screen. (To exit full screen mode, tap Restore.) Show and hide window elements. -
Page 131: Section 11: Using Camera And
10.3 Windows Media Player Microsoft® and video files that are stored on your device or on a network. To switch to Windows Media Player, tap Media. Use Microsoft® Windows Media Player on your PC to copy digital audio Note: and video files to your PPC6600. Your PPC6600 can play Windows Media and MP3 files. -
Page 132: Viewing Pictures
Viewing Pictures 1. In Pictures, tap 2. Tap to view pictures stored in your My Pictures folder. 3. Tap to view pictures stored on a storage card. Tap anywhere on the screen to display the Slide Show toolbar, which you can use to pause the slide show, rotate the view, and more. -
Page 133: Editing Pictures
Editing Pictures You can rotate,crop,zoom and adjust the brightness and color contrast of your .jpg pictures. 1. Tap to rotate a picture 90 degrees counter-clockwise. 2. Tap to crop a picture by dragging and selecting the crop area.Tap outside of the box to stop cropping. 3. -
Page 134: Customizing Pictures
Customizing Pictures You can opt to launch the Pictures program automatically when a digital camera storage card is inserted,and decide on a time delay length between slides when showing a slide show. To launch pictures automatically when a storage card is inserted: 1. -
Page 135: Section 11: Using Camera And Album
Section Using Camera and Album In This Section 11.1 Camera 11.2 Album 11.3 Managing Sprint PCS Picture Mail... -
Page 136: Camera
11.1 Camera With Camera Wizard, you can use the built-in camera on the back of your device to snap new photos or shoot video clips with accompanying audio. When in Image Capture mode, you can capture standard still images. In Picture Frame mode, you can place your captured images into attractive frames (templates). -
Page 137: Usage Of Buttons In Camera Mode
Usage of Buttons in Camera Mode When in Camera mode, you can press the following buttons on your Pocket PC Phone as a shortcut to performing various functions. Left and Right Buttons Select template: Picture Theme If in Capture mode, press to select the previous or next template. -
Page 138: Photo Capture Mode
Photo Capture Mode When in Photo Capture mode, you can capture a single still image by pressing the Capture button on the left side of your PPC6600, or the Capture button on the screen, or by pressing the Action button. This captures the current content shown on your screen, and saves it to a file immediately using your currently specified filename convention in Options. - Page 139 If the Review file after capture checkbox is currently checked in the Options > General screen, then immediately after you capture an image, it will be displayed on the screen along with four icons. Confirm mode screen: 1. To return to the previous screen, tap the Camera icon.
- Page 140 Send via E-mail Selecting this option will launch your inbox Compose screen and automatically attach your picture to the e-mail. Just compose and send the e-mail as you normally would. Zooming In/Out When in Video Capture submode or Photo Capture submode, you can press the Up navigational button on your Pocket PC to Zoom In the incoming video stream.
-
Page 141: Video Capture Mode
Video Capture Mode To start video recording: 1. Press the Camera button on the side of the device, then to enter Video capture mode. 2. Press the Capture or the 3. To stop recording, press it again. This captures the current content shown on your screen, and saves it to a file immediately using your currently specified filename convention in... - Page 142 Picture Frame Capture Mode Picture Frame capture mode lets you choose a template in which you can place one or more images. You can think of a template as a type of frame in which you would insert a photograph. A few templates are already included with your subfolder named browse and select different templates:...
-
Page 143: Contact Photo Capture Mode
Contact Photo Capture Mode When in Contact Photo Capture mode, you can capture a single still image by pressing the Capture button on the left side of your PPC6600, or the Capture button on the screen, or by pressing the Action button. -
Page 144: Tools Menu
Tools Menu The Tools Menu provides many more settings that let you customize the behavior of Camera mode functions. a) Ambience It allows you to easily adjust the Captured screen so that the incoming image stream looks its best in various environments. By default, the Auto setting is currently active. - Page 145 The preview window in the screen interactively shows the effects of the changes you make in the incoming video stream. When you are ready to save all changes and return to the capture screen, tap OK. c) Options... The Options screen contains four tabs: General, Image, Video, and Modes.
- Page 146 Options Prefix Type By default, the filename of each new captured image will be image followed by a sequential number, for and Prefix file example: image_00001.jpg. If you wish to change this String prefix to a different arbitrary text string, select String in the Prefix Type field and type the desired characters into the Prefix String field.
- Page 147 Options Prefix Type and By default, the file name of each new captured video Prefix String file will be “video” followed by a sequential number. If you wish to change this prefix to a different arbitrary text string, select String in the Prefix Type field and type the desired characters into the Prefix String field.
-
Page 148: Album
11.2 Album You can select Album from the Programs menu to view image and video files, and to play audio files. Four view modes are available: Thumbnail view, Full Screen view, Detailed view, and Slide Show view. To enter Album mode: ... - Page 149 4. This speaker icon indicates that audio annotation has been recorded and associated with this file. 5. Tap to switch to Slide Show view. 6. Tap to switch to Detailed view. (Or, tap directly on a thumbnail to load that file into Detailed View.) If an audio or video file, it will begin playing.
- Page 150 Making an Annotation on Your File This command lets you add (or remove) text or audio annotations for a file. The associated text and/or audio recording can then be set to display/play during a Slide Show. 1. In the Thumbnail View screen, select the desired file, then select Edit >...
- Page 151 Change Tools Crop Resize If you tap Change Tools, more tool options will appear which are indicated below. Select Change Object Tools Text To save an edited picture: 1. Tap File > Save or Save as... If you select Save as, you can choose where you want to locate the picture, in which folder you want to save, and the name of the picture.
-
Page 152: Sending Pictures
To adjust view properties of the picture: Tap Level on the Editor toolbar. This enables you to adjust the view properties of the picture, Contrast, Gamma, and Brightness.To adjust lighter or darker, press the navigation pad up or down. Or, alternatively, through the Camera mode by tapping Tools, and then select Image Control from the pop up menu. - Page 153 2. In the To field, enter the recipient(s)'s e-mail or mobile number directly. To add more recipient(s),tap Add. An Add Recipients screen will appear. Select the recipient(s) from the list. Or alternatively, you can select Options in the command bar, and then choose either to add a New Contact or use the Append Online Contacts.
- Page 154 If this is the first time you have accessed the Sprint PCS Picture Mail account, you will be prompted to create your Sprint PCS Note: Picture Mail password. See "Creating Your Sprint PCS Picture Mail Password" on page 53. Upload All ...
-
Page 155: Options In Album Settings
Copy/Move allows you to copy or move the picture to another folder. Save To Phone allows you to save the picture to another file, Caller ID,Wallpaper, or to an incoming call. Delete to delete pictures. Edit Caption to edit the picture's caption. ... -
Page 156: General Tab
General tab Function Default zoom The setting in the Default Zoom field controls the size of the selected file when it is initially displayed in Detailed View. However, if you want files to always be initially displayed in their original size, select Original Size from the drop-down list box. -
Page 157: Detailed View Mode
Association tab You can associate any or all of the supported file types with the Album program.When selecting a file of the associated type in the File Explorer,it will automatically be opened using the Album application. (If Album is not already running when you select the associated file type, Album will launch.) Slide Show tab These settings control only the behavior of Slide Show view mode. - Page 158 Images Too Big for Screen Whenever the image is too large to be shown in the display area in its entirety, you can simply press your stylus anywhere in the display area and drag it to interactively quick-pan the image to any desired position.
-
Page 159: Slide Show View
Slide Show View When in Thumbnail View or Detailed View, you can tap the Slide Show icon in the Command Bar to enter Slide Show mode. In Slide Show mode, all image, video, and audio files will automatically be displayed/played, one after another. If video and audio files are encountered during a Slide Show, they will be played once,and then the next file in the Slide Show will be displayed/played. -
Page 160: Full Screen View Mode
Full Screen View Mode You can enter Full Screen View only from Detailed View. When in Detailed View mode, simply tap the Full Screen icon on the Toolbar to switch to Full Screen. Tap to switch to Full Screen View mode. When you are ready to exit Full Screen View, tap anywhere on the screen to display the Toolbar. -
Page 161: Managing Sprint Pcs Picture Mail
11.3 Managing Sprint PCS Picture Mail Using the Sprint PCS Picture Mail Website: Once you have uploaded pictures or videos from your PPC6600 to your online Sprint PCs Picture Mail account (see page 115 for more information), you can use your personal computer to manage your pictures and videos. -
Page 162: Section 12: Maintenance, Safety, And Troubleshooting
Section 12 Maintenance, Safety, and Troubleshooting In This Section 12.1 Adding or Removing Programs 12.2 Managing Memory 12.3 Backing Up Files 12.4 Resetting your PPC6600 and Clearing Memory 12.5 Regulatory Agency Identification Numbers 12.6 Important Health and Safety Information 12.7 TIA Safety Information 12.8 Driver Safety Tips 12.9 Consumer Information on Wireless Phone 12.10 Specifications... -
Page 163: Adding Or Removing Programs
12.1 Adding or Removing Programs Programs added to your device at the factory by default are stored in ROM (read only memory).You cannot remove them, and you will never accidentally lose them.You can install any other programs created for your device, as long as your device has enough memory. - Page 164 To add a program directly from the Internet: 1. Determine your device and processor type so that you know which version of the software to install. 2. Download the program to your device directly from the Internet using Pocket Internet Explorer. You may see a single *.xip, *.exe or *.zip file, a setup.exe file, or several versions of files for different device types and processors.
-
Page 165: Managing Memory
12.2 Managing Memory Memory on your PPC6600 is shared between storage memory and program memory. Storage memory is used to store the information you created and programs you installed. Program memory is used to run programs on your device. PPC6600 automatically manages the allocation between storage and program memory. - Page 166 Moving E-mail Attachments Insert an SD Storage Card in the SDIO accessories slot. 2. On Inbox, tap Tools, then Options. 3. On the Storage tab, select Store attachments on storage card then tap OK. All existing attachments are moved to the storage card, and new attachments are automatically stored on the storage card.
-
Page 167: Sd And Mmc Cards
12.3 Backing Up Files Because any new programs or data are stored in RAM, and therefore will be lost if your device loses power for any reason, it is critical that you backup files to your computer or a memory card. When you are at your desktop you can synchronize with your computer to back up files. - Page 168 Backing up or Restoring Your System Using xBackup 1. Tap , select Programs, then tap the xBackup icon, and then select the Backup or Restore tab. 2. If you have inserted the SD card properly it will appear next to Target by tapping Open and selecting Storage Card under the task bar.
-
Page 169: Resetting The Ppc6600 And Clearing Memory
12.4 Resetting the PPC6600 and Clearing Memory You can perform a soft reset or a full reset. During a soft reset, the device is restarted and only some data in open programs may be lost. However, a full reset turns the battery off and returns the device to its original factory settings and deletes all programs, files, contacts, and other information you have saved to the device. -
Page 170: Performing A Full Reset
Performing a Full Reset A full device reset clears memory, deletes all data and restores the PPC6600 to its default settings. Programs installed at the factory remain,while data you have created and programs you have installed are all erased. Press and hold the power button, and then use the ... -
Page 171: Fcc Compliance Statement
12.5 Regulatory Agency Identification Numbers The following accessories have been approved for use with your device. Their assigned model numbers listed below can identify these approved accessories. To ensure continued reliable and safe operation of your PPC6600, use only the accessories listed below with your PH20A2. Accessories Cradle Battery Pack... -
Page 172: Important Health And Safety Information
12.6 Important Health and Safety Information Retain and follow all product safety and operating instructions.Observe all warnings stated in the operating instructions on the product. To reduce the risk of bodily injury, electric shock, fire, and damage to the equipment, observe the following precautions. a) General Precautions Heed service markings ... -
Page 173: Safety Precautions For Power Supply Unit
Avoid unstable mounting Do not place the product with an unstable base. Use product with approved equipment This product should be used only with personal computers and options identified as suitable for use with your equipment. Adjust the volume ... -
Page 174: Sar Information
c) SAR Information THIS MODEL DEVICE MEETS THE GOVERNMENT'S REQUIREMENTS FOR EXPOSURE TO RADIO WAVES. Your wireless mobile CDMA phone is a radio transmitter and receiver. It is designed and manufactured not to exceed the emission limits for exposure to radio frequency (RF) energy set by the Federal Communications Commission of the U.S. -
Page 175: Persons With Pacemakers
* In the U.S. and Canada, the SAR limit for mobile CDMA phone used by the public is 1.6 Watts/kg (W/kg) averaged over one gram of tissue.The standard incorporates a substantial margin of safety to give additional protection for the public and to account for any variations in usage. -
Page 176: Driver Safety Tips
12.8 Driver Safety Tips Your wireless telephone gives you the powerful ability to communicate by voice -- almost anywhere, anytime. But an important responsibility accompanies the benefits of wireless phones, one that every user must uphold. When driving a car, driving is your first responsibility.When using your wireless phone behind the wheel of a car,practice good common sense and remember the following tips: 1. -
Page 177: Consumer Information On Wireless Phone
Website jointly sponsored by the U.S. Food and Drug Administration (FDA) and the Federal Communications Commission (FCC), entitled “Cell Phone Facts: Consumer Information on Wireless Phones.”The information reproduced herein is dated July 29, 2003. For further updates, please visit the Website: http://www.fda.gov/cellphones/qa.html.) - Page 178 What is the FDA's role concerning the safety of wireless phones? Under the law, the FDA does not review the safety of radiation-emitting consumer products such as wireless phones before they can be sold, as it does with new drugs or medical devices. However, the agency has authority to take action if wireless phones are shown to emit radio frequency energy (RF) at a level that is hazardous to the user.
- Page 179 What kinds of phones are the subject of this update? The term “wireless phone” refers here to hand-held wireless phones with built-in antennas, often called “cell,”“mobile,” or “PCS” phones. These types of wireless phones can expose the user to measurable radio frequency energy (RF) because of the short distance between the phone and the user’s head.
- Page 180 What research is needed to decide whether RF exposure from wireless phones poses a health risk? A combination of laboratory studies and epidemiological studies of people actually using wireless phones would provide some of the data that is needed. Lifetime animal exposure studies could be completed in a few years.
- Page 181 What steps can I take to reduce my exposure to radio frequency energy from my wireless phone? If there is a risk from these products--and at this point we do not know that there is - -it is probably very small.But if you are concerned about avoiding even potential risks,you can take a few simple steps to minimize your exposure to radio frequency energy (RF).
- Page 182 The final draft,a joint effort by FDA,medical device manufacturers,and many other groups,was completed in late 2000.This standard will allow manufacturers to ensure that cardiac pacemakers and defibrillators are safe from wireless phone EMI. The FDA has tested hearing aids for interference from handheld wireless phones and helped develop a voluntary standard sponsored by the Institute of Electrical and Electronic Engineers (IEEE).This standard specifies test methods and performance requirements for hearing aids...
- Page 183 standard also requires ovens to have two independent interlock systems that prevent the oven from generating microwaves the moment that the latch is released or the door of the oven is opened.The FDA has stated that ovens that meet its standards and are used according to the manufacturer's recommendations are safe for consumer and industrial use.More information is available from: http://www.fda.gov/cdrh.
- Page 184 FCC regulatory requirements.The manufacturer of a cell phone that does not meet the FCC’s regulatory requirements may be required to remove the cell phone from use and to refund the purchase price or provide a replacement phone, and may be subject to civil or criminal penalties.
- Page 185 RF, and concerning chronic effects of long-term exposure to cellular telephone RF (that is,the risks from using a cell phone for many years). If new information leads the FDA to believe that a change to the FCC’s measurement policy may be appropriate, the FDA will contact the FCC, and both agencies will work together to develop a mutually-acceptable approach.
-
Page 186: Specifications
12.10 Specifications System Information Processor Memory Operating System Display Type Resolution CDMA Module (Dual Band) Celluar Audio Audio controller Microphone/Speaker Headphone Physical Dimensions (typical) Weight (typical) Expansion Slots SDIO/MMC supports Camera Module Type Resolution Camcorder Section 12: Maintenance, Safety, and Intel PXA 263 CPU at 400MHz / Qualcomm MSM5500 - ROM : 64MB... -
Page 187: Controls And Lights
Controls and Lights Navigation Buttons Keyboard LED Lights Connection Infrared I/O port Audio Bluetooth Power Supply Battery AC Adapter Section 12: Maintenance, Safety, and - 5-way navigation pad - 8 program buttons : Calendar, Contacts, Start, Inbox, menu, Done/OK,Windows Media and Record. - 2 phone function : Send (Yes) &... -
Page 188: Troubleshooting
12.11 Troubleshooting If you encounter any problems with your PPC6600, consult the following Trouble Guide. If you are still having problems after reviewing these, contact Technical Support or your dealer. Operating Problems Problem My PPC6600 keeps turning itself off. My PPC6600 is not making ... - Page 189 Problem Screen is dark. A warning message about Running out of memory pops up on the screen. A warning message about "Battery low" pops up on the screen. Screen is hard to read, or the text on the screen is too small for you.
-
Page 190: Tapping And Writing Problems
Tapping and Writing Problems Problem Device buttons do not respond or bring up the wrong program. Inaccurate response to stylus taps. PPC6600 does not recognize handwriting. ActiveSync ® Problem ActiveSync operation cannot ® be performed or connected. Section 12: Maintenance, Safety, and Check the Buttons setting to see if the program assignment for each function... -
Page 191: Connection Problems
Problem ActiveSync is connected,but ® data or information cannot be transferred. Connection Problems Problem Unable to use Infrared (IR) to transfer information. Cannot connect to Internet, web surfing doesn't work. Section 12: Maintenance, Safety, and Solution On your desktop computer, check the Sync Options on the ActiveSync Manager menu to see if the information type for the program you want has been... - Page 192 Problem Problems in cable and cradle connection. Section 12: Maintenance, Safety, and Solution Ensure your PPC6600 is turned on. Ensure that you do not have any other active connections.Tap at the bottom of the screen > Disconnect. Ensure the cable is securely plugged into the COM port on the back of your PC.
-
Page 193: Index
Index About 68 Accessories 12 Account Passwords 3 ActiveSync 20, 56 ActiveSync Errors 61 AC Adapter Converter 13 Add a program 158 Add Ring Tone 72 Album 21, 143 Automatic Answer 73 Backing Up Files 162 Backlight 6,69 Background 128 Battery 9 Block Recognizer 25 Bluetooth 92... - Page 194 Health and safety information In-Call Options 42 Inbox 20 Incoming call 41 Indicators 18,35 Infrared Connection 60 Input Panel 22 Keyboard 71 Keypad Tone 72 LED 93 Letter Recognizer 25 Locking the keypad 47 Locking Your Phone 48 Managing Memory 123 Managing Messages and Folders 118 Memory 69...
- Page 195 Safety precautions 131 SAR information 132 Screen Orientation 16 SD and MMC Cards 162 secure your phone 47 Send 6 Services 73 Slide Show 152, 154 SMS Text Messaging 112 Soft Keyboard 23 Soft Reset 6,164 Sounds and Notifications 67 Speaker 6 Speakerphone Mode 44 Speed Dial 40...
Need help?
Do you have a question about the PPC 6600 and is the answer not in the manual?
Questions and answers