Table of Contents
Advertisement
Advertisement
Table of Contents

Summary of Contents for Data Count JR
- Page 1 Operation Manual Version 1.4...
-
Page 2: Table Of Contents
Table of Contents TABLE OF CONTENTS ................2 SPECIFICATIONS ..................4 LASER SAFETY PRECAUTIONS .............. 5 INTRODUCTION ..................7 SEED JR M ..............7 COUNT ACHINE ................. 8 ONTROL ANEL UNPACKING ....................9 IMPORTANT NOTES ................10 CLEANING THE COUNTING DETECTORS ..........11 BASIC COUNTING ................... - Page 3 PROPRIETARY AND CONFIDENTIAL Copyright © 2009 by Data Diamond Technology LTD. 12 Hartom st., Har Hotzvim, Jerusalem 97775, Israel All rights reserved. No part of this manual may be reproduced or copied in any form by any means - graphic, electronic, or mechanical, including...
-
Page 4: Specifications
Specifications • Accuracy: 99.5% - 99.9% (depending on size and shape). • Counting speed: up to 3,000 seeds per minute. • Maximum volume: 50 grams of seeds at a time. • Size range: 0.3mm – 4mm. • User selectable count to a preset number of seeds. •... -
Page 5: Laser Safety Precautions
OD1.5 for 650-670 nm, during service. The SEED count JR product is designed and built to comply with the last version of the International Standard for laser products IEC 60825-1: 03-2007. Following are the safety means that are incorporated in the product to comply with this standard. - Page 6 2. Identification, Classification warning labels: identification label, classification label (class 1), and warning label (for class 3R) are posted on the product, at locations shown on the following figures CAUTION – Class 3R visible laser radiation when open. Avoid direct eye exposure CLASS 1 LASER PRODUCT...
-
Page 7: Introduction
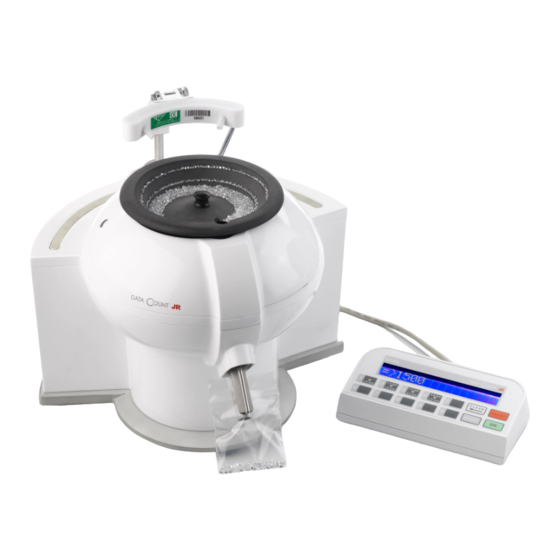
Introduction SEED count JR allows you to count up to 50 grams of Seeds quickly and efficiently. To ensure that your seeds are counted correctly, please read and follow these instructions carefully. The SEED count JR Machine Power switch and cable... -
Page 8: The Control Panel
The Control Panel The SEED count JR’s control panel is connected by a detachable cable to the main machine’s body through a USB socket. Make sure you connect the cable to the back of the machine before switching it on. -
Page 9: Unpacking
Unpacking Remove the machine and all accessories from the packing carton. Make sure that the machine has been packed with the following items: Top cover Power supply and cord Control panel Machine Manual Bluetooth USB adaptor and CD Notes: • The appearance of the power cord may differ according to your country's specifications. -
Page 10: Important Notes
Important Notes 1. Do not touch the plastic bowl when it is connected to the machine and particularly do not apply any force to it. 2. Keep the bowl perfectly clean. Any piece of dust can cause miscounts. Use air pressure and/or a damp cloth that leaves no remains to clean the inside of the bowl. -
Page 11: Cleaning The Counting Detectors
Cleaning the counting detectors From time to time, dust may be stuck on the counting detectors. This can cause miscounts. When a counting process is initiated and the machine detects an obstruction on one of its detectors it will show an error message of “Clean detector 1”... - Page 12 3. Use clean dry compressed air and blow 2 to 3 puffs of air into the machine’s nozzle. Make sure you hold the compressed air tank upright when you blow the air (see picture). 4. Check to see if the warning message appears again. 5.
-
Page 13: Basic Counting
Basic Counting The SEED count JR machine is intended only for counting Seeds. Do not count anything else in it! Make sure the seeds are clean from dirt and dust before pouring them into the bowl. Caution Do not touch the plastic bowl and particularly do not apply any force to it. -
Page 14: Using The Boost Button
When SEED count JR finishes counting all the seeds, the number of seeds appears on the display screen. Often, the last few seeds take a little longer to be counted, so SEED count JR continues working for one more minute after it has counted a seed. -
Page 15: Recovering The Last Counted Number
Caution Can be boosted Do not boost To boost SEED count JR, hold the down. Release the button to return to regular counting. Recovering the Last Counted Number If the last counted number of seeds was lost, it can be recovered by pressing the and holding it. -
Page 16: Pausing & Restarting Seed Count Jr
Pausing & Restarting SEED count JR You can pause the counting at any time. Simply press . SEED count JR stops and the display screen shows the number of seeds counted so far and the word “Paused”. To resume counting, press again. -
Page 17: Counting A Preset Number Of Seeds
Do not touch the plastic bowl and particularly do not apply any force to it. SEED count JR can be used to count a preset number of seeds. Note that the SEED count JR may sometime count a few seeds more than the specified number. - Page 18 To count a preset number of seeds: Sort your seeds by size according to the SEED count JR Sizes. Remove any broken seeds and dust to ensure accurate counting. Turn on the power switch located at the back of the machine.
- Page 19 (which may be a few more than the preset number) appears on the display screen. SEED count JR beeps to indicate that it has finished and the word “Ended” shows on the display screen.
-
Page 20: Using Custom Sizes
Each button can be configured separately. Bluetooth Connection to PC The SEED count JR can be connected to a PC by Bluetooth. Using DATA’s proprietary software called DATA Count Manager, you can send and receive information from the SEED count JR machine. -
Page 21: Troubleshooting
SEED count JR after electricity is restored.* SEED count JR is Machine was not set Set SEED count JR to incorrect. to count the correct count the correct seed seed size. size and count again. There are broken... - Page 22 Problem Possible Causes Solution Machine does not start Something is Use compressed air to counting. disrupting the clean the detector (see sensor’s detection chapter “Cleaning the Display screen line. counting detectors”.* shows(X=1 or 2): Clean Detector X or(X=1 or 2): Call Service ErX Machine does not start Synchronization...
-
Page 23: Seeds Size Table
Seeds size Table The table below describes sizes for specific tested seeds. As seeds size can vary, we advice to test the machine with your own seeds and to verify the accuracy. If the count is much lower than the right number, try to choose lower size in order to increase the sensitivity. - Page 24 Remarks: ___________________________________________________________ ___________________________________________________________ ___________________________________________________________ ___________________________________________________________ ___________________________________________________________ ___________________________________________________________ ___________________________________________________________ ___________________________________________________________ ___________________________________________________________ ___________________________________________________________ ___________________________________________________________ ___________________________________________________________ ___________________________________________________________ ___________________________________________________________ ___________________________________________________________ ___________________________________________________________ ___________________________________________________________ ___________________________________________________________ ___________________________________________________________ ___________________________________________________________ ___________________________________________________________ ___________________________________________________________ ___________________________________________________________ ___________________________________________________________ ___________________________________________________________ ___________________________________________________________ ___________________________________________________________...
- Page 25 ___________________________________________________________ ___________________________________________________________ ___________________________________________________________ ___________________________________________________________ ___________________________________________________________ ___________________________________________________________ ___________________________________________________________ ___________________________________________________________ ___________________________________________________________ ___________________________________________________________ ___________________________________________________________ ___________________________________________________________ ___________________________________________________________ ___________________________________________________________ ___________________________________________________________ ___________________________________________________________ ___________________________________________________________ ___________________________________________________________ ___________________________________________________________ ___________________________________________________________ ___________________________________________________________ ___________________________________________________________ ___________________________________________________________ ___________________________________________________________ ___________________________________________________________ ___________________________________________________________ ___________________________________________________________...
Need help?
Do you have a question about the Count JR and is the answer not in the manual?
Questions and answers